This documentation provides comprehensive insights into the Loop Builder developed by Zoloblocks.
Enable the Loop Builder
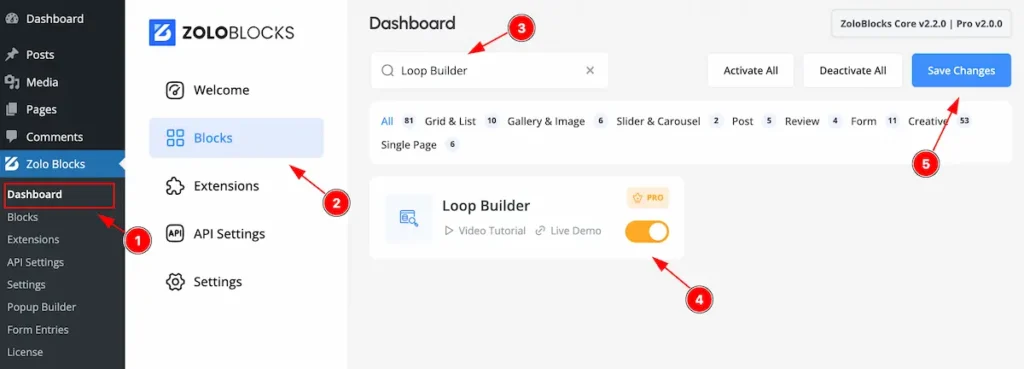
To use the Navigation block from Zoloblocks, you must first enable the block.
- Go to WordPress Dashboard > Zoloblocks Plugin dashboard.
- Then Click the Loop Builder Tab.
- Search by the Loop Builder block Name.
- Enable the Loop Builder block.
- Hit the ” Save Changes ” button to save it.
Adding a block to the editor
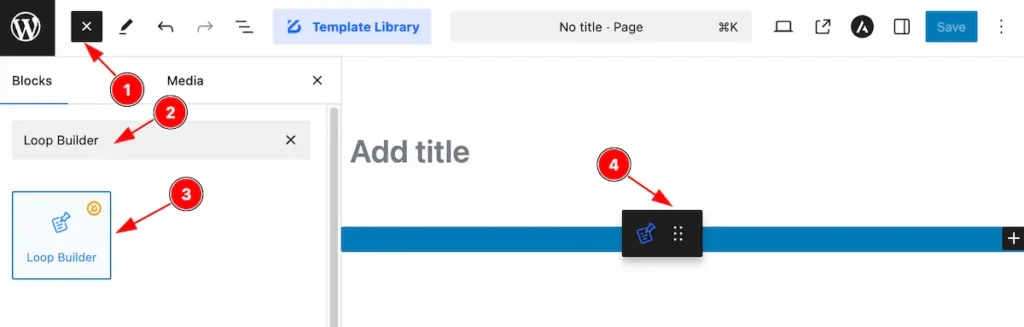
- Click the Toggle Block Inserter icon and a sidebar will appear on the left side, All the blocks will be visible here.
- Search by the Loop Builder block name.
- Then select the appear blocks ( with zoloblocks logo T.R corner).
- After Drag and Drop it on the page.
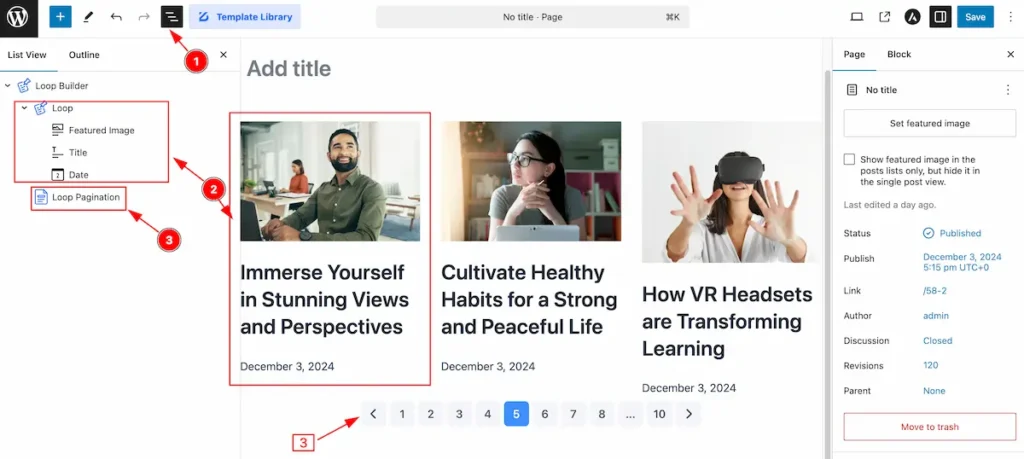
After Inserting the blocks, Follow this.
- Click on the Document Overviewer button and the Blocks list view will appear.
- Here appears the Loop Builder blocks it’s combine with three different blocks ( Loop Block ). It appear default Here add as many block need.
- The Loop Pagination blocks embedded together to work with Loop Builder.
- The Controls Tab appear here on the Right Side.
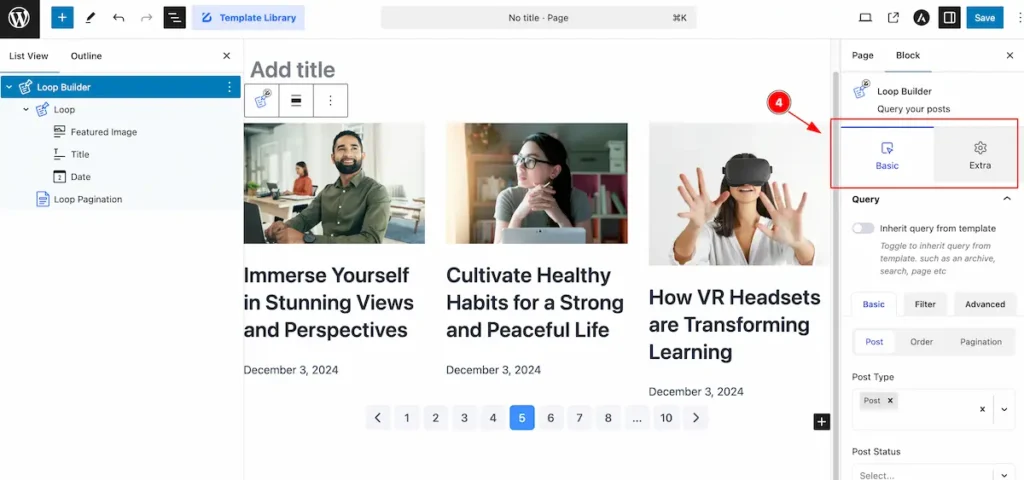
Basic Tab
The Basic tab controller displayed here offers the flexibility to adjust the layout of blocks according to your preferences.
Query Section
Go to Basic > Query
Basic Query
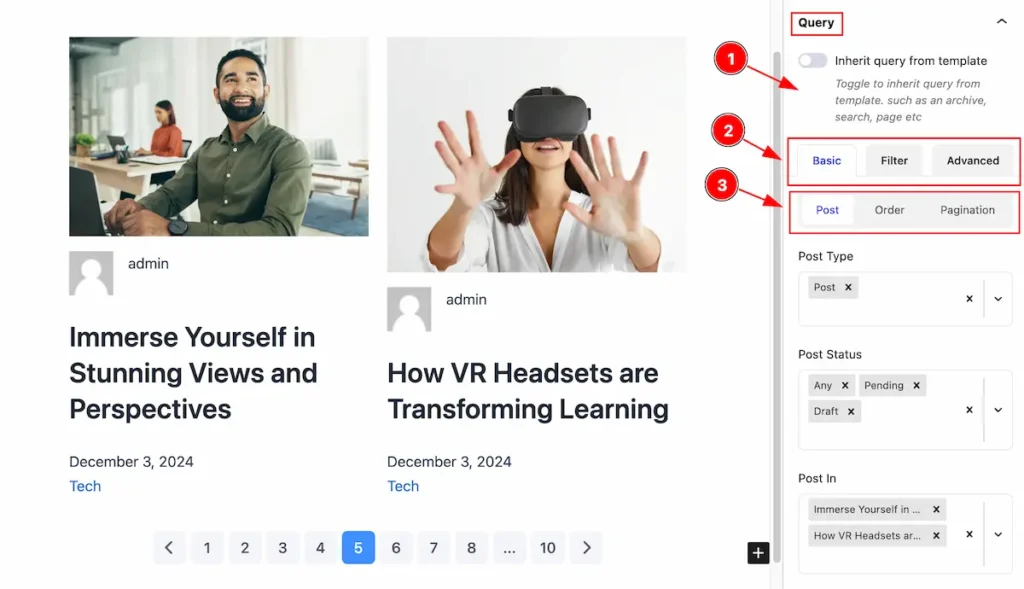
- Inherit query from template: Enable this feature to inherit tht query from different sources like ( archive, search, pages, posts etc ). Disable it and the custom query feature will appear.
- It is categorized into three different methods: Basic, Filter, and Advanced, which appear as tabs for query options.
- The Basic tab is divided into three sections: Post, Order, and Pagination.
Post
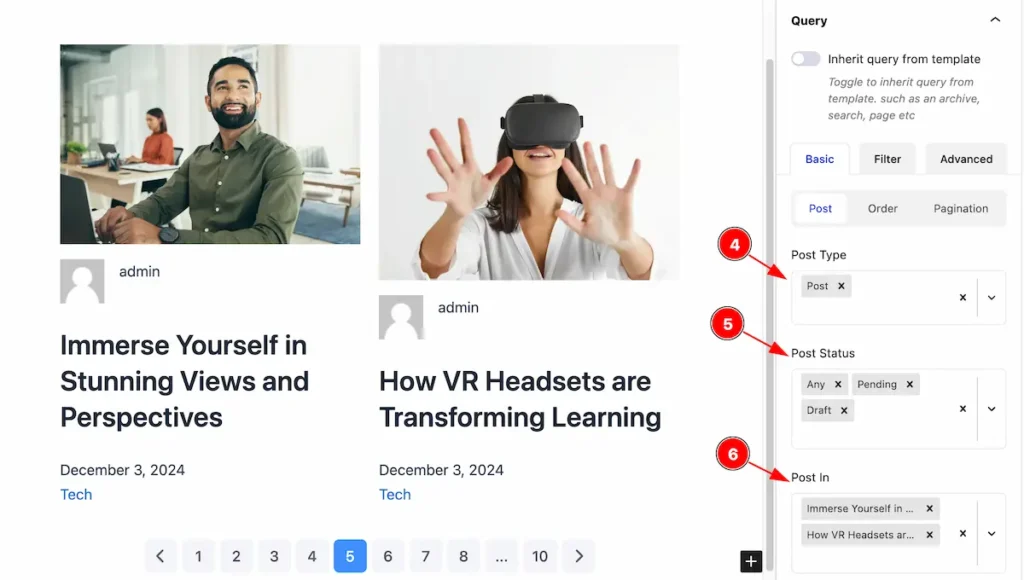
- Post Type: Select the Post type for custom query, All the types option will appear here like “Post, Pages or Available Category”.
- Post Status: Select the status of the posts, It supports Any, Publish, Private, Pending, Future, Draft, Trash type status.
- Post In: Select the Post In, It appears the posts only appear on there.
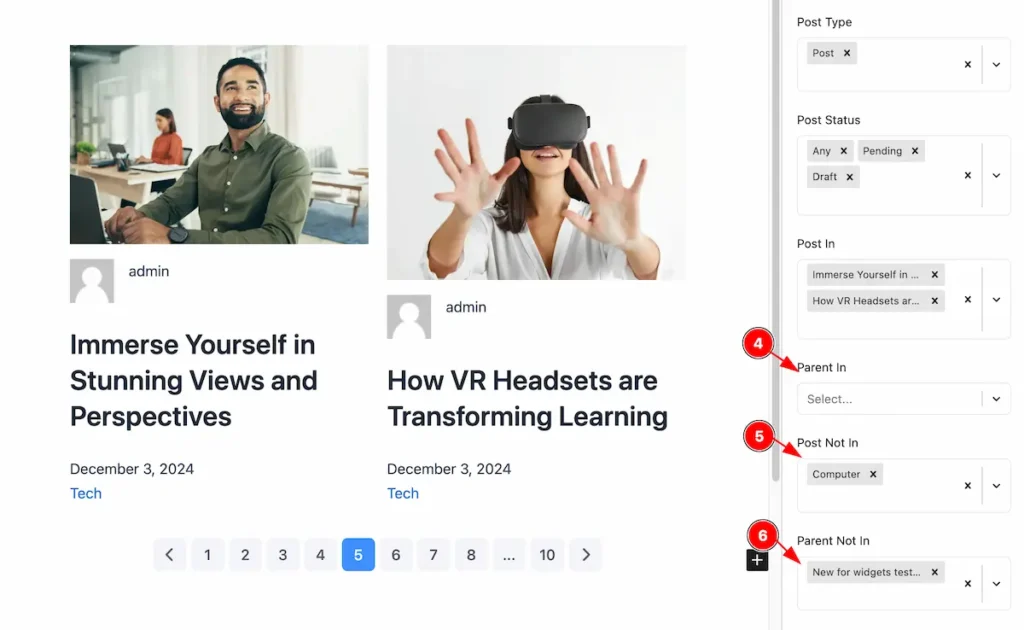
- Parent In: Select the Parent of this posts. It will appear on the right.
- Post Not In: Select those post to eleminate it.
- Parent Not In: Select the parent that is not in.
Order
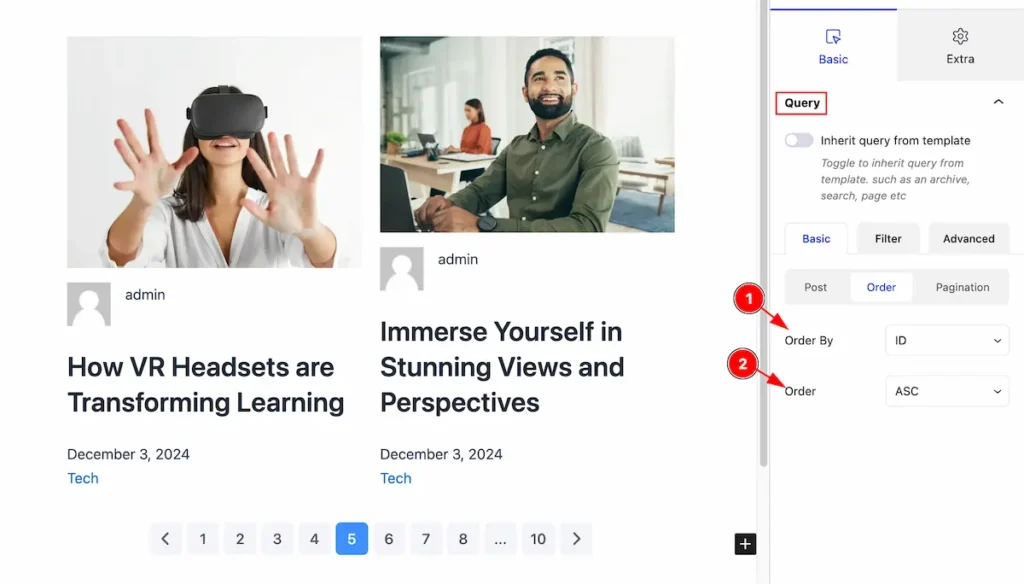
- Order By: Select the Order By to arrange the posts according to it, Select the ID, Author, Title, Name, Date, Modified, Random, Comment Count, Meta Value, Post In, Post Name In, Post Parent In etc.
- Order: Set the order for the query ASC or DESC. ASC stands for Ascending Order (e.g., A to Z, 1 to 9), DESC stands for Descending Order (e.g., Z to A, 9 to 1).
Pagination
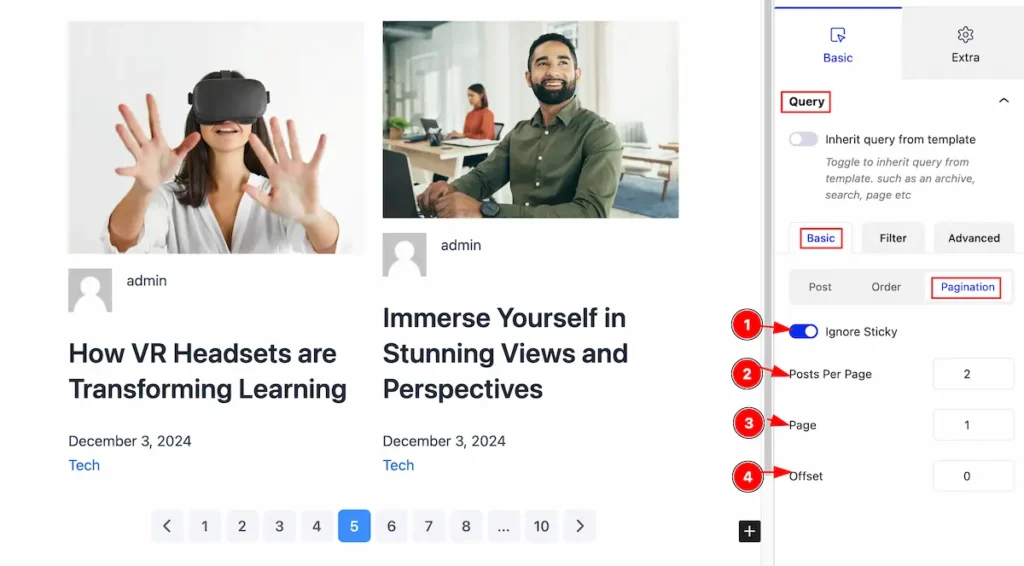
- Ignore Sticky: The Ignore Sticky switcher allows you to exclude sticky posts from the query, displaying posts in their natural order without prioritizing sticky ones.
- Posts Per Page: Posts Per Page determines the number of posts displayed per page in a query, affecting pagination and content layout.
- Page: Select the Page number for the pagination.
- Offset: Offset allows to skip a specified number of posts before displaying results in a query.
Filter of the Query
Taxonomy
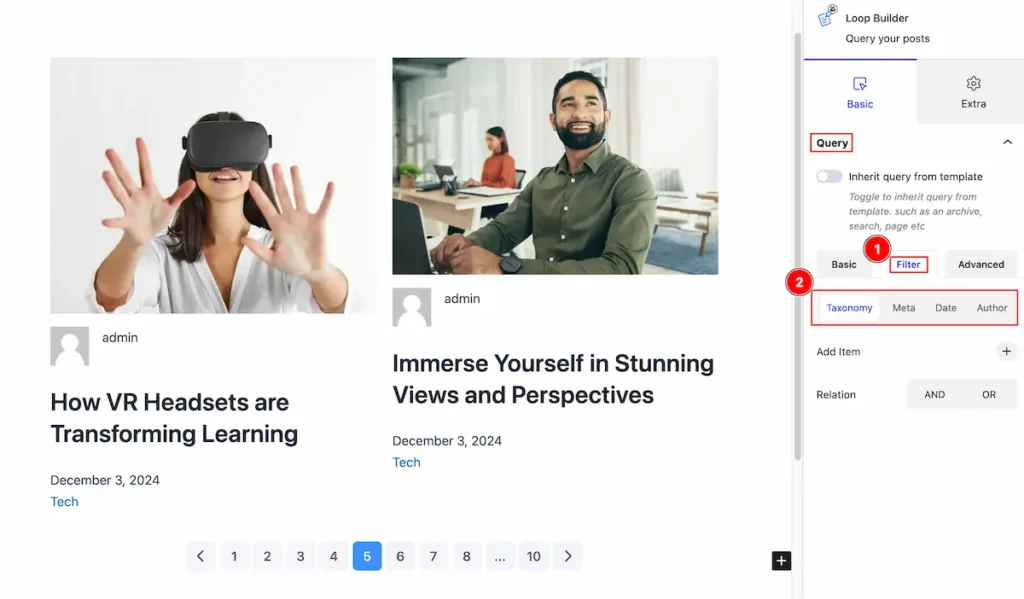
- Select the ” Filter ” tab to filter the selected query.
- Multiple filter method are available Taxonomy, Meta, Date , Author. Select the Taxonomy tab.
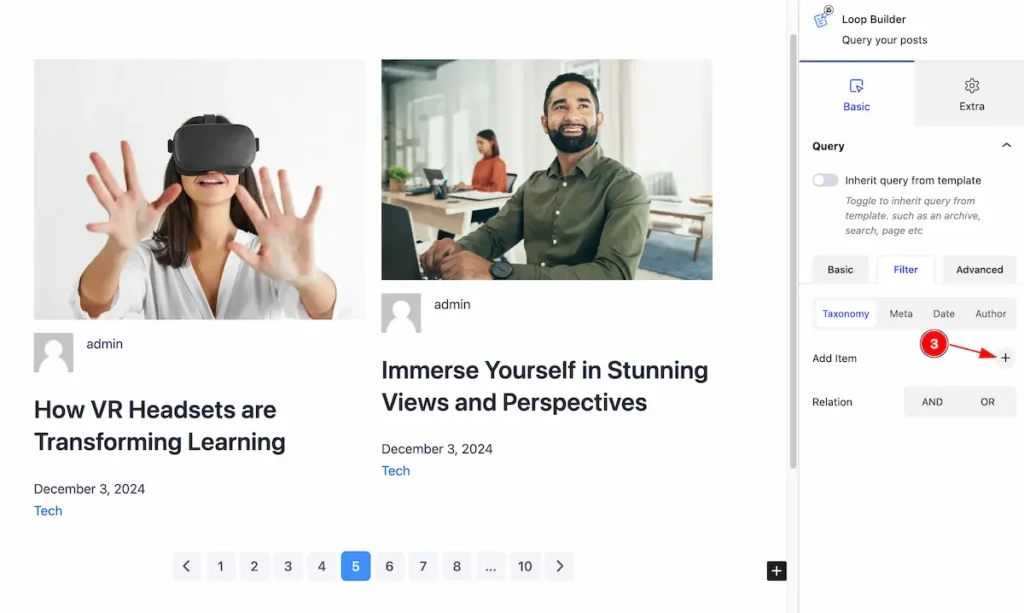
- Add Item: Select the ” + ” icon to add new item for the taxonomy.
- After added new item click on the bar and a toggler will open.
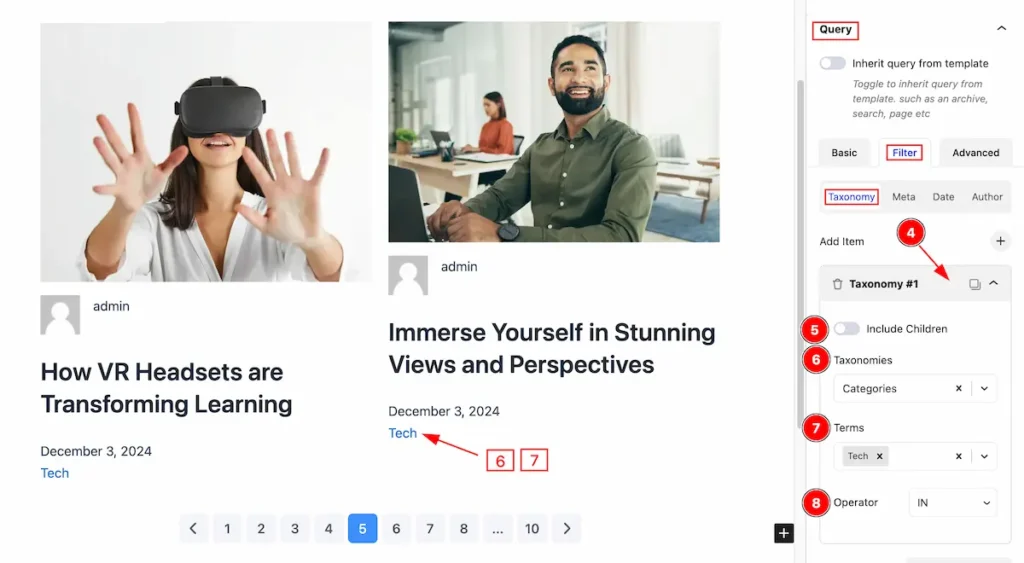
- Include Children : Enable the switcher to include the clildren.
- Taxonomies: Select the taxonomies for the filtering, Select it by Categories and Tags.
- Terms: Select the terms, It will appear the names of category or tag.
- Operator: Select the Opearator for this, It can be IN, NOT IN, AND, EXISTS, NOT EXISTS.
Relation Between Taxonomies
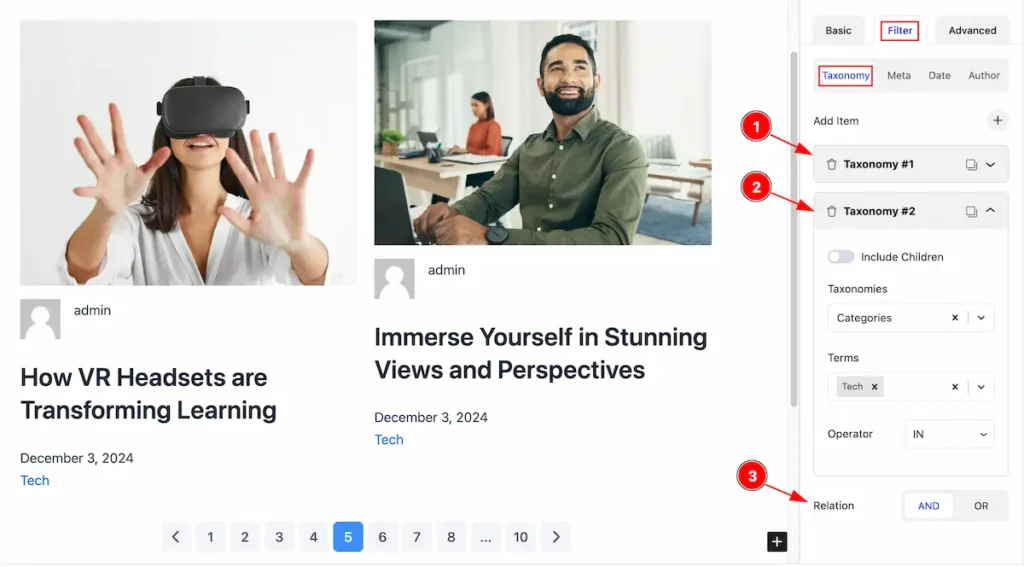
- Create First Taxonomy items and set condition on it.
- Create Second Taxonomy items and set condition on it.
- Relation: Make relation between the items by setting the ” AND ” or ” Or “.
AND: All conditions must be met.
OR: At least one condition must be met.
Note: Relation will be within Multiple Items
Date
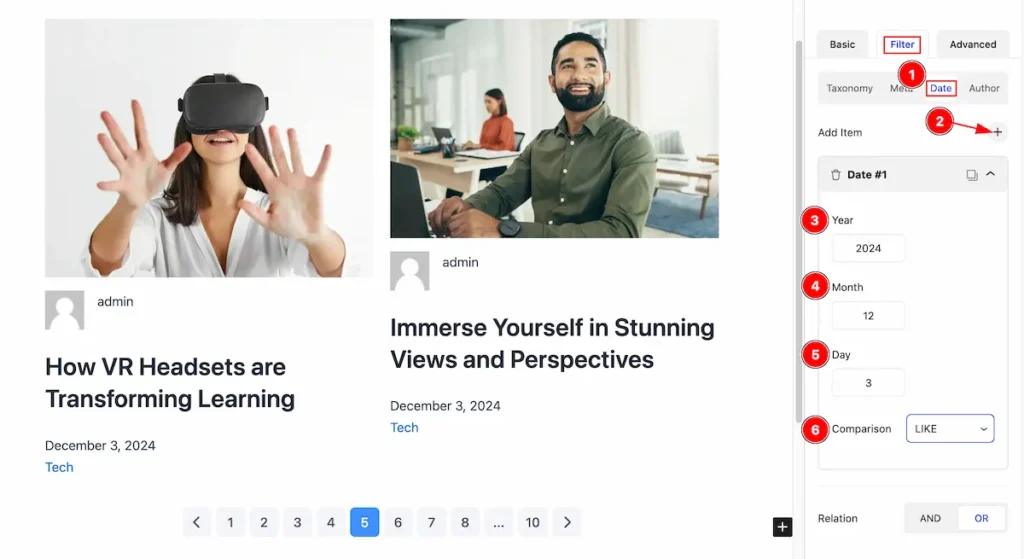
- Select the Date tab for the Taxonomy section.
- Click on the “ + ” icon to add new item for Date filtering.
- Year: Inout the year in the input fields( Number format are allowed ).
- Month: Inout the Month in the input fields ( Number format are allowed ).
- Day: Input the Day in the fields ( Number format are allowed ).
- Comparison: Select the comparison sing to compare with the items. Comparison brief here.
=: Checks if two values are equal.!=: Checks if two values are not equal.<: Checks if the left value is less than the right value.>: Checks if the left value is greater than the right value.<=: Checks if the left value is less than or equal to the right value.>=: Checks if the left value is greater than or equal to the right value.LIKE: Pattern matching with wildcards (%for any sequence,_for a single character).NOT LIKE: Excludes rows matching a pattern.IN: Checks if a value exists in a specified list.NOT IN: Excludes values in a list.BETWEEN: Checks if a value is within a range (inclusive).NOT BETWEEN: Excludes values within a range.
Author

- Select the Filter tab to filtering according to it.
- Select the ” Author ” tab for the filtering according to the Author.
- Author IN: Includes content from specific authors.
- Author NOT IN: Excludes content from specific authors.
Advanced
The advanced query is for more specify the query according to it. Follow one by one.
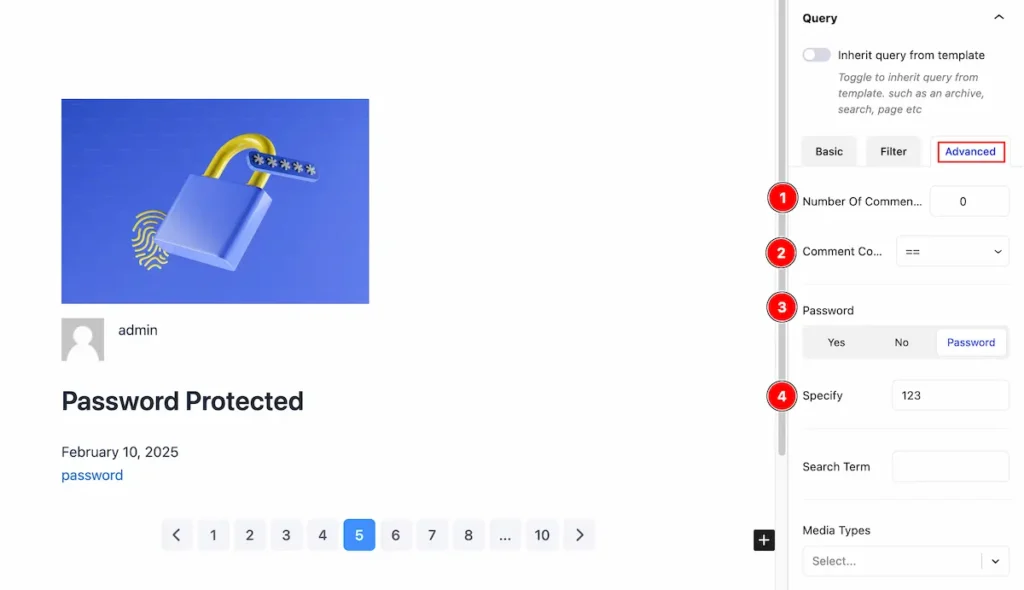
- Number of Comments: Select the number of comments of the relevant post and only the counted number posts will appear here.
- Comments Comparison: Compare the comments accordion to the number by the SQL Comparison operator. ( ==, != , <, >, <=, >=, etc.)
- Password: Only password relevant feature can be added on there, Three options are available.
Yes: It will appear those query have password protected.
No: Those post doesn’t have the password.
Password: Those posts have the password enter password to input it. - Specify: Specify the password on there and the password relevant posts will appear only.
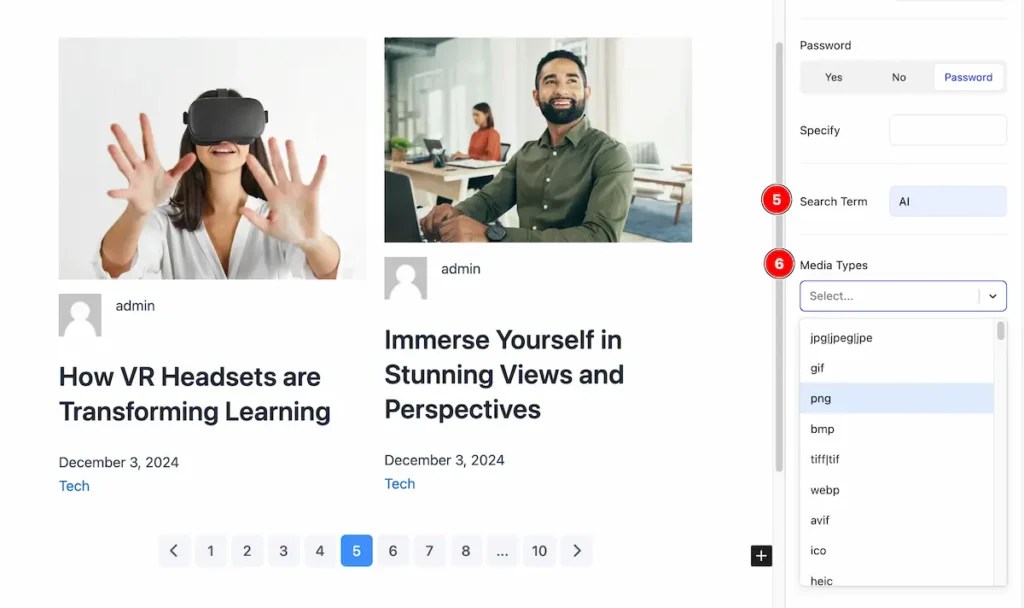
- Search Term: Search by the Term.
- Media Type: Select the media type want to show. Only those Media Types will be shown. ( jpg,gif,png,bmp,webp,avif,ico etc.)
LOOP
Customize the Loop according to it.
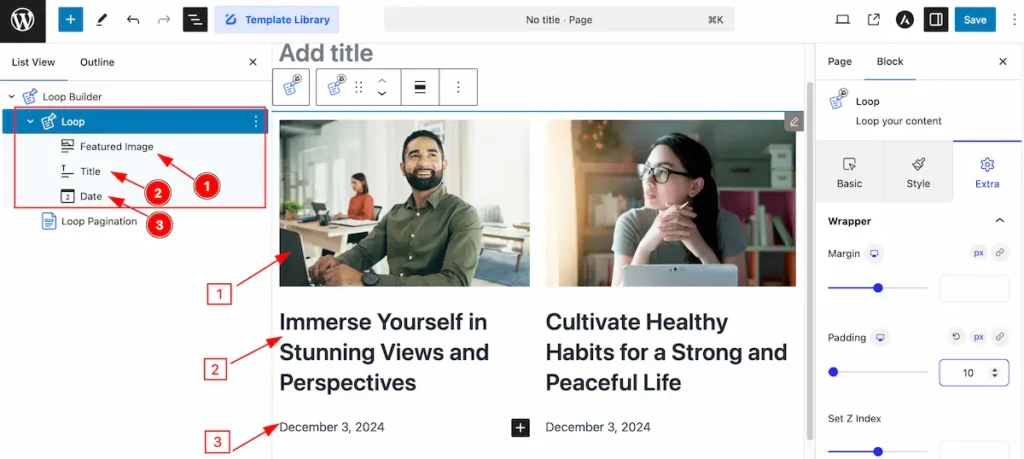
The Loop blocks are embed with the Loop Builder block, Default three block appear , Blocks are Featured Image, Title, Date.
List View section all the blocks info appear,
- Featured Image: This block show the featured image of the content.
- Title: Title block appear for the Title only.
- Date: The date block shows the date of the relevant post.
Add New Block on the Loop
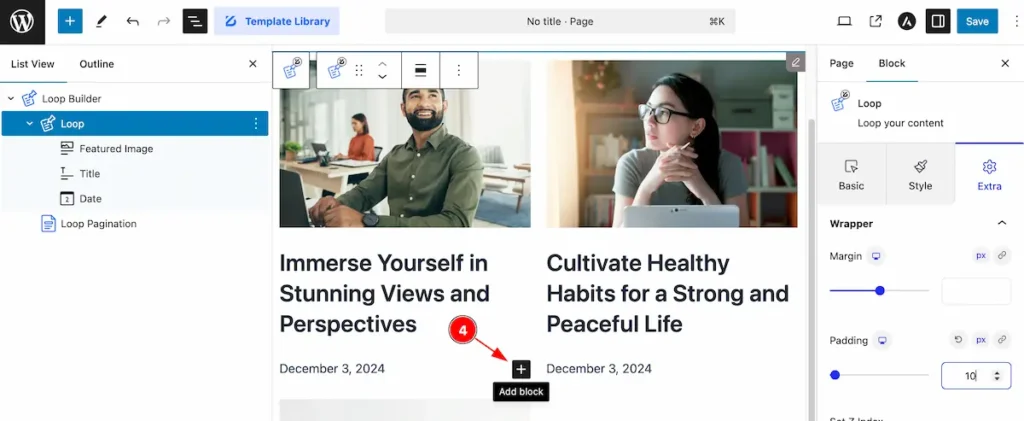
- Click on the ” + ” icon to add new block on the loop section. It will appear a new search with block lists
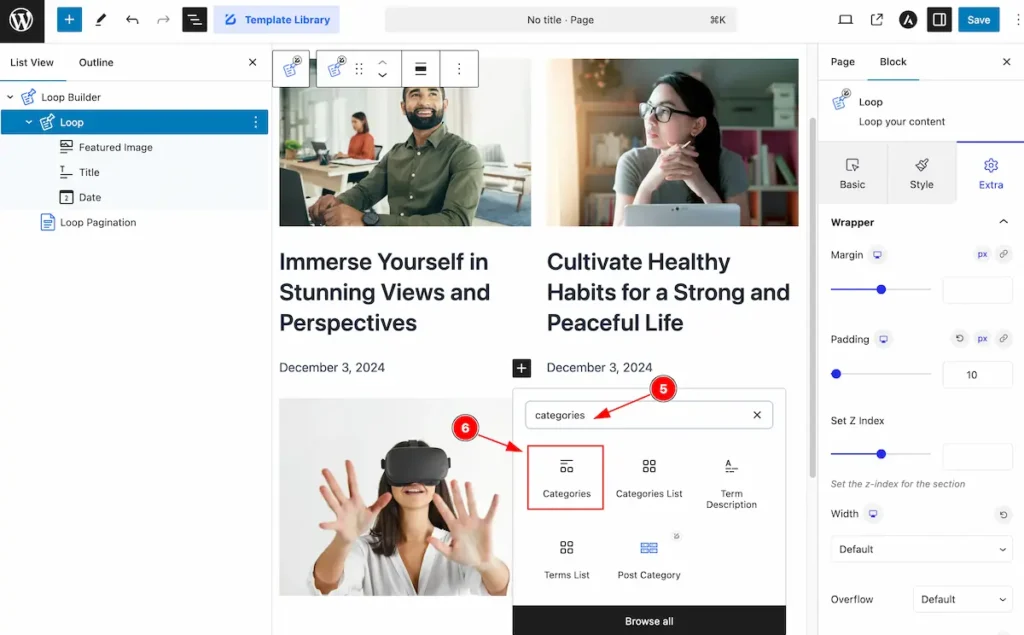
- Search by the block name e.g.: ” Categories ” , The search relevant block will appear.
- Select the block and click on it to insert on the page.
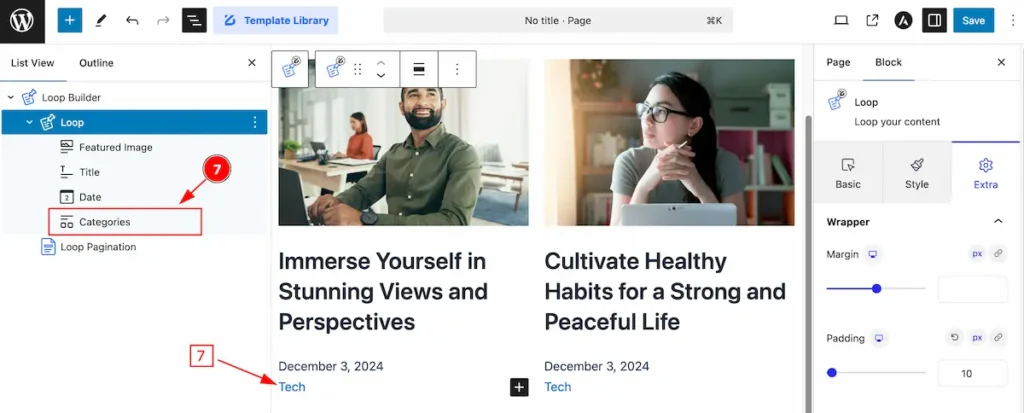
- After adding new block it will appear on the list view and it showing the category correctly on the loop section.

- Add another block, e.g.: ” Author ” block, Search by the block name it will appear on the section.
- Select the Author Block for showing the author info.
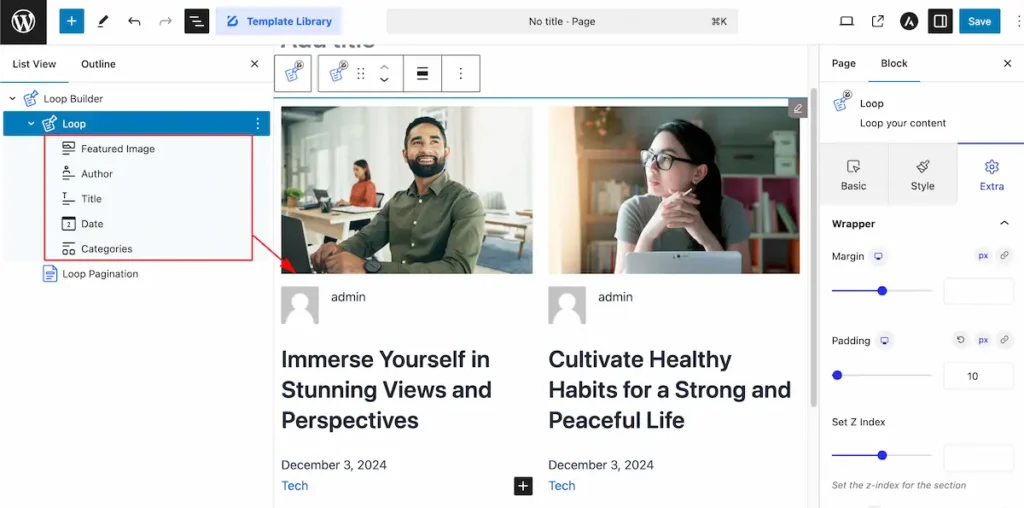
After adding all the items, It appear here on this section of loop.
This way you can add as many item you want.
Video Assist
You can also watch the video tutorial Learn more about the Loop Builder Block. Please visit the demo page for examples.
Thanks for being with us.