

The Cursor Effects Extension is an amazing feature presented by BDthemes that is a part of Element Pack Pro version 6.0. It lets you customize the cursor effects nicely for a dynamic look and does add a unique taste to your site’s interface.
Let’s learn how to use this extension on your site.
Let’s Start Applying Cursor Effects To Page Section
Step-1

First, insert any widget i.e.: Post Slider on your page. We are going to customize the cursor effect only, so any widget will do this job.
Step-2

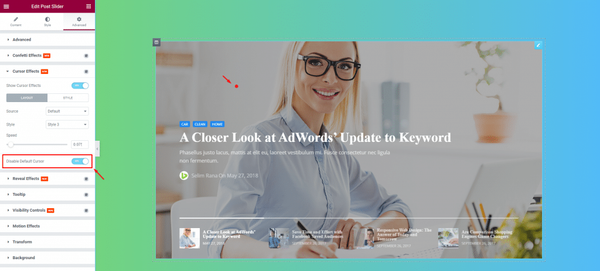
After that, click on the Advanced tab, then enable the Show Cursor Effects switcher.
Step-3

After enabling the switcher under the Cursor Effects section, you can see the cursor effect is working. Notice that a red circle with a red dot inside is following the cursor. This is the default setting.
Step-4

The section gives you several control options like Source, Style, and Speed. There are two subsections here, one for the layout and the other for style.
Change the Style of the cursor effects extension
Now, we are going to work on the style of the cursor effect.
Step-1

To do this, select a Style i.e.: Style 3 from the drop-down option of the Style sub-section.
Step-2
You can see in the section that the circle vanished and only a dot remained as the cursor. Well, that’s because you can turn off the cursor arrow by switching on the Disable Default Cursor switcher at the bottom of the options. Combined with style 3, there is just a red dot instead of a regular cursor.
Change Cursor Effects Source

For the source of the cursor effect, there are four options available to choose from. Apart from the default effect, you have text, image, and icon for the cursor effects extension.
Shall we take a look at it?
How about an image as the cursor?

Just go and select Image from the source option and then choose a picture from your media library that you want to show as the cursor effect and see what happens. The default cursor got replaced with the image. Note that we kept the Disable Default Cursor switcher on.
Can the cursor be just a text?

Now, let’s see how the text effect works. Just select Text from the Source and input the text i.e.: HELLO in the Text Label field. Now hover the cursor on the page and see the result.
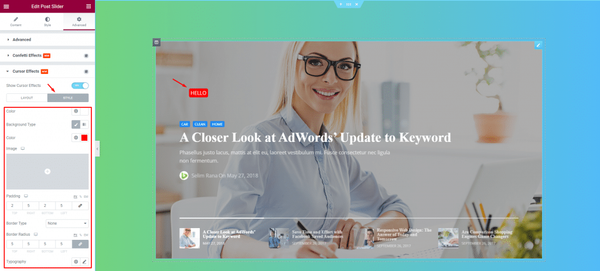
Now, you can change the style of the text from the Style sub-section. Suppose, we want to change the background of the text. For this, click on the color icon from the Background Type, then change the color to red. Then add some Padding, and set the Border Radius to a minimum.
After doing all the changes, take the cursor on the page, and let’s have a look. It looks nice, don’t you think?
Icons can also be the cursor

You can also insert an icon as the cursor effect. To do that, select Icons from the Source section then set an icon for the cursor. After that, see the result on the page.
Not that you can make the icon bigger and better by changing the layout from the style subsection anytime you want.
Great! That’s how you use the Cursor Effects Extension in the Elementor page builder plugin and get amazing cursor effects on your website.
Video assist
You can watch this video to learn how to use Cursor Effects Extension in Elementor to get a hands-down experience. You can also visit the demo page for more examples. Hope you can use it on your own.