In this documentation, we will guide you through the customization and usage of Sigma Media Manager, helping you understand how to configure and manage the plugin effectively. Throughout this guide, we’ll cover the available settings, options, and workflows so you can organize and control your WordPress media library with ease.
What is Sigma Media Manager?
Sigma Media Manager is a WordPress plugin that enhances the default media library by allowing you to organize media files into folders. It provides a clean, modern interface with features like drag & drop management, smart filters, bulk actions, and folder customization. The plugin works seamlessly with the native WordPress media system, meaning your files are not physically moved on the server, only organized visually for better management. This ensures full compatibility with WordPress, themes, and other plugins.
Key Features of Sigma Media Manager
Sigma Media Manager is a powerful WordPress plugin designed to simplify media management and improve workflow efficiency, making it easier to keep your media library clean, structured, and easy to maintain. The key features are –
- Smart Organizing Media with Folders (AI Generation) – Sigma Media Manager lets you instantly organize your media into folders in just one click with AI generation.
- AI Generate Text – It lets you automatically create image titles, captions, and descriptions in just a few clicks.
- Bulk Actions for Faster Workflow – Manage multiple files at once and quickly scan, detect, and remove unused media to keep your library organized and optimized.
- Display & View Settings – You can quickly drag and drop files or folders to reorganize your media without editing items one by one.
- Drag & Drop File Management – Easily drag and drop files or folders to organize your media quickly and efficiently, without editing items one by one.
- Advanced Filtering & Search – Use smart filters and search to quickly find media by type, date, or folder, even in large libraries.
- Backup & Restore – Easily save or transfer your settings anywhere. Restore everything with just one click.
How To Download The Plugin File From Bdthemes Account

1. Go to the link https://accounts.bdthemes.com
2. Enter the Purchase email (The email used for purchasing the Sigma Media Manager).
3. Enter the password.
4. Click on the ‘‘Login To Access Account’’ button to log in to your license management dashboard.
Please note that, if you are not registered yet, then please register first with your purchase email and then log in. After successfully logging in, you will see the dashboard.

5. Select the “Sigma Media Manager” tab from the left sidebar (Products). It will display the plugin information.
6. Here, you will get the license key to activate the pro plugin on the WP dashboard.
7. Find the “Download Files” button on the right top side and click on it.
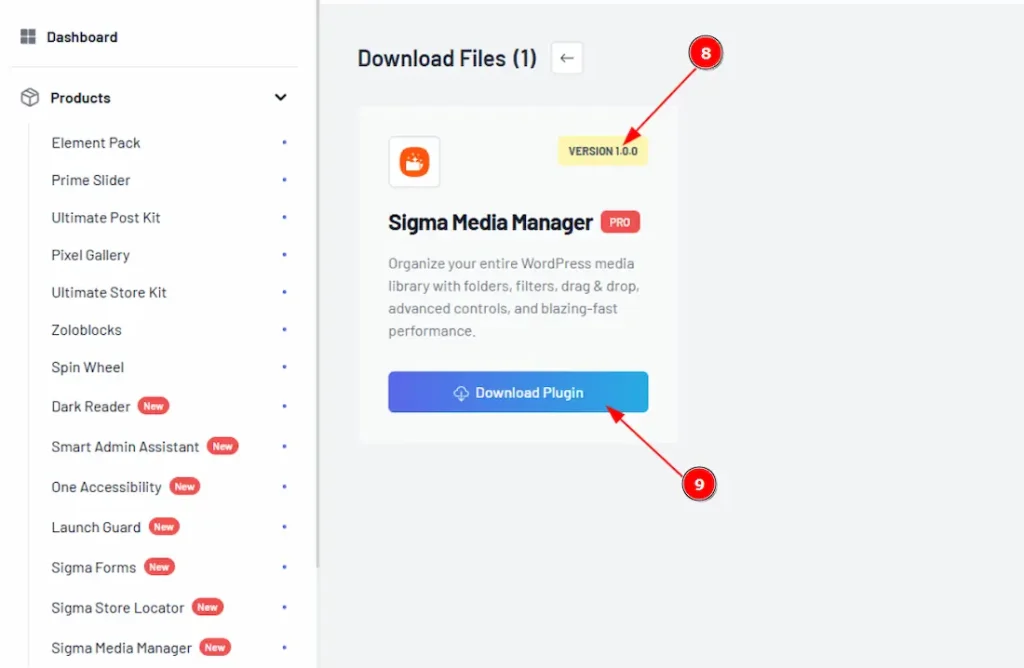
8. In the top right corner, the latest version will appear.
9. Now you will see the Sigma Media Manager plugin. Just click on the ”Download Plugin” button, and it will start to download.
How to Install & Activate the Plugin
After logging in to your WordPress dashboard, follow these steps,
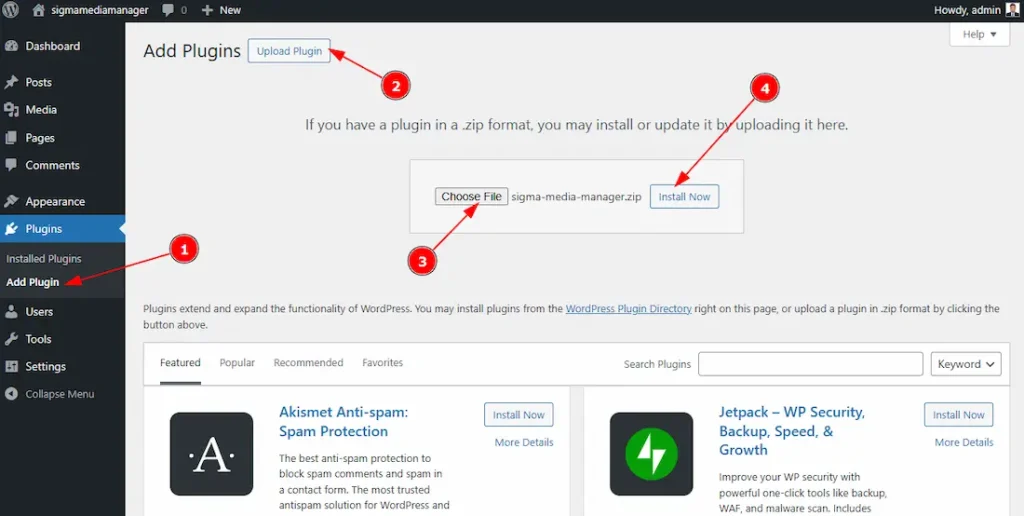
1. Navigate to the Plugins tab and click on the ” Add New Plugin “.
2. Click on the “Upload Plugins” button, and it will appear a file box.
3. Choose the file from where you have stored the downloaded file and select the file.
4. Then click on the “Install Now” button.
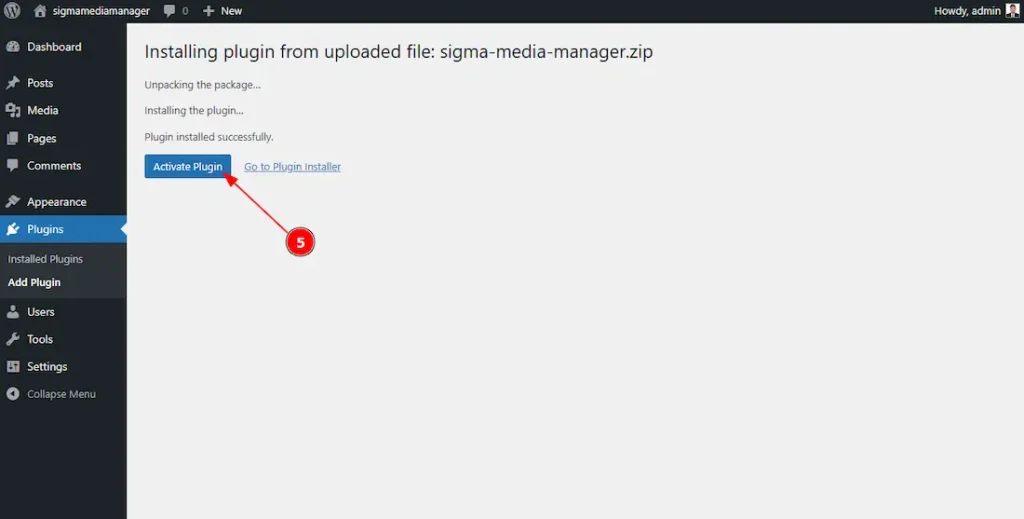
5. After completing installation, the “Activate Plugin” button will appear, and click on it to activate the plugin.
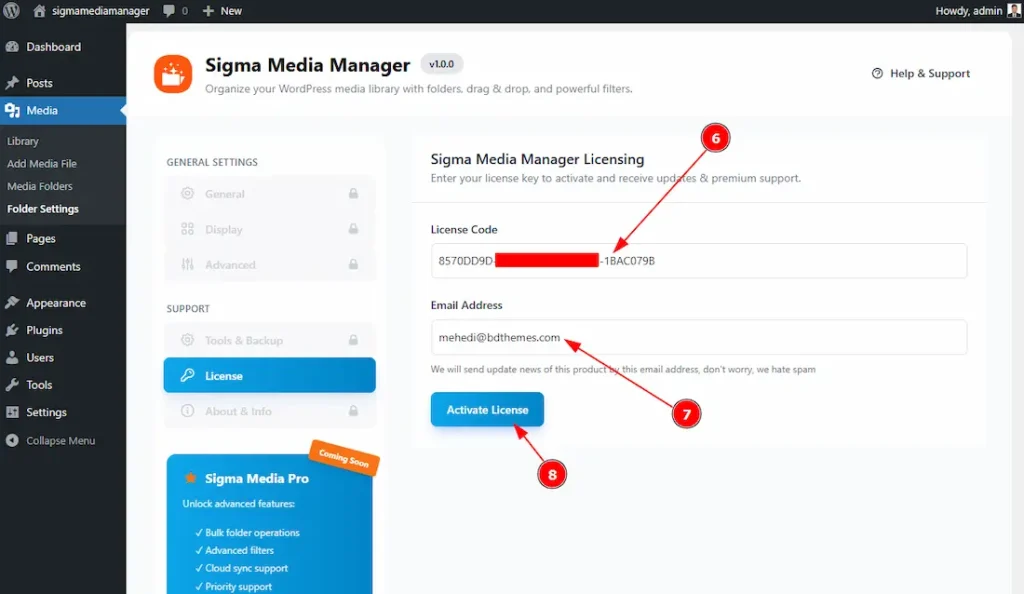
6. After clicking on the Activate plugin button, it will redirect you to the plugin’s license management tab, and here you have to add the license key that you received on your BdThemes Account.
7. You have to add your purchase email below the license code field.
8. Once you have input the license key and the email address, click on the Activate License button to activate the plugin.
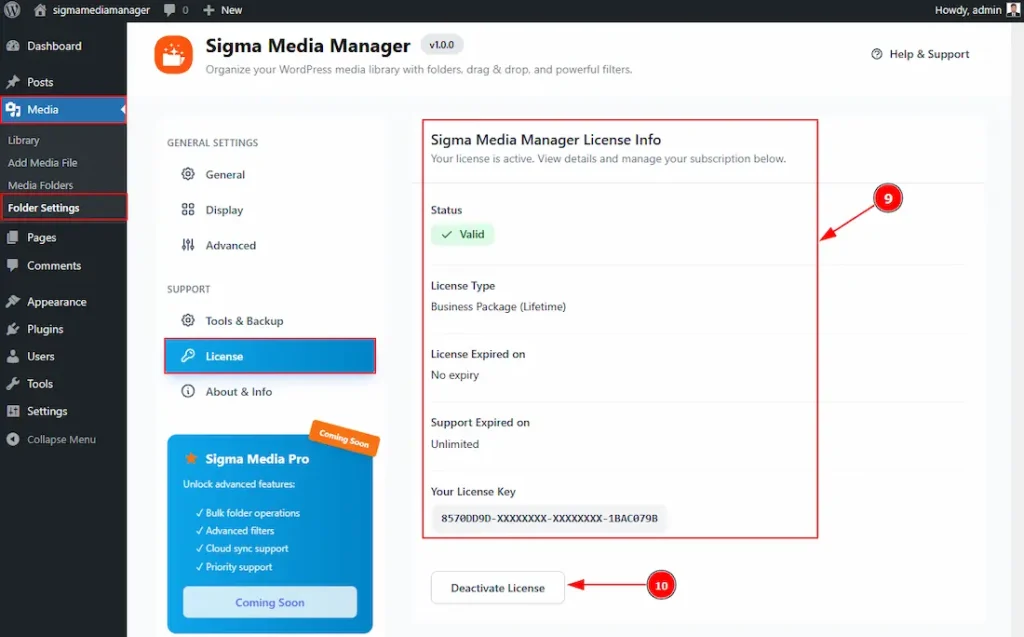
9. You will get to see the license information here after the license is successfully activated on your site. Here, you will see the license status, license type, license expiry date, support expiry date & your license key.
10. You can deactivate the license by clicking on the “Deactivate License” button.
(Note: If it’s not redirected, then please go to Media > Folder Settings > License)
Customizing the Sigma Media Manager Plugin
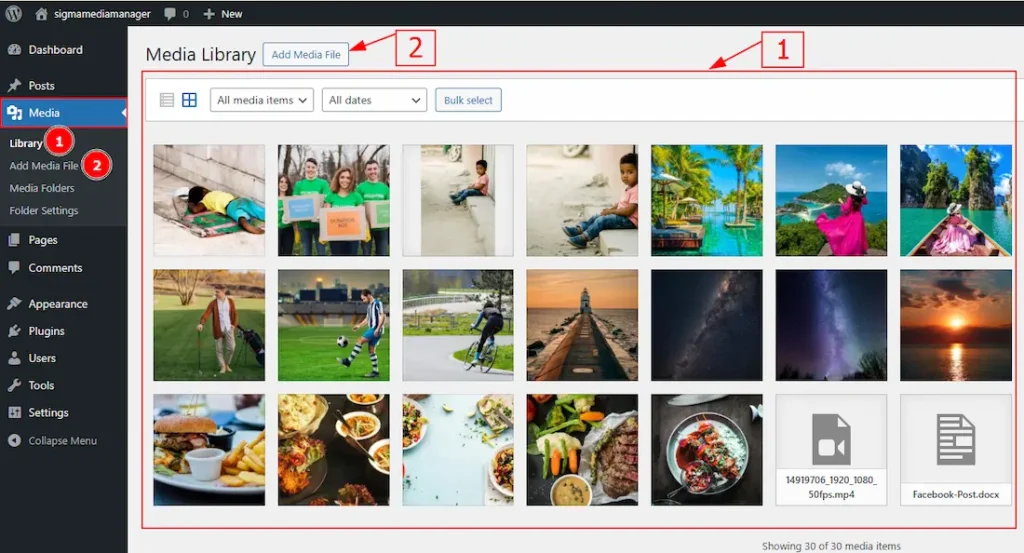
Unlike some plugins that create their own dashboard, Sigma Media Manager integrates directly into the default WordPress Media section. This allows you to manage your media without navigating away from the familiar interface. The first two options are standard WordPress functionality: they let you upload and view files, but all files are displayed in a flat list without any organization.
1. Library – This is the default WordPress media library where you can view all uploaded files.
2. Add Media File – The default WordPress option to upload new media.
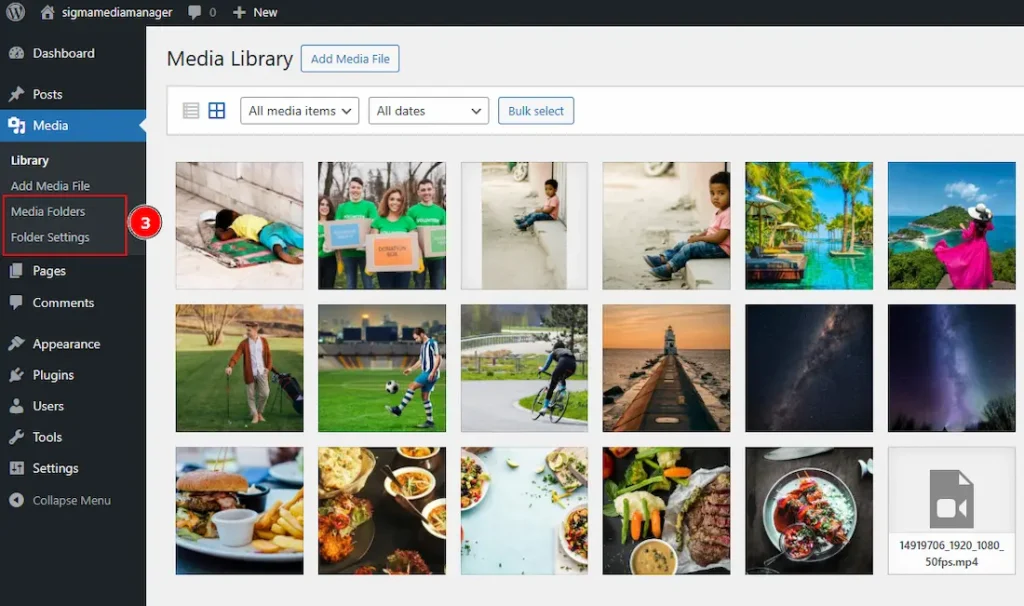
3. Here’s where the magic of Sigma Media Manager comes in the plugin transforms your media library by allowing you to organize files into folders and subfolders. This not only streamlines your workflow but also makes it easy to locate and manage media, even in large libraries.
- Media Folders – Added by Sigma Media Manager, this option allows you to create, rename, and manage folders and so much more for your media.
- Folder Settings – Also from Sigma Media Manager, this lets you configure how your folders behave, such as default folder views, sorting options, and more.
Now, let’s explore what is hidden in Sigma Media Manager.
Media Folders Section
Go to WP Dashboard > Media > Media Folders

This is the initial look when you go to Media Folders after activating. Here you will see the media files listed in all files and uncategorized, as it’s not rearranged yet.

Here is the magic of Sigma Media Manager. You can easily rearrange your media libraries with just one click.
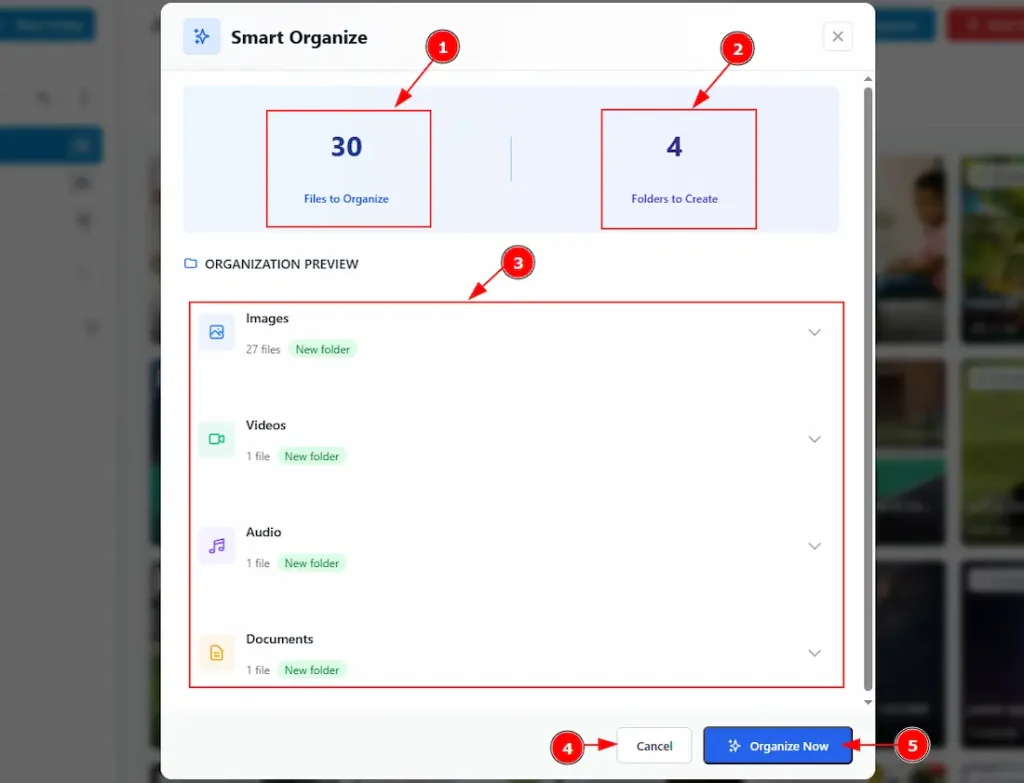
After clicking on the Smart Organize button, you will get to see a pop-up where all media files will be organized as per their categories. Let’s see what’s on the pop-up –
1. Here you can see the total sum of the media files that will be organized.
2. Here you can see the number of folders that will be created.
3. Here you get to see the preview of the organized folders, and the number of the media files are in their along with their name if the dropdown is selected on the right.
4. You can cancel the processing status of the smart organize with this option.
5. By clicking on this button, you can instantly proceed to the process of organizing the media files.
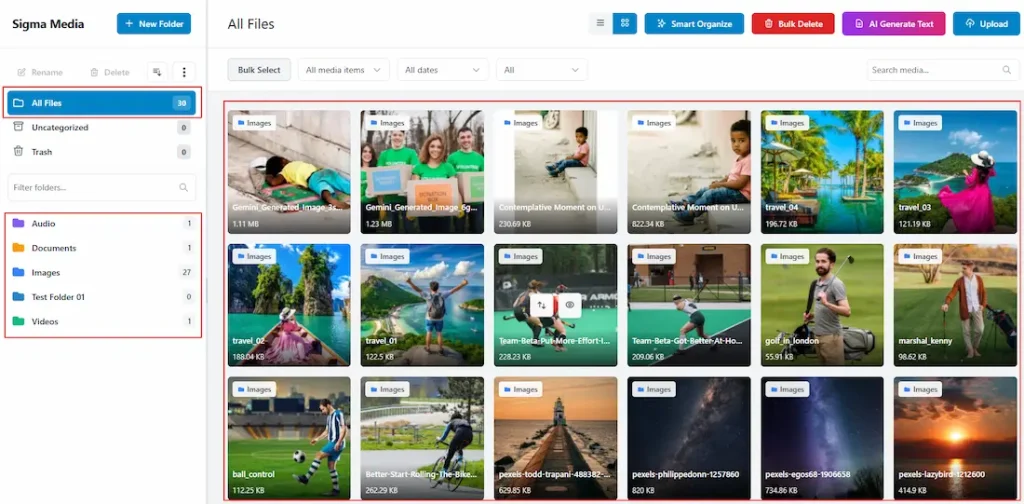
After completing the process, we will get to see the media files organized.
As you have seen, there are two sides to customize. To make it easier, let’s name it Left Site & Right Side. First, let’s explore the left side –
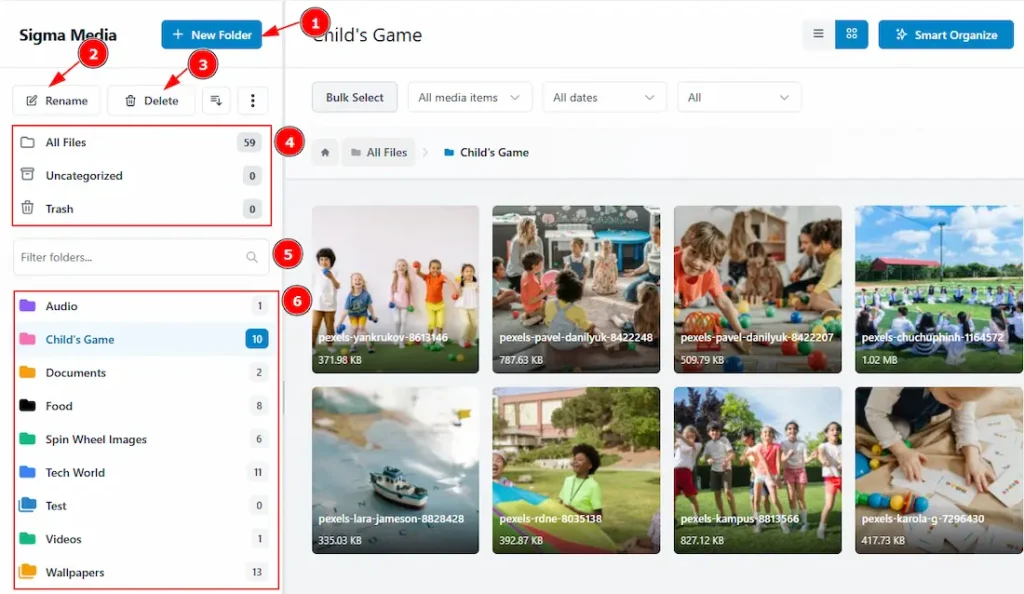
1. New Folder: Click on the button to create a new folder with this option.
2. Rename: Select the folder and then click on the rename button to change the folder name.
3. Delete: Select any folder and then click on the delete button to delete the folder.
4. Here you can see the folders that indicate All Files, Uncategorized & Trash media items.
- All Files: In this folder, you will see all the media files that are on your WP.
- Uncategorized: This folder contains the media files those don’t have any category.
- Trash: You can see the media files which have been deleted will be stored here.
5. You can search for the folders that you have created with this option.
6. In this field, you will see the folders that you have made along with the number of media files.
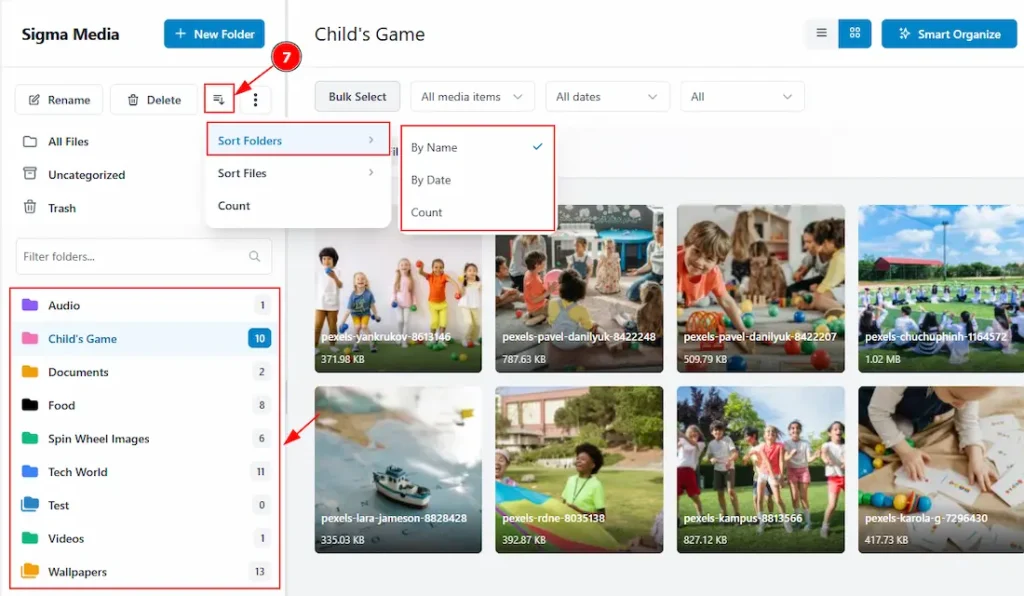
7. Sort Folders: With this sort option, you can sort folders by name, by date, and by count.

8. Sort Files: With this sort option, you can sort media files by name (ascending & descending), by date (ascending & descending, by modified, by author, by size & default.
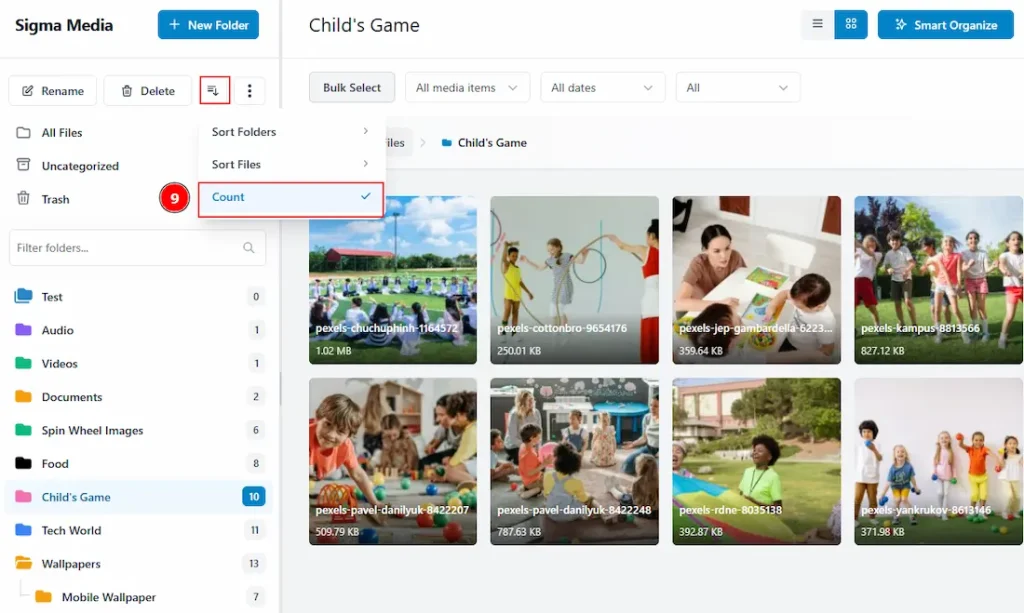
9. Count: With this sort option, you can sort the folders by the number of media files.
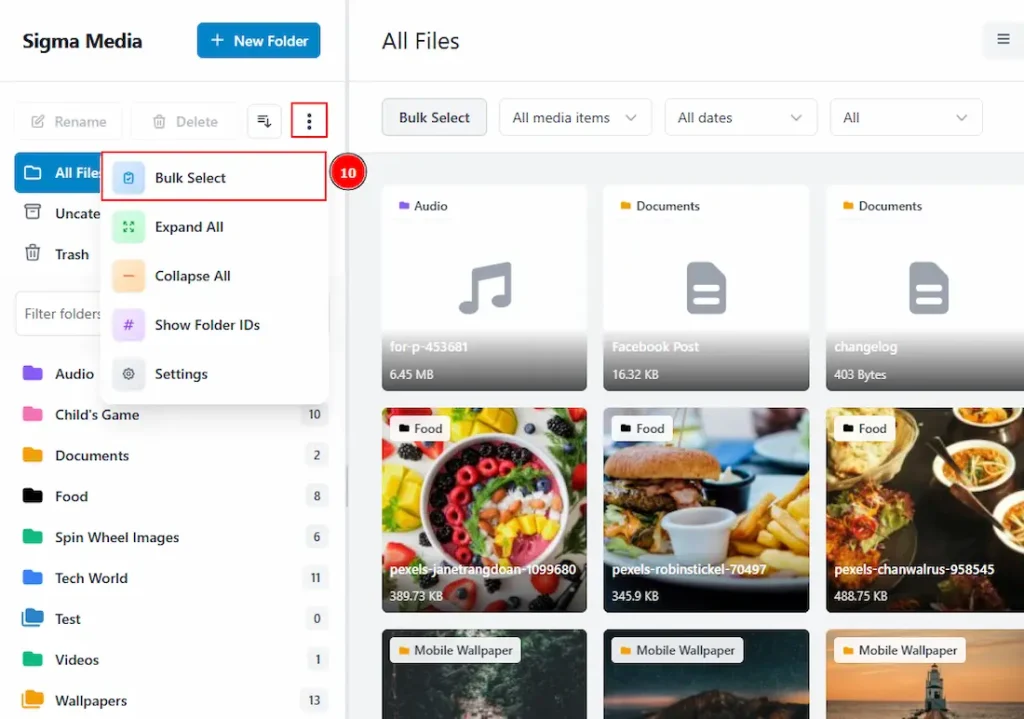
In the top right corner of the left side folder bar, you will get to see three dot and by clicking on it you will see more options. These are –
10. Bulk Select: You can select multiple folders with this option.
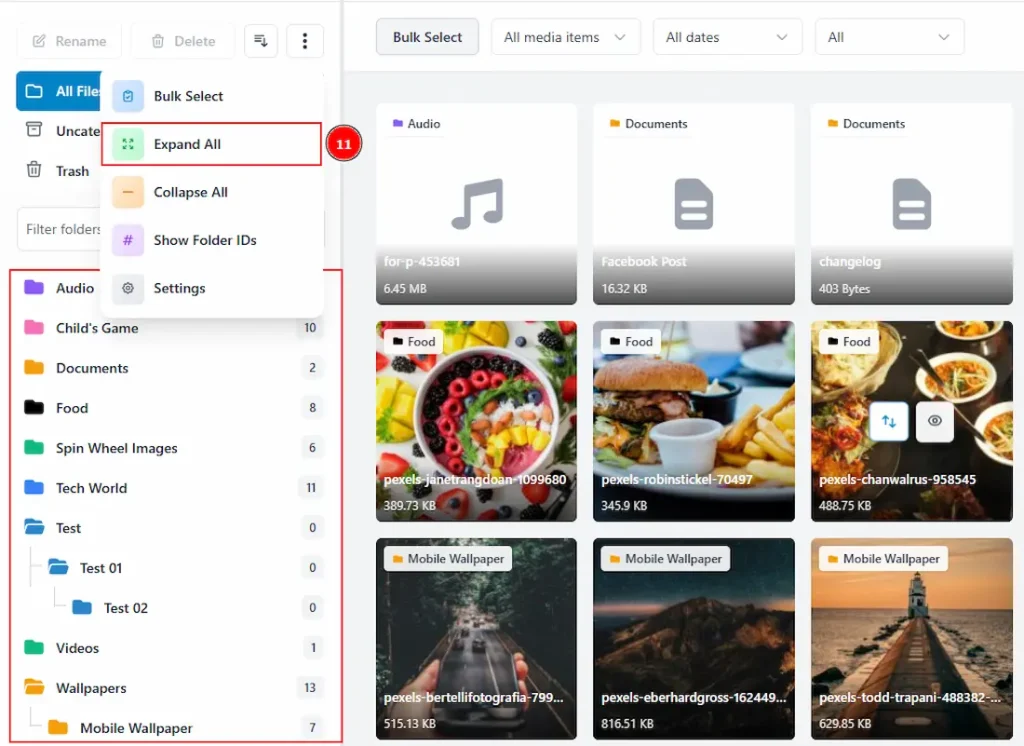
11. Expand All: You can expand all the folders along with the subfolders by clicking on this option.
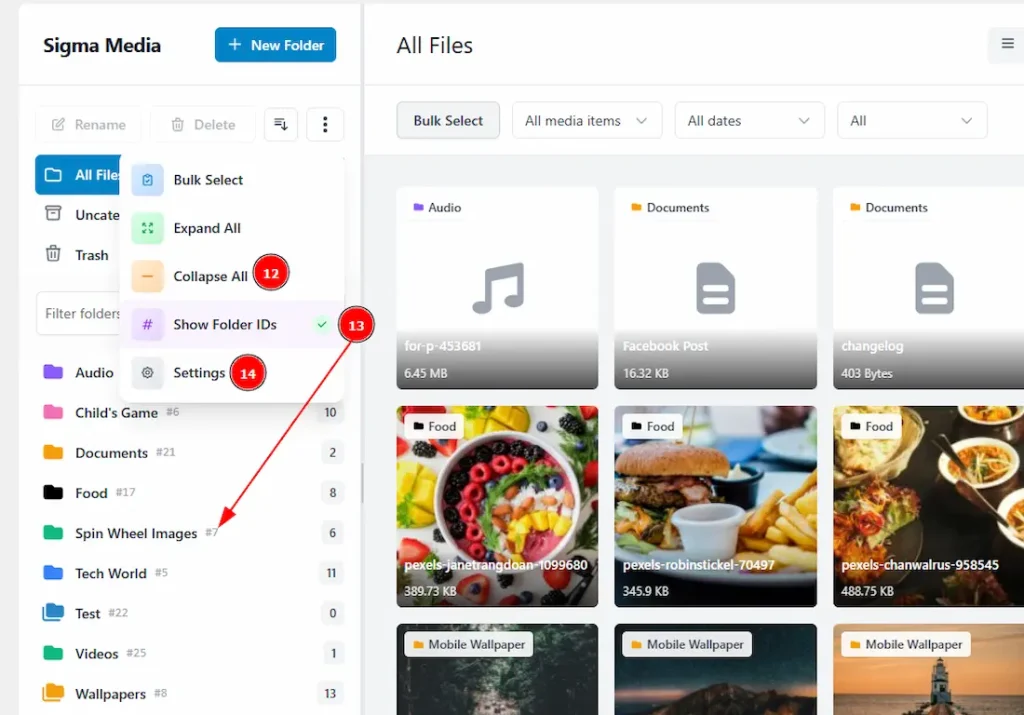
12. Collapse All: You can close the subfolders and see the parent folders only with this option.
13. Show Folders IDs: Click on this option to show the folders’ IDs.
14. Settings: Click on the settings button to get more options to customize the folder. It will redirect you to the Folders Settings tab.
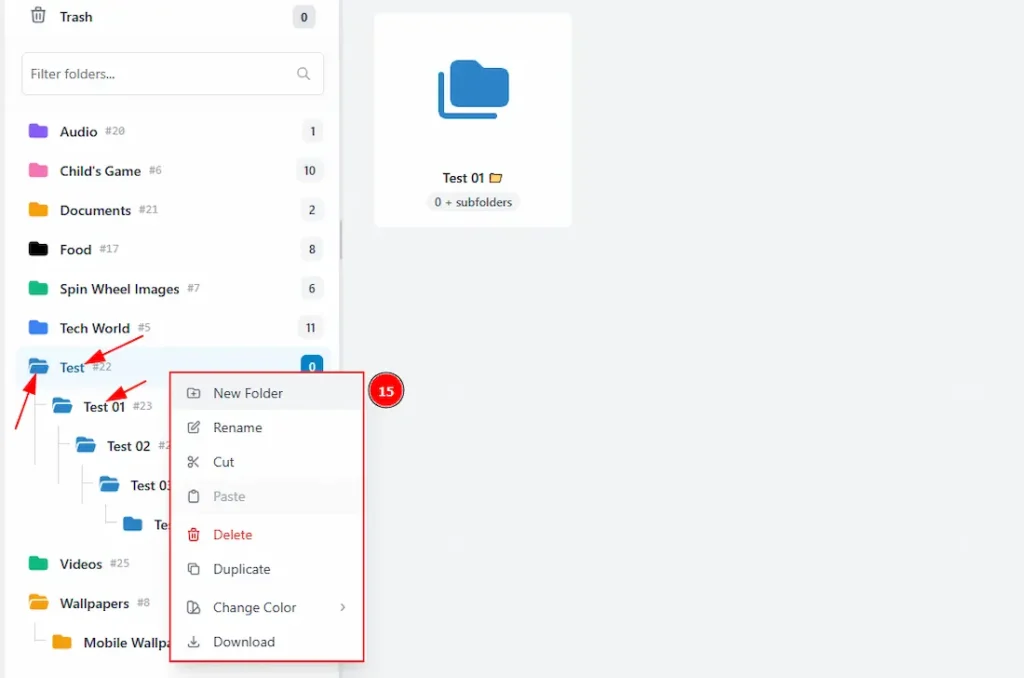
15. If you select a folder and then right-click on your mouse, you will see a pop-up with more customization options for the folder. Let’s describe those one by one –
- New Folder: You can create a subfolder under the selected folder with this option. This was you can create as many as you want.
- Rename: You can make changes to the selected folder name with this option.
- Cut: You can copy the folder that you have selected with this option.
Paste: After copying one folder by using the cut option, you can easily move it under any other folder with the paste option. - Delete: You can remove the selected folder with this option.
- Duplicate: You can duplicate the selected folder with this option.
- Change Color: You can make changes to the color of the folder’s icon with this option.
- Download: You can download the folder’s media file with this option.
Now, let’s start customizing the Right side –
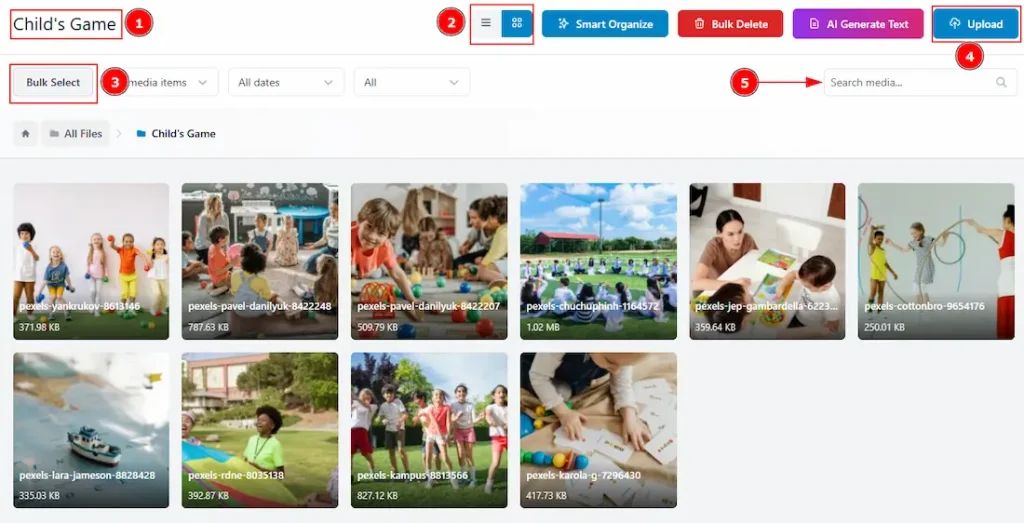
1. You will see the folder’s name that you have selected in this field.
2. You can make changes to the media files’ visual to list view or grid view in this field. Here we have kept the visual as a grid view.
3. You can select all the media files and work on those with this option.
4. You can upload files with this option. You can use the drag & drop feature as well while uploading the files, and change the folder name where you want to upload the files.
5. You can search the media files with this option.

When you click on the bulk select, all the media files are automatically selected, and you get more options to customize your data. These are –
6. Deselect All: You can deselect all the files with this button.
7. Items Selected: Here, you can see the number of files that have been selected. (It will appear as per the media files you have in your folder, as selected)
8. Clear Selection: By clicking on this button, you can instantly clear all the selections.
9. Move to Trash: You can remove the selected files to the trash folder with this option.
10. Move to Folder: You can move the media files to another folder with this option.
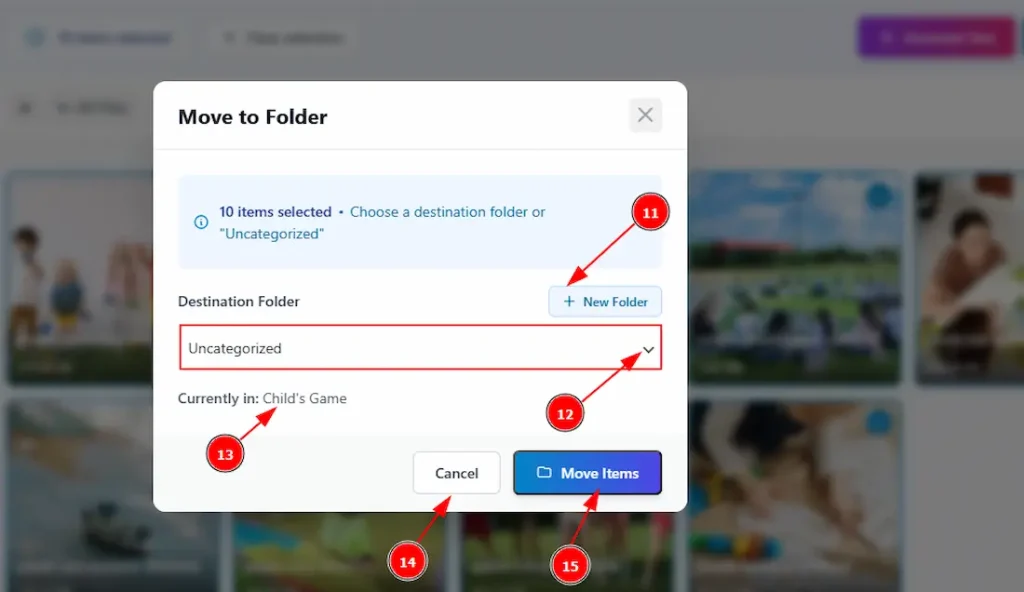
If you have clicked the Move to Folder button, then you will see a pop-up to complete the process of moving the files.
11. You can create a new folder by clicking on this button and moving the items into it.
12. By clicking on the dropdown button, you can select the folder that is already created.
13. Here you can see the information on where the files are currently.
14. You can cancel the moving process by clicking on this button.
15. You can complete the moving process by clicking on this button.
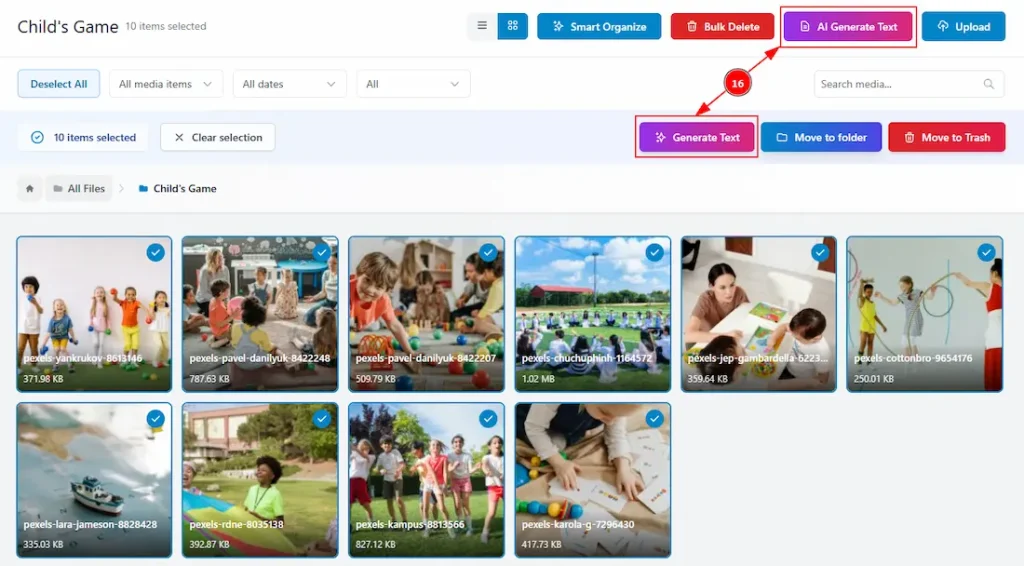
16. This is one of the core features of Sigma Media Manager. It allows you to generate AI-powered content for Media Title, Media Caption, and Media Description automatically. As shown in the screenshot, there are two buttons:
- The upper button is always visible.
- The lower button appears only when media files are selected.
Note: To use this feature, you must add your Gemini API Key in the Folder Settings
Now let’s explore the feature by describing how it works –
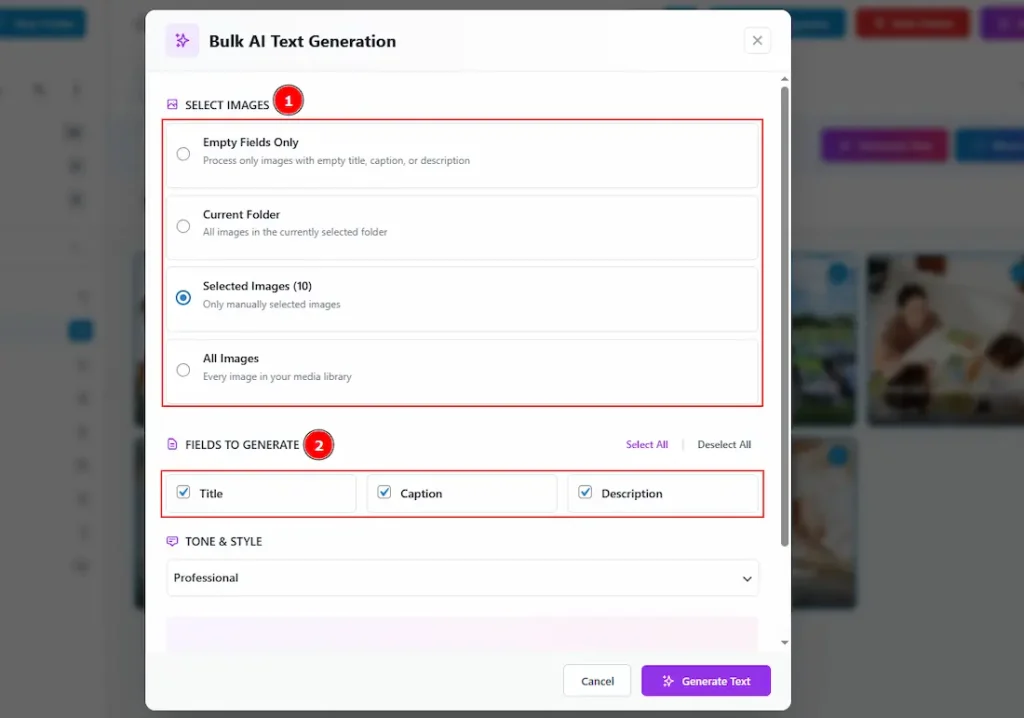
1. Select Images: You can select the options where you want to apply the AI Text Generation. Here you will see some options. These are –
- Empty Fields Only: By selecting this option, the AI generation will process only images with empty titles, captions, or descriptions.
- Current Folder: You can select this option to apply the AI generation to the current folder’s media files.
- Selected Image: If you have selected any media files, then select this option to apply the AI generation on the selected media files only.
- All Image: By selecting this option, you can generate the title, caption & description to all files on media library.
2. Fields to Generate: You can select the fields where you want to generate content using AI. The fields are – Title, Caption & Description. You can select all at once or select as per your need.
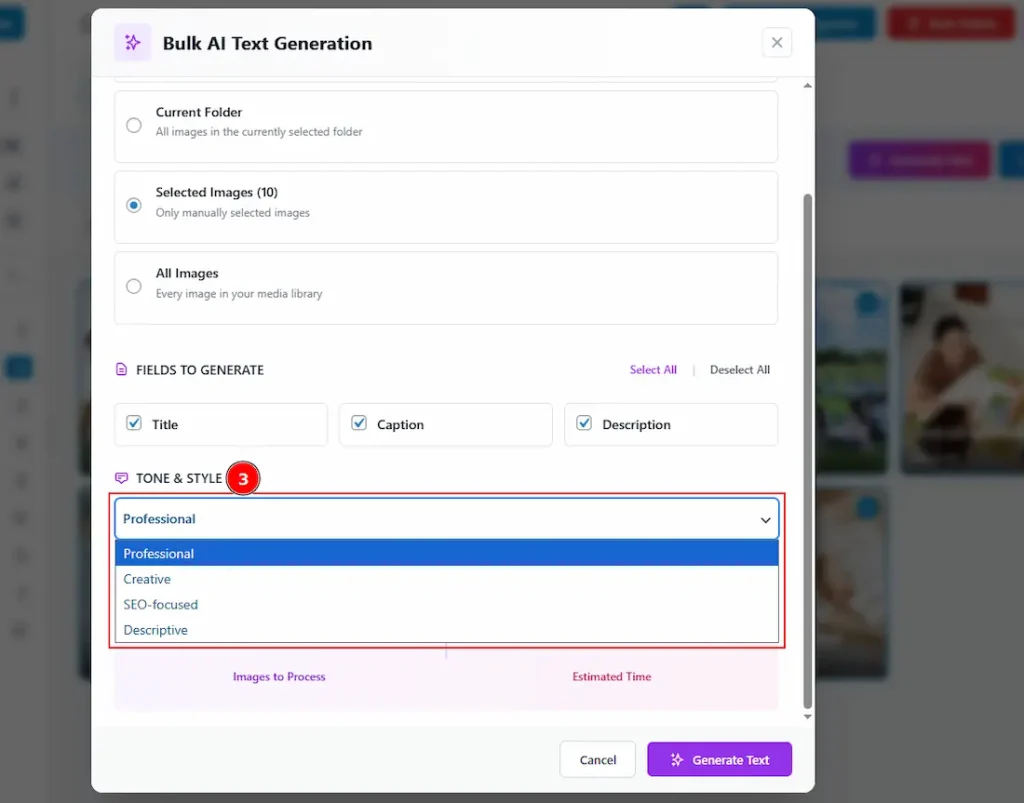
3. Tone & Style: You can select the tone & style of AI, how you want to generate the image title, caption & description with this option. The provided tone & styles are – Professional, Creative, SEO-focused & Descriptive.
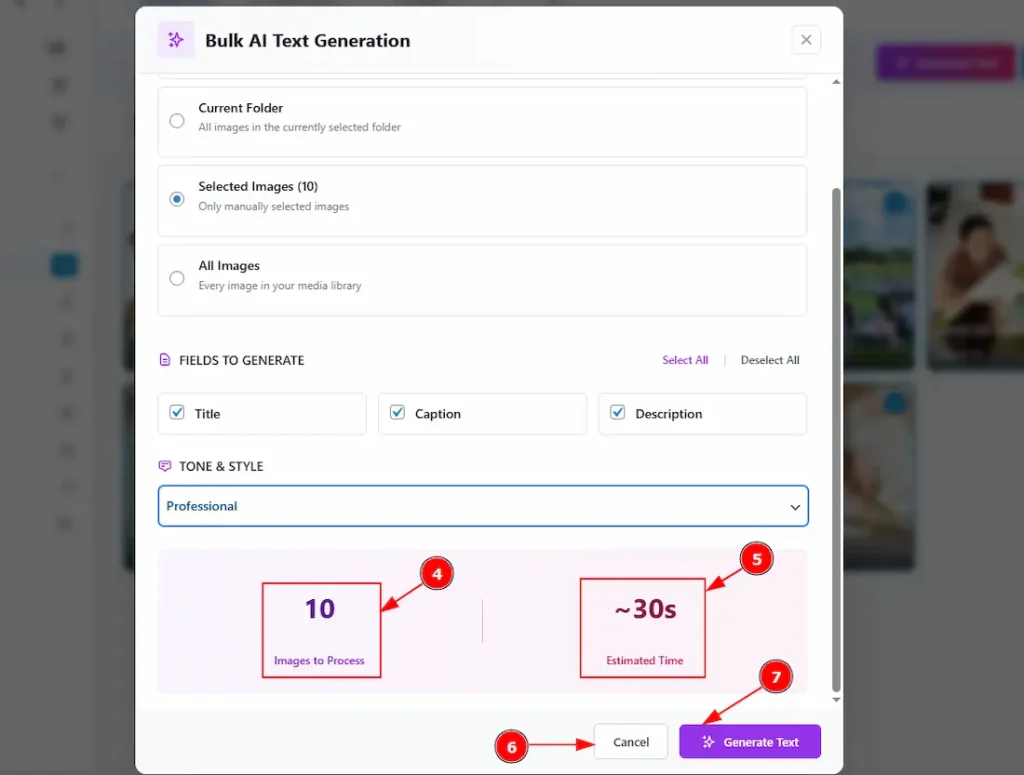
4. Here you can see the number of images that are ready to be processed by AI Text Generation.
5. You can see the estimated time that it will take to generate the content.
6. You can cancel the generation content process by clicking on this button.
7. Generate Text: This button allows you to continue and confirm the final step to generate the text.
After that, within the estimated time, it will generate text.

By hovering over the media files, you can see two small buttons over the media. These are –
17. Drag to Move: You can click on this button and then drag and drop the image to another folder. You can also select multiple image and then you can drag and drop the images at once with this option.
18. Quick View: You can preview the attachment details with this option.
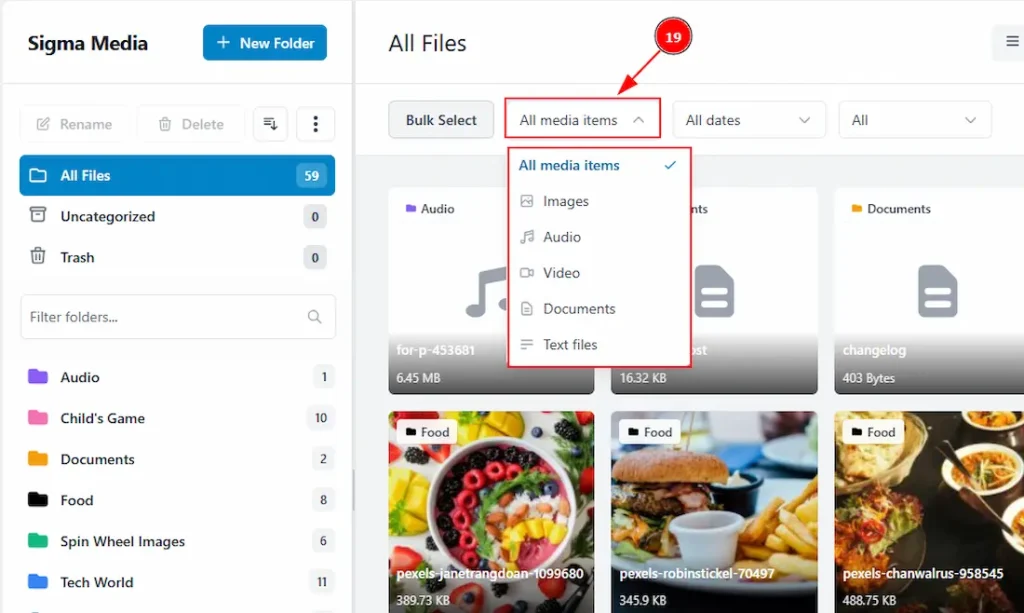
19. All Media Items: You can use the smart filter, where you can organize the files as per their categories. You can select all to see all categories together or any specific category only that you want to show.
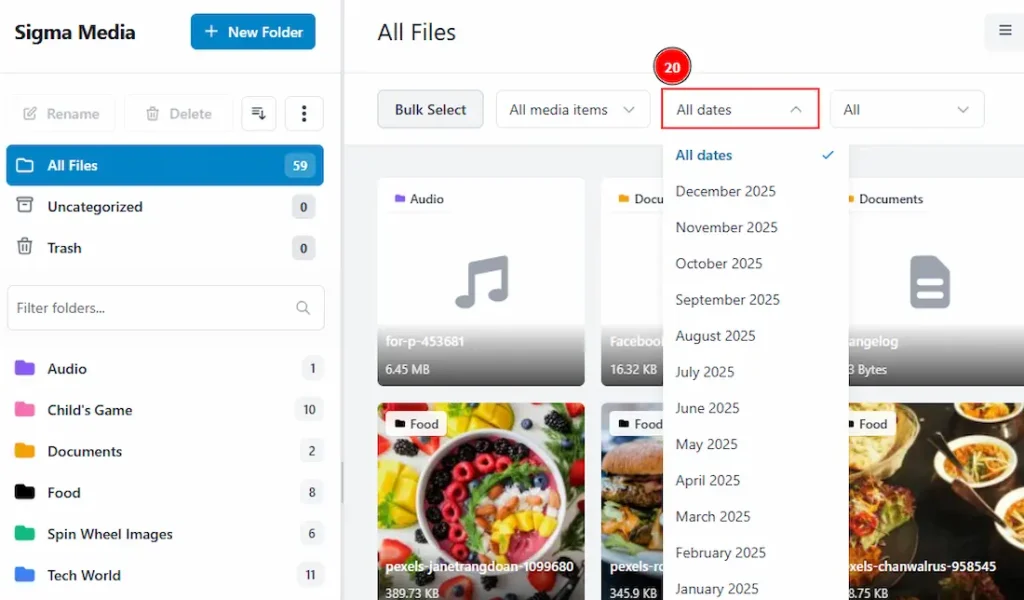
20. All Dates: You can use the All dates filter to see the media files as per their added date.
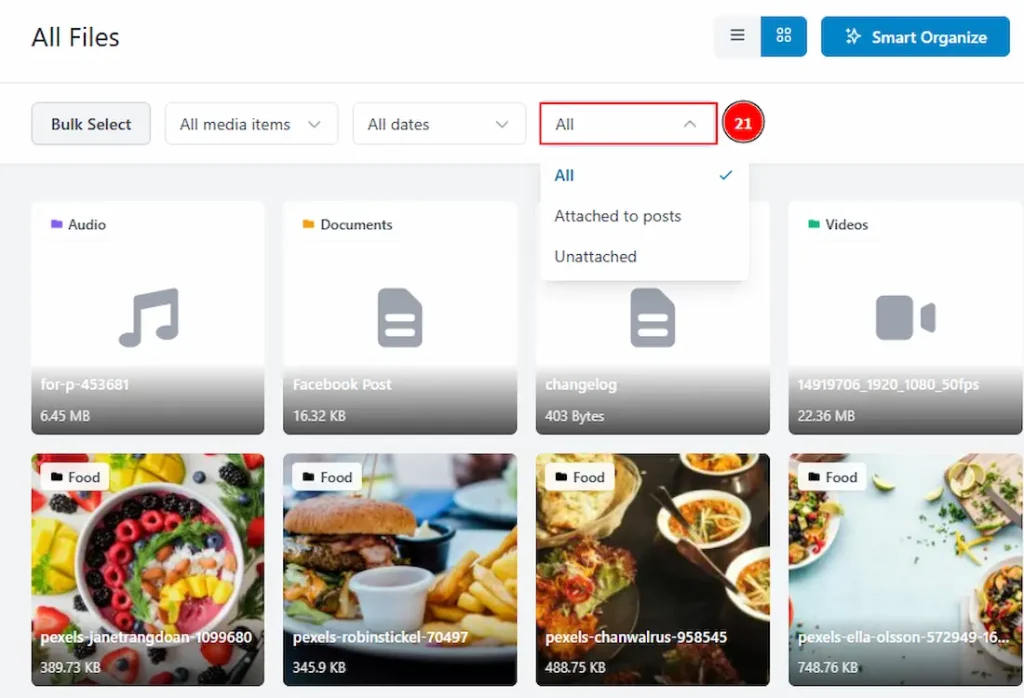
21. All: You can see the files that are attached to posts or unattached or both with this option.
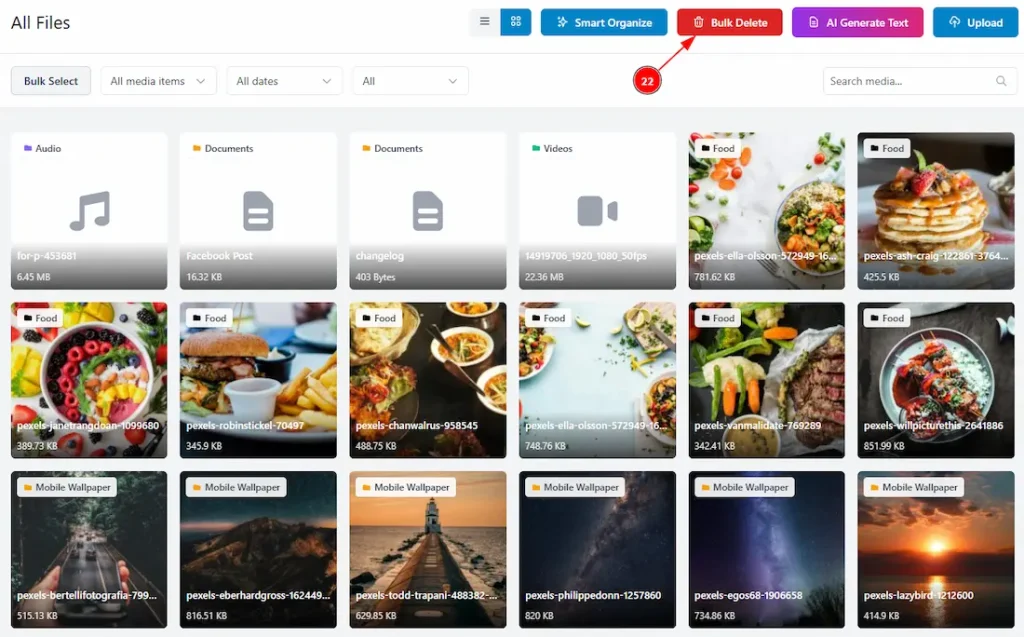
22. Bulk Delete: This is another core feature of Sigma Media Manager. With this button, you can easily delete all the unused media files and keep your library clean and organized with your necessary files only.
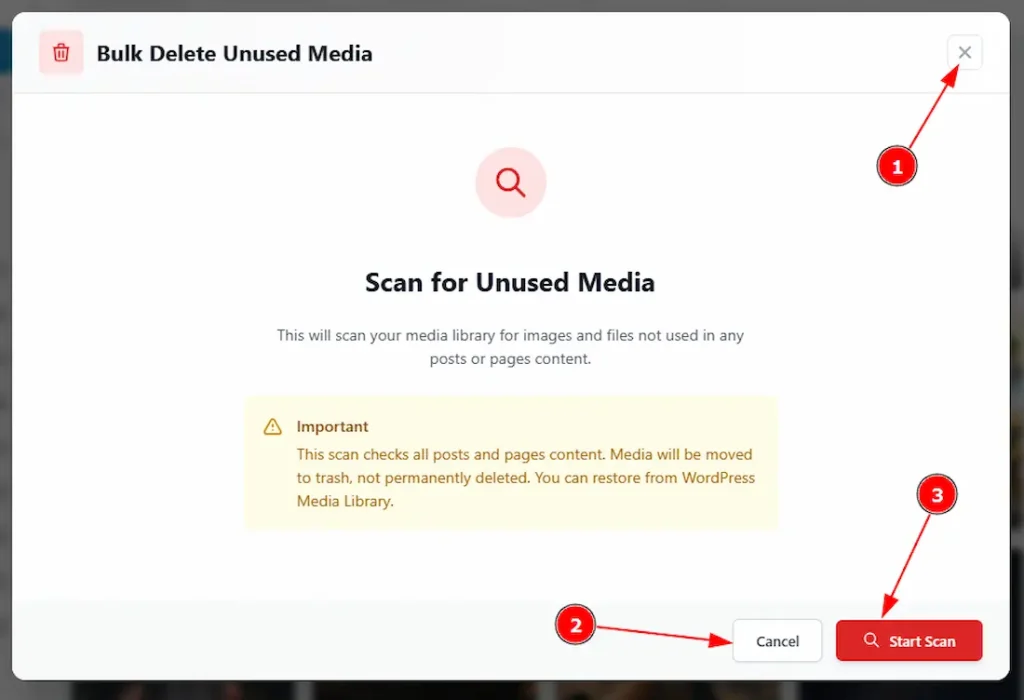
After clicking on the Bulk Delete button, you will see a pop-up. Let’s explore how it works – 1. Close Button: You can close the pop-up with this option.
2. Cancel: By clicking on the cancel button, you can easily close the pop up button.
3. Start Scan: By clicking on the Start Scan button, it will scan your media library to find out the images and files that are not used in any posts or pages content, and then show the result.

After scanning successfully, it will show the result of all unused files and automatically select all –
4. You can select or unselect the unused file with this option.
5. Select All: You can click on this button to select all the unused files at once.
6. Deselect All: You can click on this button to deselect all the unused files at once.
7. Cancel: You can click on the cancel button to stop the processing of the bulk delete.
8. Move to Trash: Click on this button to move all the unused files to trash.

After that, again a pop-up will show the result of the bulk delete along with the total count of deletion. Click on the Done button to close the pop-up.
Folder Settings Section
Go to WP Dashboard > Media > Folders Settings
General Tab
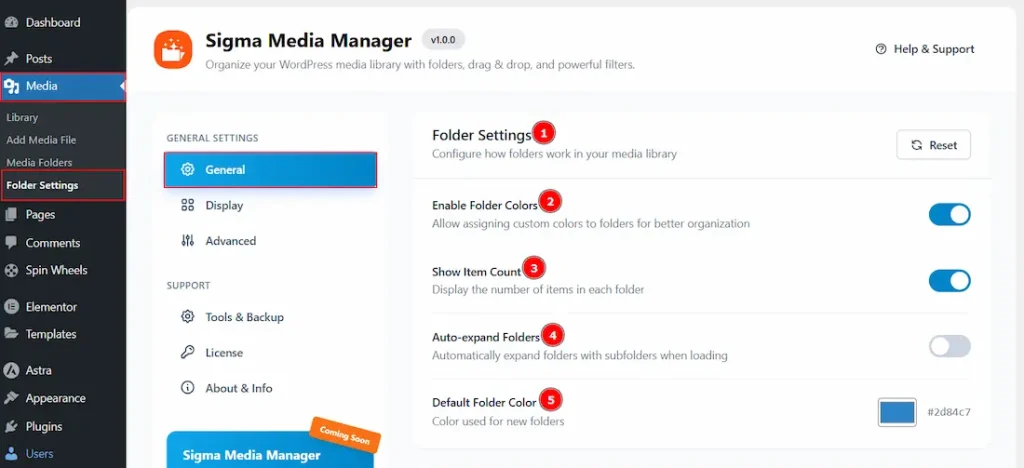
1. Folder Settings: You can reset the settings that you have made for the folders and again change back to the default with this option.
2. Enable Folder Colors: Enable the switcher to allow assigning custom colors to folders for better organization.
3. Show Item Count: Enable the switcher to display the number of items in each folder.
4. Auto-expand Folders: Enable the switcher to automatically expand with subfolders when loading.
5. Default Folder Color: You can set the default folder color with this option. Whenever a new folder is created, it will have this color.
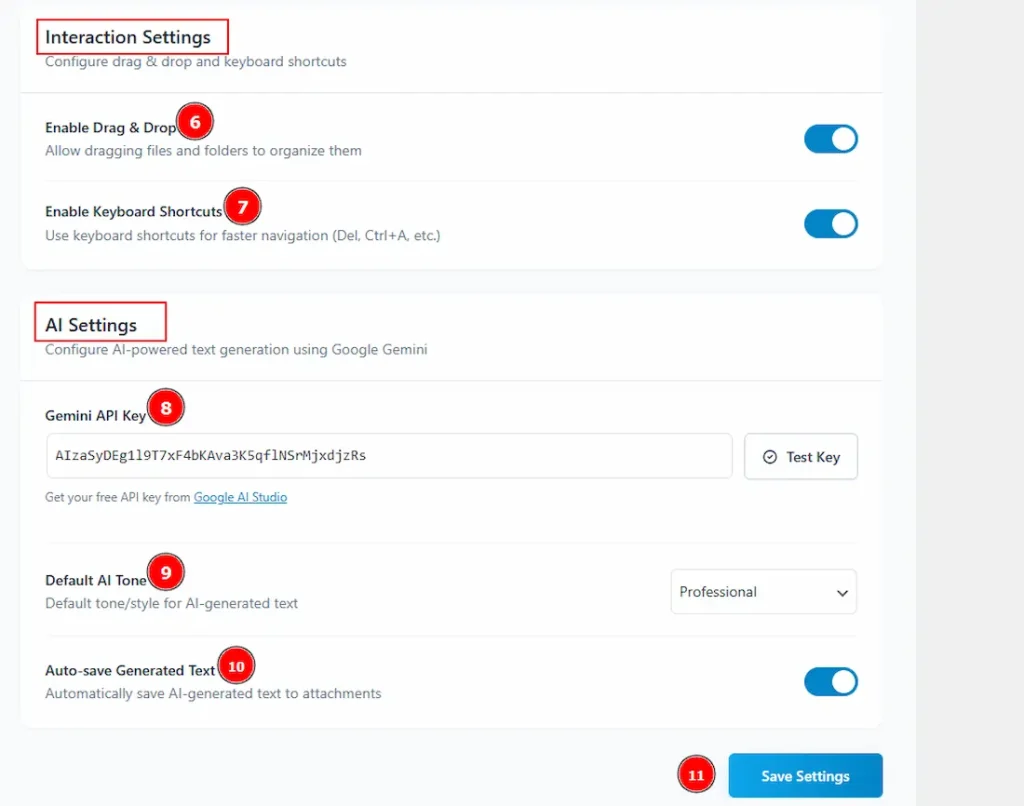
6. Enable Drag & Drop: Enable the switcher to allow the feature of drag and drop folders and media files with this option.
7. Enable Keyboard Shortcuts: Enable the switcher to use keyboard shortcuts for faster navigation.
8. Gemini API Key: You have to add the Gemini API key to use the AI Generated Text feature.
9. Default AI Tone: You can set the default AI tone to generate text with this option.
10. Auto-Save Generated Text: Enable the switcher to automatically save AI-Generated text to attachments.
11. Save Settings: Make sure to click on the save settings button to keep the changes you have made.
Display Tab
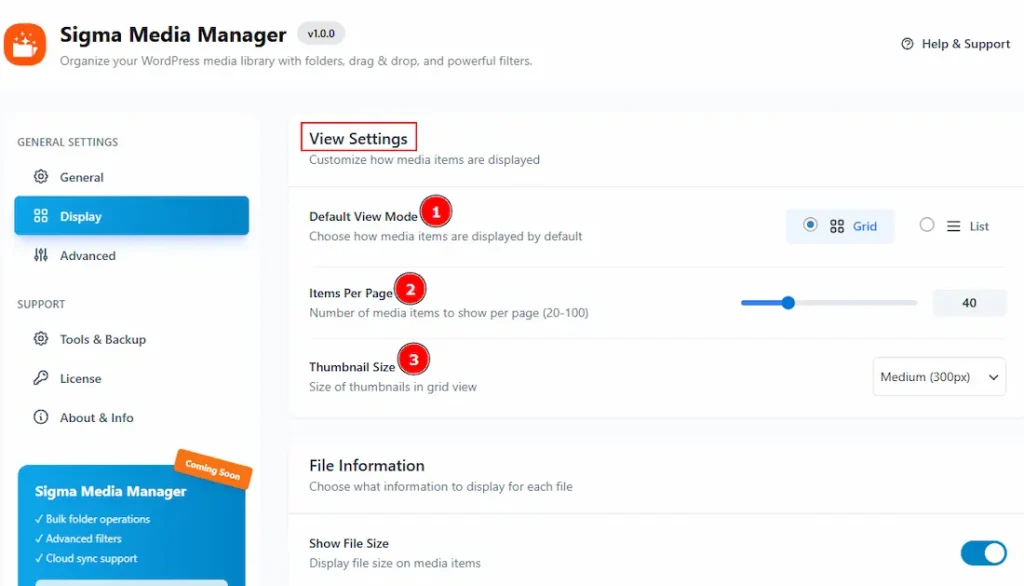
1. Default View Mode: You can select the default view mode of the media files with this option. There are two visuals available. These are Grid & List.
2. Items Per Page: You can select the number of items that you want to see on one page with this option.
3. Thumbnail Size: You can adjust the thumbnail size of the items (only in grid view) with this option.
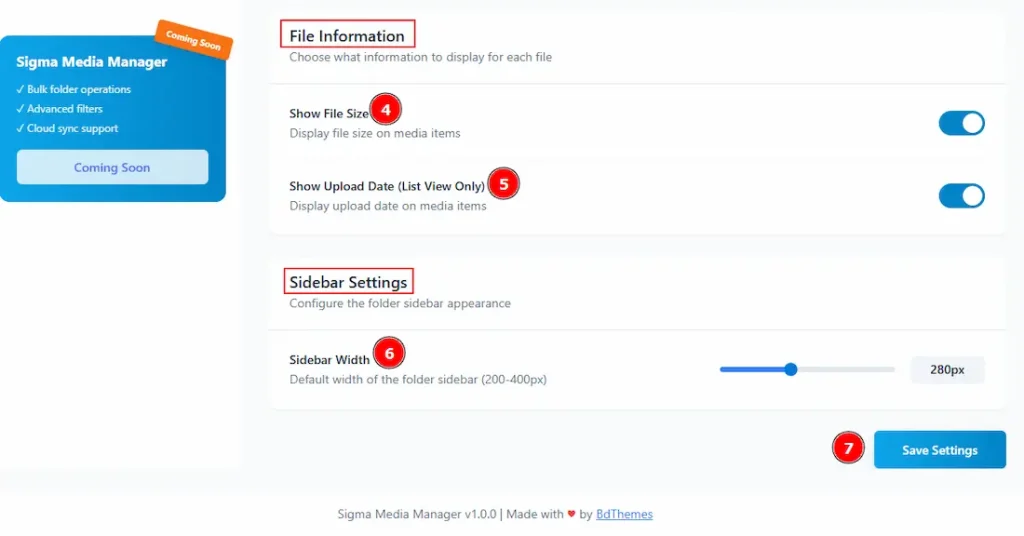
4. Show File Size: Enable the switcher to display the file size on media items.
5. Show Upload Date: Enable the switcher to display the upload date on media items. (Note: It only works on List view)
6. Sidebar Width: You can adjust the width of the left sidebar where the folders are seen with this option.
7. Save Settings: Make sure to click on the save settings button to keep the changes you have made.
Advanced Tab
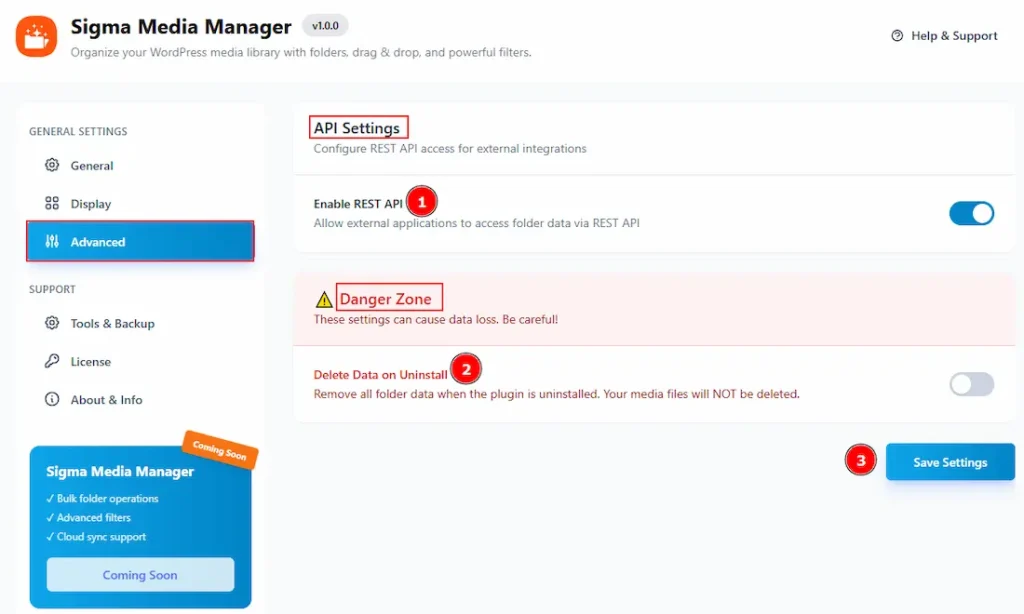
1. Enable Rest API: Enable the switcher to allow external applications to access folder data via Rest API.
2. Delete Data on Uninstall: Enable the switcher to remove all the data when the plugin is uninstalled. Your media files won’t be deleted, but the organized folders will be deleted. Please be careful with these settings, as they can cause data loss.
3. Save Settings: Make sure to click on the save settings button to keep the changes you have made.
Tools & Backup Tab
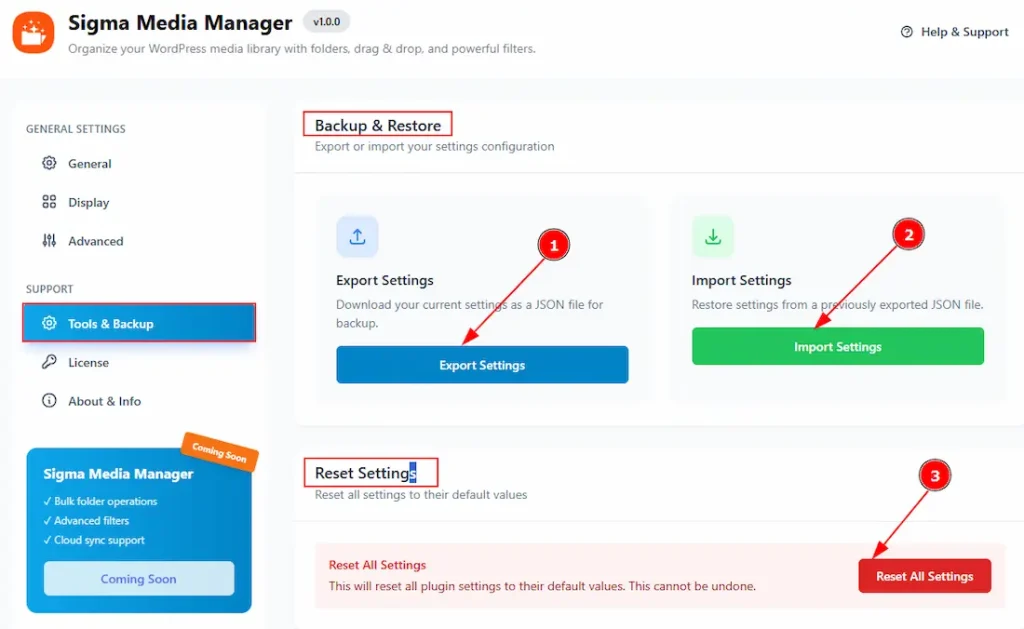
1. Export Settings: Click on the button to download your current settings as a JSON file for backup/
2. Import Settings: You can restore settings from a previously exported JSON file with this option.
3. Reset All settings: By clicking on this button, it will reset all plugin settings to their default values. Please remember that after applying, it can not be undone.
License Tab
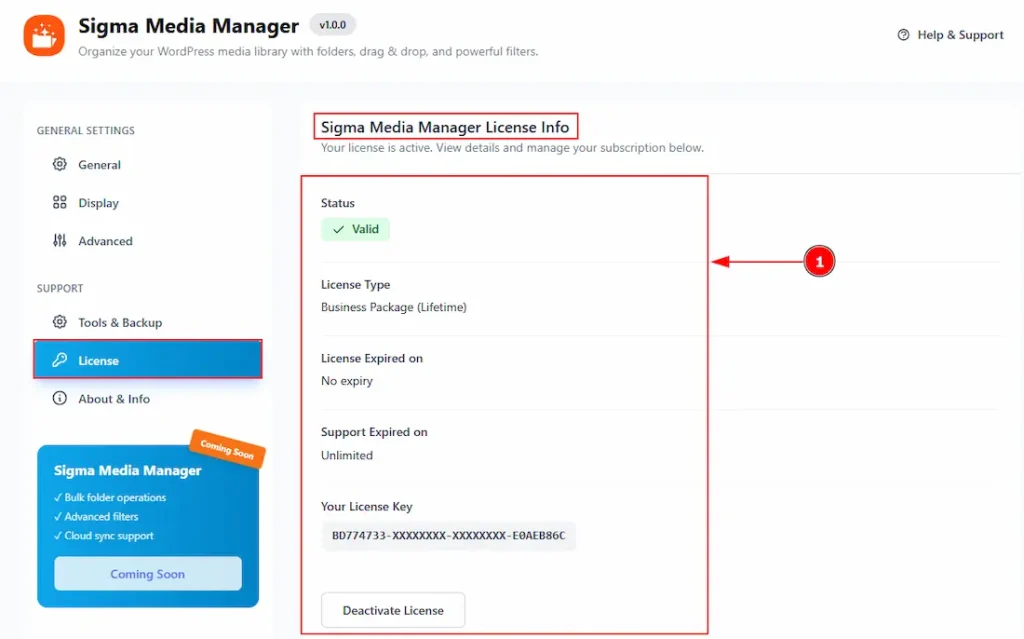
1. In this tab, you will get to see the license information along with the status, type, expiry, support expiry, license key & deactivate button. Please check the license activation section above in this document to get a proper idea about this information.
About & Info Tab
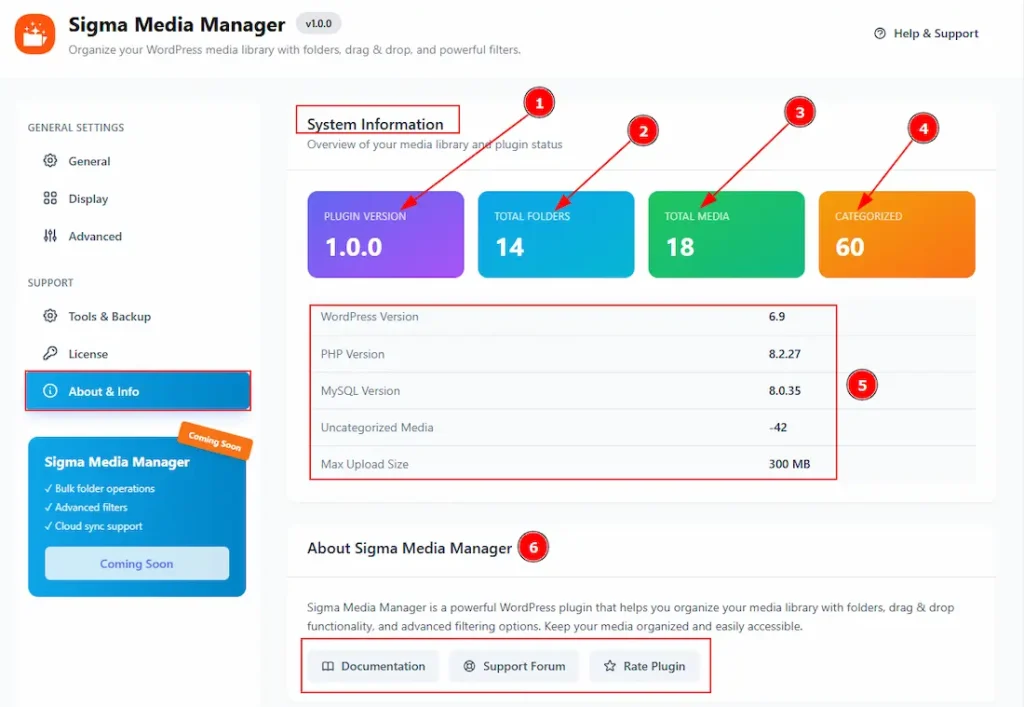
1. Plugin Version: You can check the plugin version here.
2. Total Folders: You can get a visual of the total number of created folders here.
3. Total Media: You can see the total number of media files here.
4. Categorized: You can see the total number of categorized files here.
5. In this field, you will be able to see the WordPress Version, PHP Version, MySQL Version, the number of Uncategorized Media Files & Max Upload Size.
6. Here you will find the document, support forum, and review link of the Sigma Media Manager Plugin.
All done, you have successfully customized the Sigma Media Manager plugin on your WordPress Dashboard.
Video Assist
The video will come soon. Please visit the demo page to explore the plugin features.
Thanks for staying with us.