This guide will show you how to customize the Spin Wheel Pro plugin to meet your specific needs, ensuring it aligns with your goals and enhances website engagement effectively.
Explore The Spin Wheel – An interactive wheel that lets users spin to win coupons
Make your sale fun and engaging with our interactive Spin Wheel. Visitors can spin to instantly reveal surprise discounts, special deals, and exclusive coupons. It’s a quick, exciting way to boost engagement and add a playful touch to your promotions. Spin, win, and enjoy.
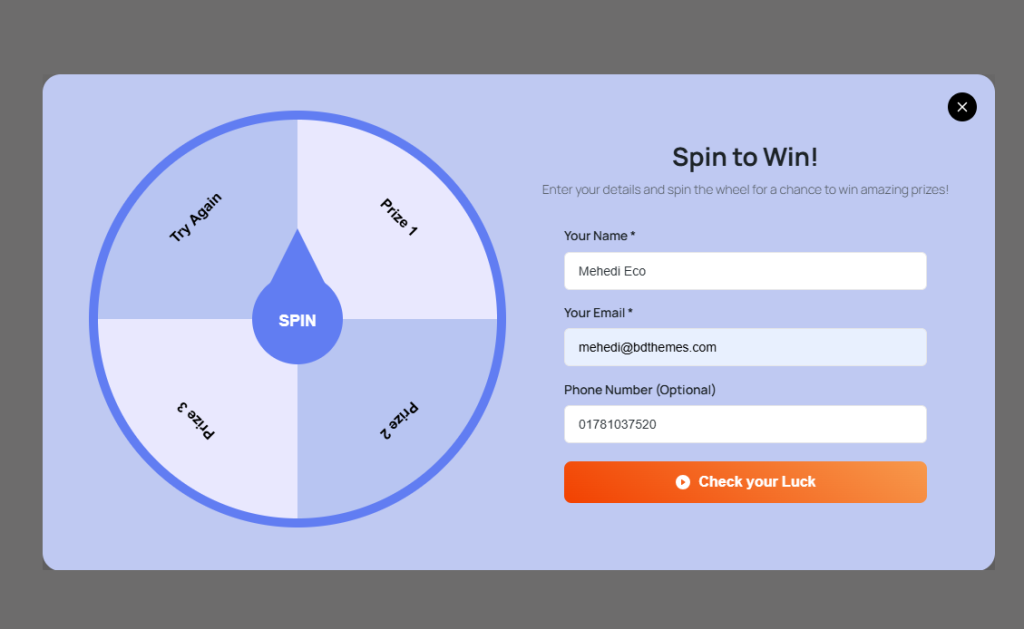
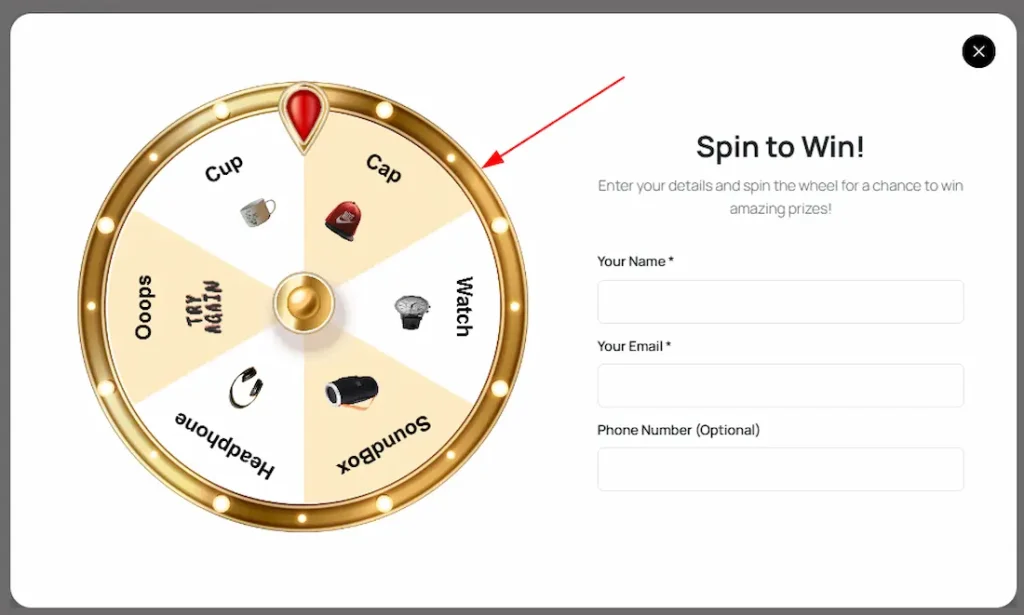
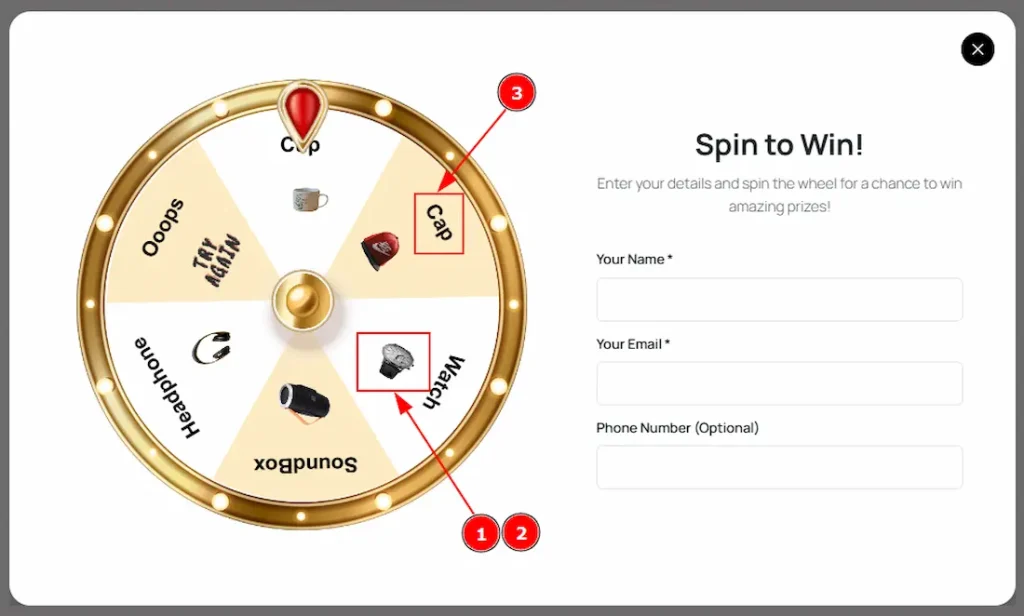
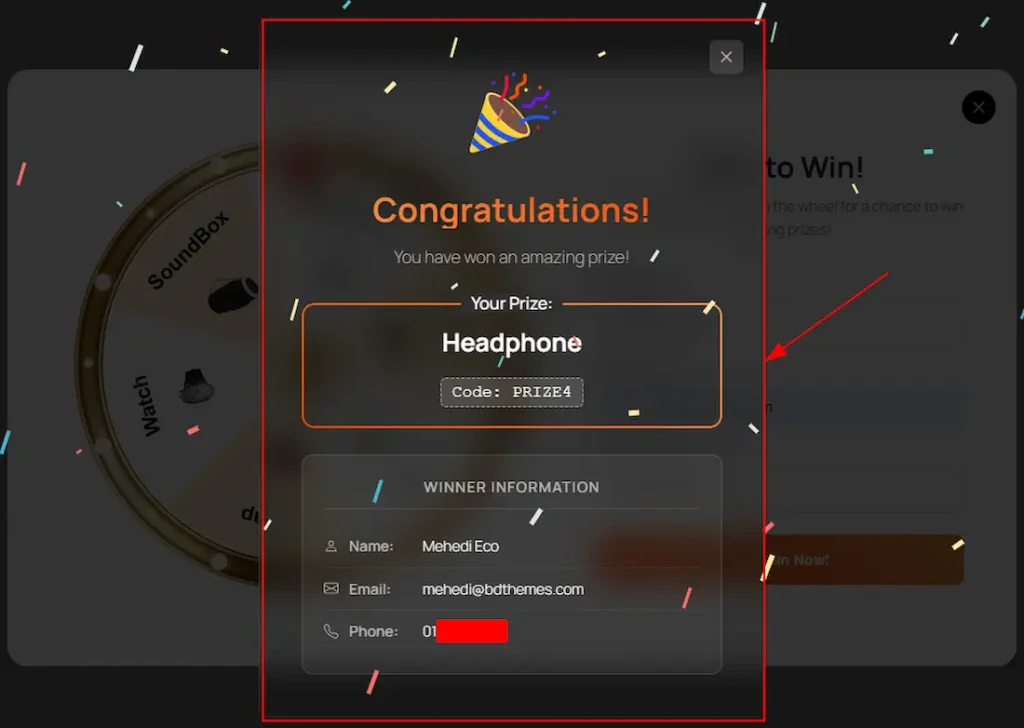
After customizing the backend, reload your website to display the Spin Wheel on the front end. Enter your name, email & number in the respective fields, then click the Spin the Wheel(Check your Luck) button.
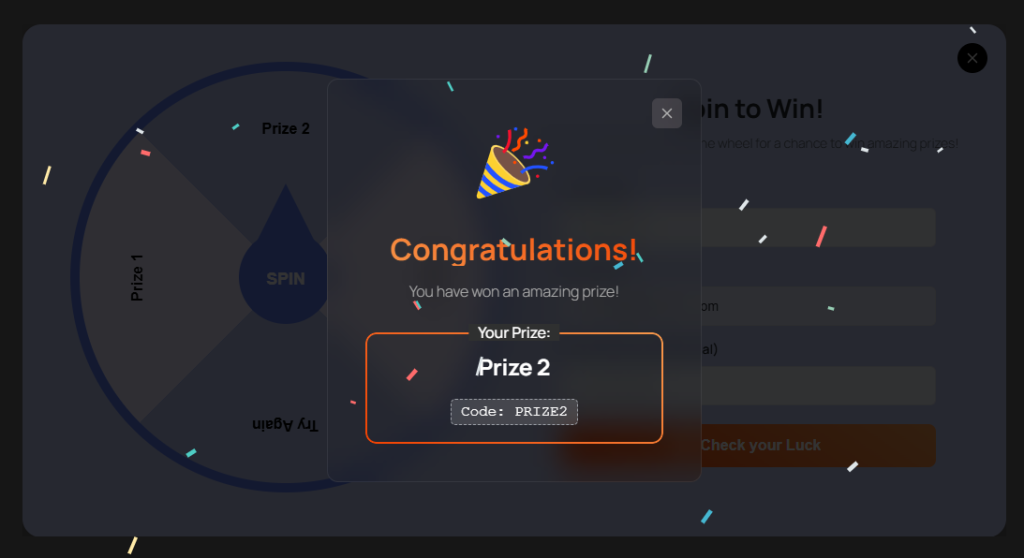
After spinning your wheel, you will get the coupon code as the above screenshot, and the winner information(Name, Email, Coupon, etc) will be found in the Backend Entries tab section.
How to Set Up and Download the Spin Wheel Plugin

To use the Spin Wheel plugin, you need to download the plugin first. You can easily find the plugin on the WordPress.org site. Don’t worry about it. We have attached a download link here. Just visit the link and download the plugin. Here is the download link. After downloading and activating the plugin, just follow the steps below.
How to Install & Activate the Spin Wheel Pro
To use the Spin Wheel Pro plugin, you need to download both the Lite and Pro plugins first. Please follow the steps below –
1. You can easily find the Lite version plugin on the WordPress.org site. Here is the download link.
2. You can find the pro version plugin on BdThemes account dashboard. You have to log in to your BdThemes account with your purchase email. If you are not registered, then make sure to register first with your purchase email.
3. After that, get the license key & your product from your account.
4. Upload both plugin files to your WordPress dashboard and activate both.
5. Make sure to activate the pro plugin with the license key.
Note: Please visit the How to Install and Activate Spin Wheel Pro document for complete guidelines.
Let’s start to customize the plugin
After installing and activating the Spin Wheel plugin, the plugin will appear on your WP plugin dashboard. From here, you can easily customize the plugin. Here you will get the 4 sections for all settings to customize the plugin. These are – All Wheels, Add New Plugin, Entries & Settings. Now, let’s start describing all the sections one by one.
All Wheels Section
Go to WP Dashboard > Spin Wheel > All Wheels
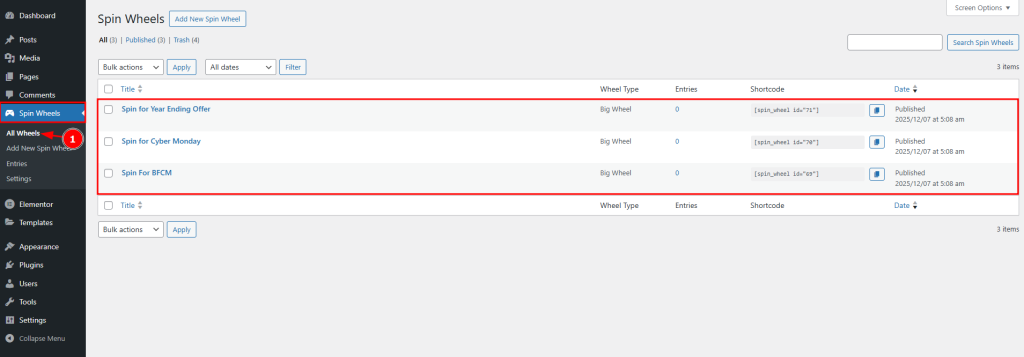
1. The All Wheels section provides a centralized overview of every spin wheel created on your site. From here, you can quickly view important details such as the wheel name, wheel type, total entries, shortcode, and publish date. This section allows you to easily manage existing spin wheels, copy shortcodes for placement anywhere on your website, and create new wheels for different campaigns as we did like BFCM, Cyber Monday, or seasonal offers, all from one simple dashboard.
Add New Spin Wheel Section
Go to WP Dashboard > Spin Wheel > Add New Spin Wheel
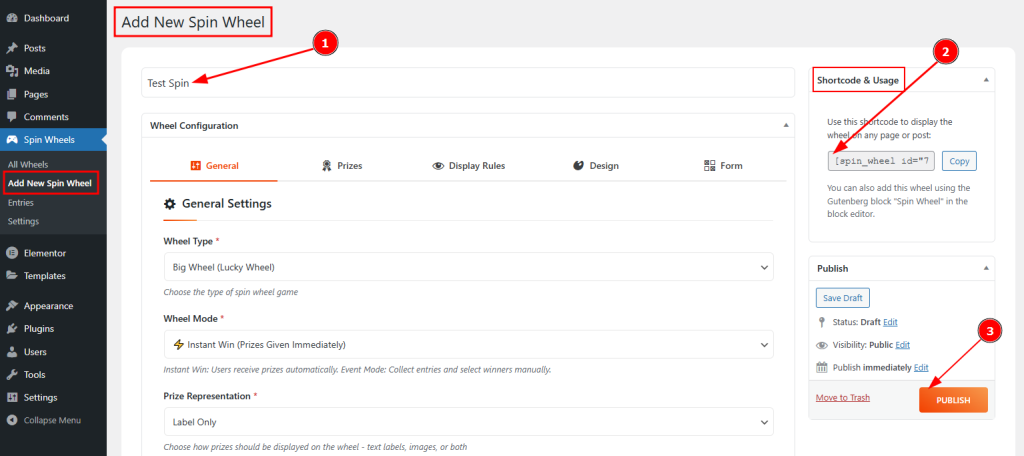
1. Add Title: You can make changes to the new spin wheel name with this option.
2. Shortcode & Usage: In this option, a unique shortcode is automatically generated each time you create a new spin wheel. This shortcode is different for every wheel and must be copied and placed wherever you want the spin wheel to appear on your site. Without inserting this shortcode, the spin wheel will not be visible on the frontend. You can also find and copy this shortcode at any time from the All Wheels section.
3. Publish: You can easily publish the spin wheel by clicking the publish button.
This section is very crucial, as you will get all the customization options of the spin that you want to apply. In this section, you will get five more tabs to customize the Spin Wheel. These are General Settings, Prizes, Display Rules, and Design & Form. Let’s start describing those one by one.
How to use the shortcode to make the Spin Wheel visible
For Elementor Editor

To use the shortcode on Elementor Editor, first insert the shortcode widget, then paste the shortcode that you have copied from the spin wheel plugin dashboard (All Wheels & Add New Spin Wheel) and then publish the page & the wheel will be visible on the published page.
For WordPress Pages / Gutenberg Block Pages
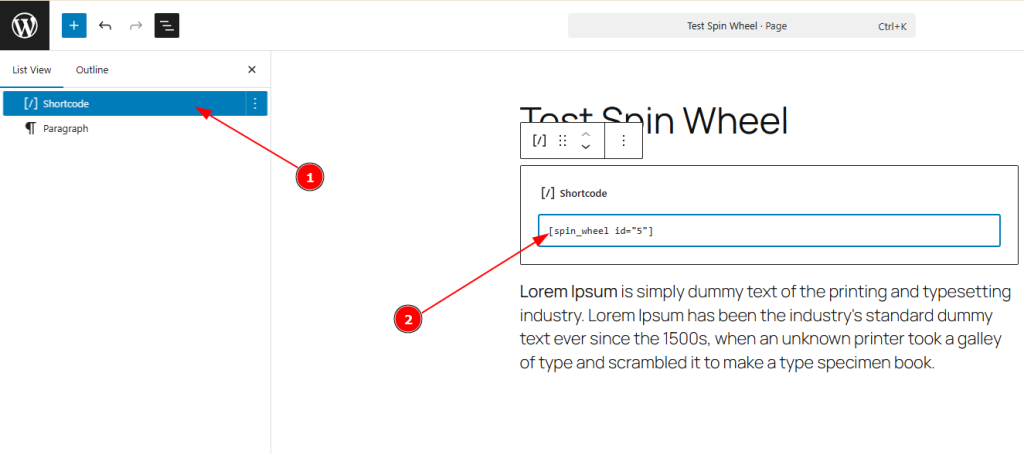
To use the shortcode on Pages/Gutenberg Block, first insert the shortcode block, then paste the shortcode that you have copied from the spin wheel plugin dashboard (All Wheels & Add New Spin Wheel), and then publish the page & the wheel will be visible on the published page.
Note: Please note that you can use the wheel anywhere by using the shortcode.
Customizing the Add New Wheel Section
General Settings Tab
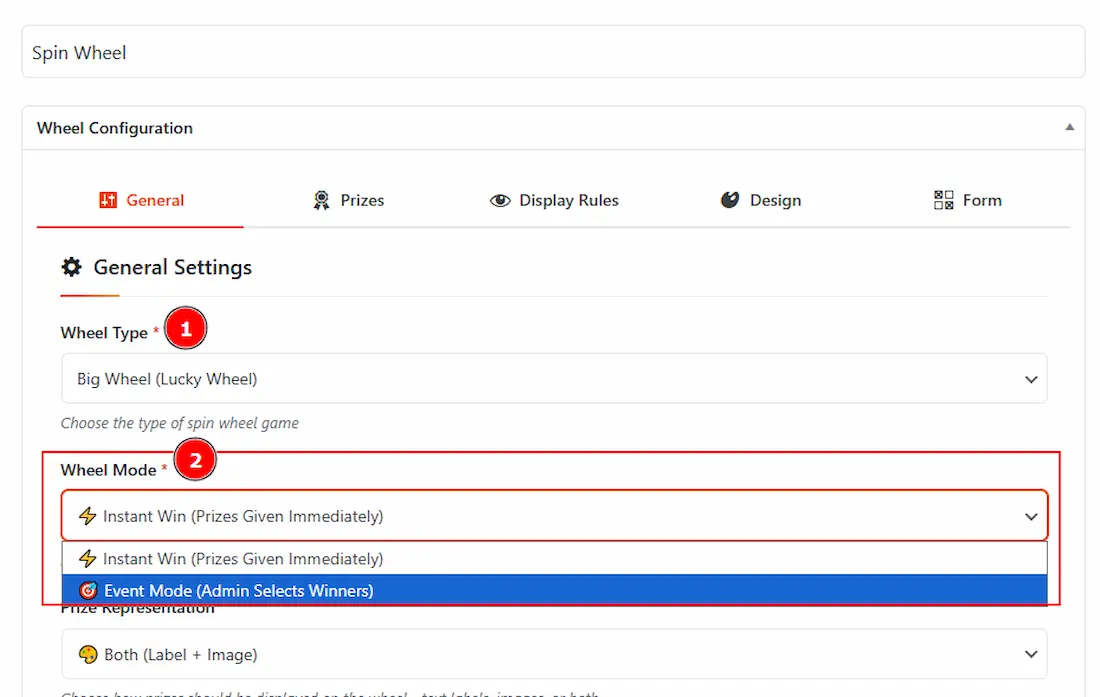
1. Wheel Type: You can select the wheel type as Big Wheel (Lucky Wheel) with this option.
2. Wheel Mode: There are two types of wheel mode available. Such as Instant Win & Event Mode.
- Instant Win (Prize Given Immediately): By selecting the wheel mode as instant win, users receive prizes immediately after spinning the wheel.
- Event Mode(Admin Selects Winners): By selecting the wheel mode as event mode, the admin can collect entries and select winners manually.
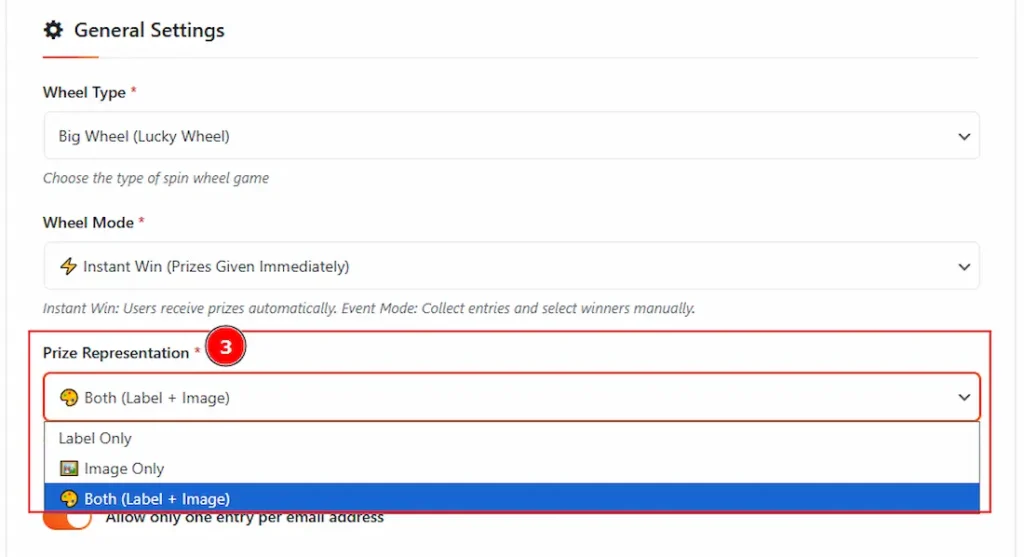
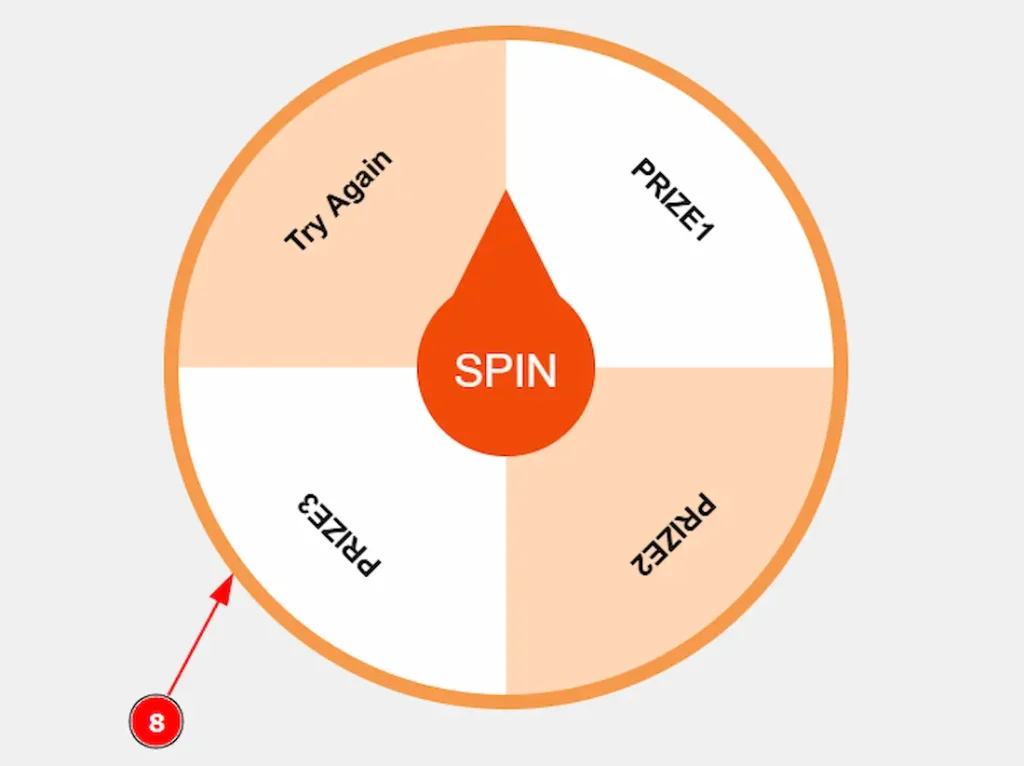
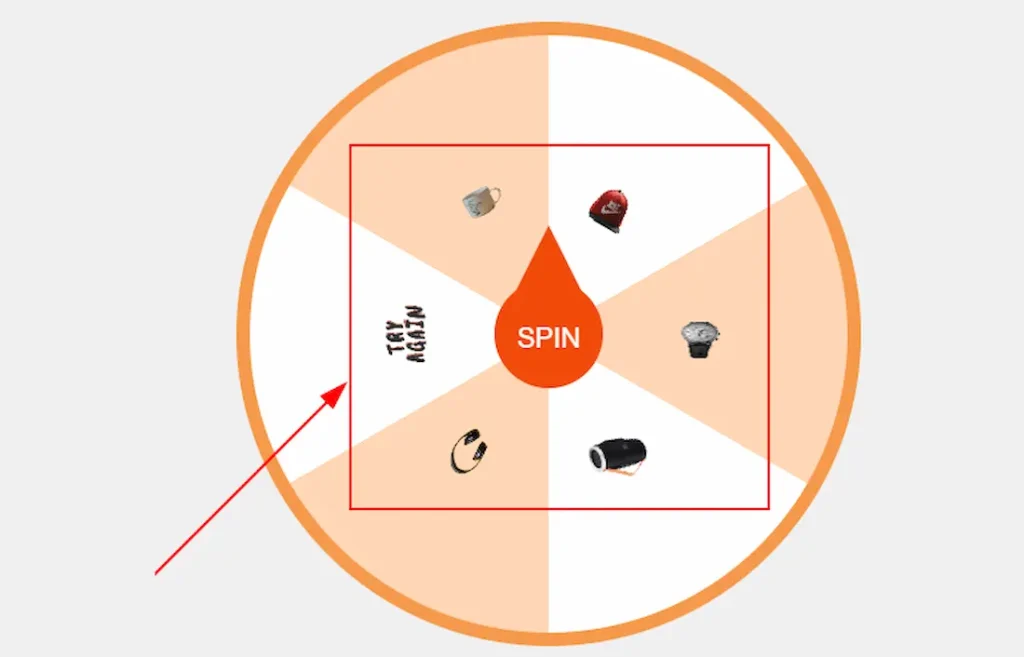
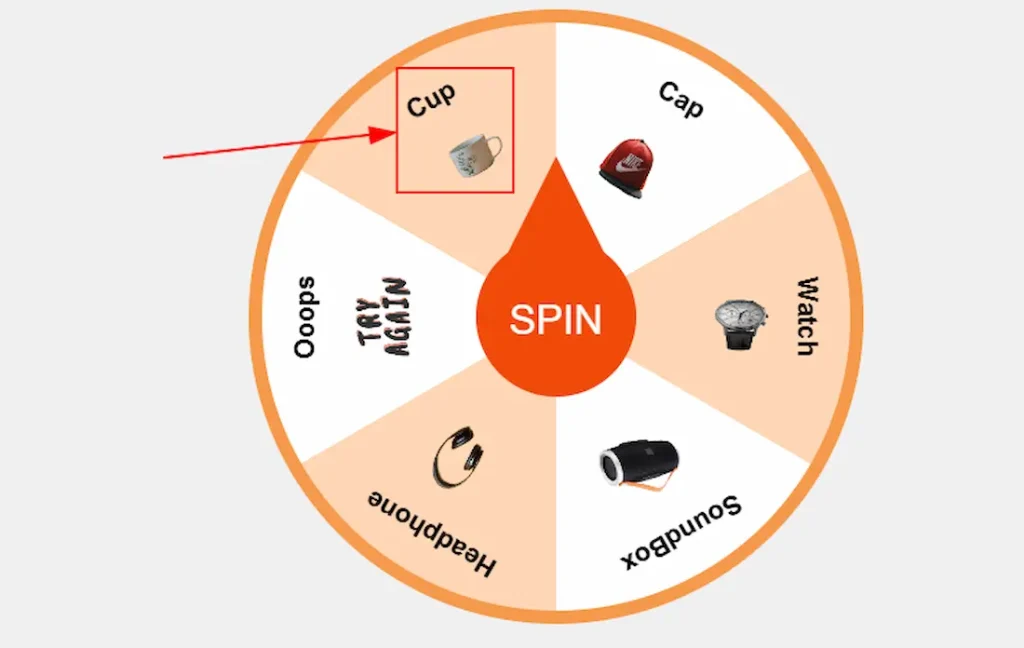
3. Prize Representation: This option allows for how the prizes should be displayed on the spin wheel. There are three options for showing the prizes. These are label only, Image only, and Both Label & Image.
- Label Only: You can display the prizes by only text labels with this option.
- Image Only: You can display the prizes with only an image with this option.
- Both (Label+Image): You can display the prizes by both image & label text with this option.
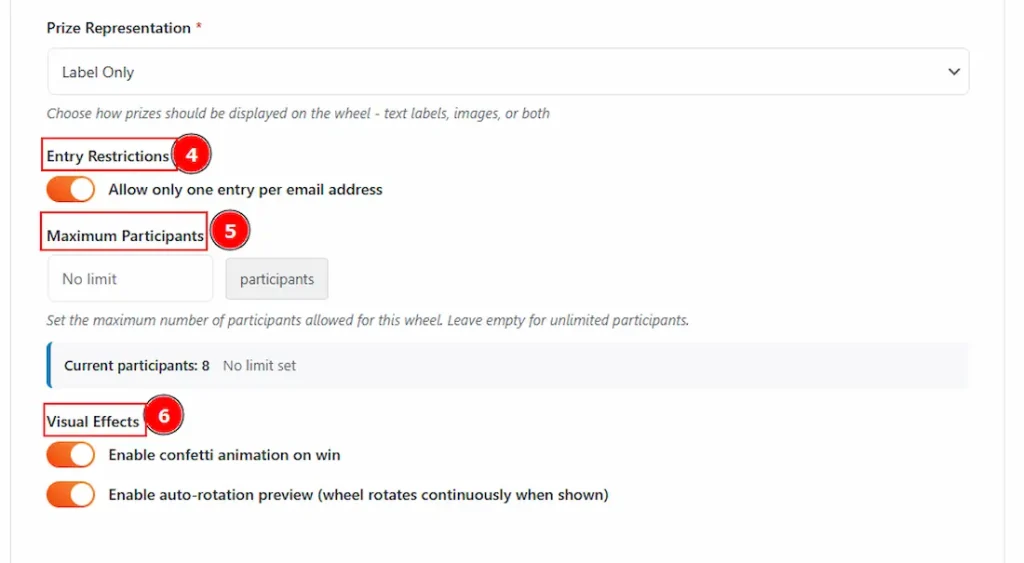
4. Entry Restrictions: Enable this switch to prevent users from using the same email address more than once. It ensures only one entry is allowed per email.
5. Maximum Participants: You can set the maximum number of participants for this wheel. By leaving the option empty for unlimited participants.
6. Visual Effects: You can enable or disable the switcher to show confetti animation on winning and to auto-rotation preview (wheel rotates automatically when shown).
Prizes Configuration Tab
When you select the Prize Representations as Label Only on General Settings

1. Add Prize: You can add more prize fields on the spin wheel with this option.
2. Prize Label: You can make changes to the prize labels with this option.
3. Coupon Code: You can customize the coupon code with this option.
4. Probability: You can adjust the percentage of the winning ratio of the prizes with this option. (Note: Total probability should equal 100%. Higher percentages mean better chances of winning that prize.)
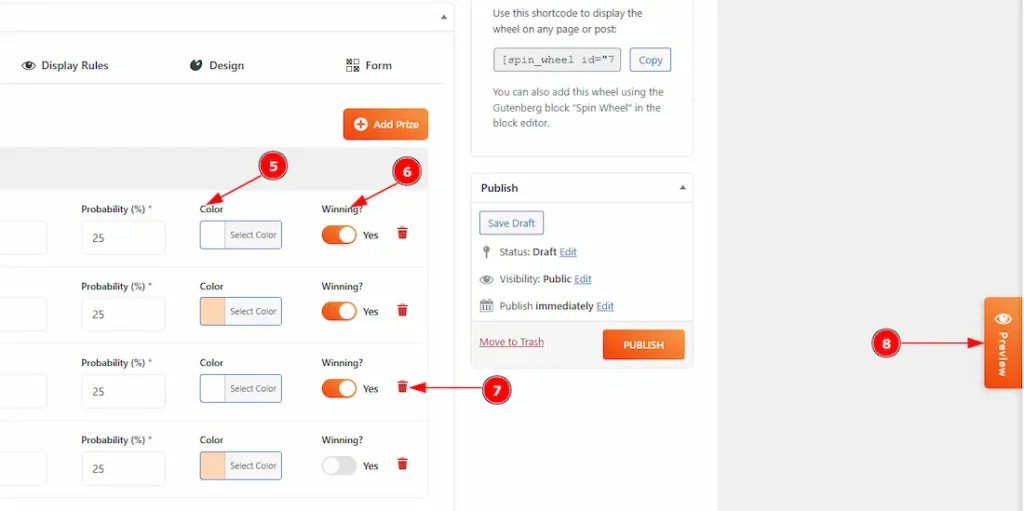
5. Color: You can make changes to the colors with this option.
6. Winning: Enable or disable the switcher to get the prize’s chance of winning or not winning with this option.
7. Delete: You can easily delete the prize configuration by clicking on this bin icon.
8. Preview: You can preview the changes you made to the spin wheel with this option.
When you select the Prize Representations as Image Only & Both Image & Label in the General Settings

1. Add Prize: You can add more prize fields on the spin wheel with this option.
2. Prize Label: You can make changes to the prize labels with this option.
- For Image Only: The prize label won’t be visible to the spin. Only the images will be visible.
- For Both Image & Label: Both image and label will be visible to the spin.
3. Coupon Code: You can customize the coupon code with this option.
4. Prize Image: You can add images with this option.

5. Probability: You can adjust the percentage of the winning ratio of the prizes with this option. (Note: Total probability should equal 100%. Higher percentages mean better chances of winning that prize.)
6. Color: You can make changes to the wheels’ colors with this option.
7. Winning: Enable or disable the switcher to get the prize’s chance of winning or not winning with this option.
8. Delete: You can easily delete the prize configuration by clicking on this bin icon.
Preview (When you select the Prize Representations as Image Only on General Settings)
Preview (When you select the Prize Representations as Both Image & Label on General Settings)
Display Rules Tab
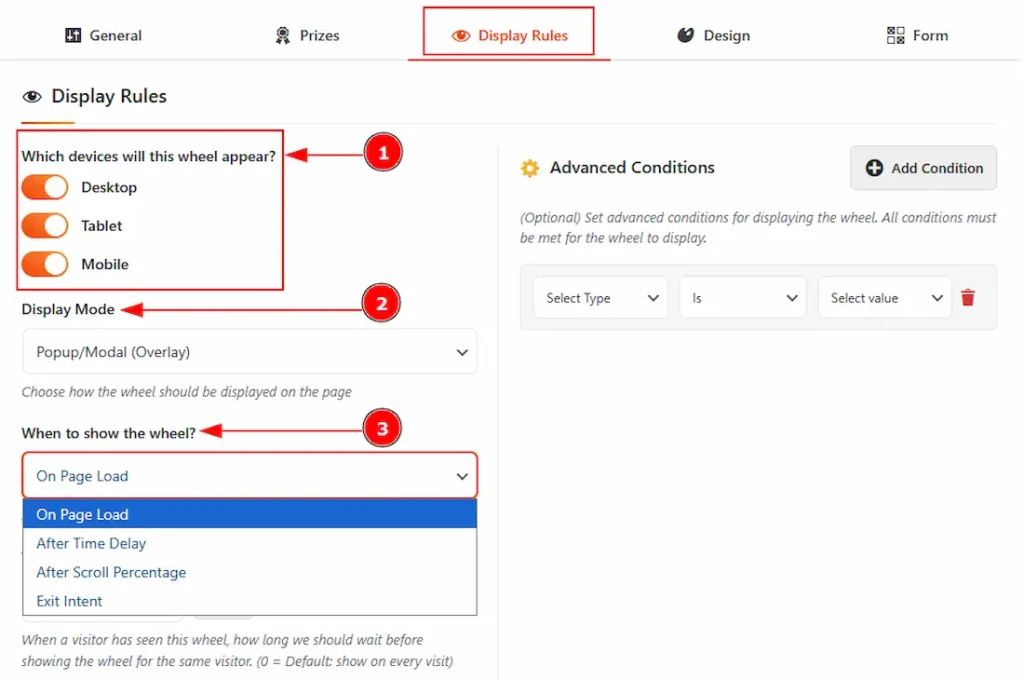
1. Enable the switcher to select the devices where you want to make the spin wheel visible.
2. You can choose how you want to display the spin wheel with this option.
3. You can select when you want to show the wheel to the audience. These are some ways to display the wheels. These are On Page Load, After Time Delay, After Scroll Percentage & Exit Intent.
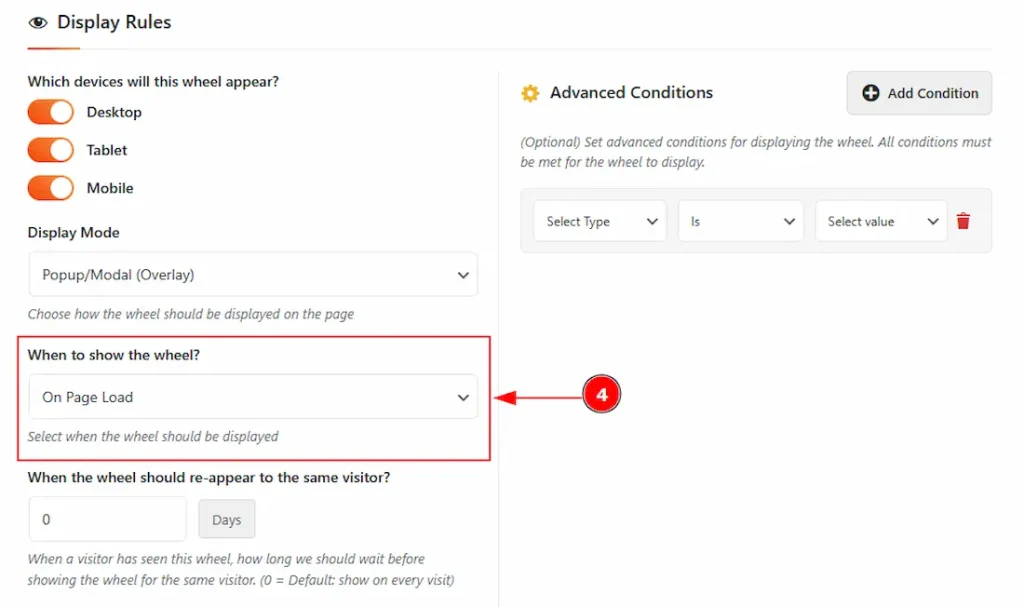
4. On Page Load: By selecting the on page load, the wheel will be visible at the same time when the page loads.
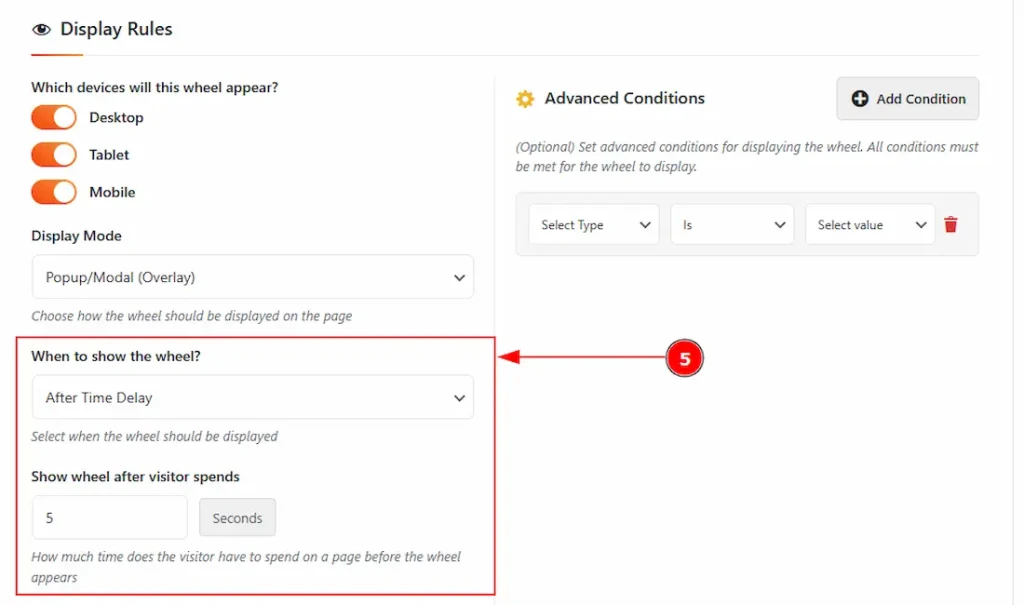
5. After Time Delay: By selecting the After Time Delay, the wheel will be visible after the selected time.
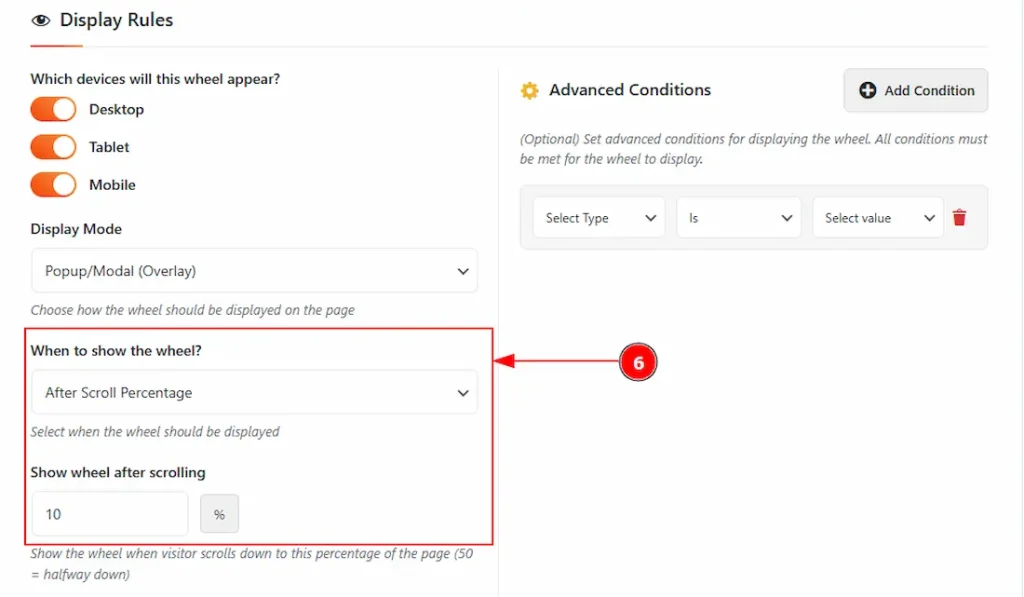
6. After Scroll Percentage: By selecting this option, the wheel will be displayed after crossing the limit of the selected scrolling percentage.
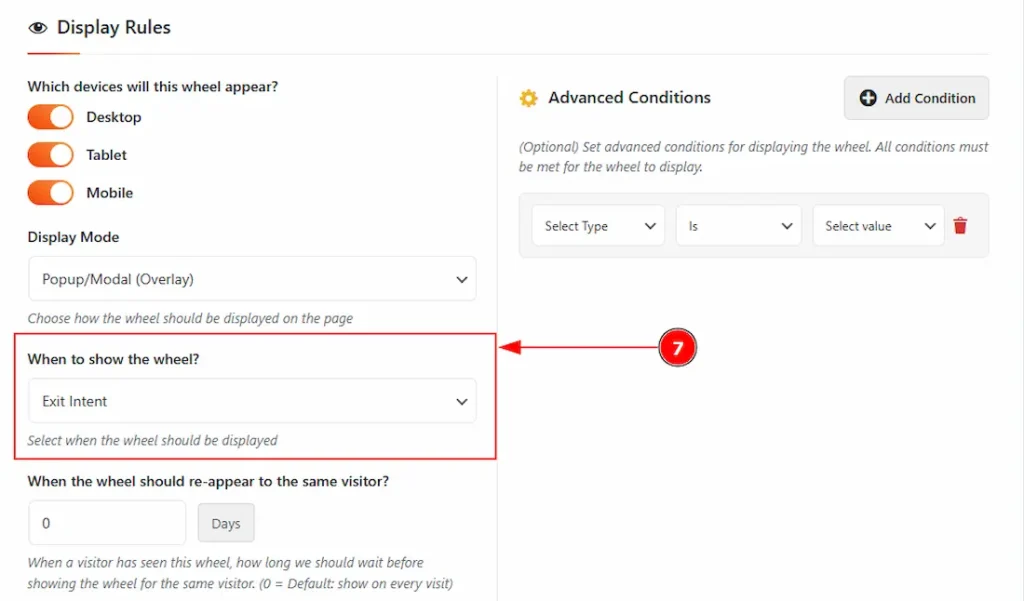
7. Exit Intent: By selecting this option, the wheel will be displayed when a user tries to close the tab by hovering over the URL field.
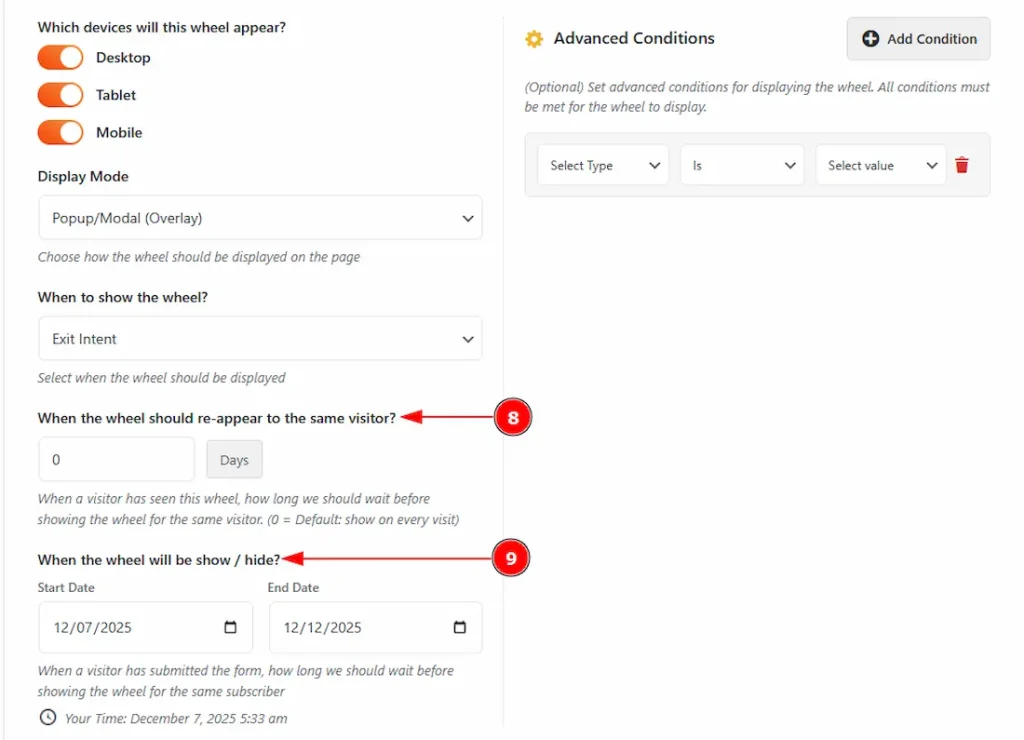
8. You can set the days to reappear for a visitor who has seen the wheel once, and after that, how much time you want to wait to show the wheel to the same visitor. (Please note that 0 is the default value, and it means to show on every visit.)
9. You can adjust the wheel starting and ending time with this option.
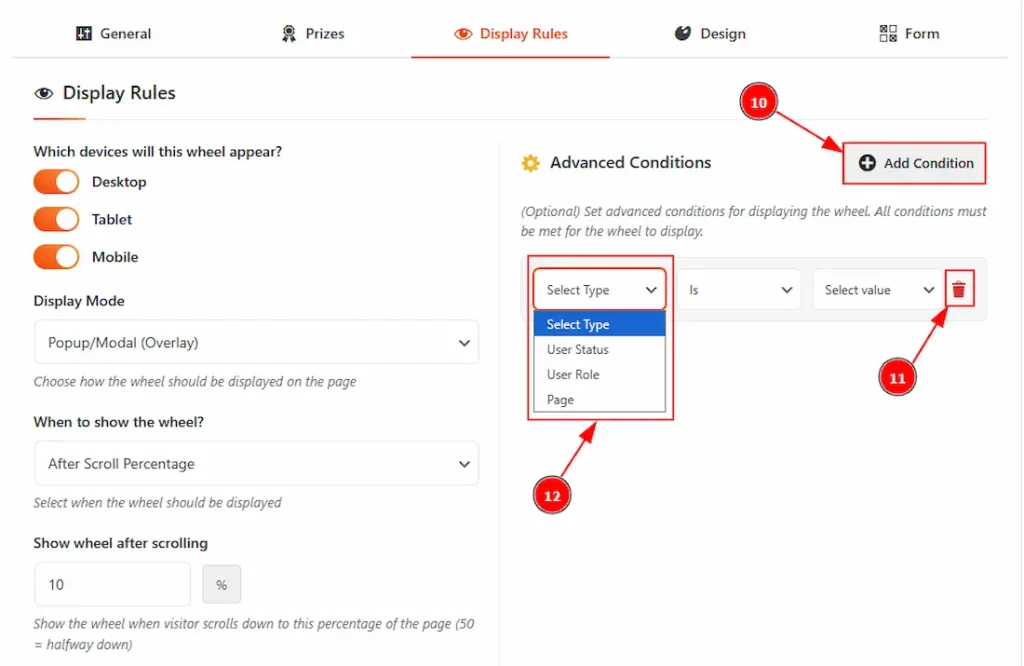
10. You can add more conditions by using this option.
11. You can remove conditions by using this option.
12. There are some types to apply the advanced conditions. These are User Status, User Role & Page. Let’s start to describe the types and values one by one.
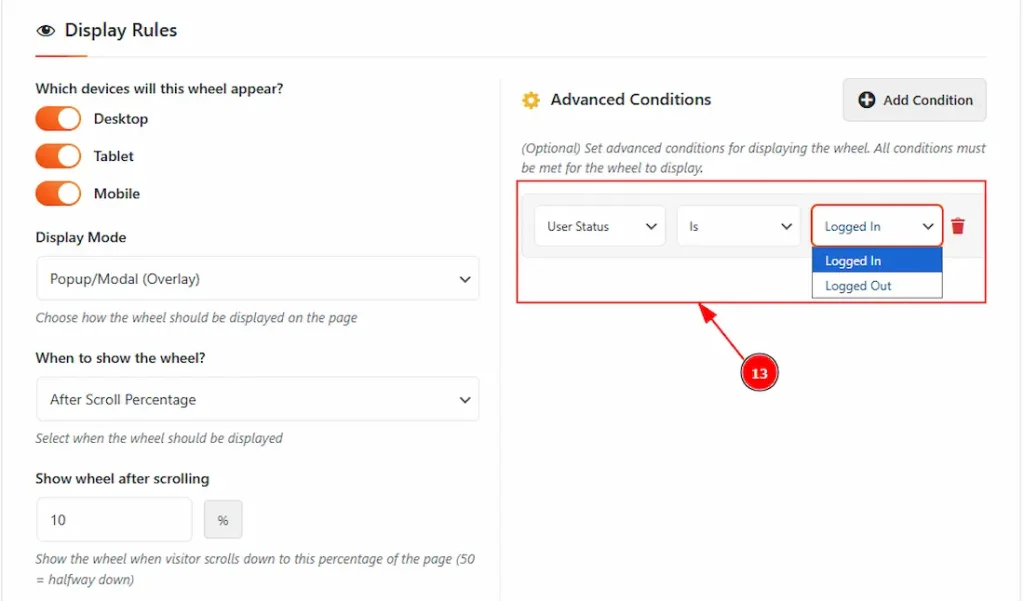
13. When you set the advanced condition type to User Status, you’ll see two value options: Logged In and Logged Out. Choose either one to control where the output should appear, or use “is not” if you want to hide it for that specific status.
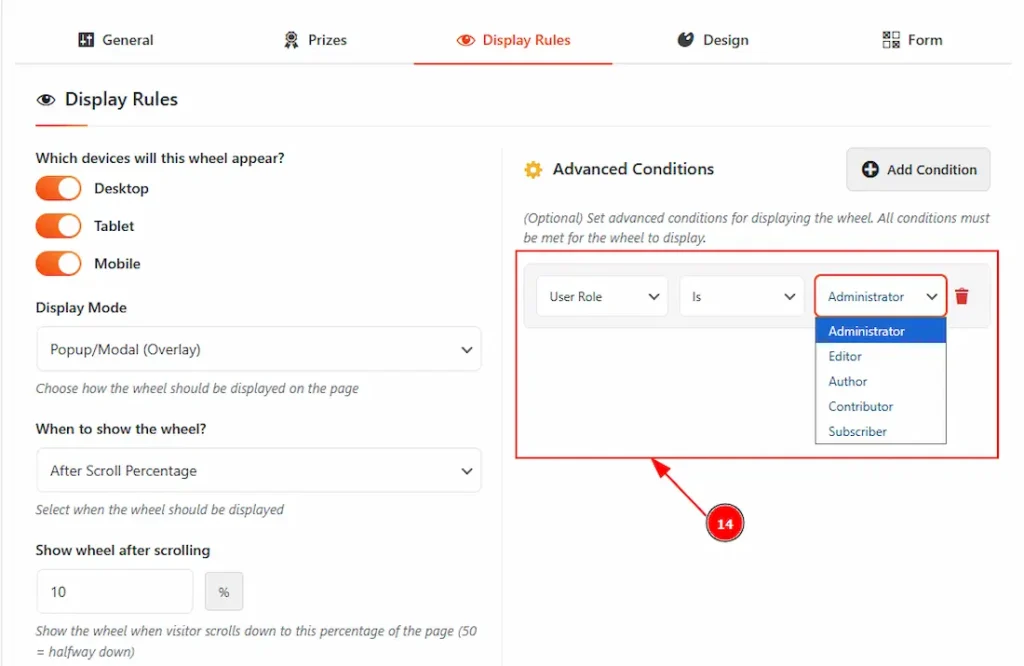
14. When you choose User Role as the type, you’ll see options like Administrator, Editor, Author, Contributor, and Subscriber. Simply select the roles where you want the wheel to appear, or choose “is not” if you want to hide it from certain roles.
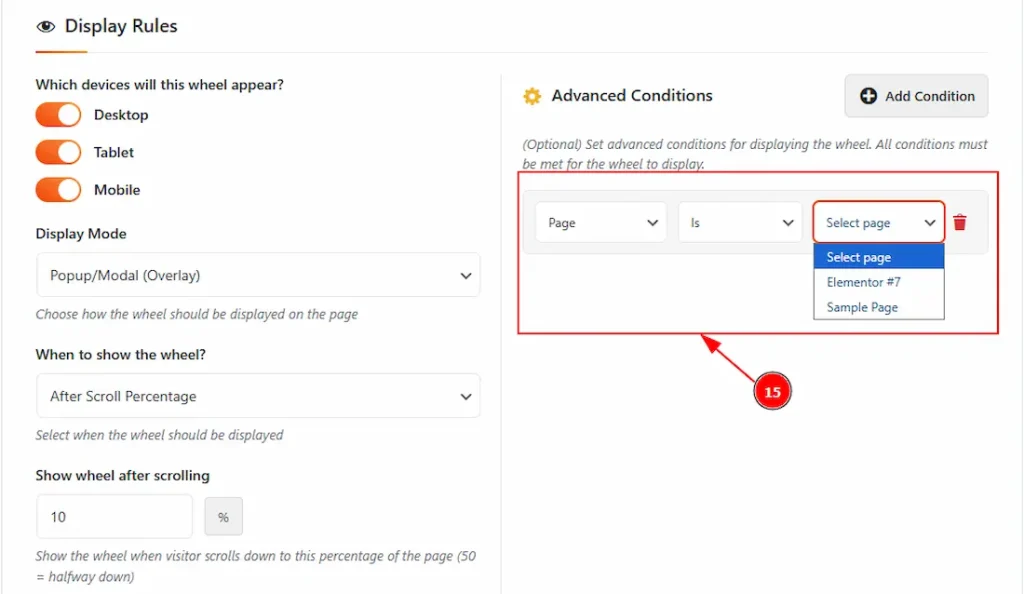
15. When you select Page as the type, you’ll see a list of your page names. Choose the pages where you want the wheel to appear, or use “is not” to exclude specific pages where you don’t want the wheel to show.
Design Tab
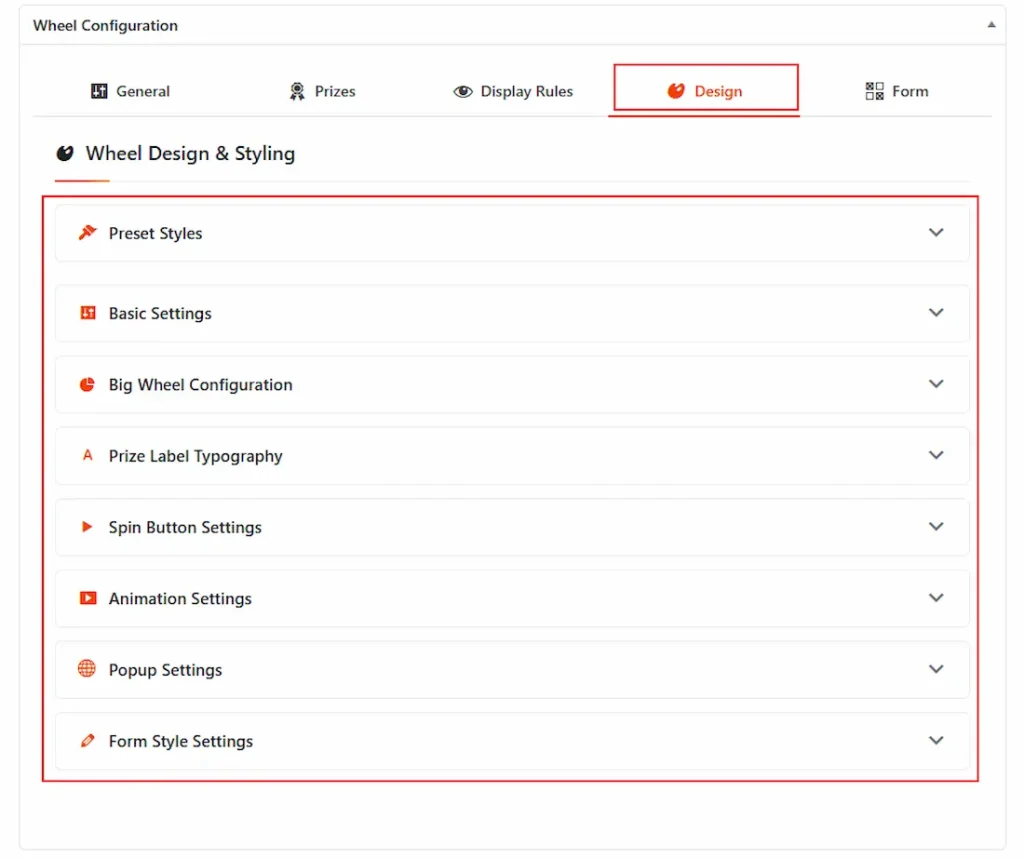
In this tab, you will get the options to customize the wheel’s design & styling. Let’s start to describe the options one by one.
Preset Styles
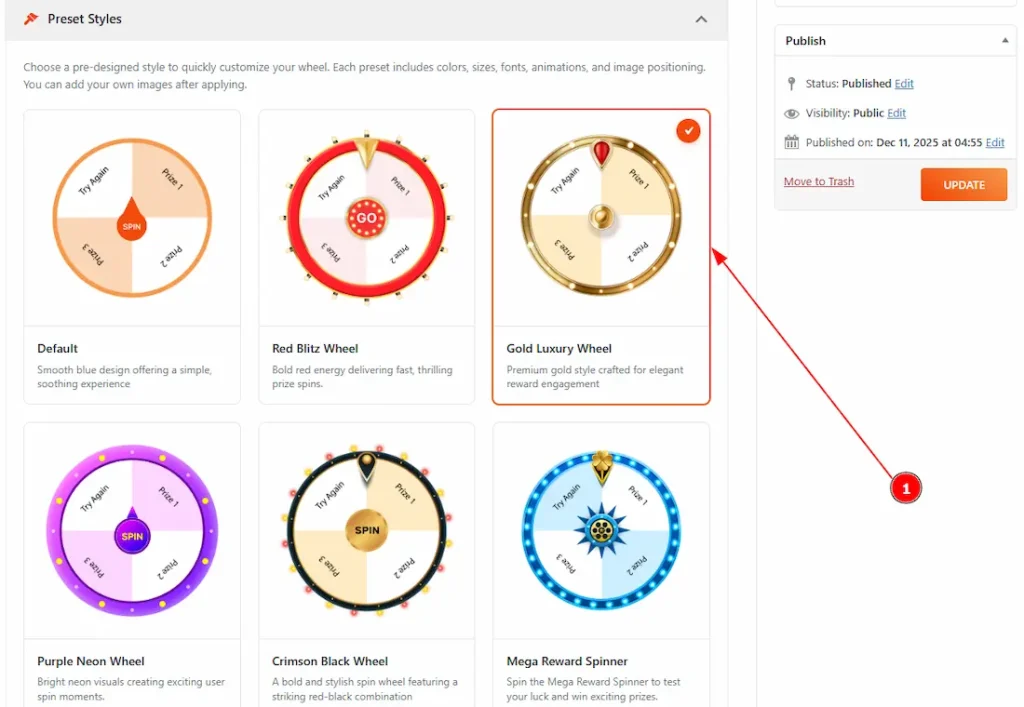
1. You can set the wheel’s preset style with this option. You can choose any of the styles to make your wheel design same like that.
Preview:
Basic Settings
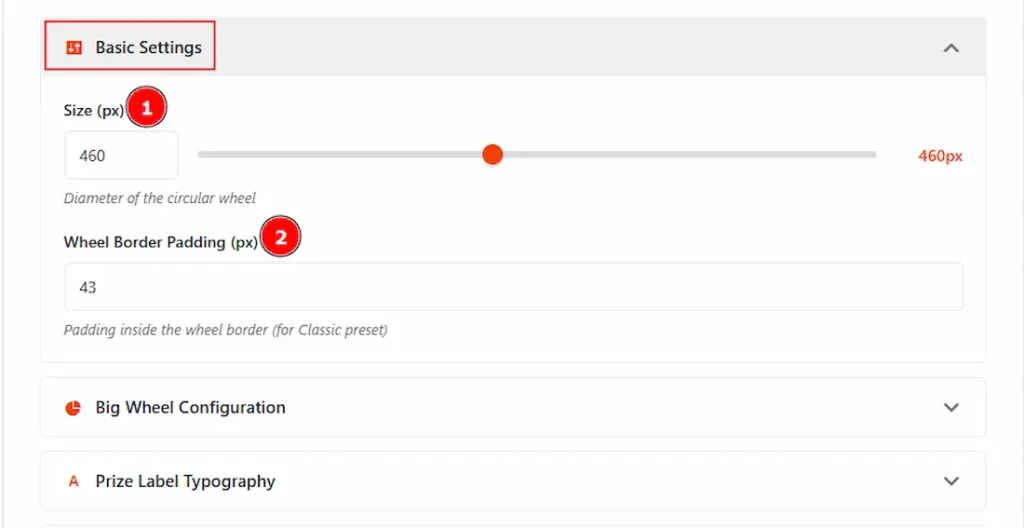
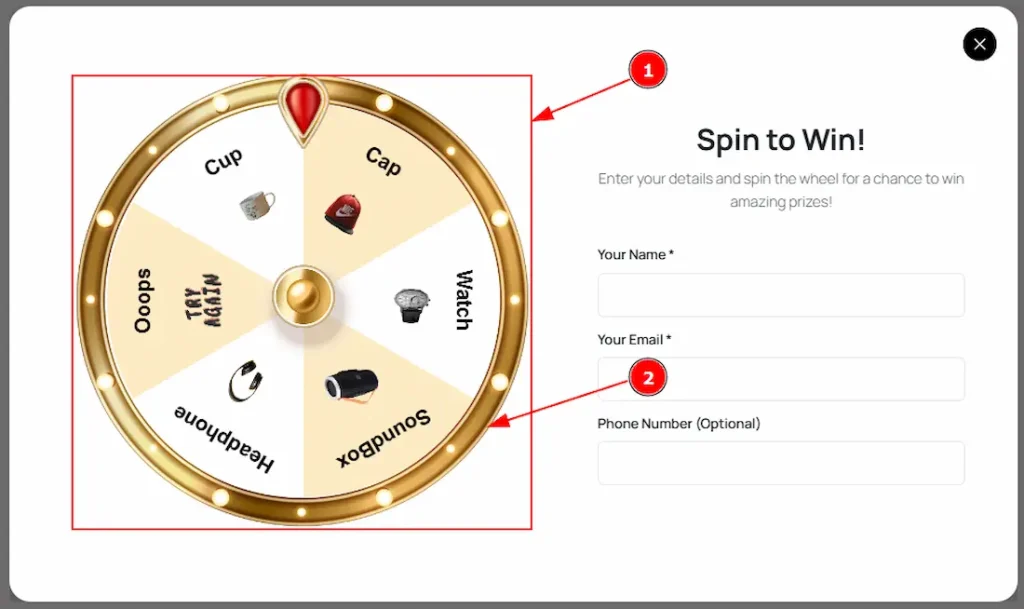
1. Size (px): You can make changes to the wheel size with this option.
2. Wheel Border Padding: You can adjust the inner space around the wheel content with this option.
Preview:
Big Wheel Configuration
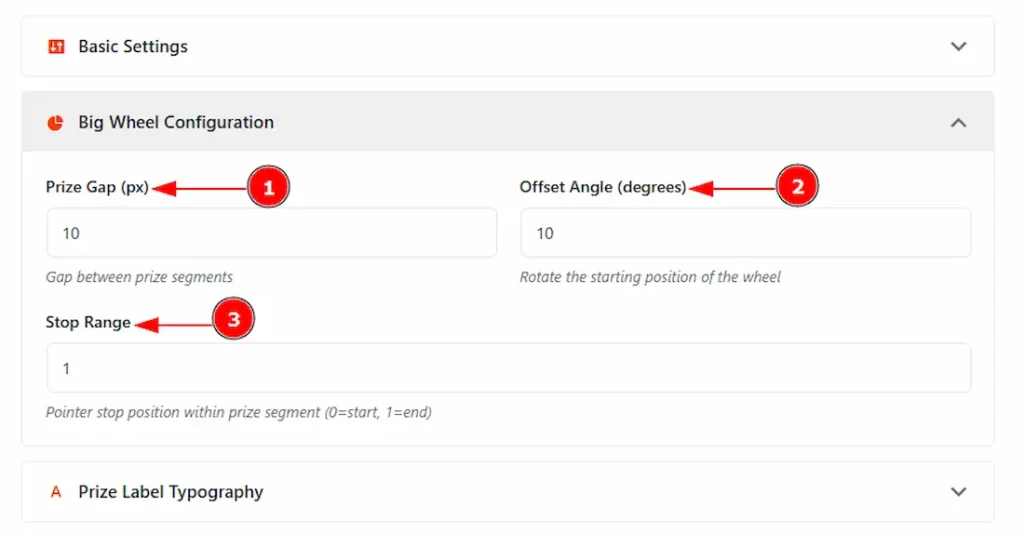
1. Prize Gap (px): You can make changes to the gaps between the prize segments with this option.
2. Offset Angle (degrees): You can rotate the spin wheel’s starting position with this option.
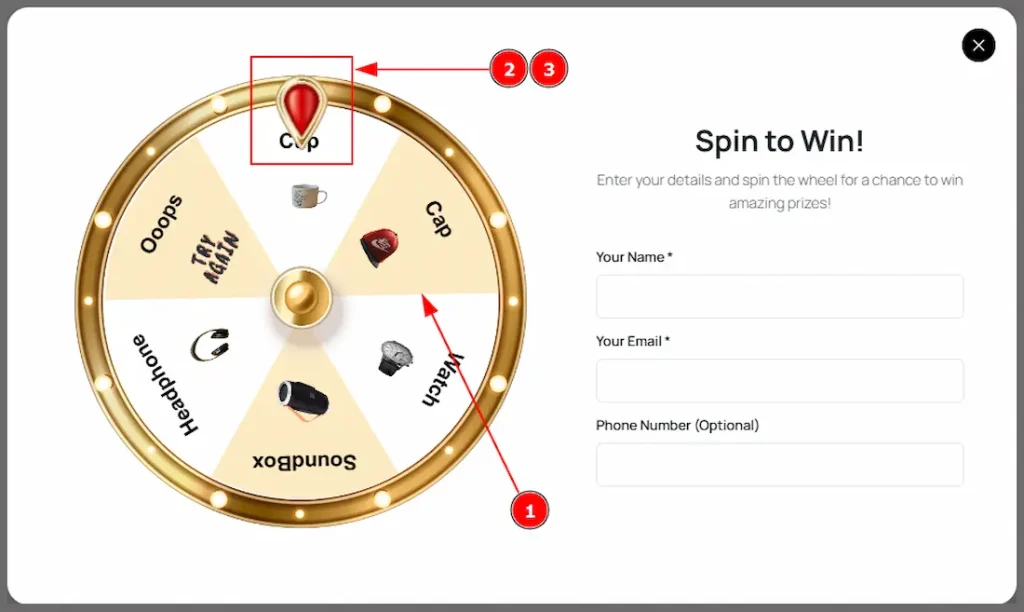
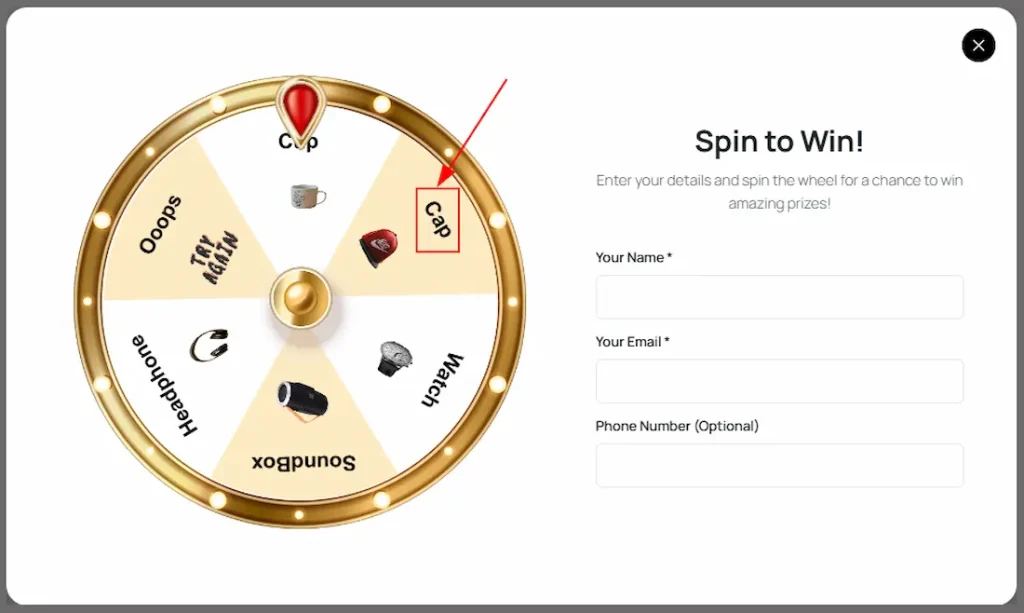
3. Stop Range: You can see the pointer stop position within the price segment with this option. Please note that value 0 = start & 1 = end.
Preview
Prize Label Typography
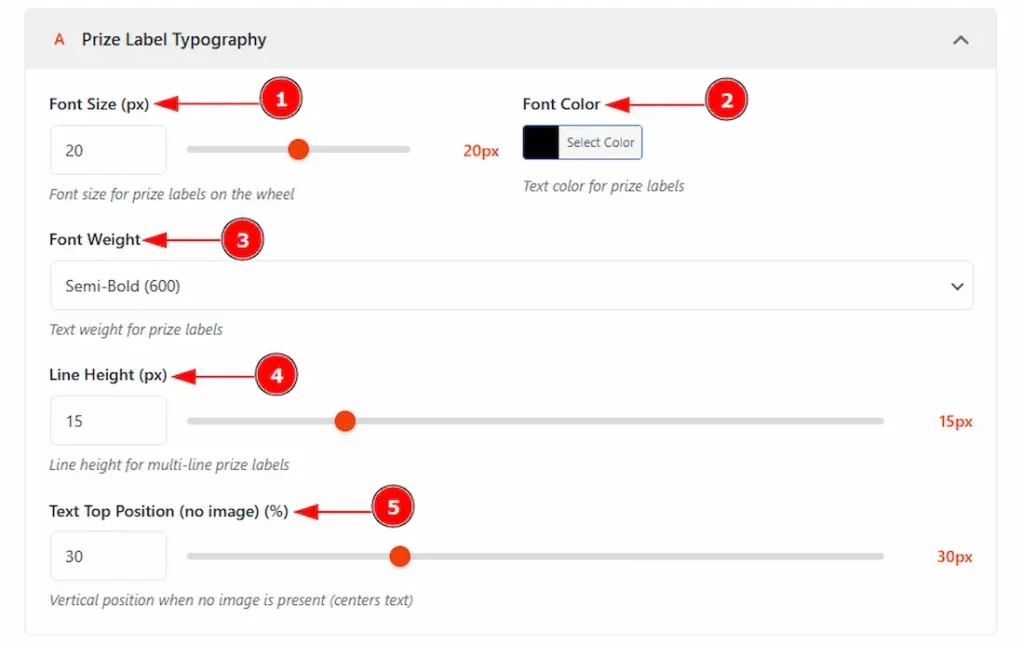
1. Font Size (px): You can make changes to the font size of the prize label on the wheel with this option.
2. Font Color: You can change the font color with this option.
3. Font Weight: You can make changes to the text weight with this option.
4. Line Height: You can make changes to the line height for the multi-line prize label with this option.
5. Text Top positions (no image)(%): You can change the text’s vertical position when no image is present with this option.
Preview:
All changes will be applied to the font.
Prize Image Settings
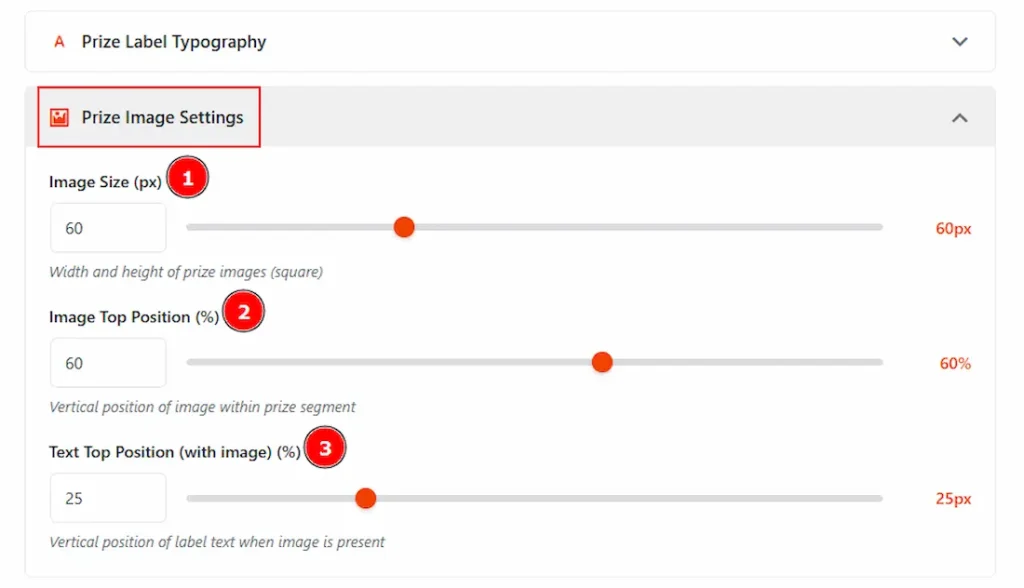
1. Image Size (px): You can make changes to the image size with this option.
2. Image Top Position (%): You can make changes to the image position with this option.
3. Text Top Position (with image) (%): You can adjust the spacing of the text with this option.
Preview:
Animation Settings

1. Speed Peak: You can set the maximum rotation/animation speed with this option.
2. Acceleration Time (ms): This option allows you to set the amount of time the wheel takes to reach full spinning speed after the spin starts.
3. Deceleration Time (ms): This option allows you to set the amount of time the wheel takes to slow down its spinning speed before stopping.
1. Button Text: You can make changes to the button text with this option.
2. Button Font Size (px): You can set the button font size with this option.
3. Button Text Top spacing: You can adjust the spacing of the button text with this option.
4. Button Size: You can adjust the size of the button with this option.
5. Show Pointer: Enable or disable the switcher to show or hide the spin pointer with this option.
6. Button Background: You can change the button’s background color with this option.
7. Button Text Color: You can change the button’s text color with this option.
Popup Settings
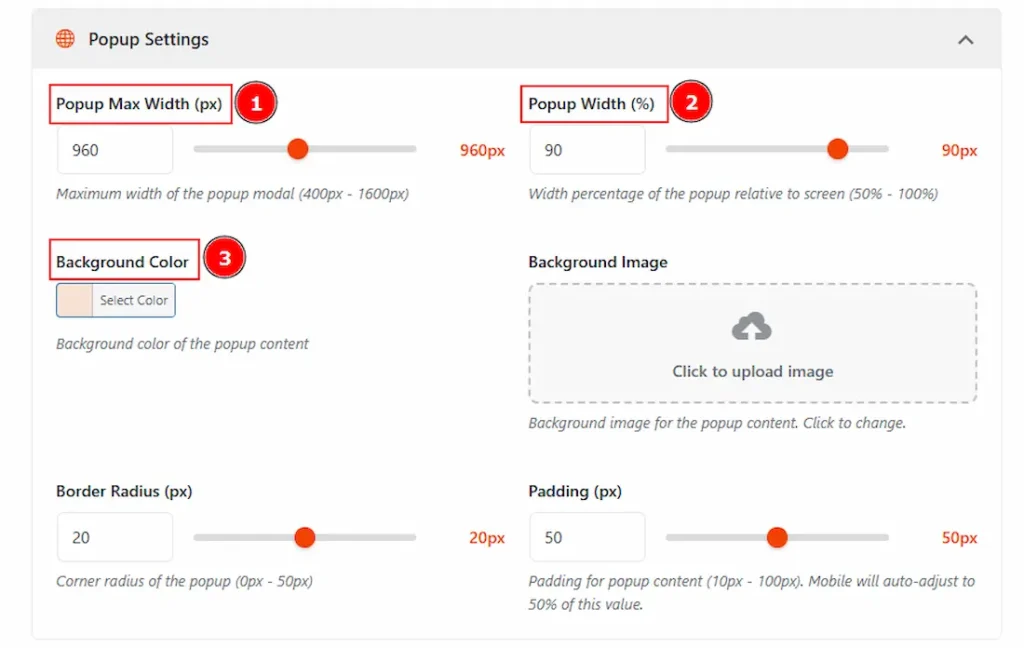
1. Popup Max Width (px): You can adjust the popup modal width with this option.
2. Popup Width (%): You can set the percentage of the popup width relative to the screen with this option.
3. Background Color: You can make changes to the background color with this option.
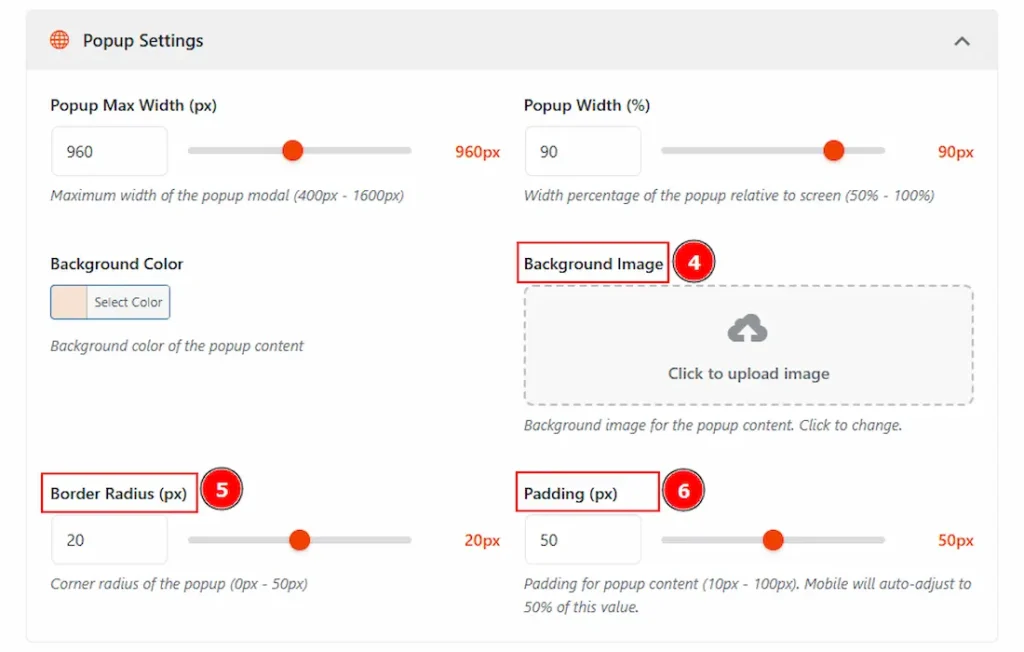
4. Background Image: You can add or change the background image with this option.
5. Border Radius: This option controls the roundness of the border.
6. Padding: You can adjust the inner space of the popup content with this option.
Preview:

Form Style Settings
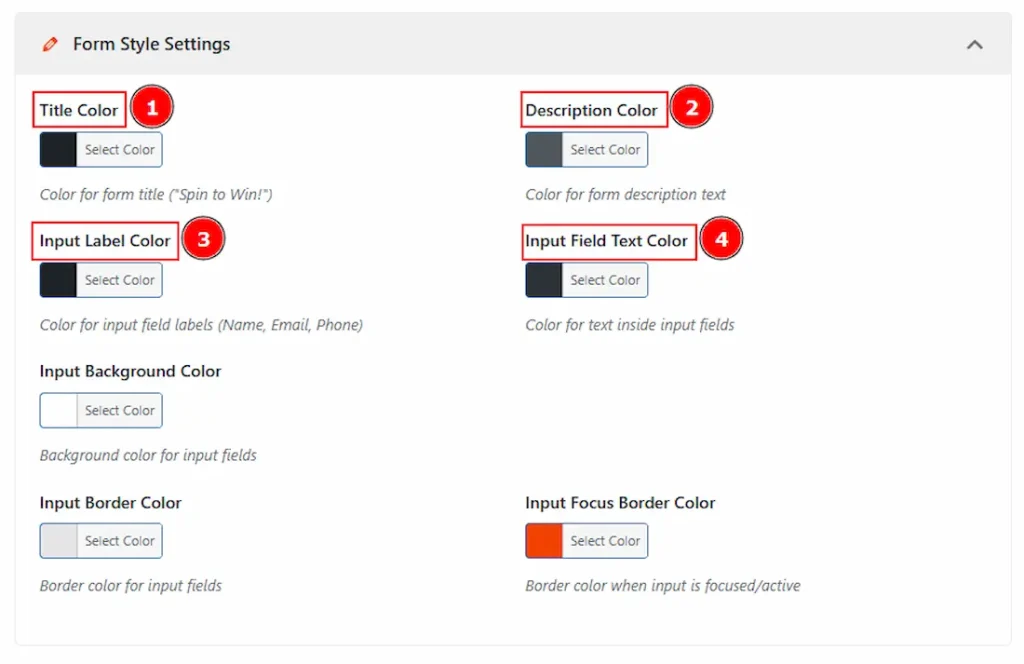
1. Title Color: You can change the title color with this option.
2. Description Color: You can change the description text color with this option.
3. Input Label Color: You can change the input label text color with this option.
4. Input Field Text Color: You can change the input field text color with this option.
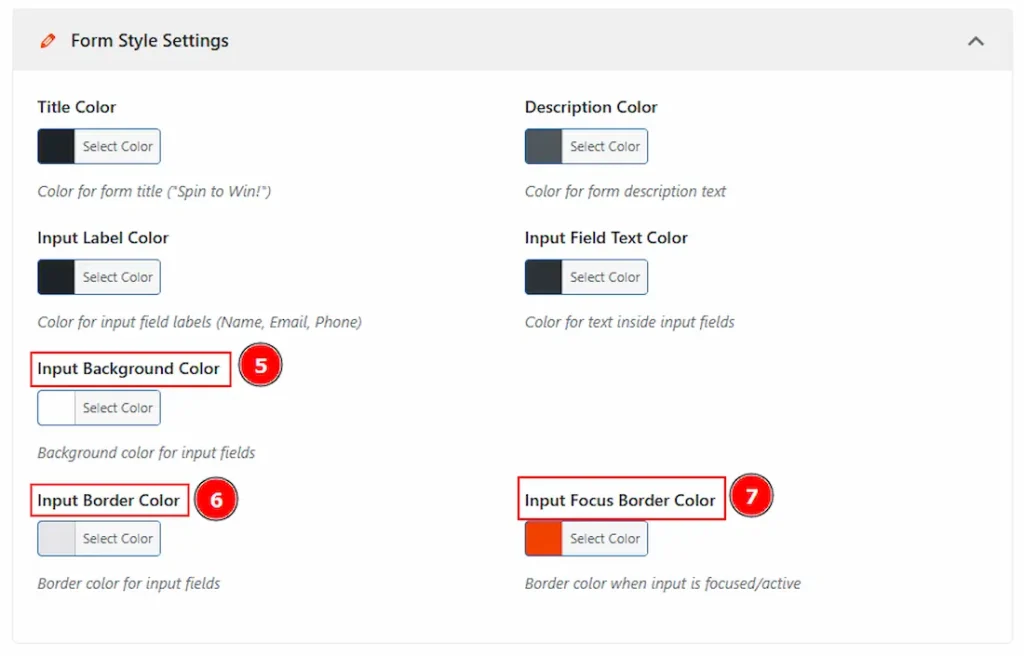
5. Input Background Color: You can change the input background color with this option.
6. Input Border Color: You can change the input border color with this option.
7. Input Focus Border Color: You can change the input focus border color with this option.
Preview:
Form Tab

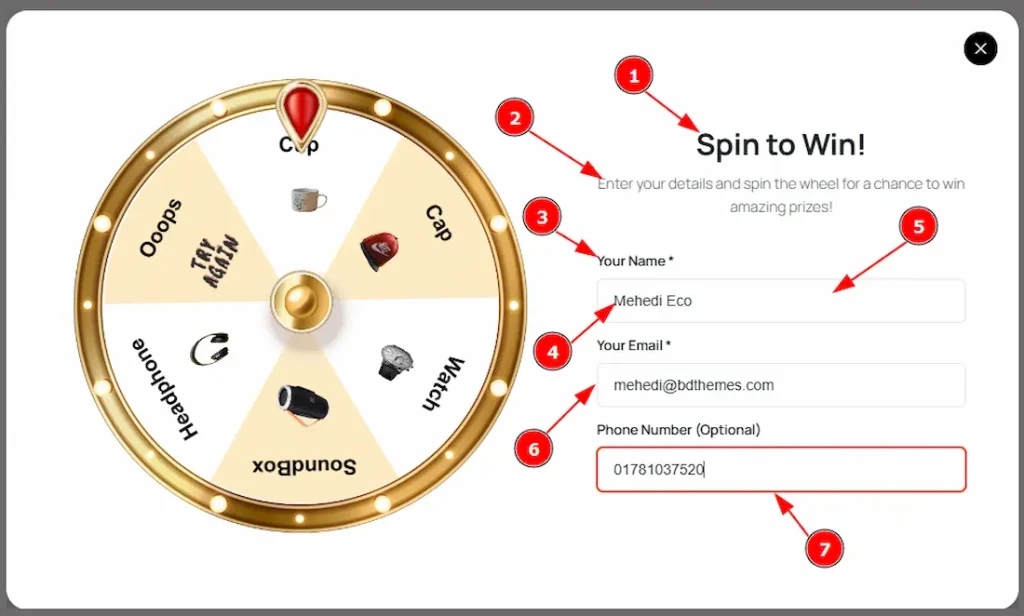
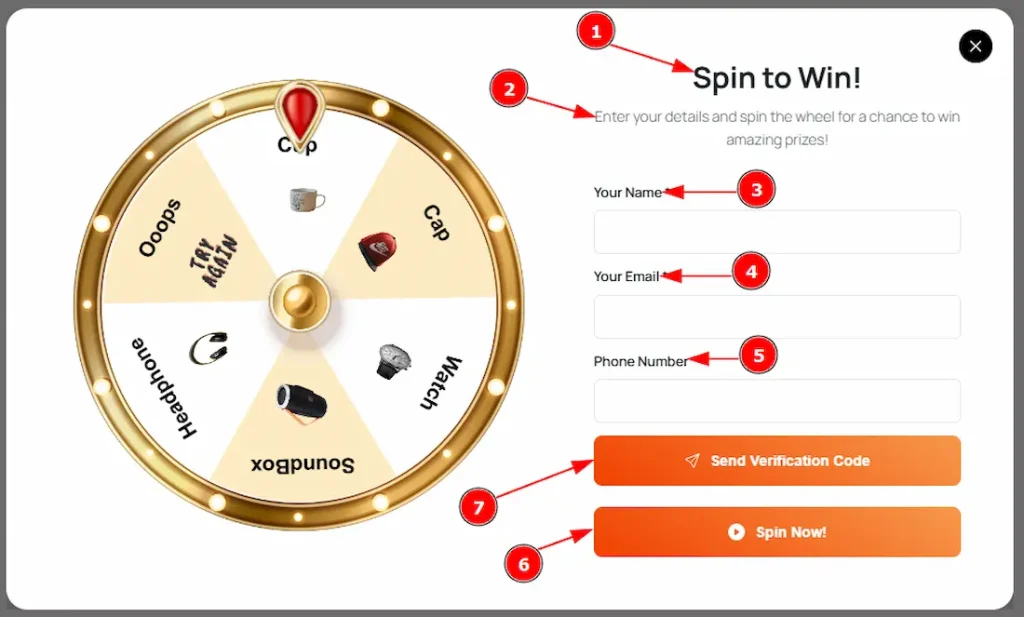
1. Form Title: You can make changes to the form title’s text with this option.
2. Form Description: You can make changes to the description’s text with this option.
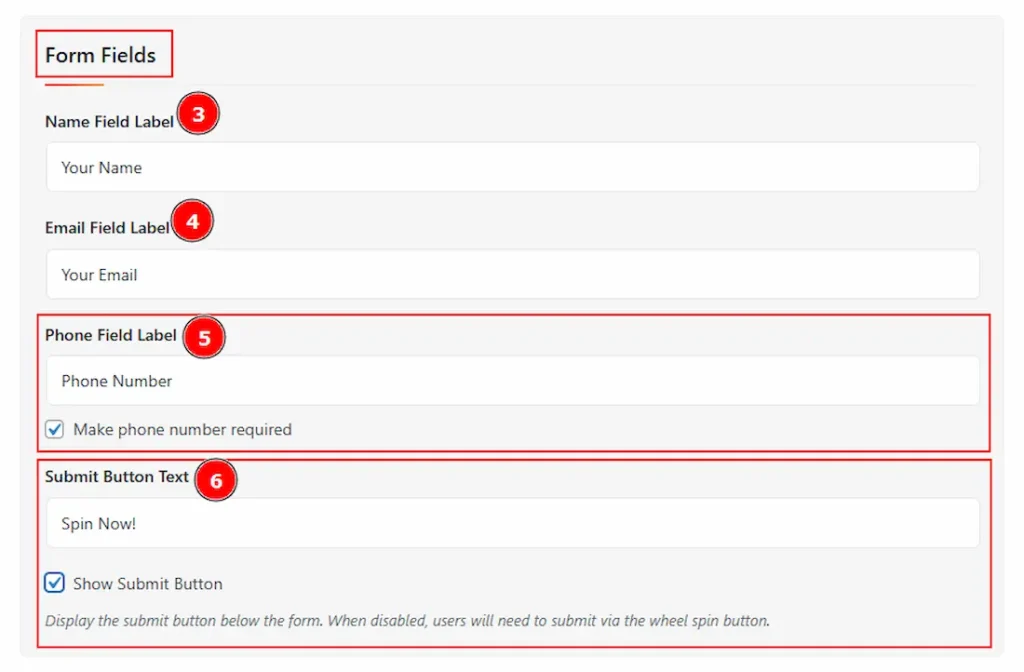
3. Name Field Label: You can make changes to the name field label text with this option.
4. Email Field Label: You can make changes to the email field label text with this option.
5. Phone Field Label: You can make changes to the phone field label text with this option.
(Note: Enable the phone field label to make the phone field label required to fill up for the users.)
6. Submit Button Text: You can make changes to the submit button text with this option. (Note: Enable the show submit button to make the button visible.)

7. OTP Verification: Enable the OTP Verification to be set as required for users to verify their email with a one-time password before spinning.
8. Result Popup Settings: By enabling this option, you can display the participant’s name, email, and phone in the congratulations popup.
Preview 01:
Preview 02:
Entries Section
Go to WP Dashboard > Spin Wheel > Entries
When you select the Wheel Mode as Instant Win (Prize Given Immediately)
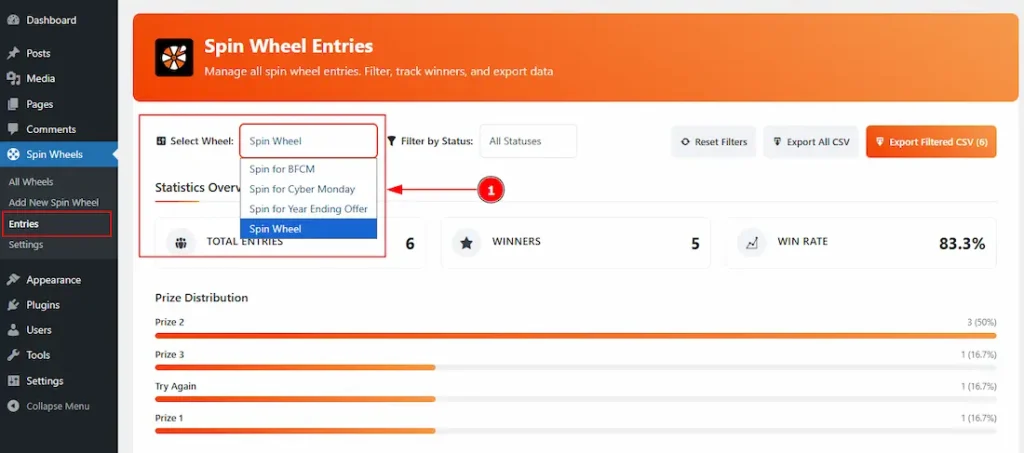
1. Select Wheel: You can select the wheel from which you want to get the data of entries.
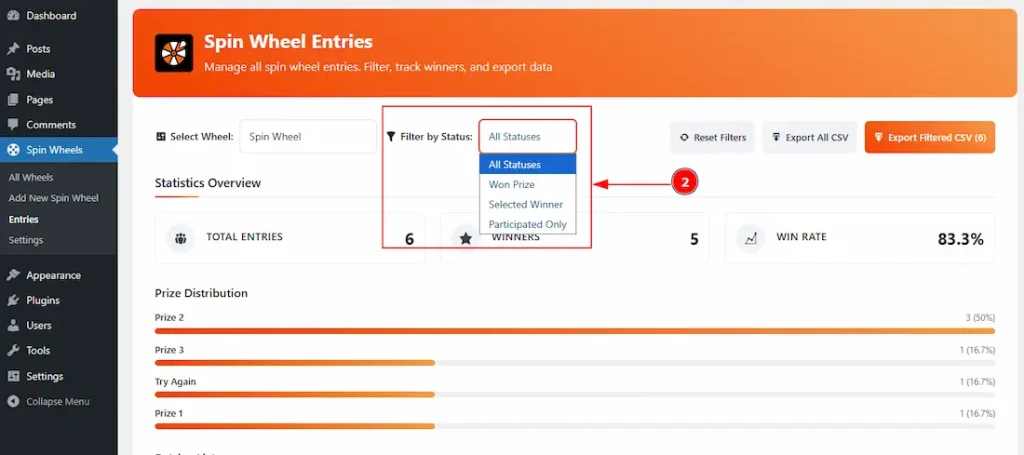
2. Filter by Status: You can change the status to show the entries as per all statuses, won prize, selected winner & participated only.
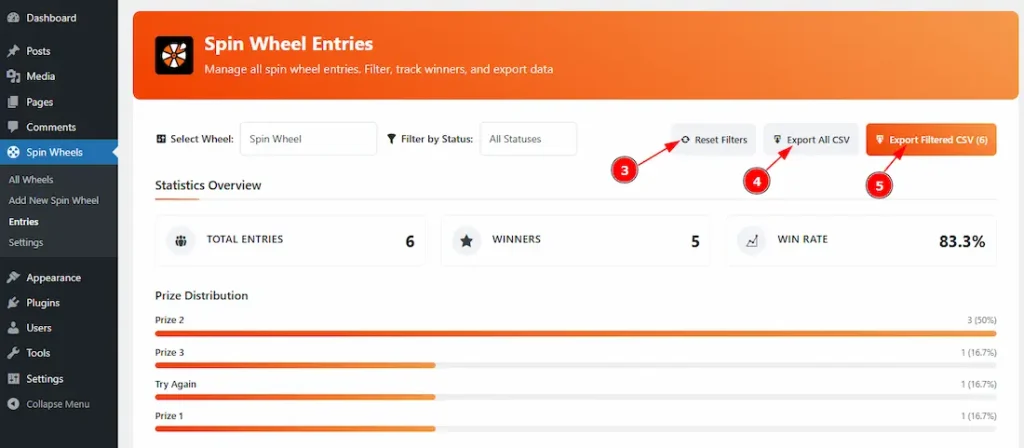
3. Reset Filters: You can reset all options of the filters by using this option.
4. Export All CSV: You can export all the wheel’s participants’ data with this option.
5. Export Filtered CSV: By clicking on this button, you can download the filtered participant entries of the campaign with this option.

6. Statistics Overview: In this option, you will be able to see the overview of the total entries, winners, and win rate.
7. Prize Distribution: Here, you can see the wheel-spinning result of the distribution.
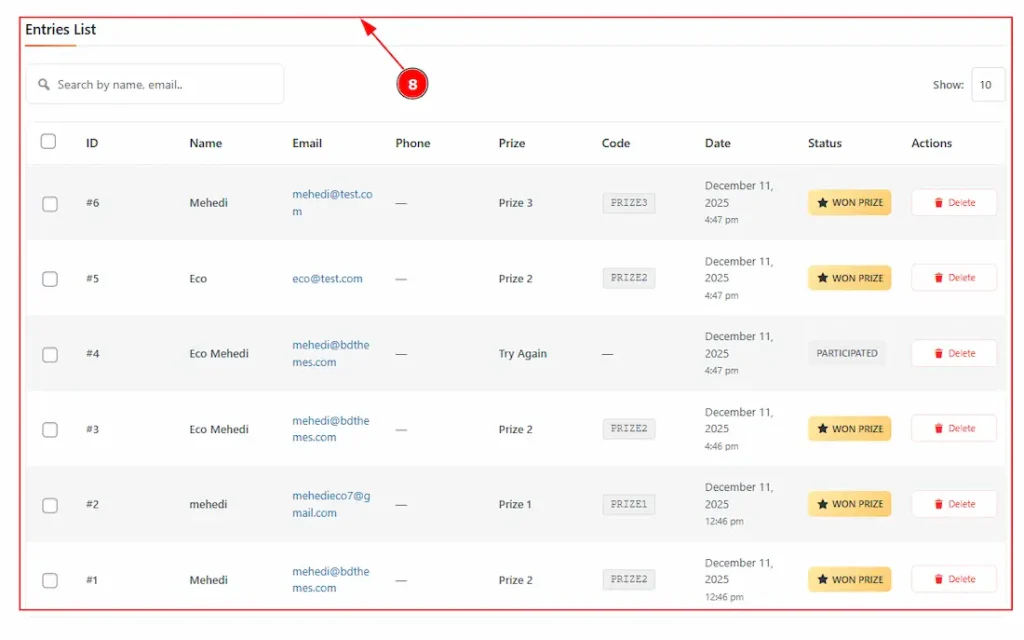
8. Entries List: You can see all the entries of the participants here, along with their ID, Name, Email, Phone, Prize, Code, Date, Status, and actions.
When you select the Wheel Mode as Event Mode (Admin Selects Winners)
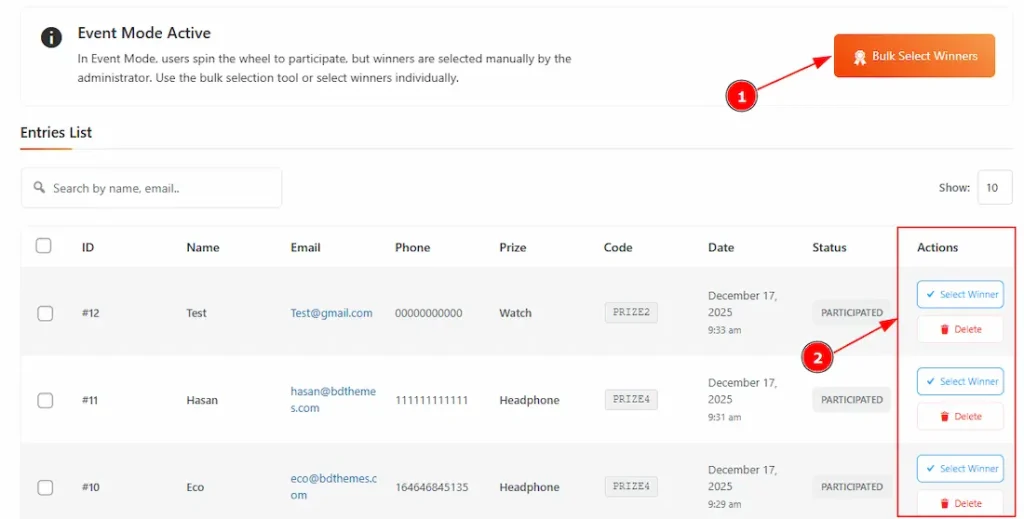
In event mode, users spin the wheel to participate, but winners are selected manually by the administrator. There are two types of selection methods available to select the winners. These are the Bulk Select Winners & The Individual Selection.
1. Bulk Selected Winners: It allows you to select multiple winners at the same time instead of choosing them one by one.
2. The Individual Selection: By this option, you will be able to select the winners manually one by one. By clicking on select winner, you can select the winner, and by clicking on delete, you can delete the entry.

When you select the winner selection method as Bulk Select Winners, you will get to see a pop-up with more options to configure the settings to select the winners. Let’s explore those options –
1. Selection Method: You can choose how you want to select winners from all eligible entries with this option. There are some options to select. These are –
- Random Selection – picks winners randomly.
- First Entries – selects users who joined first.
- Last Entries – selects users who joined last.
- Highest Prize Value First – prioritizes entries linked to higher-value prizes.
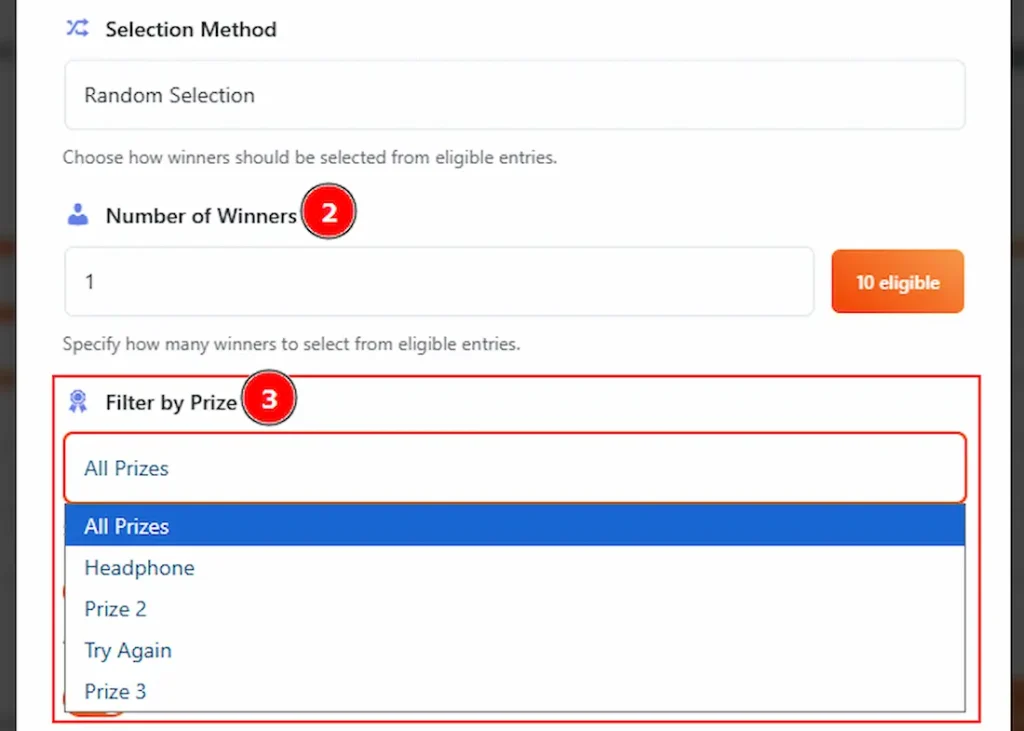
2. Number of Winners: You can set how many winners you want to select at once from the eligible entries.
3. Filter by Prize: You can choose whether winners should be selected from all prizes on the wheel or only from a specific prize category.
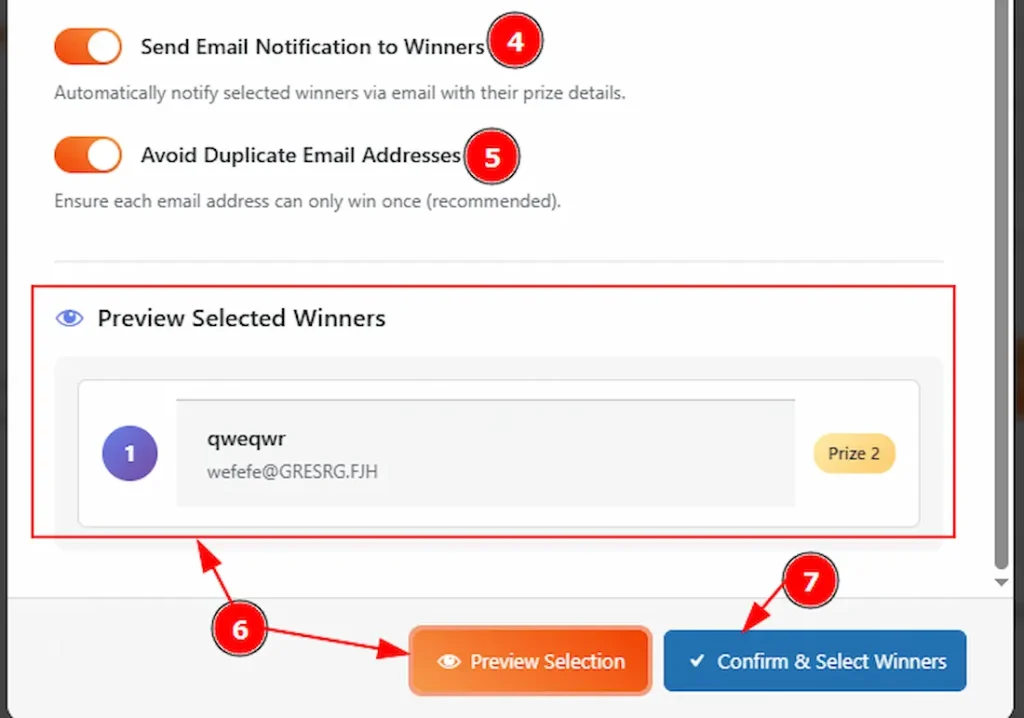
4. Send Email Notification to Winners: Enable the switcher to automatically notify selected winners via email with their prize details.
5. Avoid Duplicate Email Addresses: Enable the switcher to ensure each email address can only win once.
6. Preview Selection: This button lets you preview the selected winners (name, email, prize) before confirming. No winners are finalized at this step.
7. Confirm & Select Winners: This button finalizes and saves the winners. Once clicked, the selection is completed, and emails are sent if notifications are enabled.
Settings Section
Go to WP Dashboard > Spin Wheel > Settings
General Tab
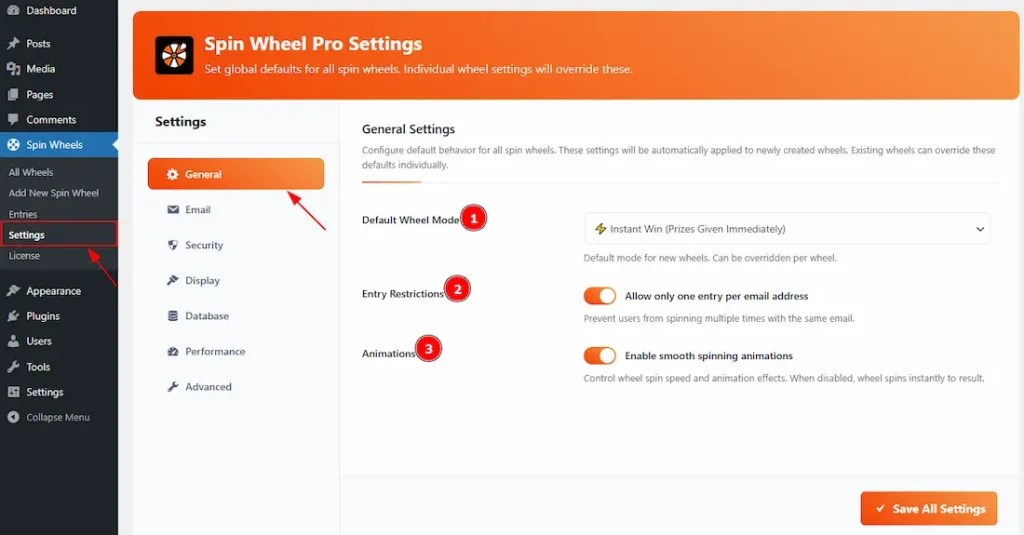
1. Default Wheel Mode: You can set the wheel mode to Instant Win (Prize Given Immediately) or Event Mode (Admin Selects Winner) with this option.
2. Entry Restriction: Enable the switcher to prevent the user from spinning multiple times with the same email.
3. Animations: Enable the switcher to control wheel spin speed and animation effects. Please remember that when the option is disabled, the wheel spins instantly to result without any animation.
Email Tab

1. Admin Notification: Enable the switcher to get notified when a user spins the wheel and wins.
2. Admin Email Address: You can make changes to the admin email address to receive admin notifications with this option.
3. From Name: You can make changes to the name that will be shown as the sender in the winner’s email.
4. From Email Address: You can make changes to the email address that will be shown as the sender in the winner’s email.
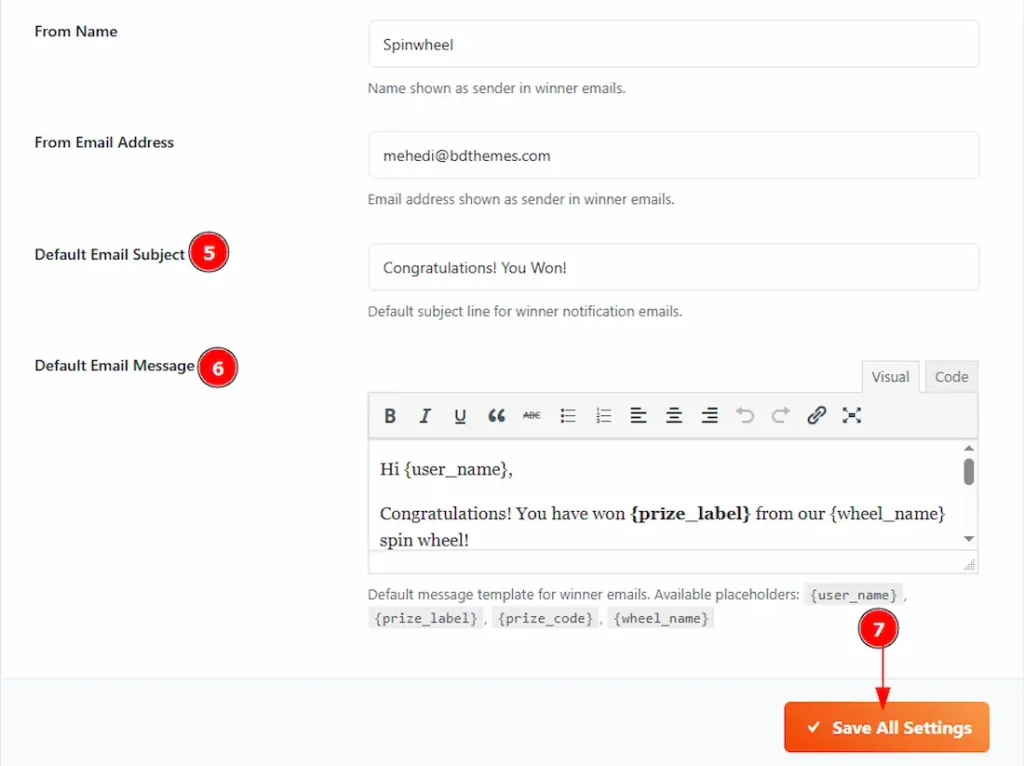
5. Default Email Subject: You can set a default email subject that will show on every email you send to the winner with this option.
6. Default Email Message: You can create a single email message that will be sent automatically to every winner. By using dynamic placeholders like {user_name} and {prize_code}, each recipient will receive a personalized email showing exactly what prize they won. No need to send emails individually.
7. Save All Settings: Make sure to click the Save All Settings button after making any changes.
Security Tab
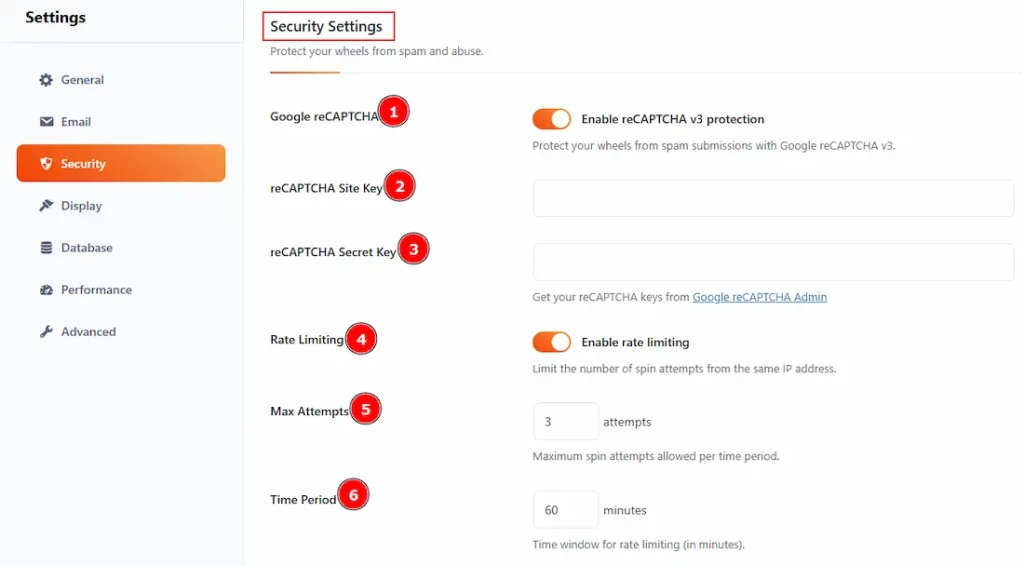
1. Google reCAPTCHA: Enable the switcher to protect your wheels from spam & bot submission with Google reCAPTCHA v3.
2. reCAPTCHA Site Key: Enter your Google reCAPTCHA site key to connect reCAPTCHA with your website.
3. reCAPTCHA Secret Key: In this field, please add the secret key provided by Google to verify reCAPTCHA requests securely.
4. Rate Limiting: Enable the switcher to limit the number of spin attempts from the same IP address.
5. Max Attempts: You can set the maximum number of spin attempts allowed within the selected time period.
6. Time Period: This optiondefines the time window (in minutes) for counting the allowed spin attempts.

7. VPN/Proxy Blocking: Enable the switcher to block users who are accessing the site using VPNs or proxy connections.
8. Block Tor User: Enable the switcher to prevent users coming from the TOR network from spinning the wheel.
9. Block Datacenter IPs: Enable the switcher to block traffic coming from datacenters or hosting providers to reduce fake entries.
10. Block Known Abusers: Enable the switcher to automatically block IP addresses known for abusive or suspicious behavior.
11. Block on API Error: Enable the switcher to block users if the VPN detection API fails or returns an error, ensuring stricter security.
12. Save All Settings: After making changes to all the settings, click on this button to save the settings.
Display Tab
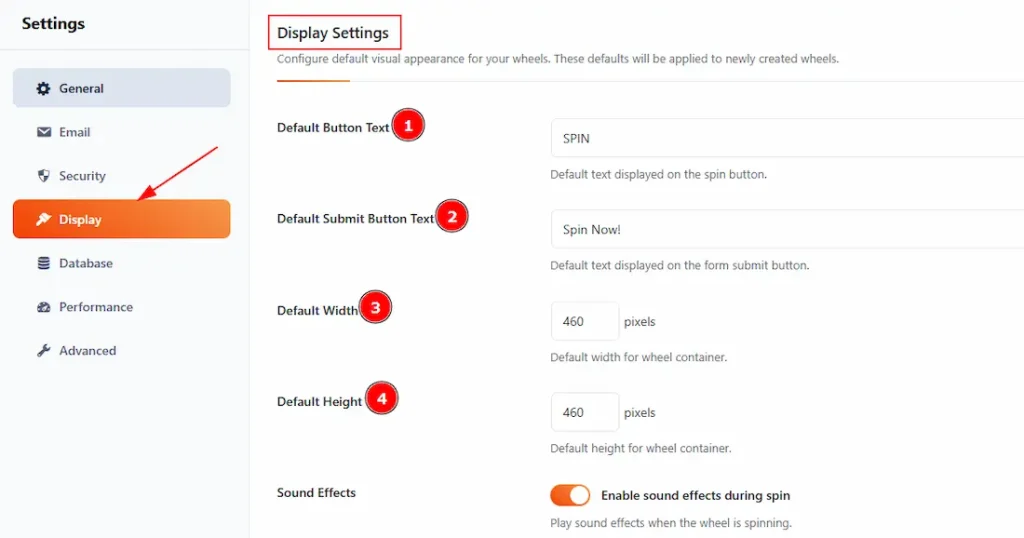
1. Default Button Text: You can make changes to the text displayed on the spin button on the wheel with this option.
2. Default Submit Button Text: You can make changes to the text displayed on the form submit button with this option.
3. Default Width: This option allows you to adjust the width of the wheel container.
4. Default Height: This option allows you to adjust the height of the wheel container.
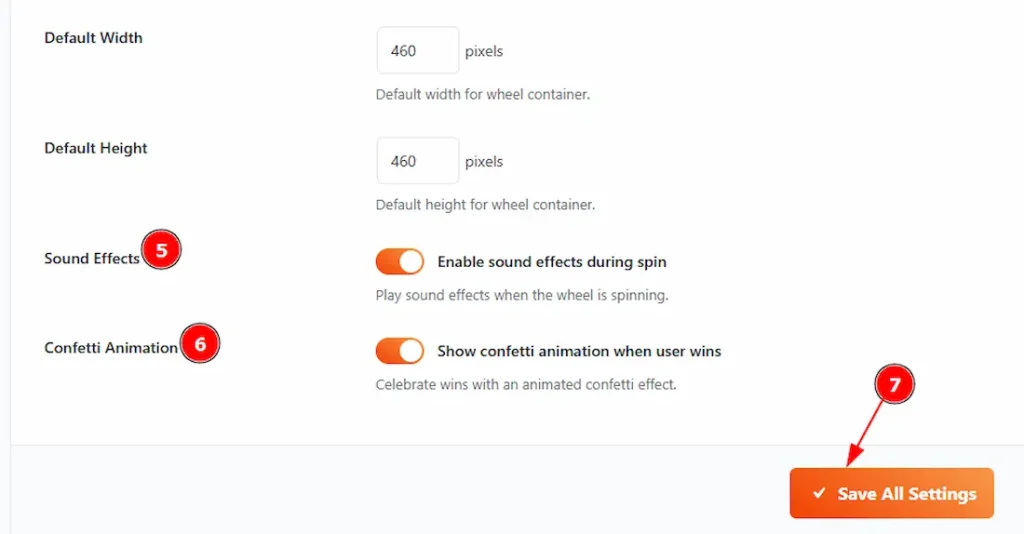
5. Sound Effect: Enable the switcher to play a sound effect when the wheel is spinning.
6. Cofetti Animation: Enable the switcher to show confetti animation when a user wins.
7. Save All Settings: Please make sure to click on the button to apply the changes you have made.
Database Tab
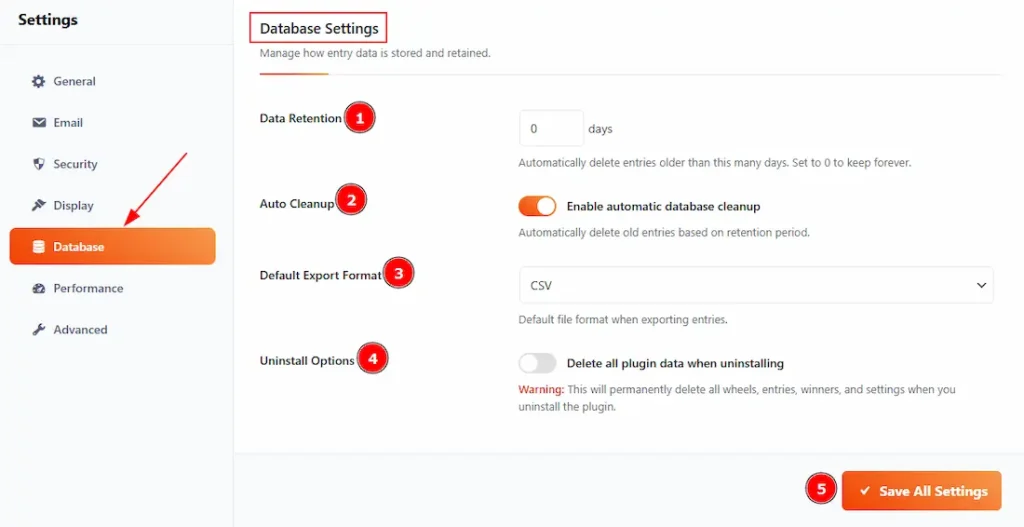
1. Data Retention: You can set the days to automatically delete entries older than the selected days. (Note: Set to 0 to keep data forever.)
2. Auto Cleanup: Enable the switcher to automatically delete old entries based on the retention period.
(Note: Without enabling this option the selection of days for data retention won’t work.)
3. Default Export Format: You can select the file format that you want to have while exporting entries.
4. Uninstall Options: Enable the switcher to permanently delete all wheels, entries, winners, and settings when you uninstall the plugin.
5. Save All Settings: Please make sure to click on the button to apply the changes you have made.
Performance Tab
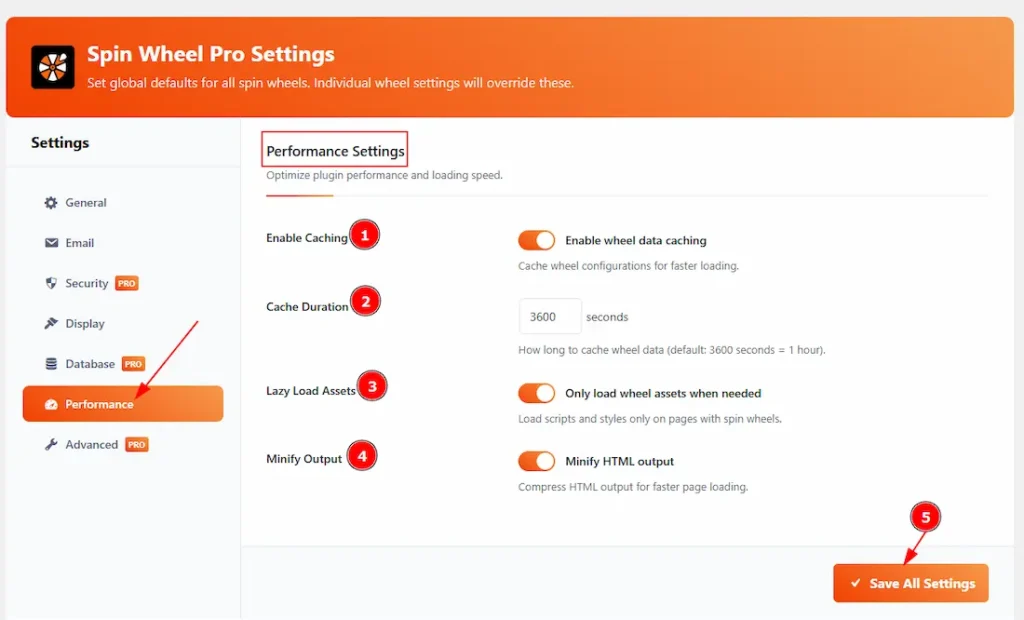
1. Enable Caching: Enable the switcher to store the spin wheel settings temporarily so the wheel loads faster the next time.
2. Cache Duration: You can set how long the wheel data will stay saved before updating again. A higher time means faster loading but slower updates.
3. Lazy Load Assets: Enable the switcher to load spin wheel files only on pages where the wheel is shown, helping other pages load faster.
4. Minify Output: Enable the switcher to reduce the size of the wheel’s code to improve page speed.
5. Save All Settings: Click the Save All Settings button to save all the changes you made on this page.
Advanced Tab

1. Custom CSS: Add your own CSS code here to customize the design and appearance of the spin wheel without changing theme files.
2. Custom JavaScript: Insert custom JavaScript (runs after the page loads) to add extra functionality or custom behavior for the spin wheel.
3. Save All Settings: Click this button to save and apply all the changes made in the Advanced Settings.
All done! You have successfully customized the Spin Wheel Pro Plugin on your website.
Video Assist
The video will help you to use the Spin Wheel Plugin Features. Please visit the demo page to see examples. If you want, then you can try the live wheel from here.
Thanks for staying with us.