In this documentation, we will show you how to customize the Order Page widget by Ultimate Store Kit.
Enable the Order Page Widget
To use the Order Page widget by Ultimate Store Kit, first, you have to enable the widget.
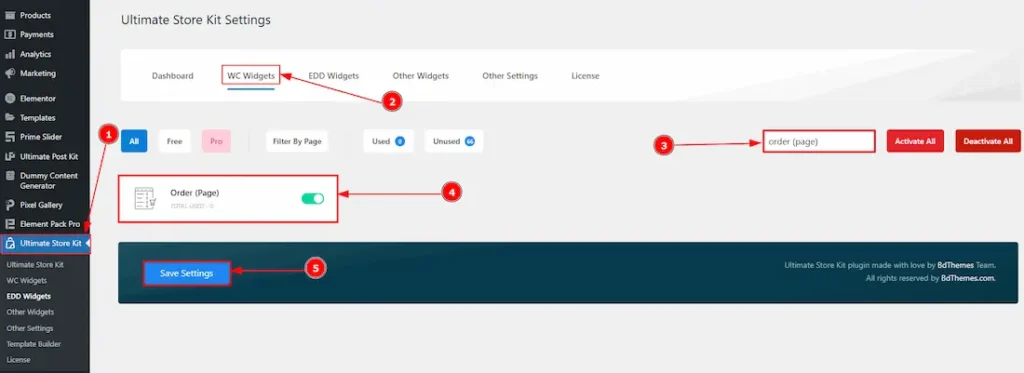
- Go to WordPress > Ultimate Store Kit Plugin dashboard.
- Then, Click the WC Widgets Tab.
- Search the Order Page Widget Name.
- Enable the Order Page Widget.
- Hit the Save Settings Button.
Inserting Order Page widget

- Go to the Elementor Editor Page and hit the “+” (Add Element) icon button.
- Search the Order Page widget.
- Drag the widget and drop it on the editor page
Configuring the Content Tab Of the Order Page
The Content Tab provides options to manage and structure the core settings of elements. It allows defining the content and functionality to align with design goals.
Thank you Order Section
Go to Content > Thankyou Order
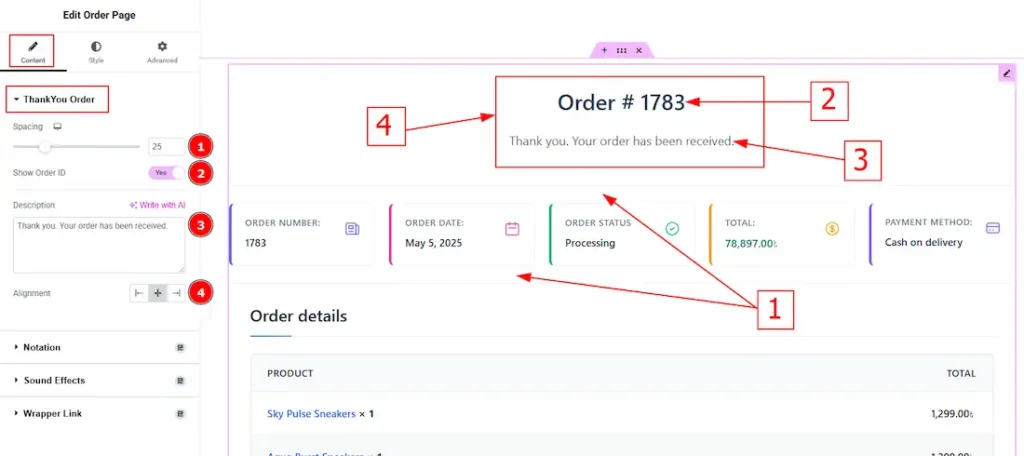
1. Spacing: This option allows you to adjust the space between tabs.
2. Show Order ID: Enable the switcher to visible the order ID.
3. Description: You can add the description as a note with this option.
4. Alignment: You can move the content position to left, center or right with this option.
Work with the Style Tab
Order ID Section
Go to Style > Order ID
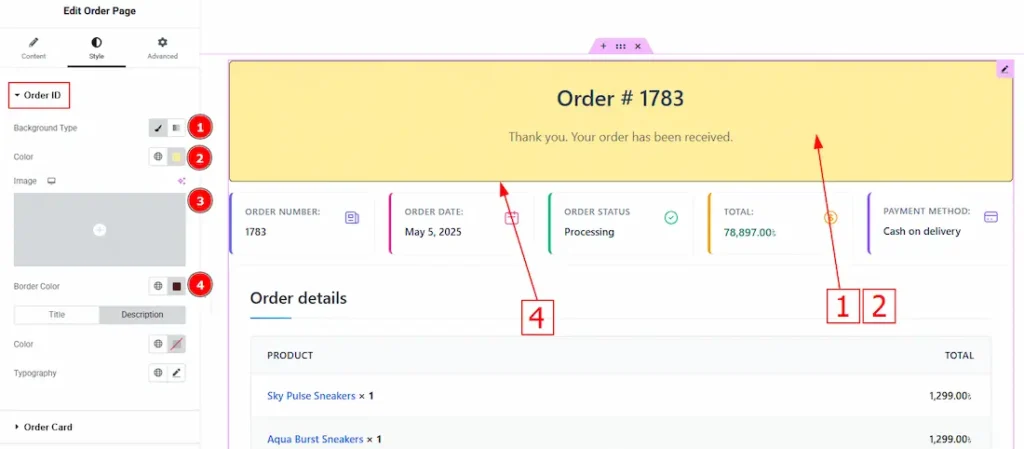
1. Background Type: You can change the background type here. There are two options in background type. These are Classic & Gradient.
In Classic, you can change the background color and also set an image as the background. In the gradient option, you can also set background color along with locations and angle for each breakpoint to ensure the gradient adapts to different screen sizes. Also, you can change the gradient type (Radial & Linear) and positions.
2. Color: You can change the background color with this option.
3. Image: You can change the background image with this option.
4. Border Color: You can change the border color with this option.
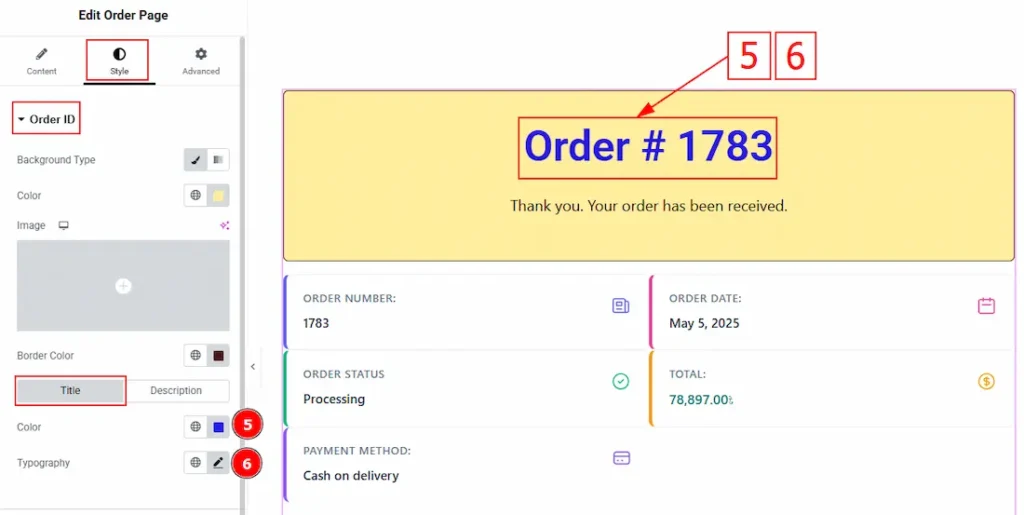
In this section, we have two tabs. These are – Title and Description. Let’s start with the Title Tab –
5. Color: You can change the title color with this option.
6. Typography: Change the title’s font family, size, weight, transform, style, decoration, line height, letter spacing, and word spacing from here.
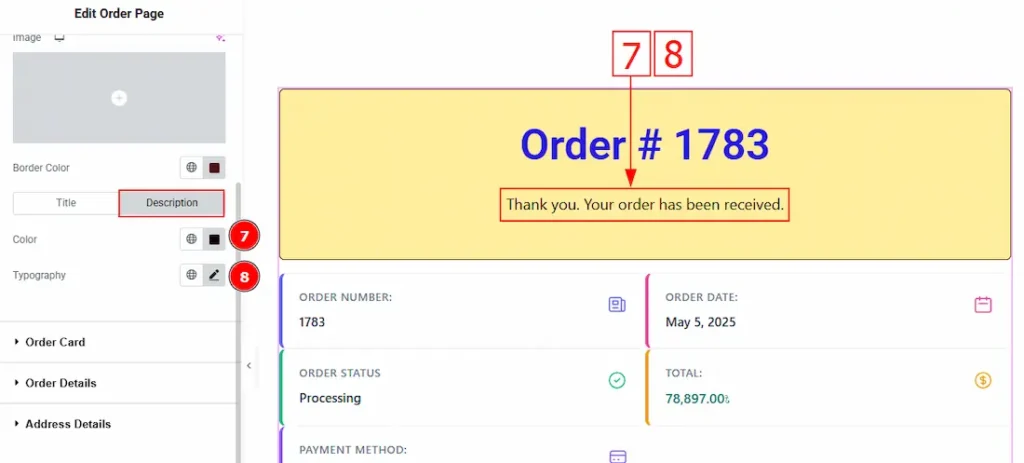
Now, let’s proceed to the Description Tab –
7. Color: You can change the description color with this option.
8. Typography: Change the description text’s font family, size, weight, transform, style, decoration, line height, letter spacing, and word spacing from here.
Order Card Section
Go to Style > Order Card
Container Sub-Section
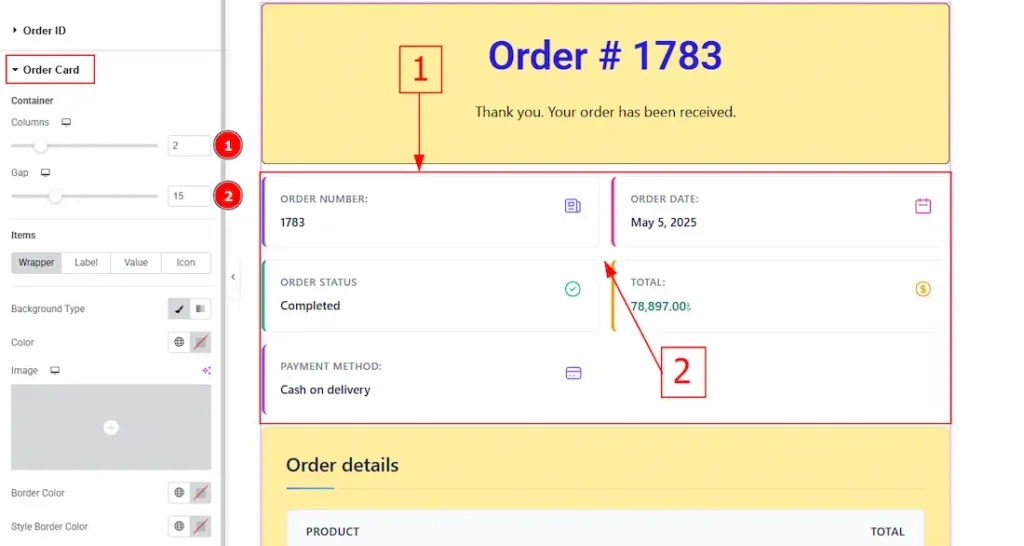
1. Columns: You can set the column limit with this option.
2. Gap: This option allows you to adjust the space between the container.
Items Sub-Section
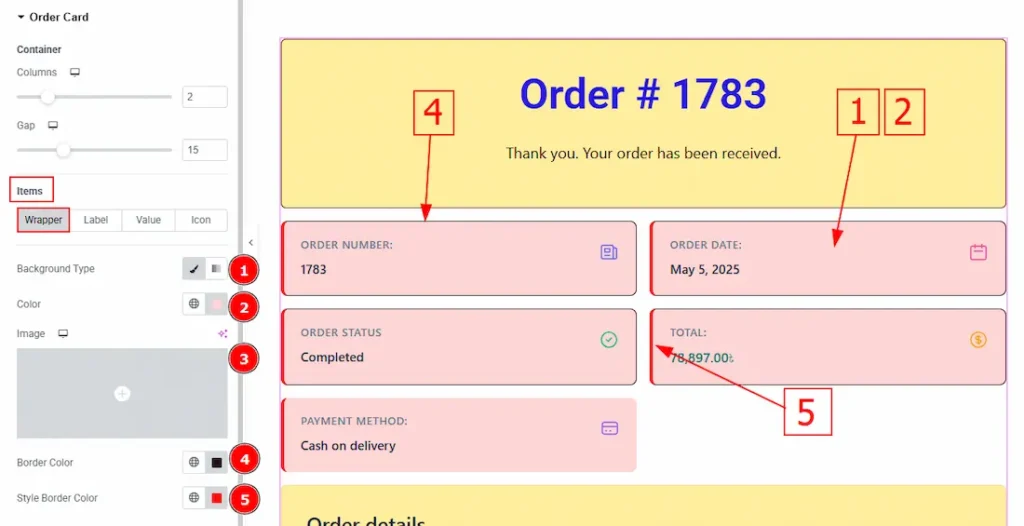
In this section, we have four tabs. These are Wrapper, Label, Value & Icon. Let’s start with the Wrapper Tab –
1. Background Type: You can change the background type here. There are two options in background type. These are Classic & Gradient.
In Classic, you can change the background color and also set an image as the background. In the gradient option, you can also set background color along with locations and angle for each breakpoint to ensure the gradient adapts to different screen sizes. Also, you can change the gradient type (Radial & Linear) and positions.2. Color: You can change the background color with this option.
3. Image: You can change the background image with this option.
4. Border Color: You can change the border color with this option.
5. Style Border Color: You can change the style border color with this option.
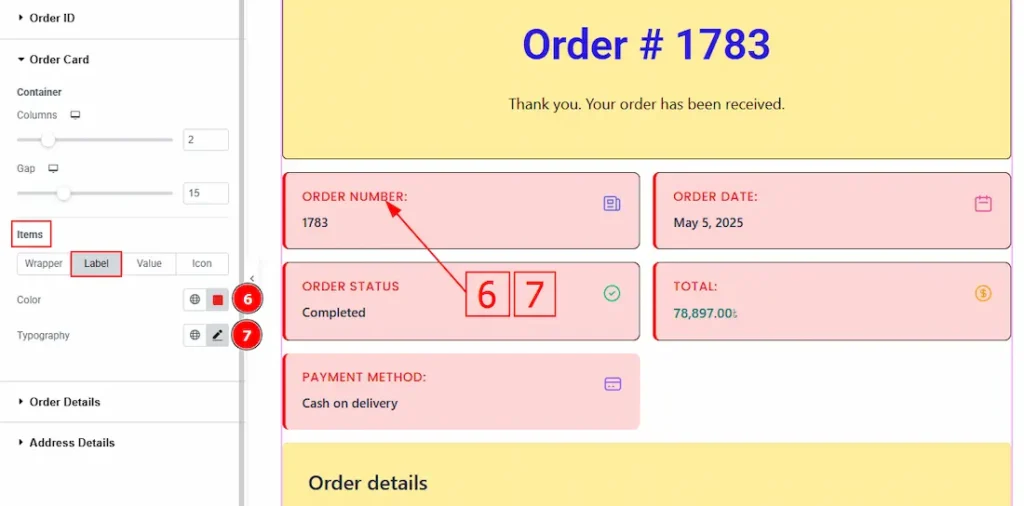
Now, let’s proceed with the Label Tab –
6. Color: You can change the label color with this option.
7. Typography: Change the label’s font family, size, weight, transform, style, decoration, line height, letter spacing, and word spacing from here.
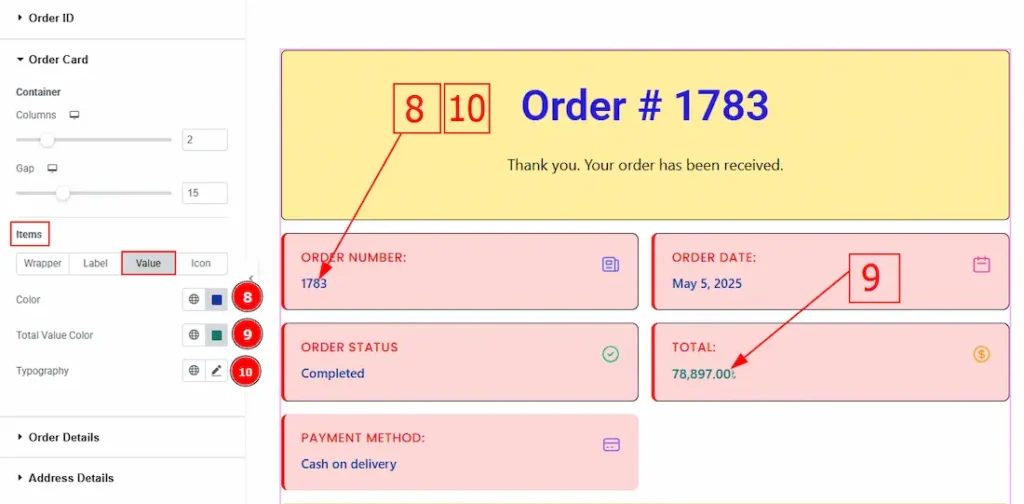
Now, let’s proceed with the Value Tab –
8. Color: You can change the label color with this option.
9. Total Value Color: You can change the total value color with this option.
10. Typography: Change the value’s font family, size, weight, transform, style, decoration, line height, letter spacing, and word spacing from here.
Finally, let’s proceed with the Icon Tab –
11. Size: You can make changes to the icon size with this option.
12. Color: You can change the icon color with this option.
Order Details Section
Go to Style > Order Details
This section contains two tabs and one sub-section. Let’s start with the Wrapper tabs first –
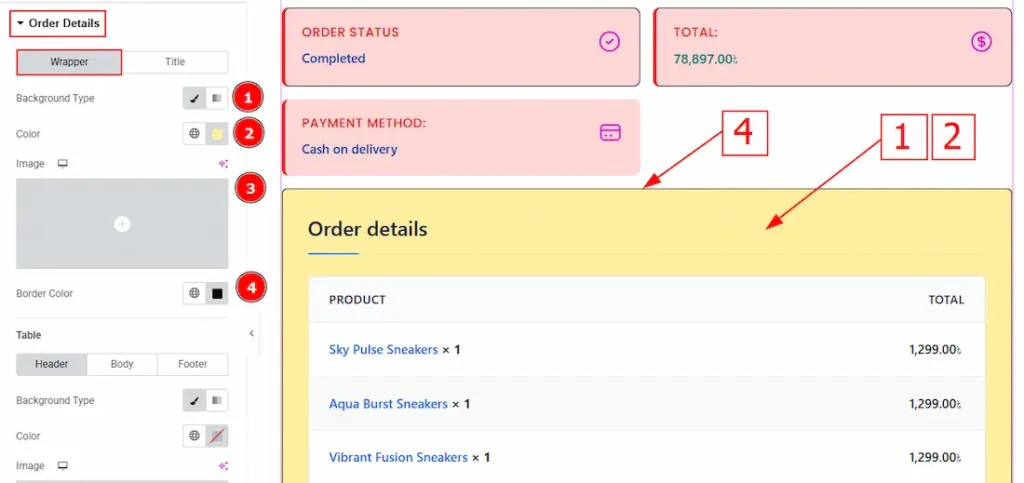
1. Background Type: You can change the background type here. There are two options in background type. These are Classic & Gradient.
In Classic, you can change the background color and also set an image as the background. In the gradient option, you can also set background color along with locations and angle for each breakpoint to ensure the gradient adapts to different screen sizes. Also, you can change the gradient type (Radial & Linear) and positions.
2. Color: You can change the background image with this option.
3. Image: You can change the background image with this option.
4. Border Color: You can change the border color with this option.

Lets explore the Title sub section-
5. Color: You can change the title color with this option.
6. Border Color: You can change the border color with this option.
7. Typography: Change the title’s font family, size, weight, transform, style, decoration, line height, letter spacing, and word spacing from here.
Table Sub-Section
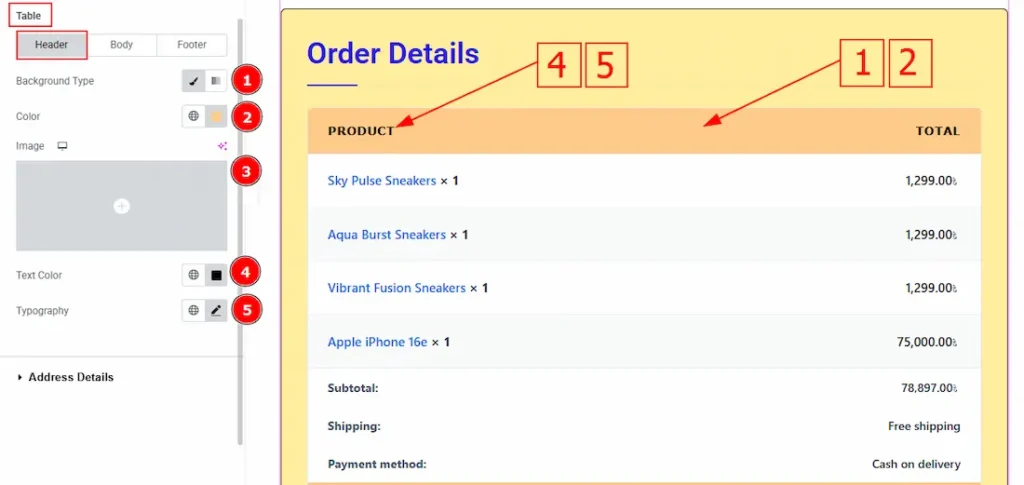
In this sub-section, we have three tabs. These are Header, Body & Footer. Let’s start with the Header Tab –
1. Background Type: You can change the background type here. There are two options in background type. These are Classic & Gradient.
In Classic, you can change the background color and also set an image as the background. In the gradient option, you can also set background color along with locations and angle for each breakpoint to ensure the gradient adapts to different screen sizes. Also, you can change the gradient type (Radial & Linear) and positions.
2. Color: You can change the background color with this option.
3. Image: You can change the background image with this option.
4. Text Color: You can change the header text color with this option.
5.Typography: Change the header text font family, size, weight, transform, style, decoration, line height, letter spacing, and word spacing from here.

Now, let’s continue to the second tab, The Body Tab –
In this tab, we have three more sub-sections. Let’s explore those one by one –
Odd Row
1. Background Color: You can change the odd background color with this option.
2. Text Color: You can change the text color with this option.
Even Row
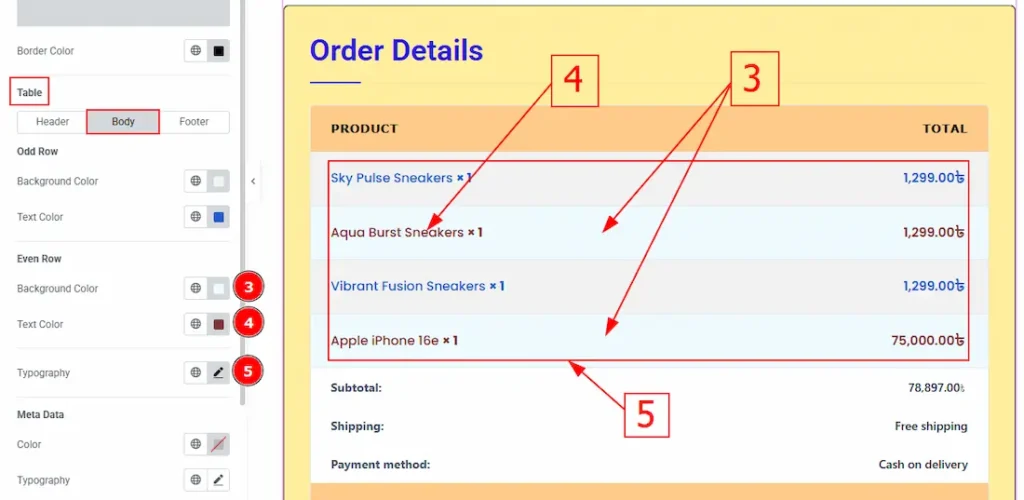
3. Background Color: You can change the even background color with this option.
4. Text Color: You can change the text color with this option.
5. Typography: Change the font family, size, weight, transform, style, decoration, line height, letter spacing, and word spacing from here.
Meta Data
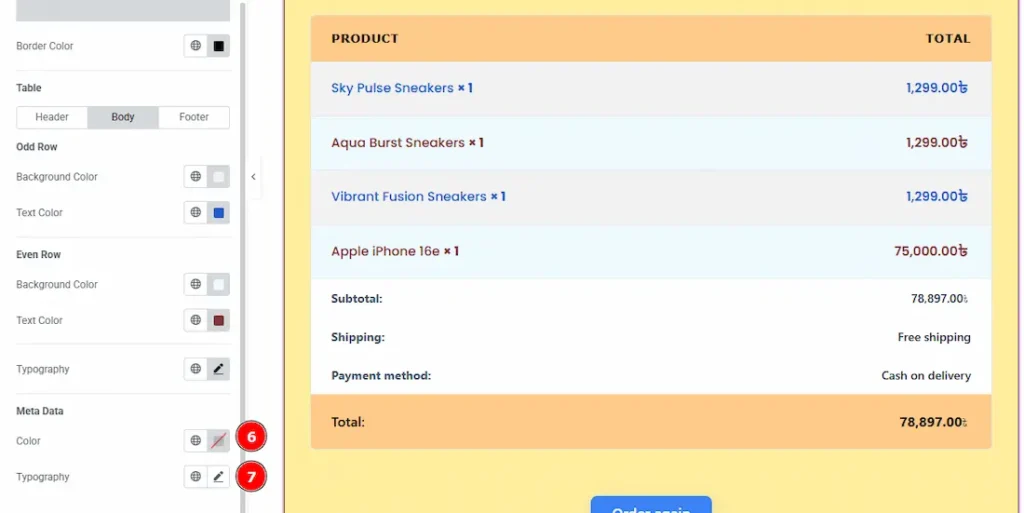
5. Color: You can change the meta color with this option.
6. Typography: Change the font family, size, weight, transform, style, decoration, line height, letter spacing, and word spacing from here.
(Note: This option becomes editable only when a product with variation swatches is available.)
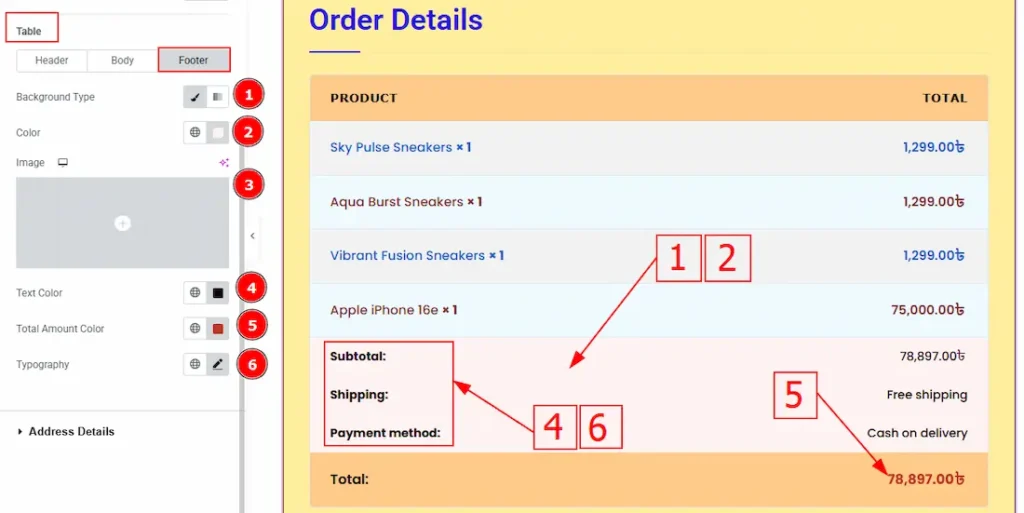
Finally, let’s proceed to the Footer Tab –
1. Background Type: You can change the background type to classic or gradient with this option.
2. Color: You can change the background color with this option.
3. Image: You can change the background image with this option.
4. Text Color: You can change the footer text color with this option.
5. Total Amount Color: You can change the total amount color with this option.
6. Typography: Change the font family, size, weight, transform, style, decoration, line height, letter spacing, and word spacing from here.
Address Details
Go to Style > Address Details
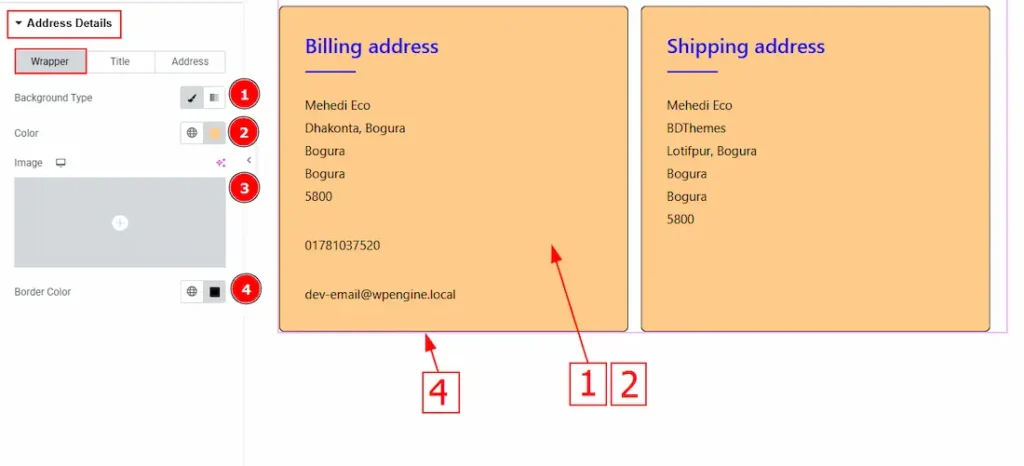
This section contains three tabs. These are Wrapper, Title & Address. Let’s explore these step by step –
Wrapper Tab
1. Background Type: You can change the background type to classic or gradient with this option.
2. Color: You can change the background color with this option.
3. Image: You can change the background image with this option.
4. Border Color: You can change the border color with this option.
Title Tab
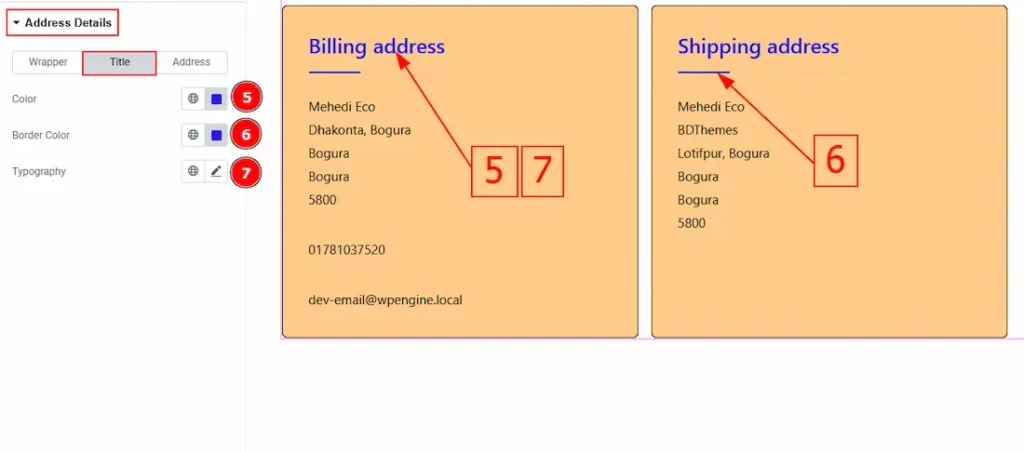
5. Color: You can change the title color with this option.
6. Border Color: You can change the border color with this option.
7. Typography: Change the font family, size, weight, transform, style, decoration, line height, letter spacing, and word spacing from here.
Address Tab
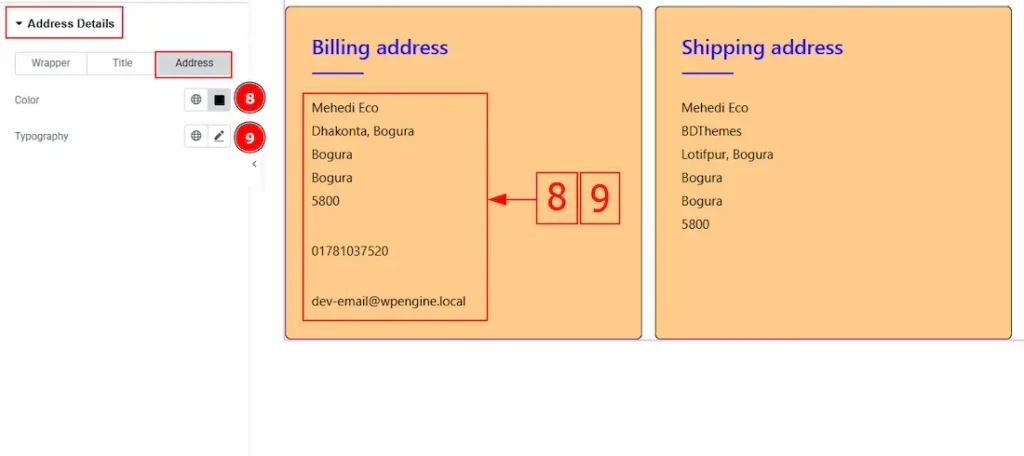
8. Color: You can change the address text color with this option.
9. Typography: Change the font family, size, weight, transform, style, decoration, line height, letter spacing, and word spacing from here.
All done! You have successfully customized the Order (Page) widget on your website.
Video Assist
The video and demo will come soon. Thanks for staying with us.