In this documentation, we will discuss how to create a template to use the Dynamic Widgets, brought to you by the Ultimate Post Kit addon for Elementor. Dynamic Widgets rely on Elementor templates to fetch and display content dynamically. Building a proper template allows you to design and control how your dynamic data, such as posts, pages, or custom post types, will appear on the frontend. Once the template is built, it can be linked to the Dynamic Widgets to display the same layout across multiple content items automatically.
Enable The Dynamic Content & Dynamic Widgets
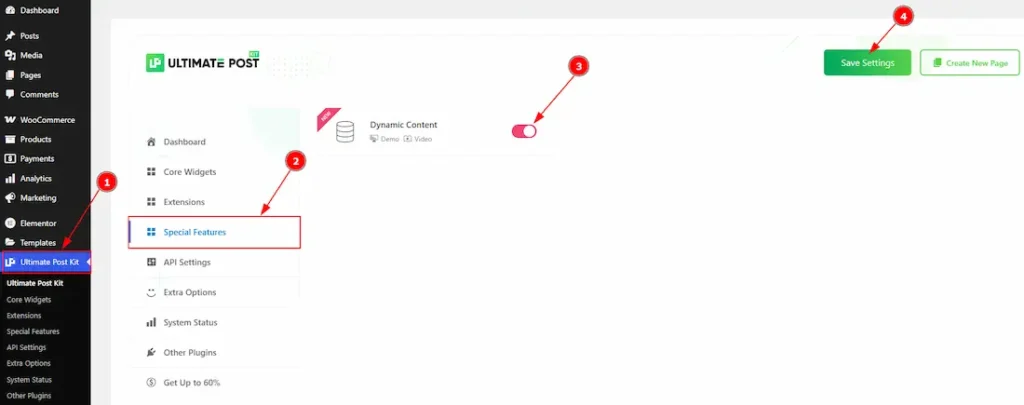
To use the Dynamic Content feature from Ultimate Post Kit, first, you have to enable the feature.
- Go to WordPress dashboard > Ultimate Post Kit Plugin dashboard.
- Then, Click the Special Features Tab.
- Enable the Dynamic Content feature.
- Hit the Save Settings Button.
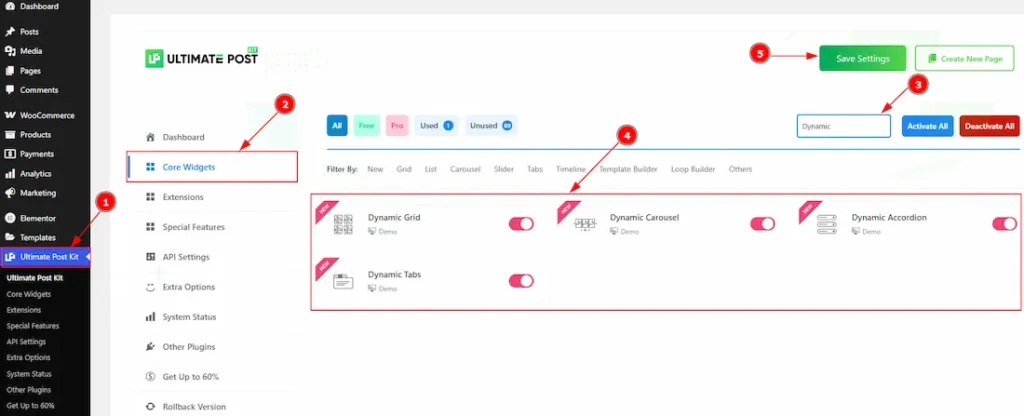
After that, you have to enable the dynamic widgets brought to you by the Ultimate Post Kit. These widgets allow you to display dynamic content from your template. You can choose to enable all Dynamic Widgets at once or activate only the ones you need for your specific layout.
- Go to WordPress dashboard > Ultimate Post Kit Plugin dashboard.
- Then, Click the Core Widgets Tab.
- Search the Dynamic Widgets Name. (By searching only for dynamic, you will get all the dynamic widgets)
- Enable the Dynamic widgets.
- Hit the Save Settings Button.
Creating Template
Go to WP Dashboard > Templates
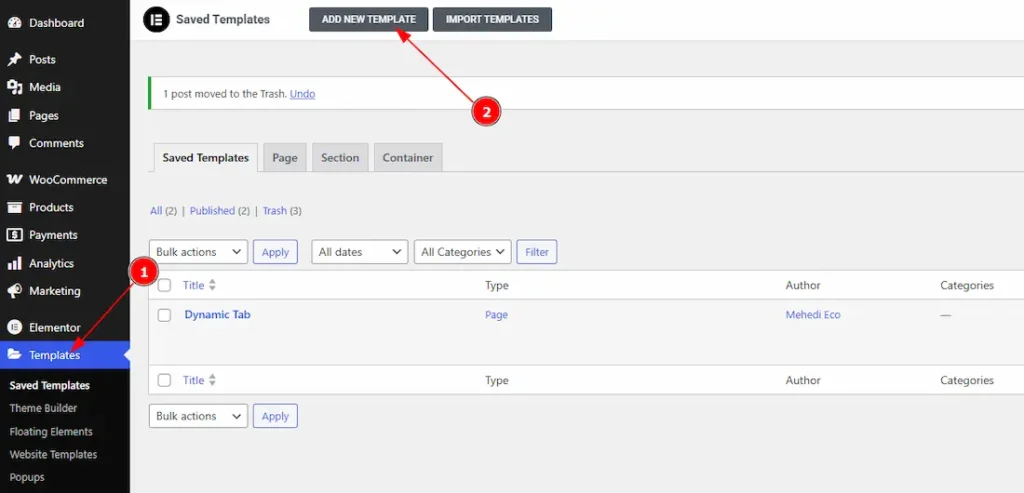
- Click on the Templates Tab on WP Dashboard
- Click on Add New Template to create a new template.
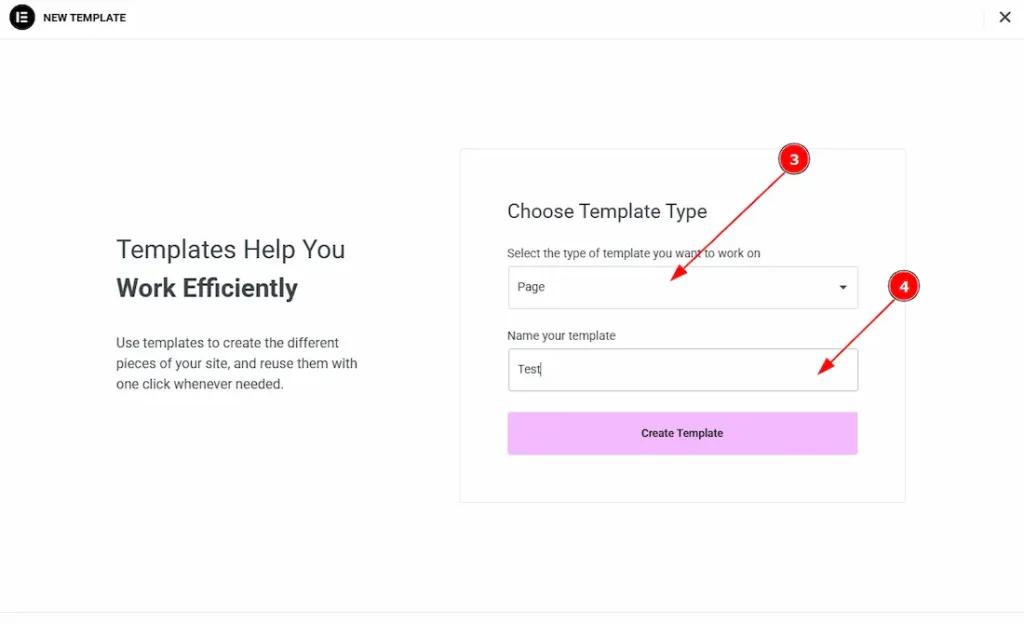
- Select the template type with this option. Here you will get container, page, section & single event template as template type. Here we have selected the template type as page.
- You can make changes to the template name with this option.
Building A Template For Dynamic Widgets
Inserting Image Element
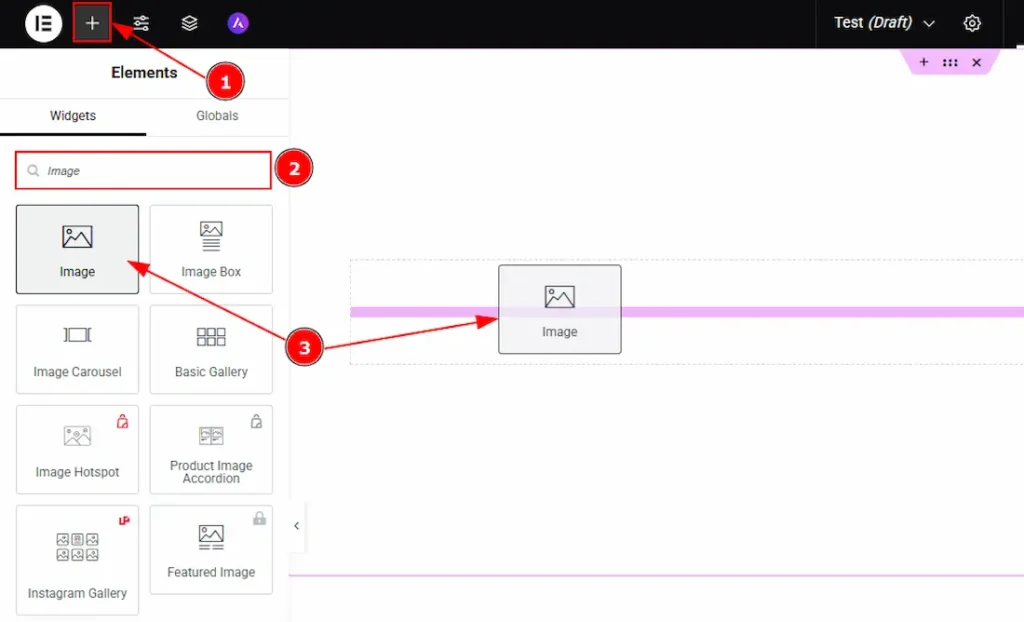
After creating a new template, it will automatically redirect you to the Edit with Elementor page. If not, then please do it manually. Then you have to drag & drop the elements that you need to build your template.
1. Go to the Elementor Editor Page and Hit the “+” icon Button.
2. Search the Image element.
3. Drag the widget and drop it on the editor page.
Customizing Image Element
Go to Content > Image
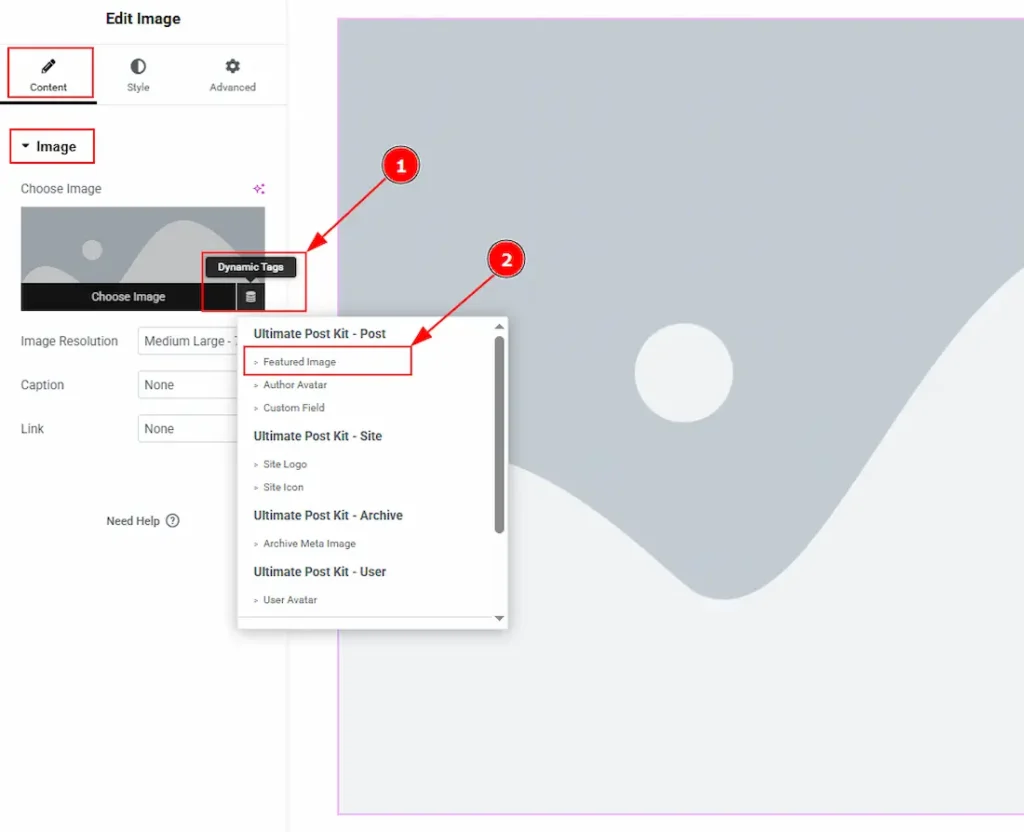
1. Find the Dynamic Tag icon at the bottom right and click the icon to load images dynamically, so the image changes automatically based on the current post, user, or context.
2. Now, you can select the image type that you want to show on dynamic widgets. Here, we have selected the image type as Featured Image so the widget automatically displays each post’s featured image.
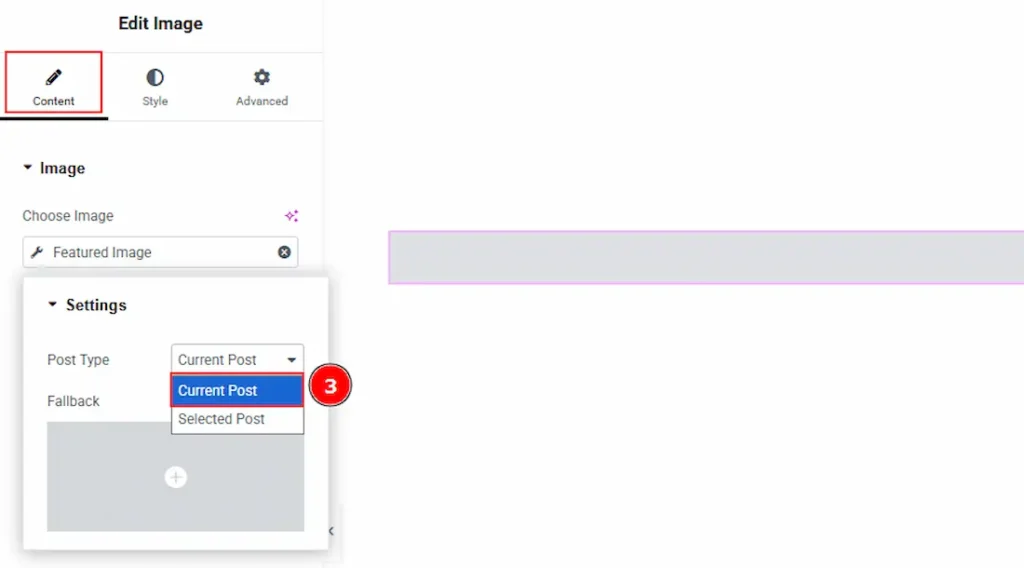
3. Post Type: This option lets you choose which post’s image to display. If you select Current Post, it will automatically show the featured image of the post you have currently made. If you choose Selected Post, you can manually pick any post whose image you want to display.
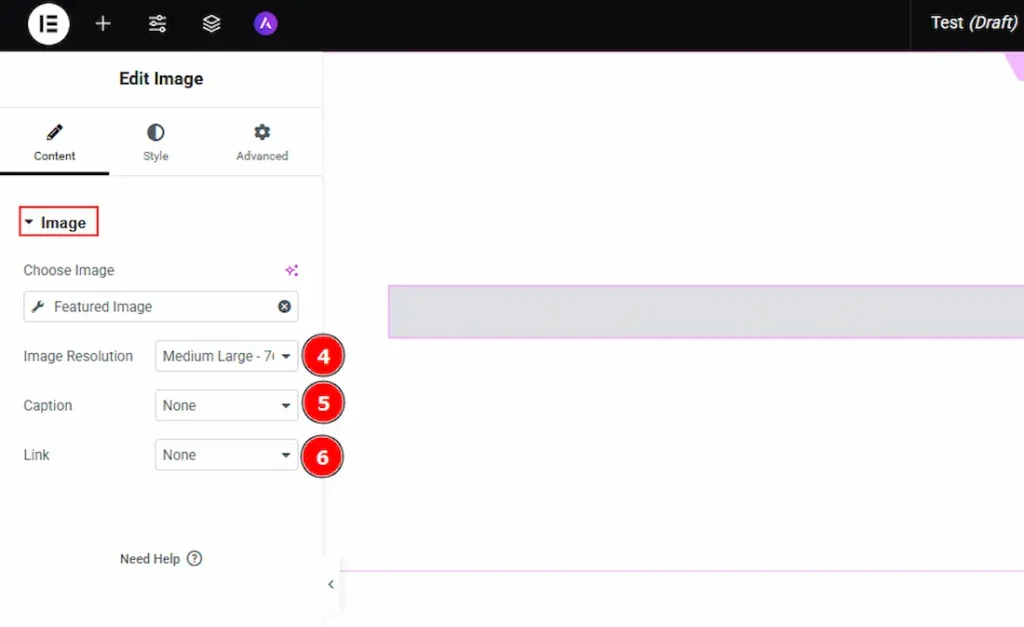
4. Image Resolution: You can make changes to the image resolution with this option.
5. Caption: You can add a caption to the image with this option.
6. Link: You can add a link to the image with this option.
Inserting Heading Element
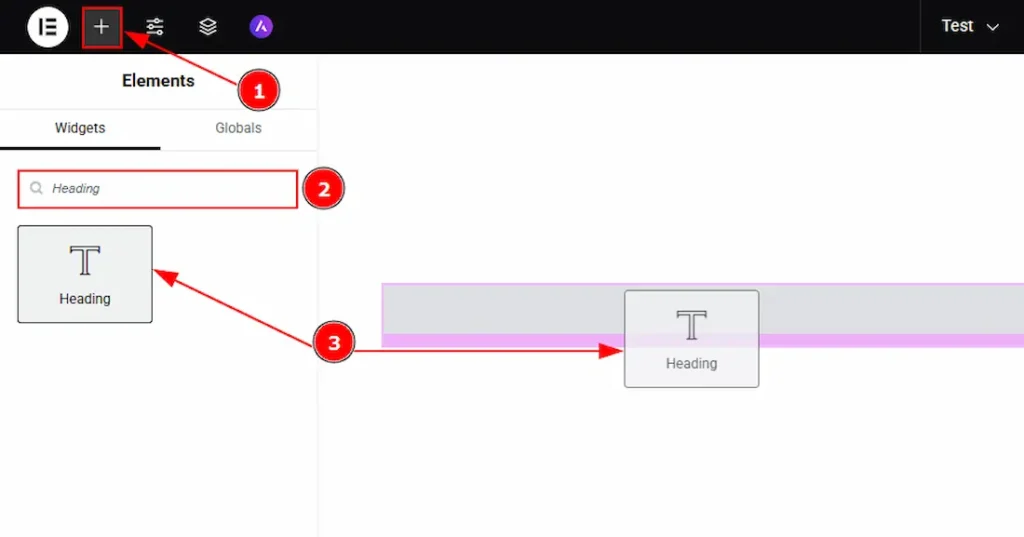
1. Go to the Elementor Editor Page and Hit the “+” icon Button.
2. Search the Heading element.
3. Drag the widget and drop it on the editor page.
Customizing Heading Element
Go to Content > Heading
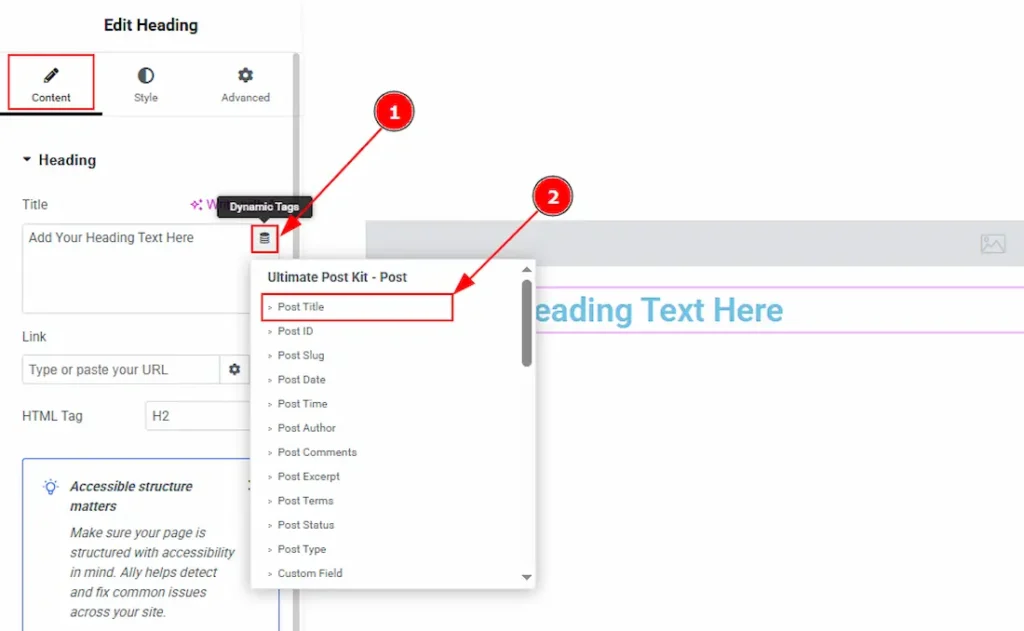
1. Find the Dynamic Tag icon at the bottom right and click the icon to load heading dynamically, so the heading changes automatically based on the current post, user, or context.
2. Now, you can select the heading type that you want to show on dynamic widgets. Here, we have selected the heading type as Post title so the widget automatically displays each post’s title.
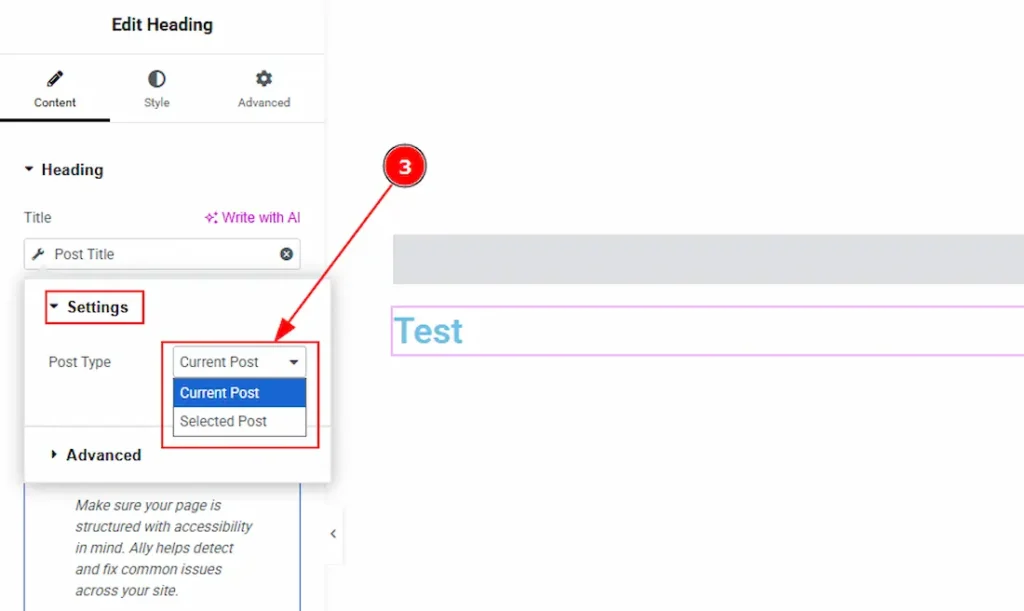
3. Post Type: This option lets you choose which post’s title to display. If you select Current Post, it will automatically show the title of the post you have currently made. If you choose Selected Post, you can manually pick any post whose title you want to display.
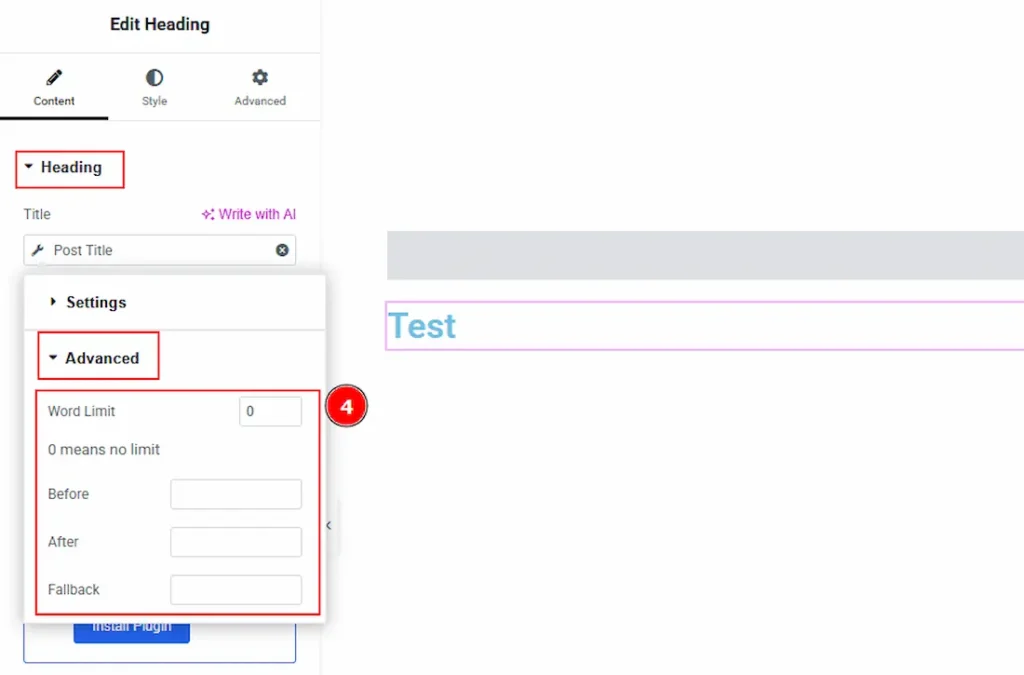
4. Advanced: The Advanced panel provides extra customization options for your heading content –
- Word Limit: Set a number to display only that many words from the title. (Enter 0 to show the full title without any limit.)
- Before: Adds custom text before the heading with this option.
- After: Adds custom text after the heading with this option.
- Fallback: This option displays alternative text if the selected dynamic title (like Post Title) is not available.
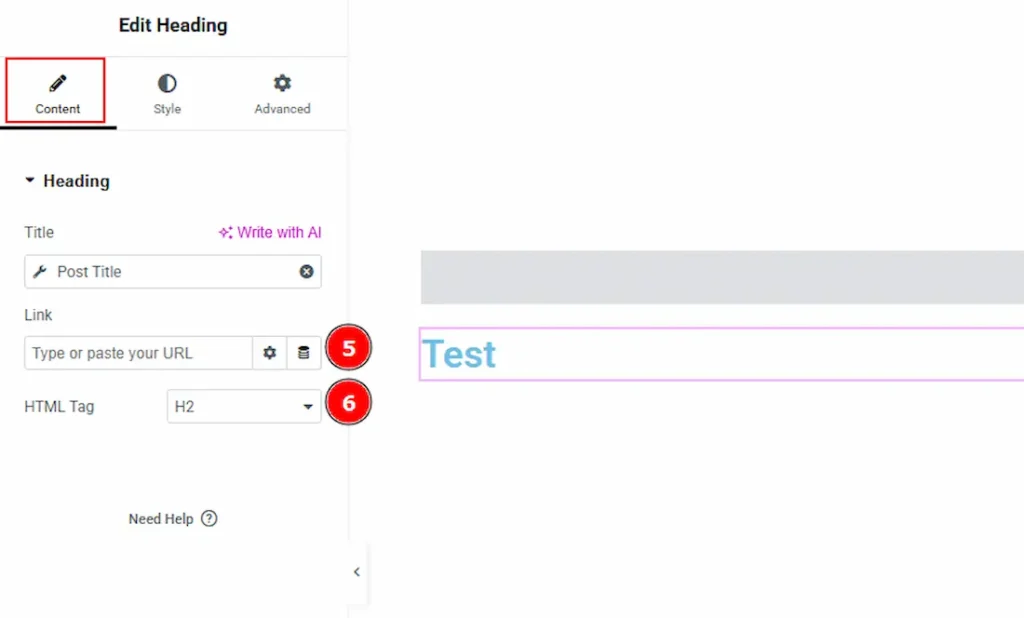
5. Link: You can add a link to the heading with this option.
6. HTML Tag: You can set the HTML tag for the heading with this option.
Inserting Text Editor Element
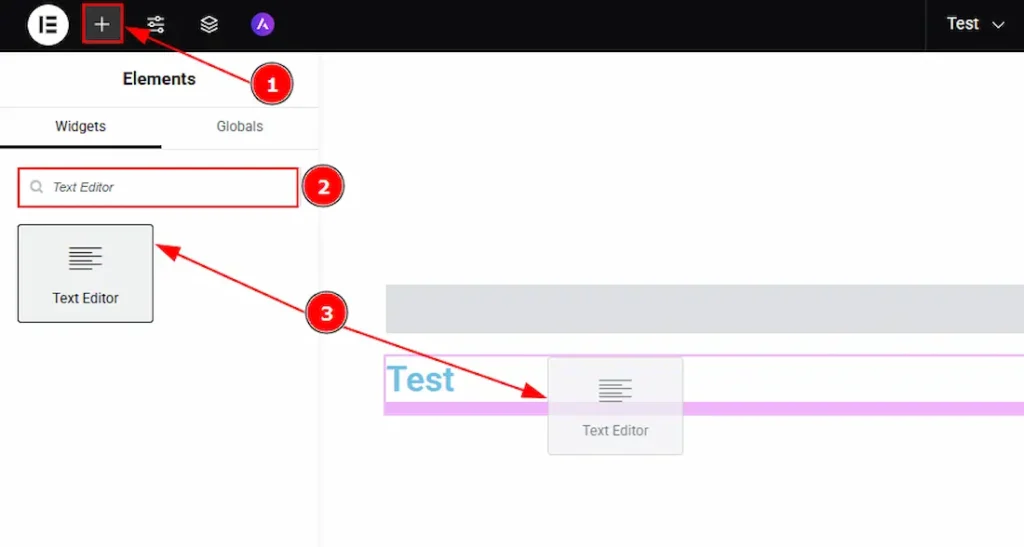
1. Go to the Elementor Editor Page and hit the “+” icon Button.
2. Search the Text Editor element.
3. Drag the widget and drop it on the editor page.
Customizing Text Editor Element
Go to Content > Text Editor
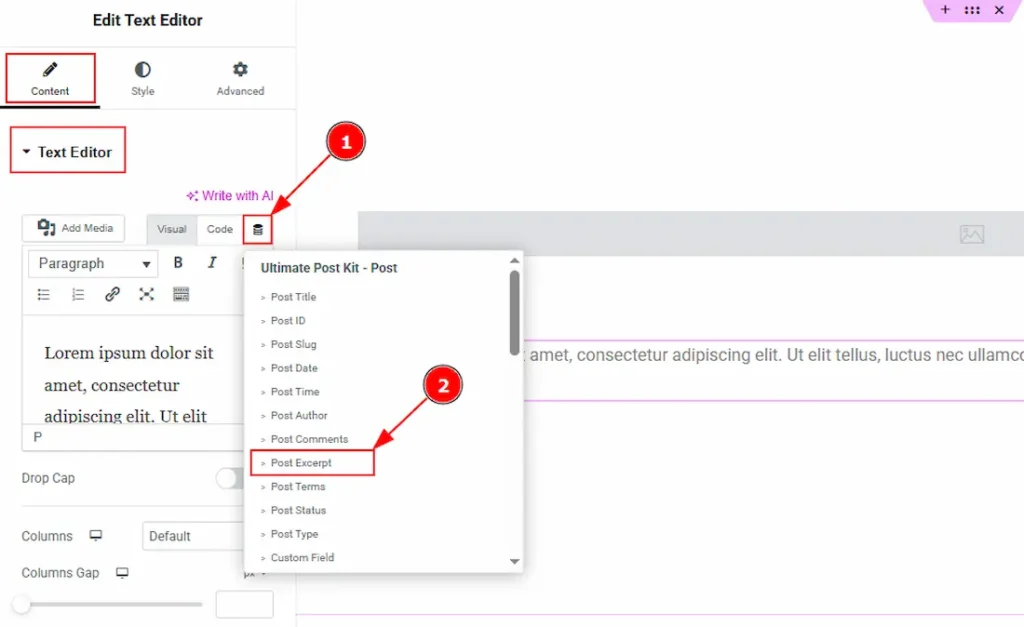
1. Find the Dynamic Tag icon at the bottom right and click the icon to load text dynamically, so the text changes automatically based on the current post, user, or context.
2. Now, you can select the text type that you want to show on dynamic widgets. Here, we have chosen the text type as Post excerpt so the widget automatically displays each post’s excerpts.
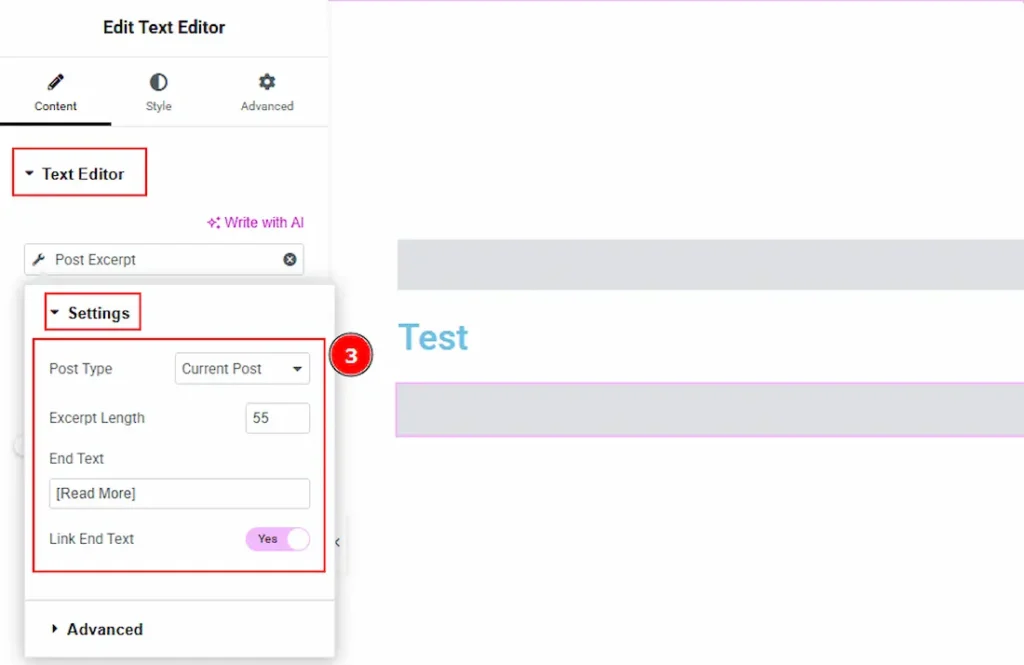
3. You can make changes to several settings with this option. These are –
- Post Type: You can change the post type to the current or selected with this option.
- Excerpt Length: You can adjust the excerpt length with this option.
- End Text: You can add an end text with this option.
Link End Text: You can add a link to the end text with this option.
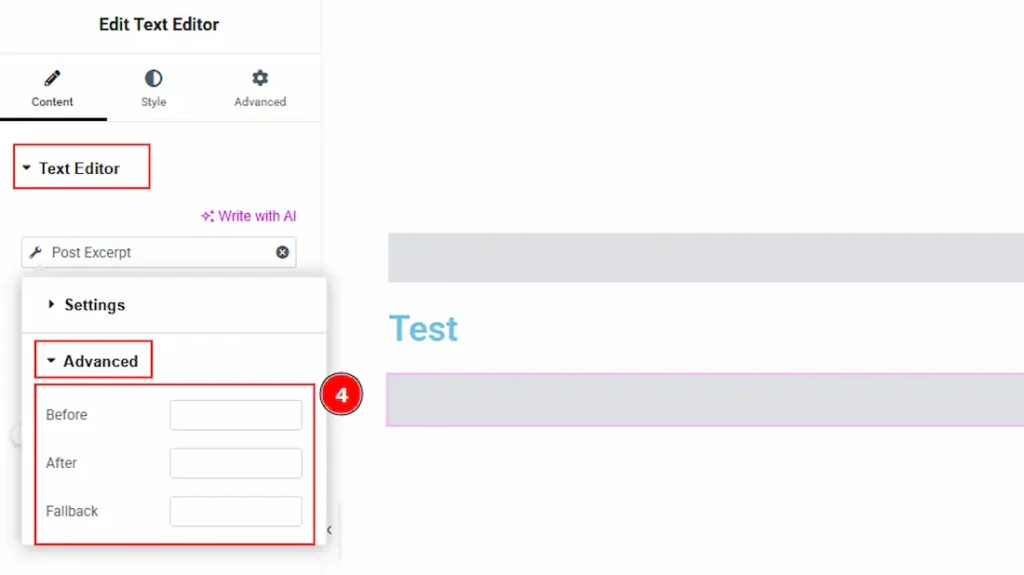
4. Advanced: The Advanced panel provides extra customization options for your excerpt content –
- Before: Adds custom text before the excerpt with this option.
- After: Adds custom text after the excerpt with this option.
- Fallback: This option displays alternative text if the selected dynamic excerpt (like Post excerpt) is not available.
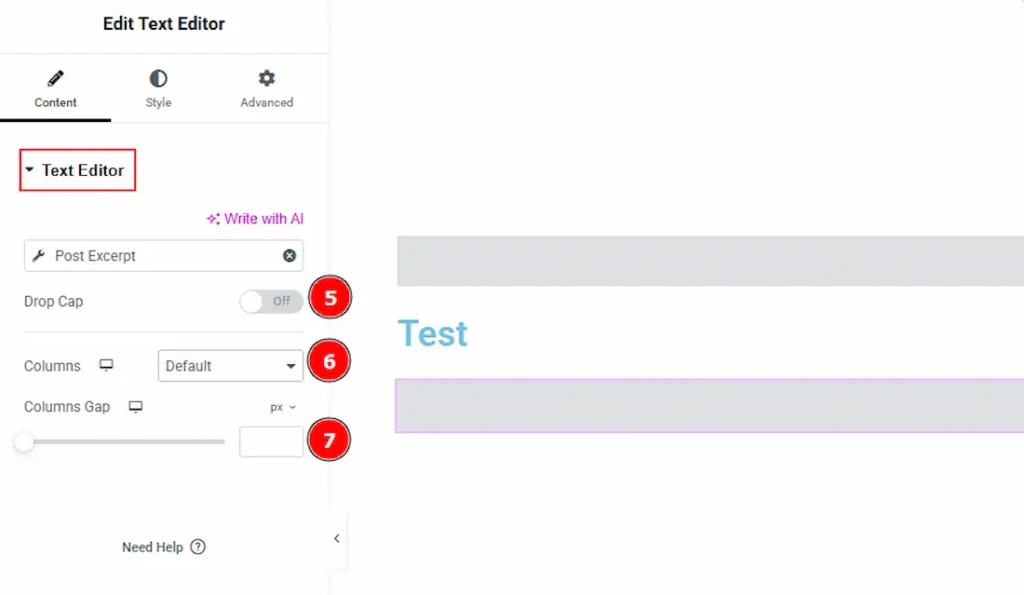
5. Drop Cap: Turns the first letter of the text into a large, decorative letter (like in magazines or blogs).
6. Columns: Splits your text into multiple columns (e.g., 2 or 3), similar to how text appears in newspapers.
7. Columns Gap: Adjusts the space between the columns for better readability or design balance.
Inserting Info List Element
1. Go to the Elementor Editor Page and hit the “+” icon Button.
2. Search the Icon List element.
3. Drag the widget and drop it on the editor page.
Customizing Icon List Element
Go to Content > Icon List
1. Layout: You can make changes to the icon list layout to default or inline with this option.
2. Close Item: You can delete the list item by clicking the Close icon button.
3. Copy Item: This option lets you copy the same item.
4. Add Item: You can add a new item by clicking the “+” Add Item button.
5. Apply Link On: You can set a link to the list items to full width or inline with this option.
6. Find the Dynamic Tag icon at the bottom right and click the icon to load list text dynamically, so the list text changes automatically based on the current post, user, or context.
7. Now, you can select the text type that you want to show on dynamic widgets. Here, we have chosen the text type as Post Date, so the widget automatically displays each post’s date.
8. Settings: You can make changes to several settings with this option. These are –
- Post Type: You can change the post type to the current or selected with this option.
- Date Type: You can change the date type to post date or post modified date with this option.
- Format: You can adjust the date format with this option.
9. Advanced: The Advanced panel provides extra customization options for your date content –
- Word Limit: Set a number to display only that many words from the title. (Enter 0 to show the full title without any limit.)
- Before: Adds custom text before the date with this option.
- After: Adds custom text after the date with this option.
- Fallback: This option displays an alternative date if the selected dynamic date (like Post Date) is not available.
10. Icon: You can add or change an icon with this option.
11. Link: You can add a link to the date with this option.
12. Find the Dynamic Tag icon at the bottom right and click the icon to load list text dynamically, so the list text changes automatically based on the current post, user, or context.
13. Now, you can select the text type that you want to show on dynamic widgets. Here, we have chosen the text type as Post Author, so the widget automatically displays each post’s Author.
14. Settings: You can make changes to several settings with this option. These are –
- Post Type: You can change the post type to the current or selected with this option.
- Date Type: You can change the date type to ID, Display Name, Bio, Email, First Name, Last Name & Username with this option.
15. Advanced: The Advanced panel provides extra customization options for your Author. You can check the Number 9 option to get a clear idea about this field.
16. Icon: You can add or change an icon with this option.
17. Link: You can add a link to the date with this option.
All done! You have successfully customized elements and built a Template to use the dynamic widgets of Ultimate Post Kit on your website.
Thanks for being with us.