In this documentation, we will discuss a special feature of the Dynamic Content, introduced by the Ultimate Post Kit Pro addon for Elementor.
🧩 Dynamic Content — Ultimate Post Kit Pro
Dynamic Content is a powerful feature of the Ultimate Post Kit Pro addon for Elementor, designed to automatically fetch and display real-time data from your WordPress posts, pages, or custom post types. Instead of manually updating your content every time, Dynamic Content connects your widgets directly to your database — allowing your website to stay fresh, flexible, and fully automated.
🌟 Key Features
🔹 Dynamic Data Source – Pull content automatically from posts, pages, custom post types, ACF fields, or WooCommerce products.
🔹 Live Content Updates – Reflects any changes made in the WordPress editor instantly across your connected widgets.
🔹 Custom Field Integration – Supports Advanced Custom Fields (ACF) and Meta Fields, allowing you to create tailored content layouts.
🔹 Flexible Design Control – Combine dynamic data with Elementor’s design flexibility to build unique, data-driven templates.
🔹 Smart Linking – Easily link titles, buttons, or images to dynamic URLs without manual configuration.
🔹 Performance Optimized – Lightweight and optimized to fetch data efficiently without slowing down your site.
🔹 Seamless Compatibility – Works perfectly with Elementor Theme Builder, allowing dynamic templates for posts, archives, and custom loops.
Enable Dynamic Content Feature
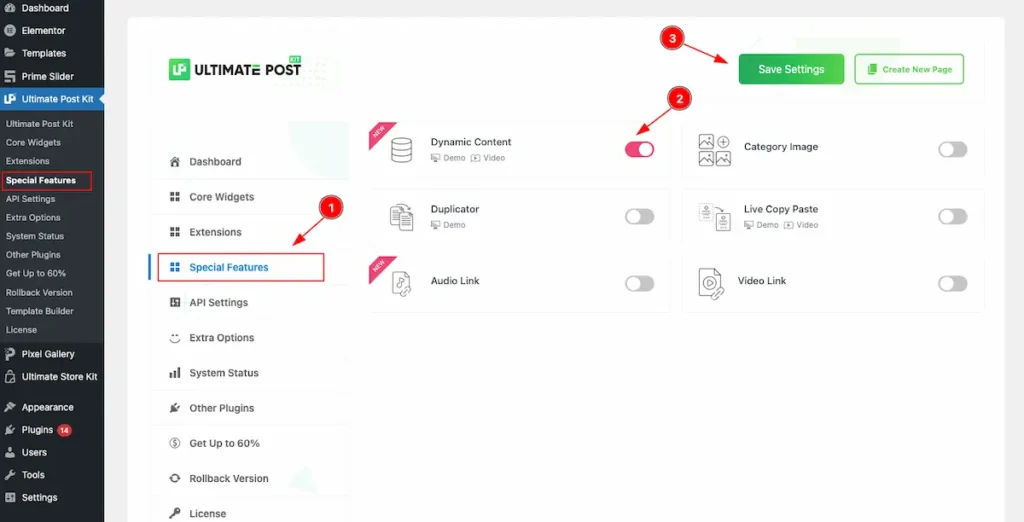
- Navigate to the Ultimate Post Kit > Special Features section.
- Enable the switcher of the Dynamic Content .
- Now Click on the ” Save Settings ” button to save it.
Find the Dynamic Content
Go to the page or template where you want to use dynamic content. Click “Edit with Elementor.”
Use on any widget that supports dynamic content — for example:
Heading (for Post Title)
Image (for Featured Image)
Text Editor (for Post Excerpt or ACF Field)
Button (for Post URL or Custom Link)
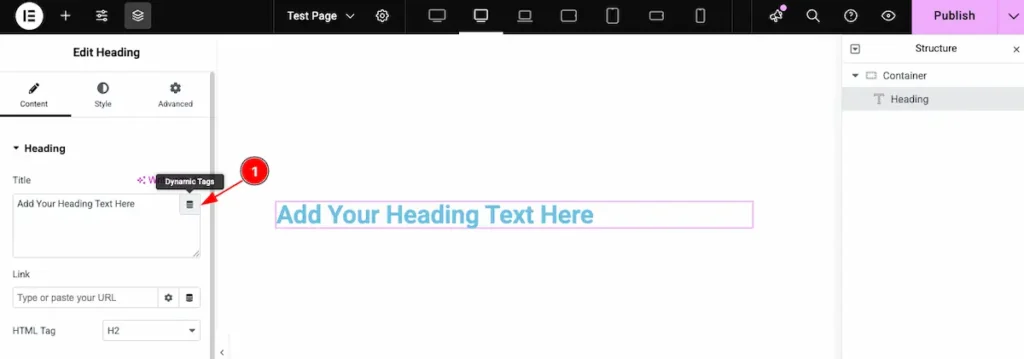
Click the “Dynamic Tags” Icon ⚡
- You’ll see a small ⚡ Dynamic Tags icon beside fields like Title, Image, URL, or Content.
Click it — a dropdown will appear with multiple dynamic sources.
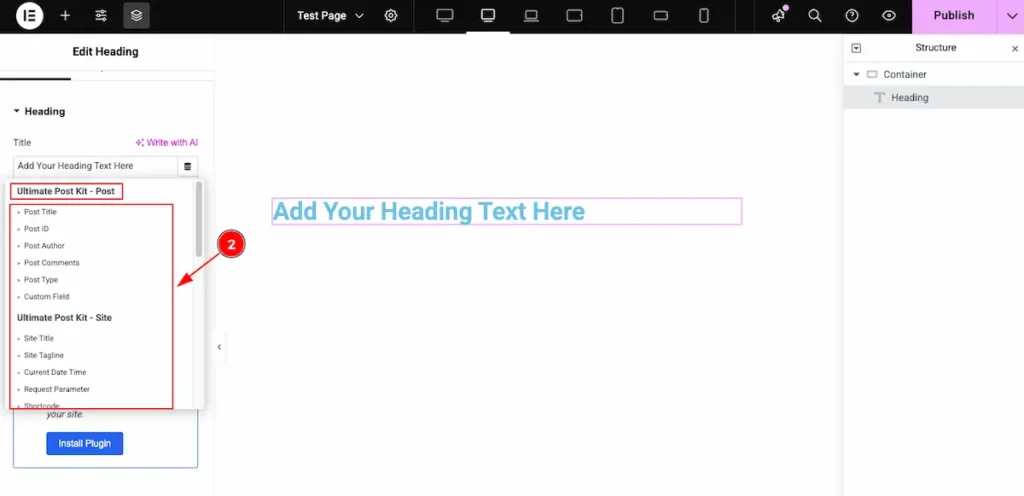
Choose Your Dynamic Source
- Select the source you want to connect, such as:
- Post Title
- Post URL
- Featured Image
- Post Excerpt
- ACF Field
- Author Info
- Date
- Custom Meta Field
Check all the Feature of Dynamic Content
Ultimate Post Kit – Post
Demonstrate all the feature of the Post Info.
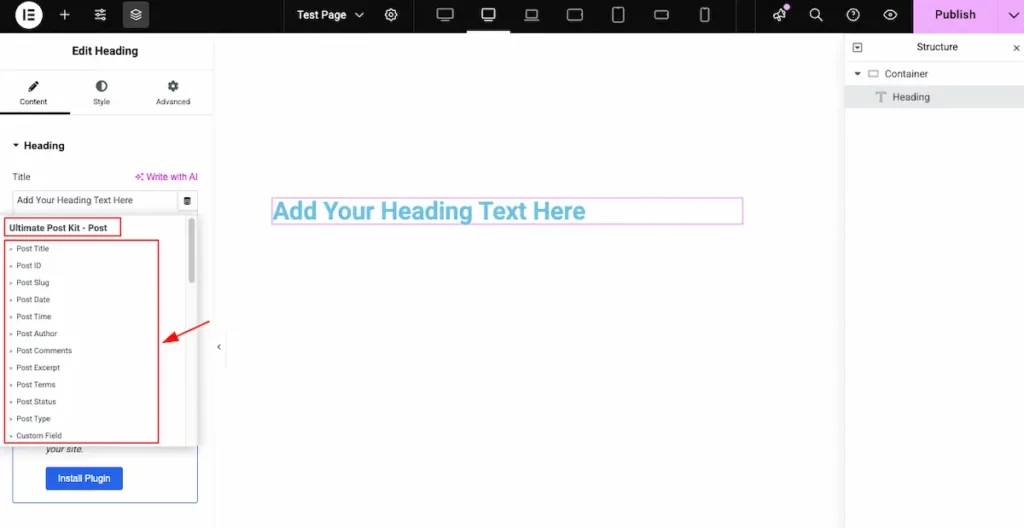
- Post Title – Displays the title of the current post.
- Post ID – Shows the unique WordPress ID of the post.
- Post Slug – Displays the post’s URL-friendly slug.
- Post Date – Shows the published date of the current post.
- Post Time – Displays the exact time the post was published (based on your WordPress time and date settings).
- Post Author – Displays the name of the post’s author.
- Post Comments – Shows the total number of comments on the post.
- Post Excerpt – Displays the post’s short summary or excerpt.
- Post Terms – Shows the selected taxonomy terms of the post, such as categories or tags.
- Post Status – Displays the current publication status (e.g., Published, Draft).
- Post Type – Indicates the type of the post (e.g., Post, Page, or Custom Post Type).
- Post URL – Displays the direct URL of the post.
- Post Custom Field – Allows you to pull and display data from custom fields associated with the post (e.g., ACF fields).
Ultimate Post Kit – Site
Demonstrate the Site Info.
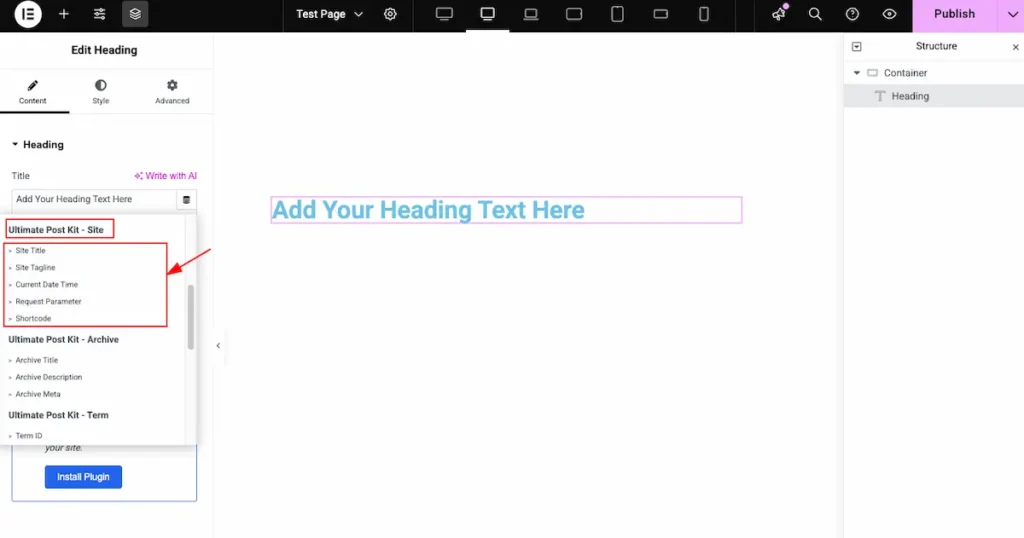
- Site Title – Automatically displays your WordPress site’s title.
- Site Tagline – Shows your site’s description or tagline from Settings → General.
- Current Date Time – Displays the current date and time based on your WordPress timezone.
- Request Parameter – Fetches data dynamically from the URL parameters (useful for personalized or query-based content).
- Shortcode – Allows you to insert any WordPress shortcode and display its dynamic output inside the widget.
Ultimate Post Kit – Archive
Show all the archive page info.
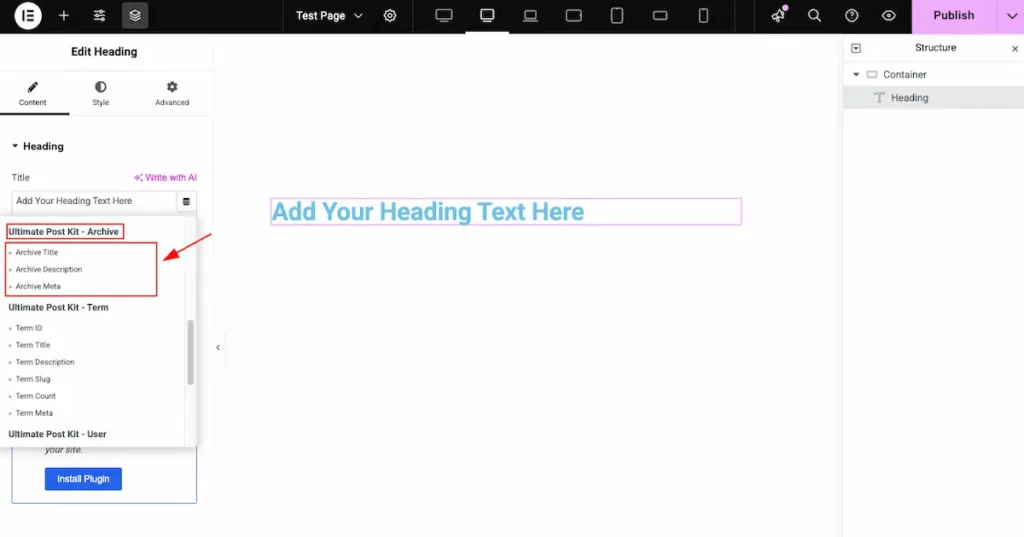
- Archive Title – Displays the current archive title dynamically (e.g., Category: News, Tag: Tutorials, Author: John Doe).
- Archive Description – Shows the archive’s description text (if added in the category, tag, or taxonomy settings).
- Archive Meta – Displays metadata about the current archive, such as post count or other related details depending on the archive type.
Ultimate Post Kit – Term
Demonstrate the Term
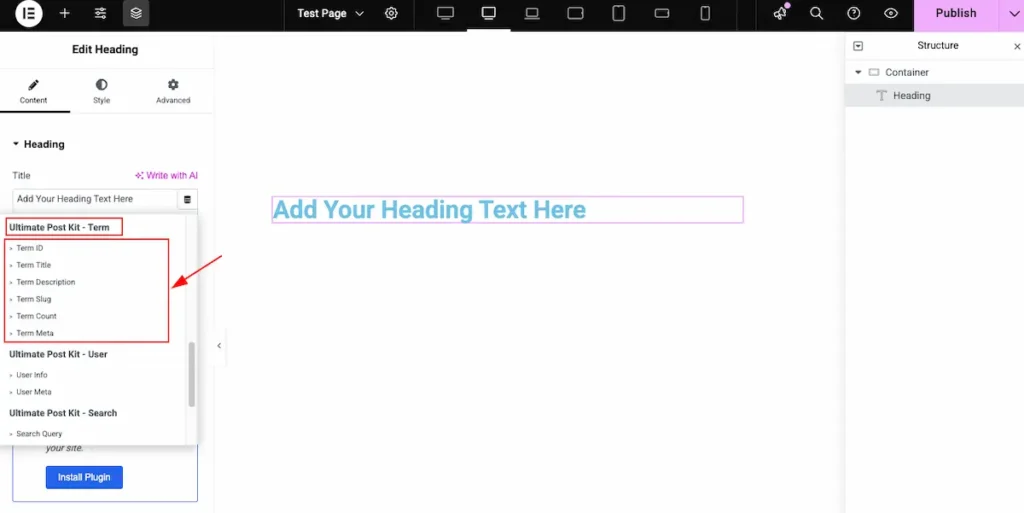
- Term ID – Displays the unique WordPress ID assigned to the current term.
- Term Title – Shows the name or title of the current term (e.g., Technology, News, Lifestyle).
- Term Description – Displays the description text added to the term in the WordPress taxonomy settings.
- Term Slug – Shows the URL-friendly version of the term name (e.g., technology, news).
- Term Count – Displays the number of posts associated with the current term.
- Term Meta – Retrieves and displays custom metadata linked to the specific term (useful for advanced taxonomies).
Ultimate Post Kit – User
Demonstrate the User Info.
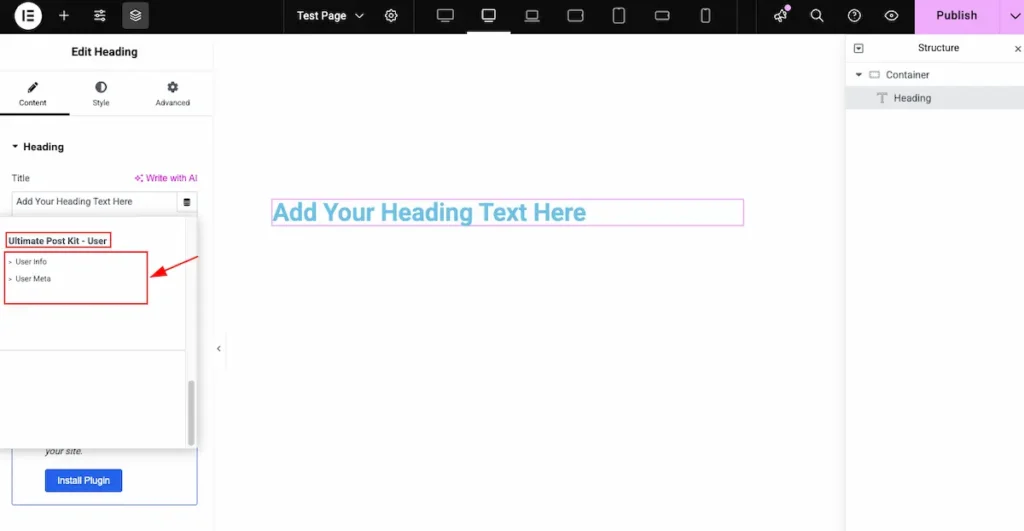
- User Info – Displays the default information of the logged-in user, such as: ID, Name, Email, Website, Display Name, Nickname, First Name, Last Name, Description, Role.
- User Meta – Indicates whether the user is an admin, editor, subscriber, etc.
Displays custom user data stored in meta fields (created by plugins like ACF, User Meta Manager, etc.) . It’s includedphone_number,address,profile_bio.
Ultimate Post Kit- Search
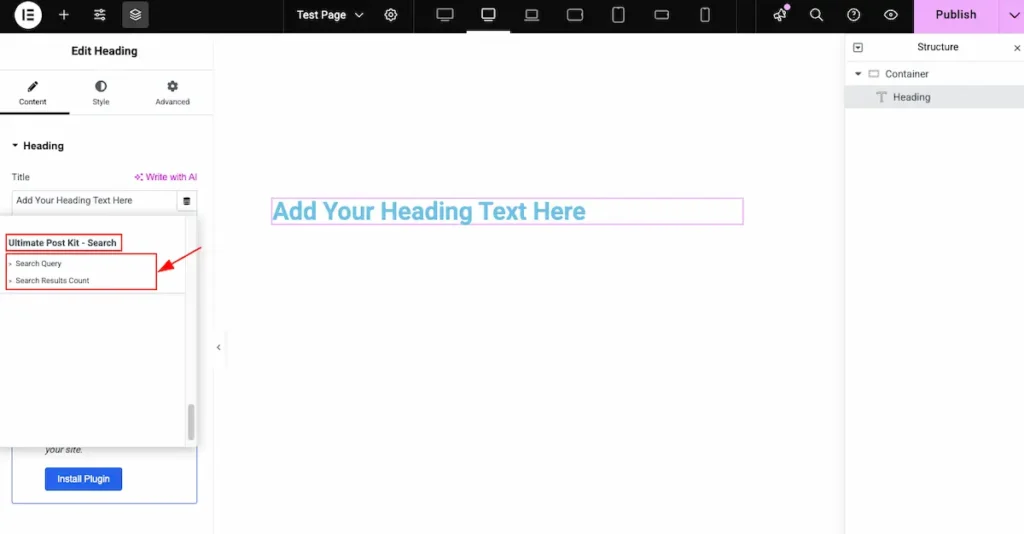
- Search Query: Displays the keyword or phrase that the user has entered in the search box. Show a message like:
“You searched for: [dynamic search query]” - Search Results Count: Shows the total number of posts, pages, or items returned for the current search query. Display a message like:
“Found 15 results for your search.”
Dynamic Content with the Post
Create a single dynamic post
We’ll build a single post page where content is generated dynamically. Using Elementor’s Dynamic Content feature, we’ll design a simple post layout that automatically pulls data—like the title, image, and content—from each post. Then, we’ll create a sample post and test how the dynamic system works in action.
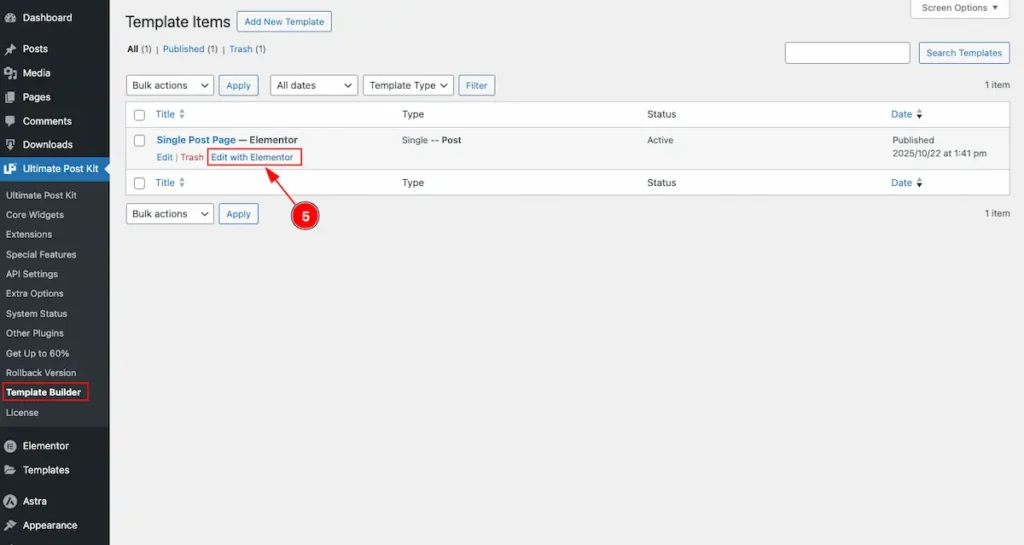
Create a Single Post Template First
Ultimate Post Kit offers a Template Builder feature that allows you to create any type of template easily—whether it’s for posts, archives, or custom layouts. You can design and customize templates visually without coding.
👉 Learn more here: Ultimate Post Kit Template Builder Documentation.
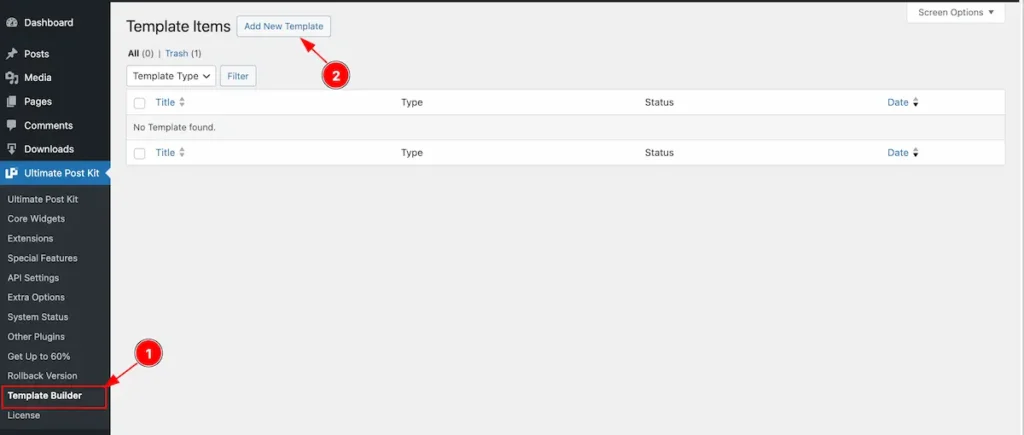
- Go to Ultimate Post Kit → Template Builder from your WordPress dashboard.
- You’ll see a list of all your existing templates. To create a new one, simply click the “Add New Template” button — this will open the template editor where you can start designing your layout.
Choose The Templates
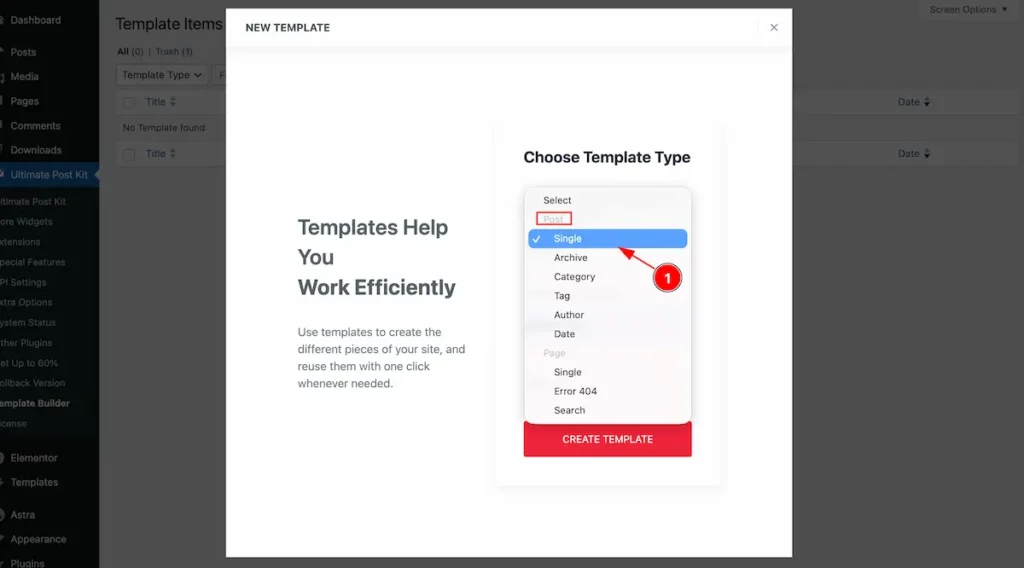
- In the popup that appears, select Post > Single as the template type.
This ensures your new template will be used for displaying single post pages dynamically.
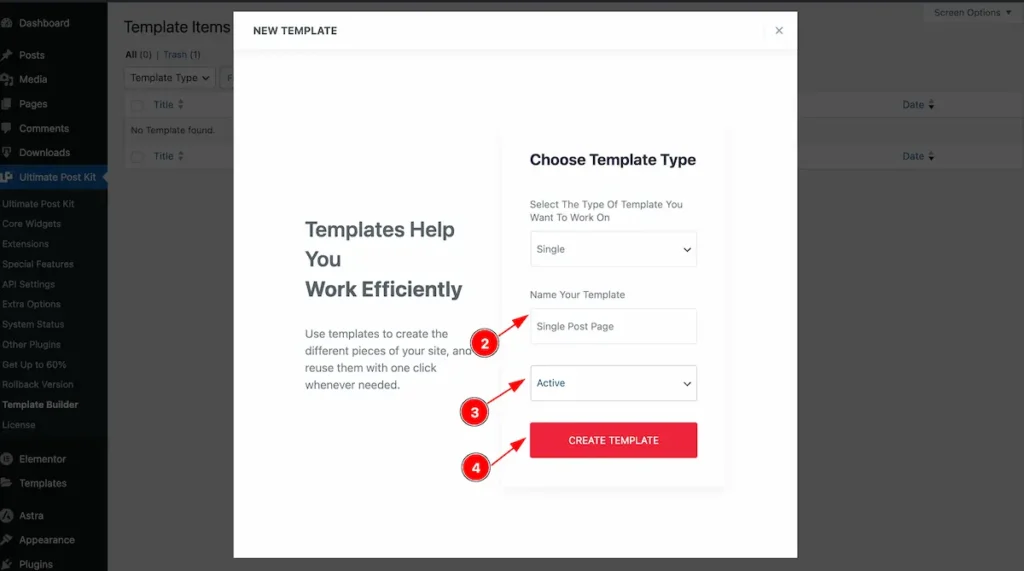
- Enter a name for your template in the Name Your Template field.
- Then, set the Status to Activate.
- Finally, click the “CREATE TEMPLATE” button to start building your new dynamic post template.
- Click on Edit with Elementor to open the template in the Elementor editor.
From there, you can design and customize your single post layout using Elementor widgets and dynamic content.
Add Dynamic Featured Image
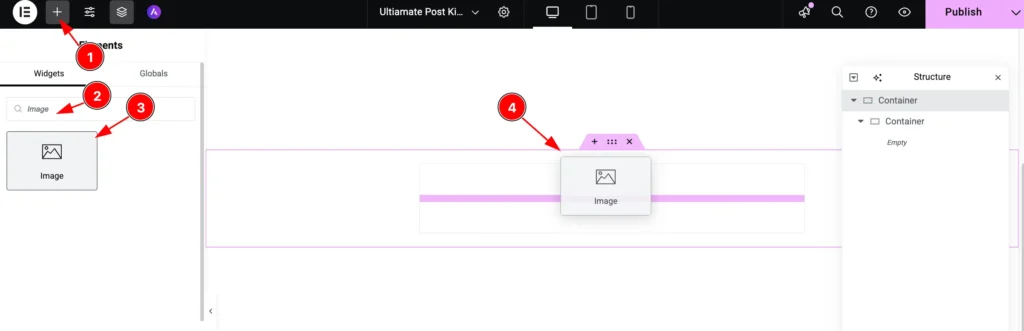
- Click on the “+” icon to open the widget panel.
- Search for the “Image” widget and select it when it appears.
- Drag the Image widget.
- Drop it onto the editor page.
Select the Dynamic Features
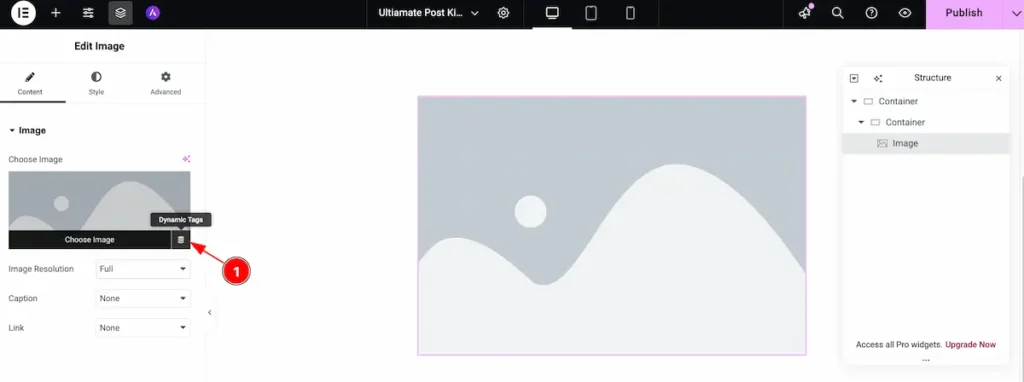
- Click on the Dynamic Tags (⚙️) icon next to any widget field in Elementor.
This feature lets you pull dynamic data—like the post title, content, featured image, author, or custom fields—directly from your posts into the template.

- From the Dynamic Tags dropdown, scroll to the Ultimate Post Kit – Post section and select Featured Image.
This will automatically display each post’s featured image dynamically within your template.
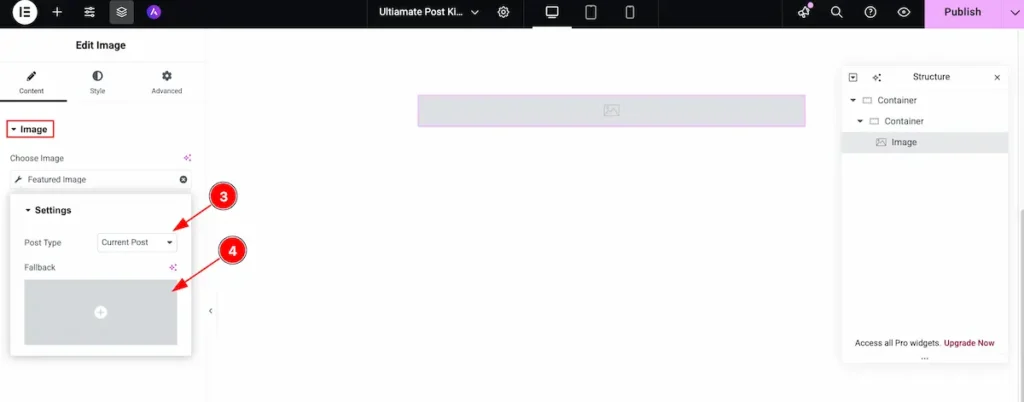
- Post Type, choose Current Post to ensure the featured image is pulled dynamically from the post being viewed.
- Fallback Image — this image will appear if a post doesn’t have a featured image assigned.
Heading Widget
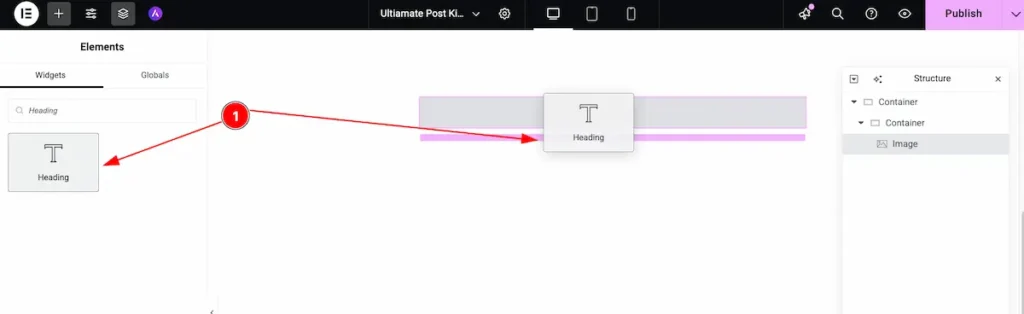
- Now Select the heading Widget and Insert It on the Editor Page.
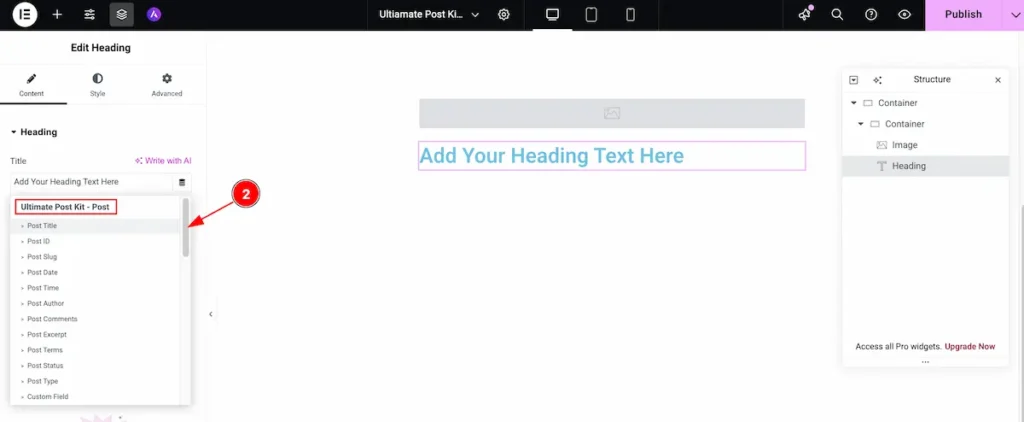
- Now select the Post Title for the Ultimate Post Kit – Post section.
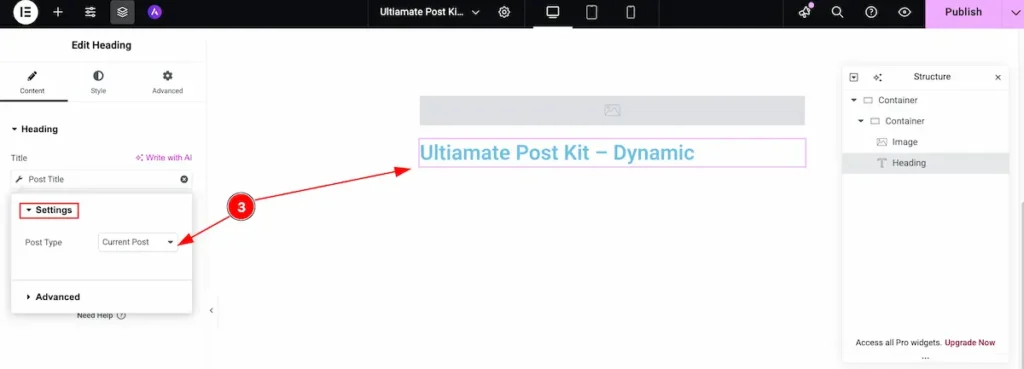
- Post Type: Set the Post Type to Current Post in the settings.
Select the Text Editor
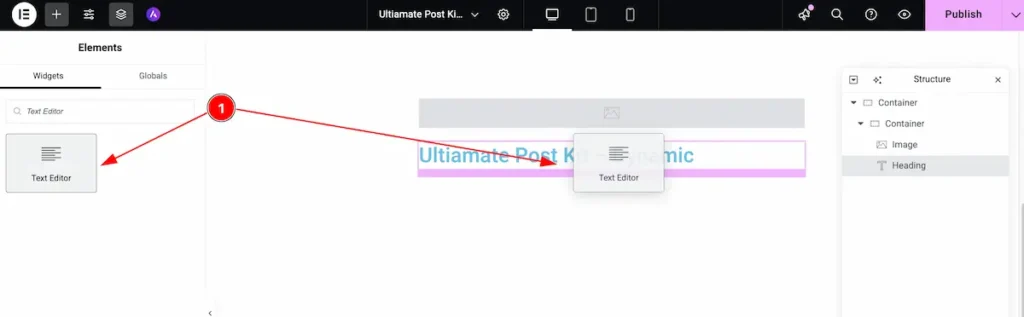
- Now Insert the ” Text Editor ” on the Page.
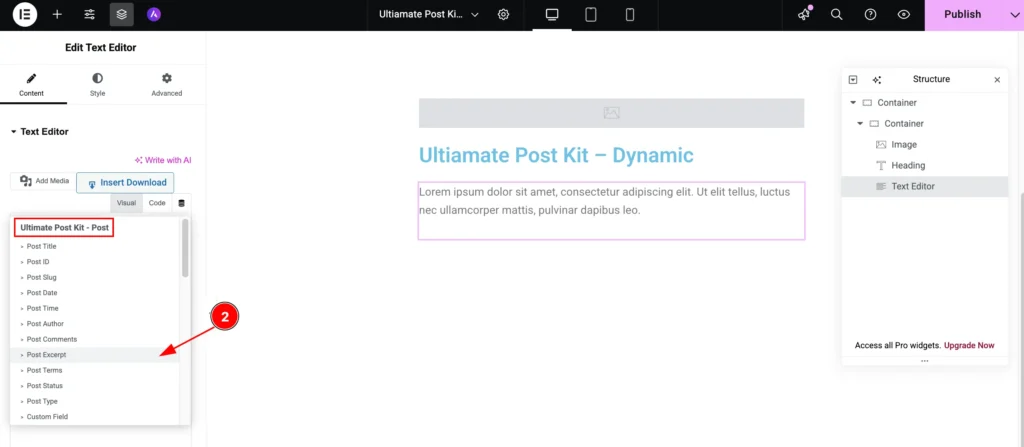
- Now select the Post Excerpt for demonstrating the Description of the Post from the Ultimate Post Kit – Post section.
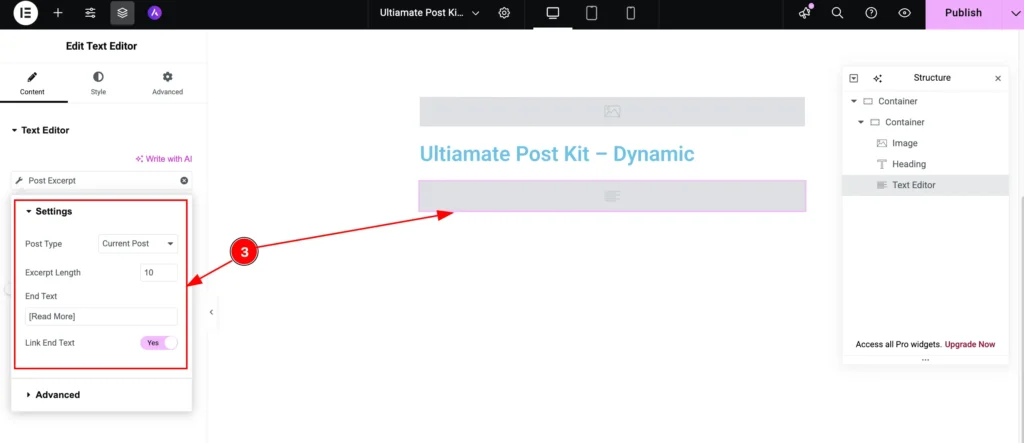
- Now set the settings for the editor section.
- Post Type: Select the Post type to Current Post.
- Excerpt Length: Set the length of the excerpt. Select that want to demonstrate.
- End Text: Set the Text at the End of the Excerpt. e.g.: [ Read More ].
- Link End Text: Enable the switcher to for the Excerpt.
Select the Author for Author

- Now search by the ” Text Editor ” and select on the Page.
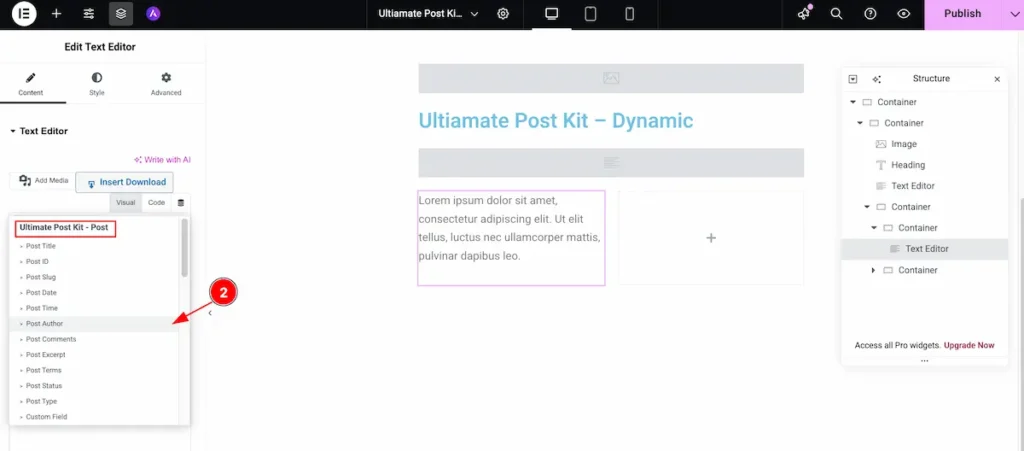
- Now select the Post Author from the Ultimate Post Kit – Post. It will demonstrate the Author of the Post.
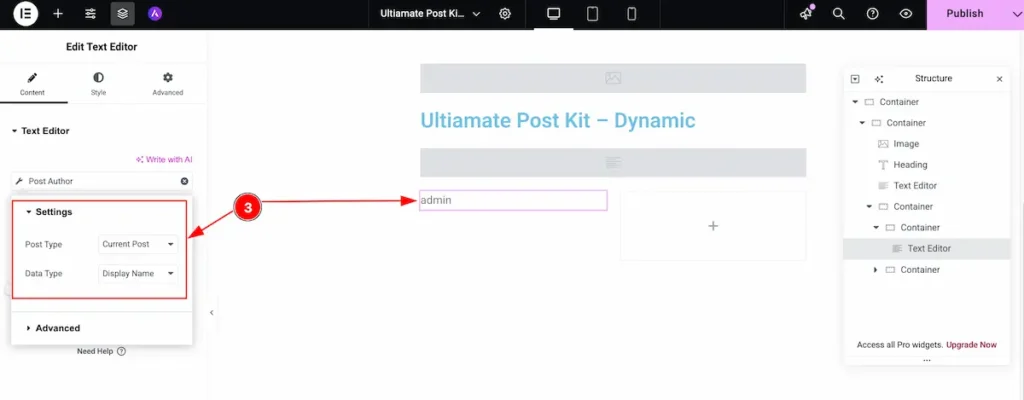
- Set the Settings for the Post Author.
- Post Type: Choose the Current Post type for the author.
- Date Type: Select the Data type for the Display Name. It will demonstrate the Display Name only.
Select the Post Terms
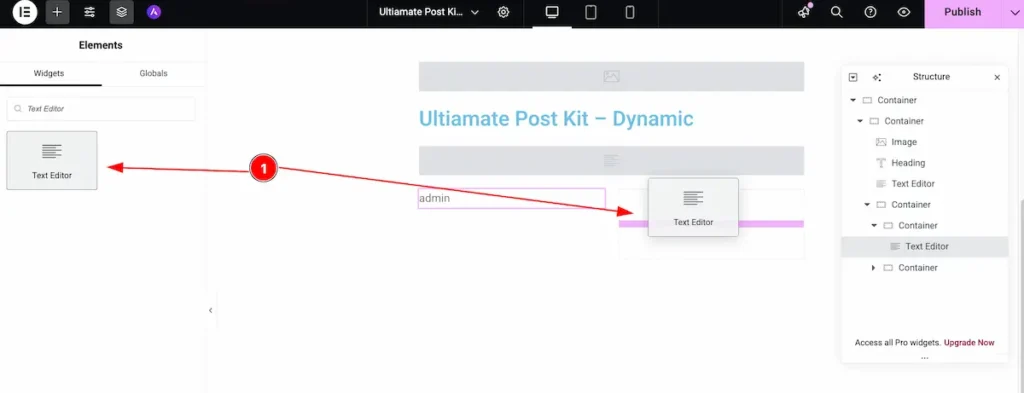
- Search by the Text Editor and select it on the page.
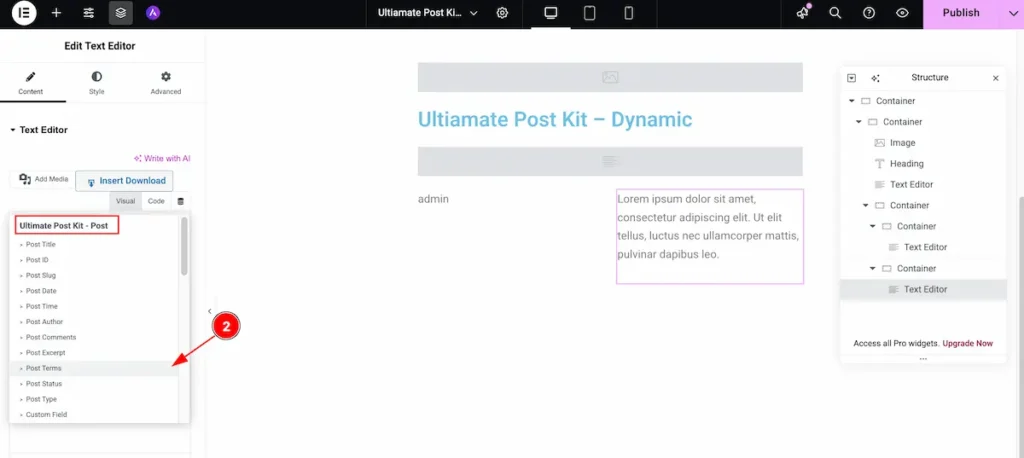
- Now select the Post Terms from the Ultimate Post Kit -Post section. It demonstrate the terms.
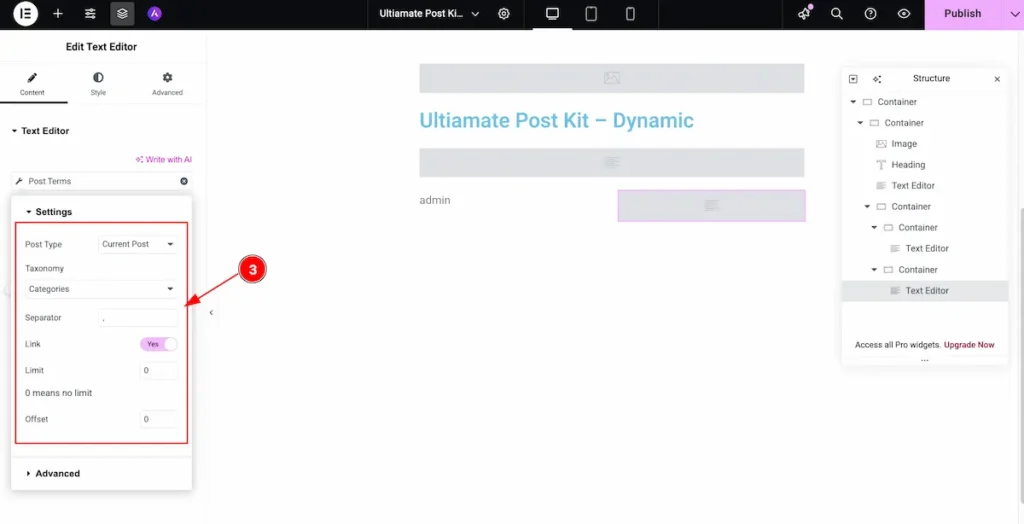
- Set the settings for the Terms.
- Post Type: Select Current Post for the Post Type.
- Taxonomy: Choose the appropriate taxonomy in the settings.
- Separator: Set the separator as needed for the display.
- Link: Enable the switcher to make it clickable.
- Limit: Set the limit to 0.
- Offset: Define the offset for the content display.
After Setting all the Dynamic content now check it.
- Here, all the content you’ve configured will appear: Featured Image, Post Title, Post Excerpt, Post Author, and Post Terms.
Insert any Post Widget and Check the Archive Dynamic Content
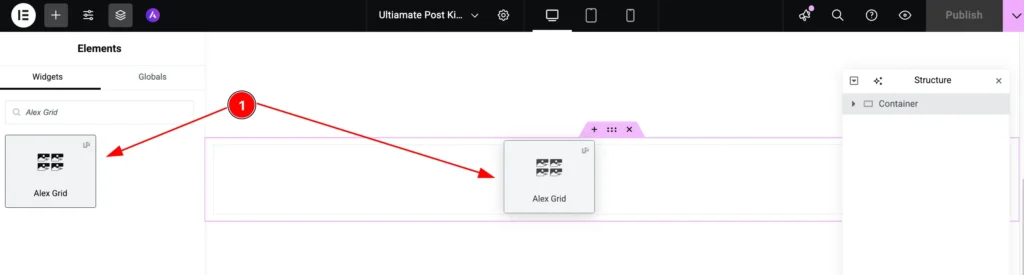
- Search and select the “Alex Grid” widget of Ultimate Post Kit. It’s one of the Popular widget. Use any widget you want.
- After inserting the Alex Grid widget will appear on the Page.
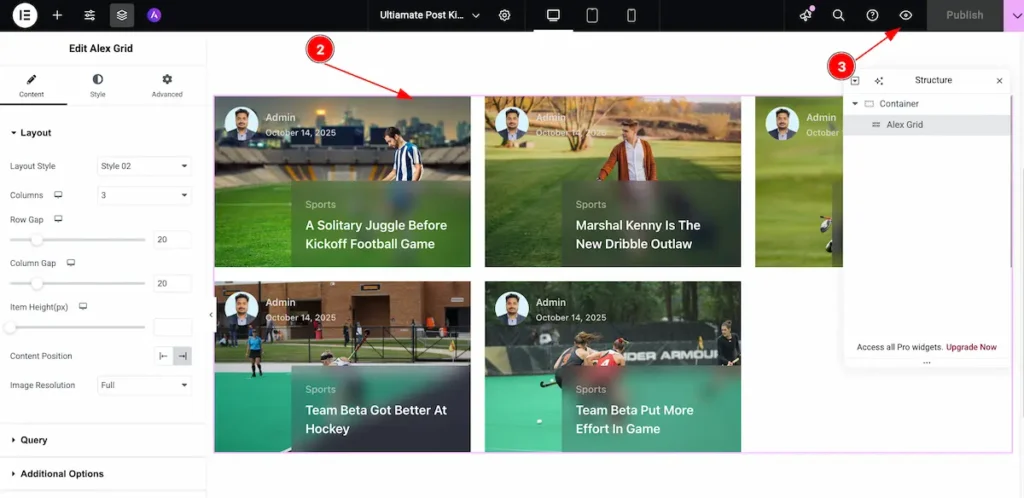
- Now click on the ” Preview Icon ” to check the preview.
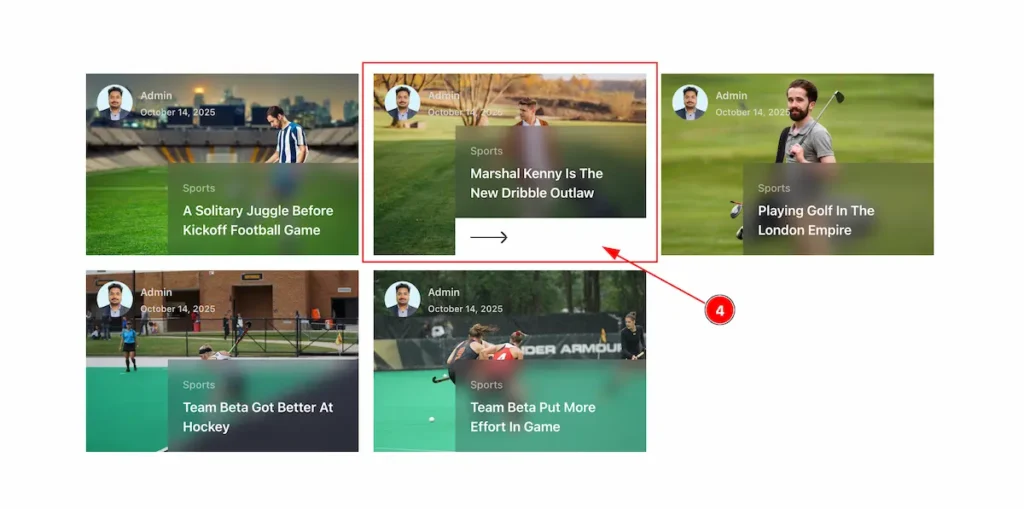
- One the Preview page select any post and click on it. As demonstrate we have select any of them.
- It appear in a archive single post page. It selected the Single Post Page we have activated for the Post.
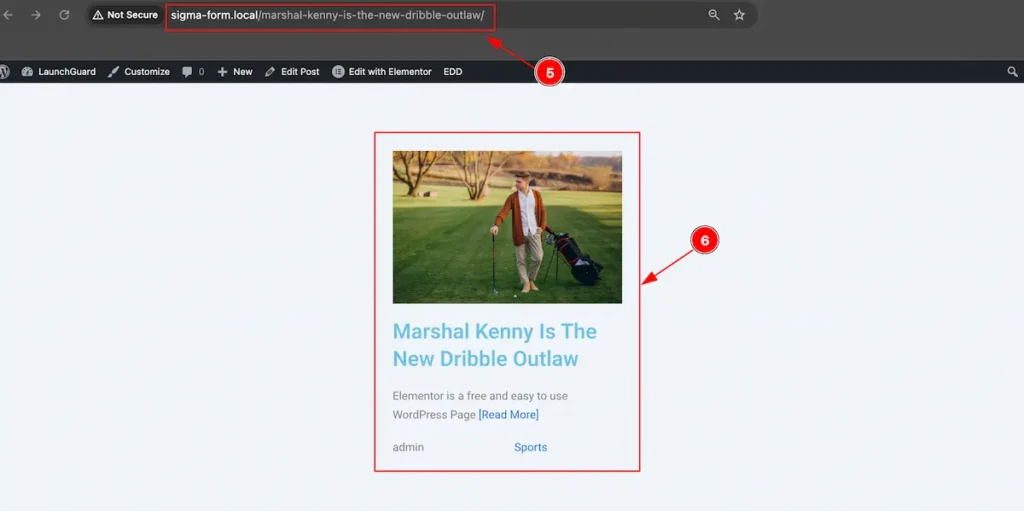
- It appear the dynamic content we have design earlier. The Featured Image, Post Title, Post Excerpt, Post Author and Post Terms.
Video Assist
Video Tutorial Coming Soon!
We appreciate your support.