This documentation provides comprehensive insights into the using the Custom CSS and JS of Ultimate Post Kit.
Custom CSS and JS
The Custom CSS and JS feature in Ultimate Post Kit allows you to add your own styling and scripts directly from the plugin interface — no need to edit theme files or child themes. It gives you full creative control to customize the design and behavior of your post layouts, widgets, and elements exactly how you want.
Key Features
- Add Custom CSS:
Write and apply your own CSS code to style any widget or section within Ultimate Post Kit.
Perfect for adjusting layouts, colors, fonts, and spacing. - Add Custom JavaScript:
Insert JavaScript or jQuery snippets to add interactive effects or advanced functionality. - Widget-Level Customization:
Apply code to a specific widget only — no need to affect the entire site. - Safe and Update-Proof:
Your custom code is stored securely and won’t be lost during theme or plugin updates.
Find Custom CSS and JS features.

Navigate to your WordPress Dashboard.
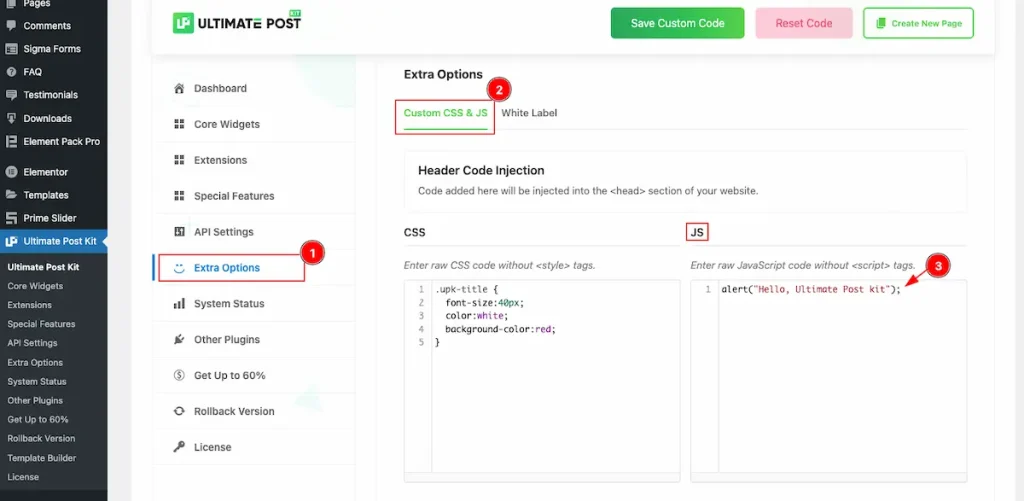
- Go to Ultimate Post Kit > Extra Options.
- Then click on the Custom CSS & JS tab. Here, you’ll find the custom code section where you can easily add and manage your own Custom CSS and JavaScript for advanced styling and functionality.
Header Code Injection
In this section, you’ll find a code injection header area where you can input your custom CSS or JavaScript code. This allows you to apply unique styles or scripts directly to your site without editing theme or plugin files.

- Header Code Injection: Code entered here will be added to the
<head>section of your website. - CSS: Write your custom CSS directly — no need to include
<style>tags. - JS: Add your custom JavaScript without using
<script>tags.
Footer Section Injection
In this section, you’ll find a code injection footer area where users can add their custom CSS or JavaScript code. The code entered here will be injected into the footer section of the website, allowing scripts or styles to load after the main content for better performance.

- Footer Code Injection: Code entered here will be added to the
</body>section of your website. - CSS: Write your custom CSS directly — do not include
<style>tags. - JS: Add your custom JavaScript directly — no need to use
<script>tags.
Page & Post Exclusion Settings
Set the exclusion for a specific page or post. Simply select the page or post you want to exclude, and apply it to prevent the custom CSS or JS from loading on that specific content.

- Page & Post Exclusion Settings: Select the specific pages and posts where you don’t want any custom code to be injected. This setting applies to all the sections mentioned above.
- Page: Displays a list of all pages from your WordPress site, allowing you to choose which ones to exclude from the custom code injection.

- Recent Posts: This section lists all your WordPress posts. You can select any post from here to exclude it from the custom code injection.
Inject Custom CSS and JS for Header Section.
We’ll now add some custom CSS code to see how it works.
To begin, insert any widget into your page using the Elementor editor.
Set the Custom CSS Code
We will check how to find any css of the widget and use it for the Custom Code for this.
Insert Any Widget

- Click on the “+” icon to add a new section.
- Then, search for the Alex Grid widget.
- Drag the Alex Grid widget and drop it into the section on your page.
Inspect page and Find the CSS of the Widget

- After inserting the widget on the page, right-click anywhere on the section and select “Inspect” from the browser menu. This will open the developer tools so you can view and test the section’s HTML and CSS.

- Now, locate the widget you want to style and identify its CSS class.
For example, if you select the Title in the Alex Grid widget, its CSS class might beupk-title. You can use this class to apply your custom CSS.
Set the Custom CSS and Check it
We will test it by selecting the Custom CSS for the Post.
Now select the Custom CSS code according to the Class

- Now, go to the CSS section in the Custom CSS & JS settings and write your custom code.
For example, you can add a simple CSS snippet to style the Title like this:
css:
.upk-title {
font-size:40px;
color:white;
background-color:red;
}
This will make the title white, with a red background, and a larger font size.

- Now, click on “Save Custom Code”.
After saving, you will see a confirmation message, for example: “Custom code saved successfully!”
Check the custom find

- Now, go to the preview page.
You will see the custom CSS applied to the widget as defined — for example: red background, white text, and larger font size.
Now Check where the code injected ?

- Now, right-click anywhere on the page and select “View Page Source”.
This will open a new page showing the full HTML of your site, where you can see the custom CSS code injected into the<head>or<body>section, depending on where you added it.

- After scrolling through the page source, you will find the Custom CSS section.
It will display a comment indicating it’s custom code, followed by the CSS code you added. This confirms that your custom code has been successfully injected into the page.
<!-- Ultimate Post Kit Custom Header CSS -->
<style type="text/css">
.upk-title {
  font-size:40px;
  color:white;
  background-color:red;
}
</style>- The custom code injection appears just before the closing
</head>tag in the page source, ensuring that your CSS is loaded in the header section of the website.
Set the Custom JS Code
We will check how to set the Custom JS code and use it.
- Navigate to the Extra Options section.
- Now select the Tab of Custom CSS & JS
- On the JS section, write the Custom JS code.
Here we have written the simple JS code for test purpose only.
alert(" Hello, Ultimate Post Kit ");
- Now click on the ” Save Custom Code ” button to save it. And this will appear a message “Custom code saved successfully! “.
Check the JS preview.

- Now navigate to any page to see the JS Alert. Reload the page and the alert will appear. It means the custom JS is working perfectly.
Check where the Custom JS Code Injected

- Now, navigate to any page and right-click on it to open the options menu. Then, select Inspect to inspect the page.

- Now, the custom JS will appear in the inspected section.
- The custom code is injected just before the closing </head> tag.
Inject Custom CSS and JS for Footer Section.
We’ll now add some custom CSS code for the footer section to see how it works.
To begin, insert any widget into your page using the Elementor editor.
Set the Custom CSS Code
We will check how to find any css of the widget and use it for the Custom Code for this.
Insert Any Widget
- Click on the “+” icon to add a new section.
- Then, search for the Alex Grid widget.
- Drag the Alex Grid widget and drop it into the section on your page.
Inspect page and Find the CSS of the Widget
- After inserting the widget on the page, right-click anywhere on the section and select “Inspect” from the browser menu. This will open the developer tools so you can view and test the section’s HTML and CSS.
- Now, locate the widget you want to style and identify its CSS class.
For example, if you select the Title in the Alex Grid widget, its CSS class might beupk-title. You can use this class to apply your custom CSS.
Set the Custom CSS and Check it
We will test it by selecting the Custom CSS for the Post.
Now select the Custom CSS code according to the Class

- Now, go to the CSS section in the Custom CSS & JS settings and write your custom code.
For example, you can add a simple CSS snippet to style the Title like this:
css:
.upk-title {
font-size:40px;
color:white;
background-color:red;
}
This will make the title white, with a red background, and a larger font size.

- Now, click on “Save Custom Code”.
After saving, you will see a confirmation message, for example: “Custom code saved successfully!”
Check the custom find

- Now, go to the preview page.
You will see the custom CSS applied to the widget as defined — for example: red background, white text, and larger font size.
Now Check where the code injected ?
- Now, right-click anywhere on the page and select “View Page Source”.
This will open a new page showing the full HTML of your site, where you can see the custom CSS code injected into the<head>or<body>section, depending on where you added it.

- After scrolling through the page source, you will find the Custom CSS section.
It will display a comment indicating it’s custom code, followed by the CSS code you added. This confirms that your custom code has been successfully injected into the page.
<!-- Ultimate Post Kit Custom Footer CSS -->
<style type="text/css">
.upk-title {
  font-size:40px;
  color:white;
  background-color:red;
}
</style>- The custom code injection appears just before the closing
</body>tag in the page source, ensuring that your CSS is loaded in the header section of the website.
Set the Custom JS Code
We will check how to set the custom Js of the widget and use it for the Custom Code.

- Navigate to the Extra Options section.
- Now select the Tab of Custom CSS & JS
- On the JS section, write the Custom JS code.
Here we have written the simple JS code for test purpose only.
alert(" Hello, Ultimate Post Kit ");
- Now click on the ” Save Custom Code ” button to save it. And this will appear a message “Custom code saved successfully! “.
Check the JS preview.

- Now navigate to any page to see the JS Alert. Reload the page and the alert will appear. It means the custom JS is working perfectly.
Check where the Custom JS Code Injected
- Now navigate to any page and click on the Right button and it will appear the option section. Now click on the Inspect the page.

- Now the appear on the custom JS with the comments <!– ultimate Post kit custom foooter js –>.
- The custom appear before the body closing tag.
Pages and Post Exclusion
Please select any page to exclude it.

- Navigate to the Ultimate Post kit > Extra Options section.
- Now select the ” Custom CSS & JS ” tab.
- Scroll down and find a section where have the Pages & Post Exclusion settings avaiable.
Check Page Exclusion
The changes will apply for the Page only. You can select any page to get rid of the custom code injected for header and footer.
Choose Any Page for Exclusion

- Now select any page that want to exclude. Here will demonstrate all the pages available on the dashboard.
Select The Page and Check

- Now navigate to the Pages > All Pages section where all the page available.
- Now select the Page that we have already selected. Click on the View. It will navigate to the View page.

- The Navigation link appear that page we are visiting.
- Now check the Title of the Alex Grid. The widget we have selected for the demonstration. It’s appear just simple page not Custom CSS code applied here.
Inspect and check the Code

- Now Right click on the page and it will appear all the options. Now select the Inspect options and click on it.

- Now check the page and on the Heading section. No Ultimate Post Kit Custom CSS Code appear before </head> closing tag.
Check the Post Exclusion
The custom will not apply for the post that will be selected.
First check the Post.

- Navigate to the Posts > All Posts section. It will appear all the posts.
- Now choose any post that want to check the preview. We have selected one and click on the ” View ” page.

- It will navigate to the new page and the The Post URL will appear on there.
- The Alert function will appear on there and it will show the alert message.
Now Select the Post for Excluding

- Now navigate to the Ultimate Post Kit > Extra Options section.
- Now select the ” Custom CSS & JS ” tab.
- On the Recents Posts section select any post for excluding. You can select one or more posts at a time. e.g.: We have selected the first post.

- Now click on the ” Save Custom Code ” button to save it. It will appear a message “Custom Code Saved Successfully ( 1 pages excluded) “.
Now check it on the preview page
- Navigate to the Posts > All Posts section. It will appear all the posts.
- Now choose any post that want to check the preview. We have selected one and click on the ” View “ button of the page.

- It will navigate to the Post Page. The Post Link appear on there.
- On the Body section the post info appear only. The Alert is not appearing on there.
Now Inspect and Check it

- Now Right click on the mouse to open the options and select the inspect. If you can like you can use the shortcut. Press Shift + Cmd + I.

- Now check before the </head> tag it will appear no longer the content.
By following these instructions, you can use the Custom CSS and use it on your own way.
Video Assistant
Please watch the video tutorial to learn about the feature. The video will help you to use the Custom CSS and JS Feature of the Ultimate Post Kit plugin.
Thanks for staying with us.