Sigma Store Locator is a powerful WordPress plugin that helps you create and manage a searchable store or location finder on your website. It allows you to add unlimited locations and display them on an interactive map with customizable layouts, filters, and geolocation features, making it easy for visitors to find nearby stores and get directions quickly.
Key Features of Sigma Store Locator
Sigma Store Locator is designed to help businesses display and manage multiple locations through an intuitive, map-based store finder. With flexible customization options, smart search functionality, and performance-focused features, it ensures visitors can quickly find nearby stores while site owners maintain full control over the display and behavior. The key features are –
- Unlimited Store Locations – Add and manage unlimited stores with detailed information like address, contact details, business hours, and categories.
- Interactive Map Display – Display stores on a responsive Google Map with customizable controls, zoom levels, and marker animations.
- Advanced Search & Filters – Let users search stores by location, category, or distance, with optional geolocation support.
- Distance-Based Results – Automatically show the nearest stores based on the user’s current location.
- Customizable Layouts & Styles – Choose from multiple frontend layouts, map styles, and templates to match your website design.
- Performance Optimized – Includes marker clustering and store data caching for faster load times, even with large numbers of locations.
- Flexible Display Options – Toggle store lists, search boxes, directions, distance display, pagination, and lazy loading.
- Page Builder Friendly – Easily embed the store locator using shortcodes and use it with popular page builders.
- Localization & Language Support – Set map language and regional preferences for global audiences.
- Custom CSS Support – Add your own CSS directly from the settings to fine-tune the appearance.
How To Download The Plugin File
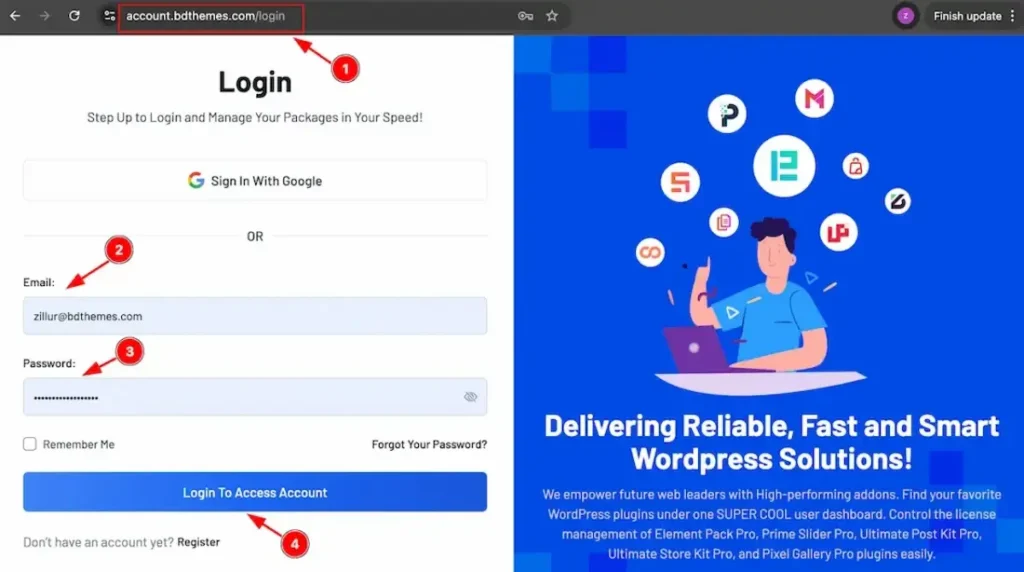
1. Go to the link https://accounts.bdthemes.com
2. Enter the Purchase email (The email used for purchasing the Sigma Store Locator).
3. Enter the password.
4. Click on the ‘‘Login To Access Account’’ button to log in to your license management dashboard.
Please note that, if you are not registered yet, then please register first with your purchase email and then log in. After successfully logging in, you will see the dashboard.
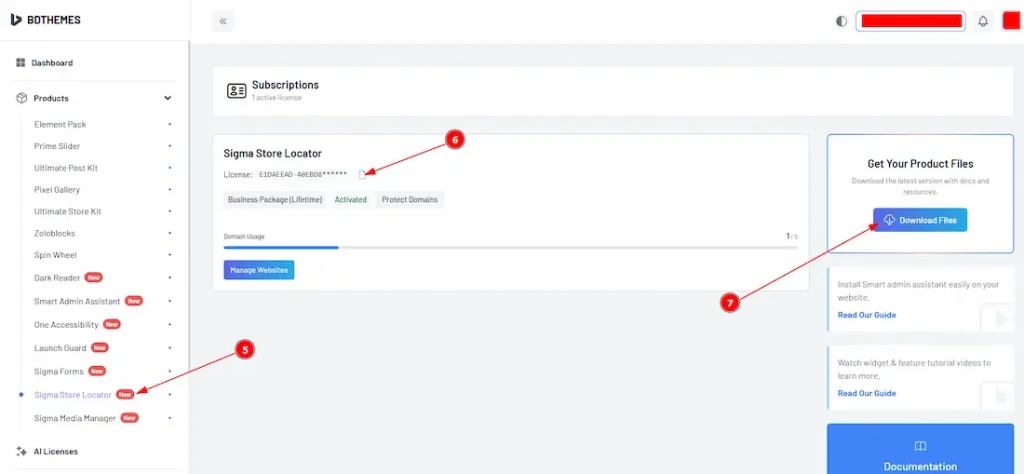
5. Select the “Sigma Store Locator” tab from the left side bar (Products). It will display the plugin information.
6. Here, you will get the license key to activate the pro plugin on the WP dashboard.
7. Find the “Download Files” button on the right top side and click on it.
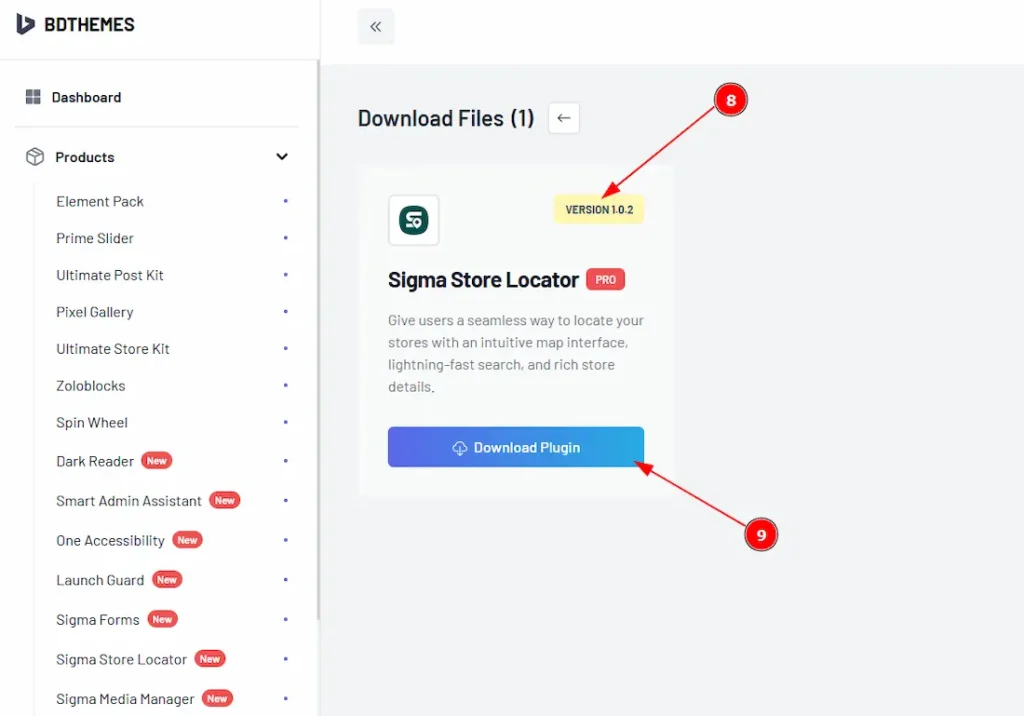
8. In the top right corner, the latest version will appear.
9. Now you will see the Sigma Store Locator plugin. Just click on the ”Download Plugin” button, and it will start to download.
How to Install & Activate the Plugin
After logging in to your WordPress dashboard, follow these steps,
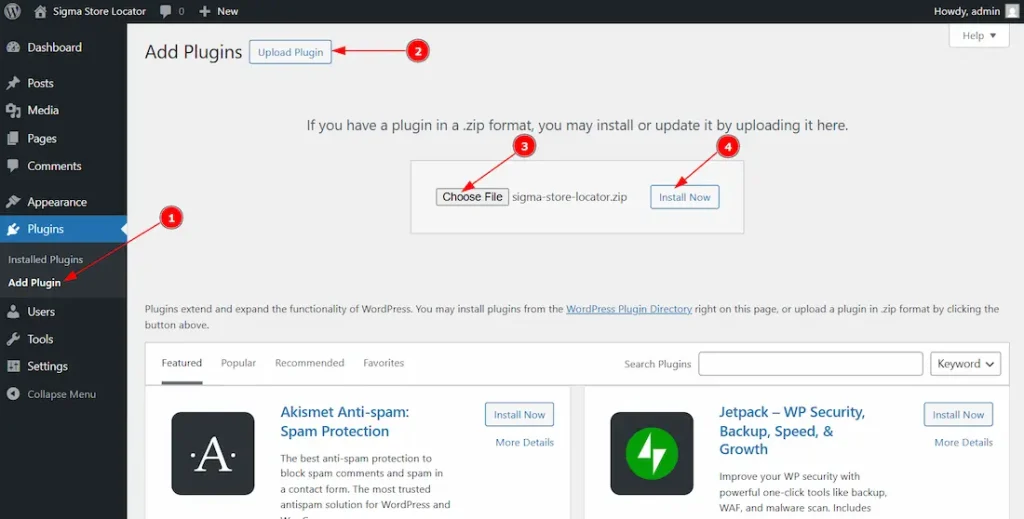
1. Navigate to the Plugins tab and click on the “Add New Plugin”.
2. Click on the “Upload Plugins” button and a file box will appear.
3. Choose the file from where you have stored the downloaded file and select the file.
4. Then click on the “Install Now” button.
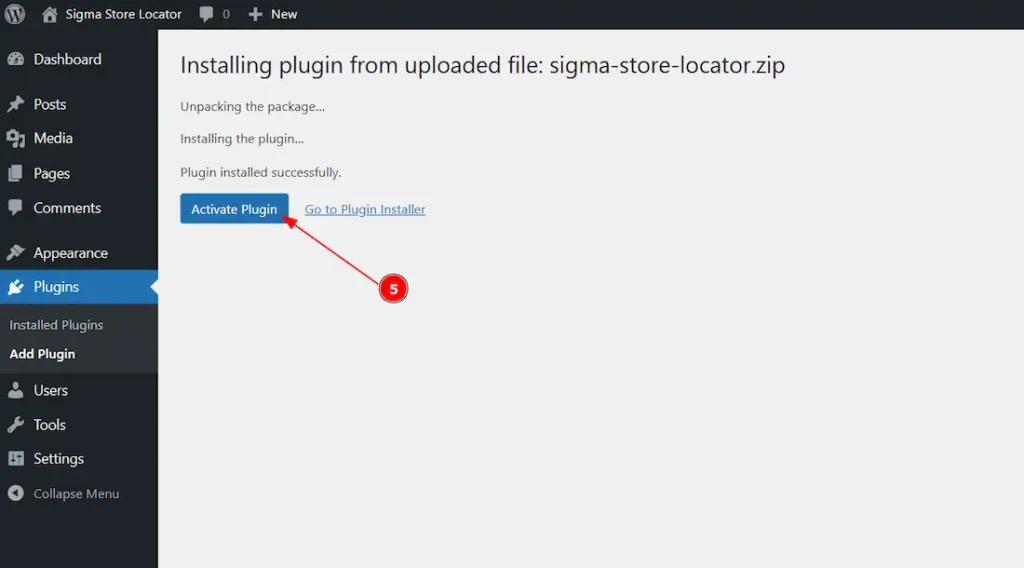
5. After completing installation, the “Activate Plugin” button will appear, and click on it to activate the plugin.
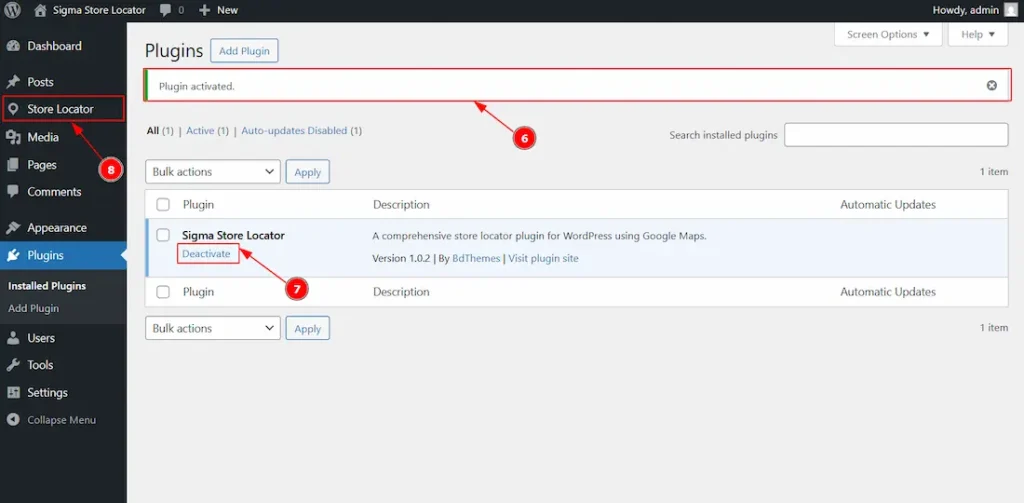
6. After clicking on the Activate plugin button, it will redirect you to the plugin’s page and here you will see a notification informing that the plugin is activated.
7. See the Plugin list, below the name of the plugin, you will get to see the status of the plugin, whether it’s activated or deactivated. (If it’s activated, then you will see the deactivate button and if it’s deactivated, then you will see the activate button.)
8. Now, click on the Store Locator on the left side to redirect to the Store Locator dashboard. It will directly take you to the License tab as you can’t use it until activating the license.
(Note: If it’s not redirecting you, then you can manually go to WP Dashboard > Store Locator > Settings > License Tab)
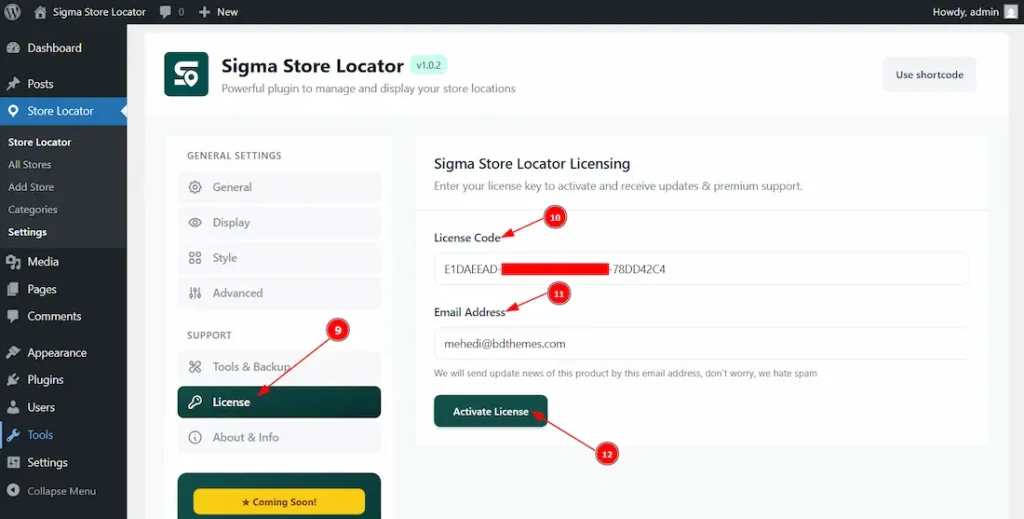
9. Until you activate the license, you will only have access to the License tab. Here, you have to add the license information.
10. Please add the license code that you received on the BdThemes account.
11. Here, you have to add the email address that you used to purchase the product.
12. Click on this button to activate the license.

13. After the license is activated successfully, you will see the license information here that includes license status, license type, license expiry date, support expiry date and your license key. Also, all the other options in settings will be accessible to customize.
14. You can deactivate the license by clicking on the “Deactivate License” button.
Customizing the Sigma Store Locator Plugin
Store Locator / Settings Section
Go to WP Dashboard > Store Locator / Settings
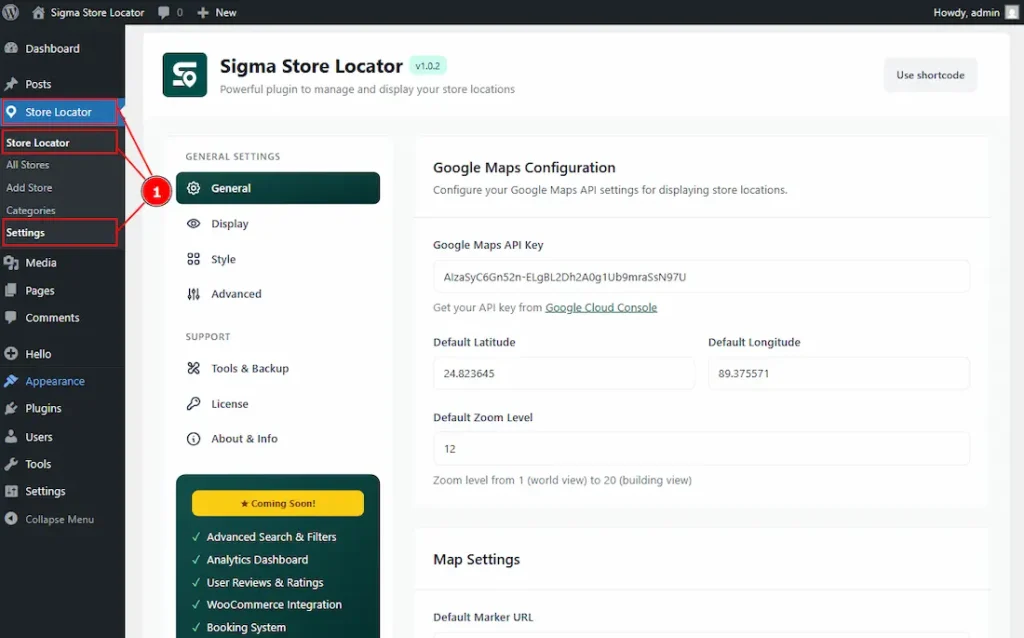
1. Clicking any of these three options will redirect you to the Sigma Store Locator Settings page. All three options lead to the same dashboard, which is a crucial area for configuring how your store locations are displayed to customers. From here, you can manage and adjust the essential settings required for proper functionality and presentation.
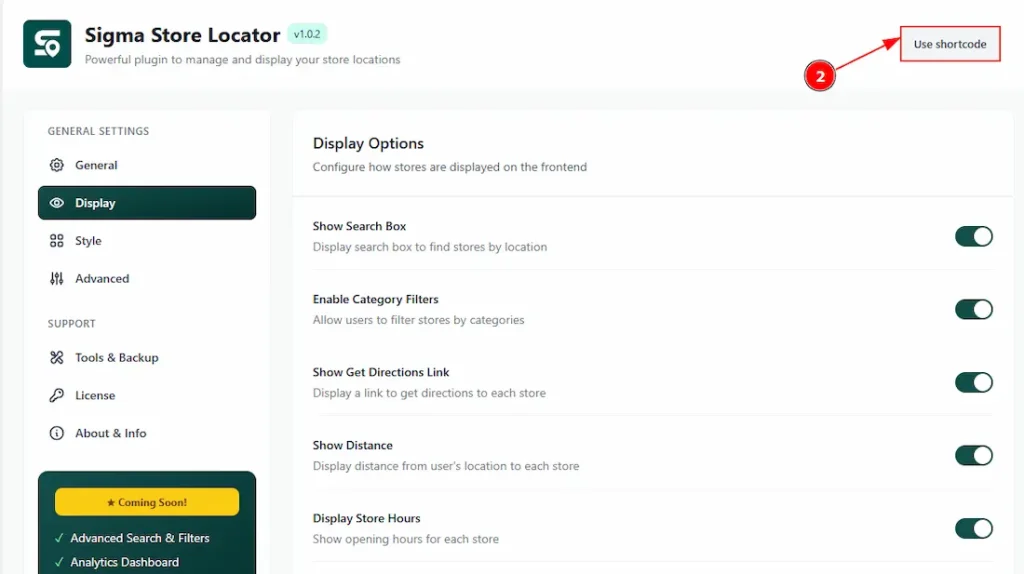
You will get the shortcode in the top right corner. Click on the Use Shortcode Button, and it will be automatically copied to your clipboard then use the shortcode where you want to show the store locator.
Usage of Shortcode for Elementor Editor
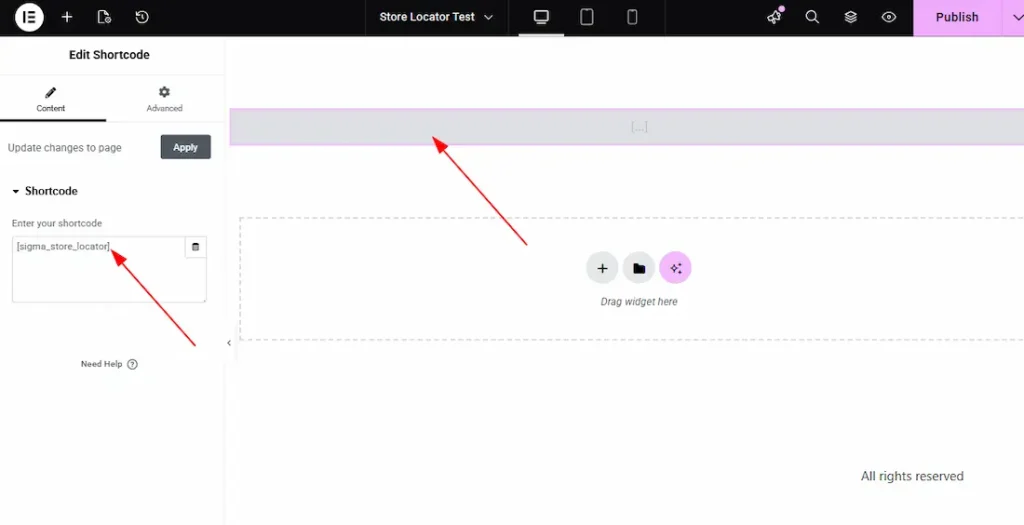
To use the shortcode on Elementor Editor, first insert the shortcode widget, then paste the shortcode that you have copied from the button and then publish the page. The store locator will be visible on the published page.
Usage of Shortcode for WordPress Pages / Gutenberg Block Pages
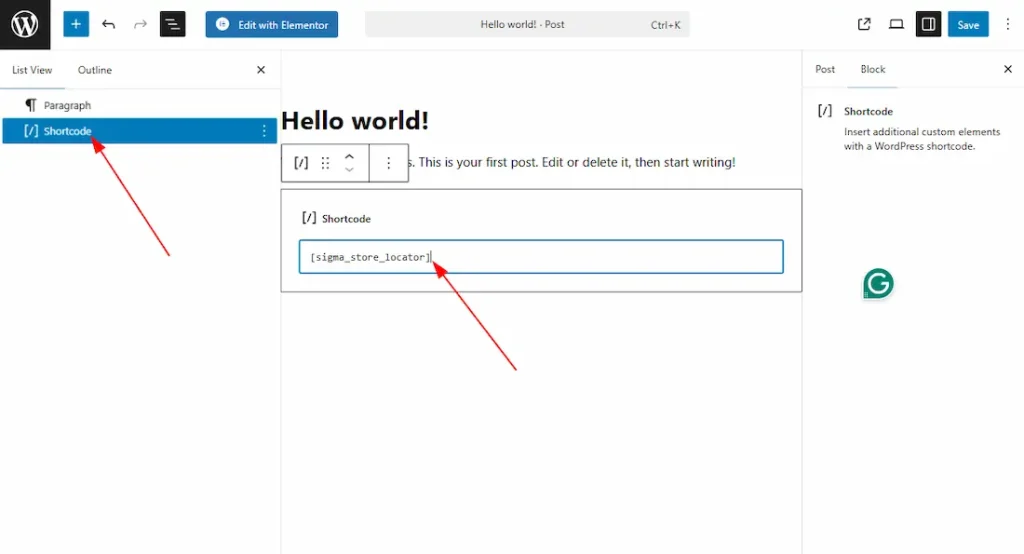
To use the shortcode on Pages/Gutenberg Block, first insert the shortcode block, then paste the shortcode that you have copied from the button and then publish the page. The store locator will be visible on the published page.
The Settings page is divided into two sections: General Settings and Support. We’ll begin the customization process with the General Settings section. In General Settings, four tabs are seen. These are General, Display, Style & Advanced. Let’s explore those one by one.
General Settings Section
General Tab
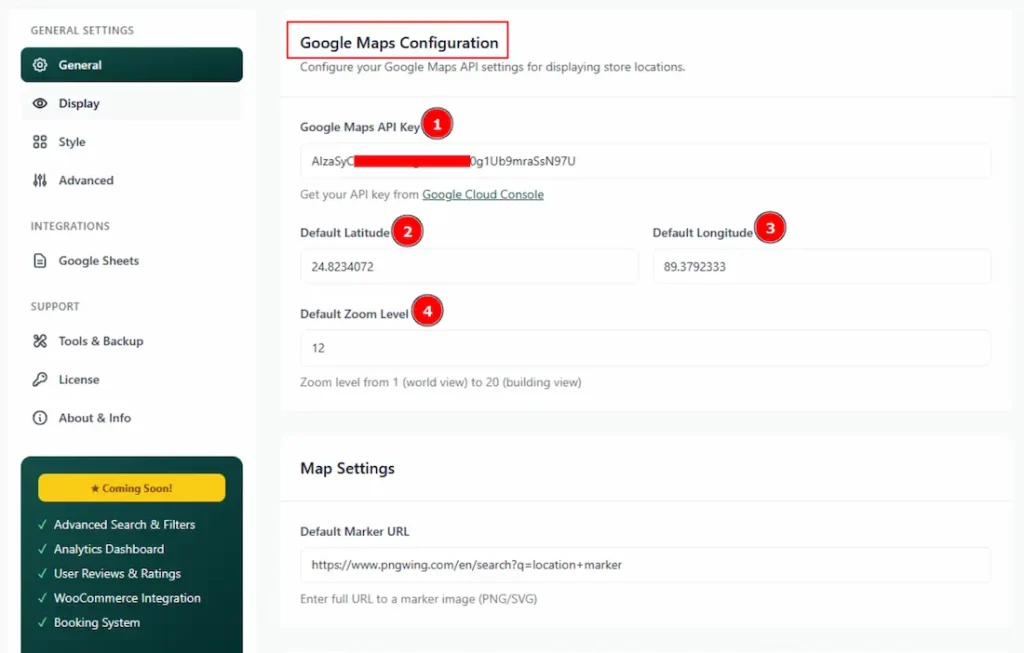
1. Google API Key: You have to add the Google Maps API Key in this field.
(Note: If you didn’t know how to generate the Google Map API key, then you can see the video on how to generate the Google Map API key, which helps you properly generate the Google Map API key.)
2. Default Latitude: You can add the latitude here to show the default latitude view of the map to the customer.
3. Default Longitude: You can add the longitude here to show the default longitude view of the map to the customer.
4. Default Zoom Level: You can add a default zoom level to the map with this option. Here you can set the zoom level from 1 (world view) to 20 (building view)
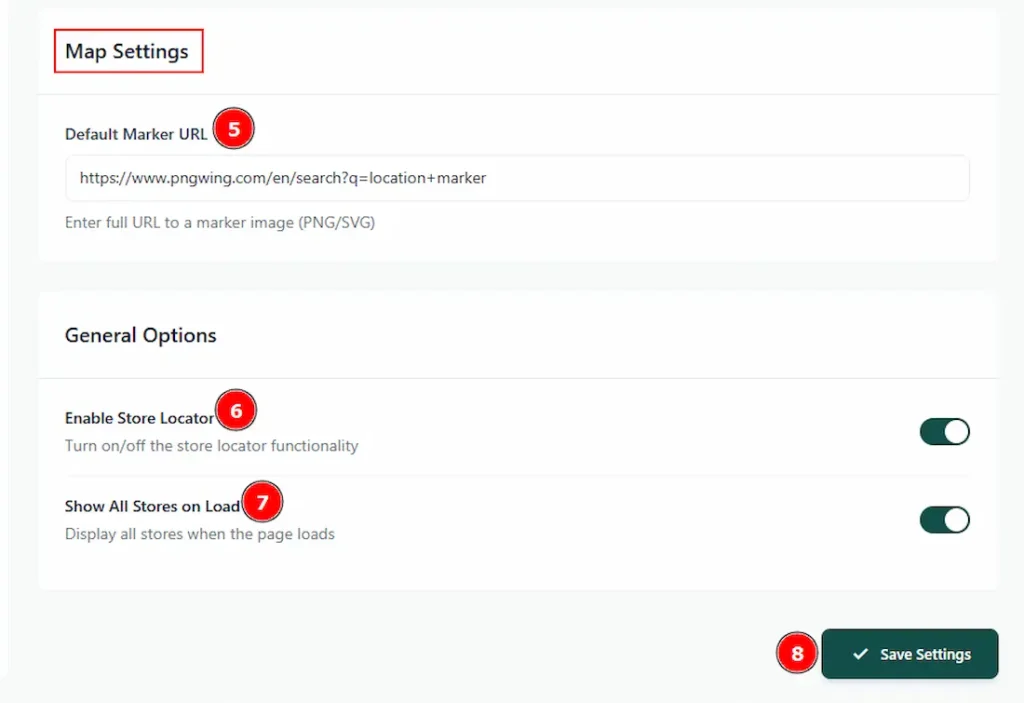
5. Default Marker URL: Here, you can add a full URL to a marker image (PNG/SVG) to locate your store on the map.
6. Enable Store Locator: Enable or disable the switcher to turn on/off the store locator functionality.
7. Show All Stores on Load: Enable the switcher to display all stores when the page loads.
8. Save Settings: Make sure to click on the save settings button to apply the changes that you have made.
Display Tab
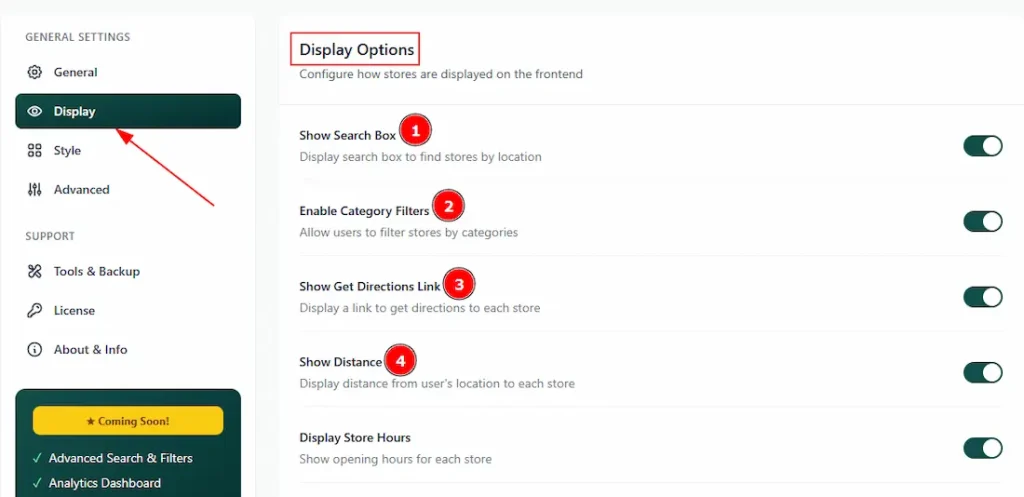
1. Show Search Box: Enable the switcher to display the search box to find stores by location.
2. Enable Category Filters: Enable the switcher to show the category filter bar and allow users to filter stores by categories.
3. Show Get Directions Link: Enable the switcher to display a link to get directions to each store.
4. Show Distance: Enable the switcher to display the distance from users’ locations to each store.
Preview:
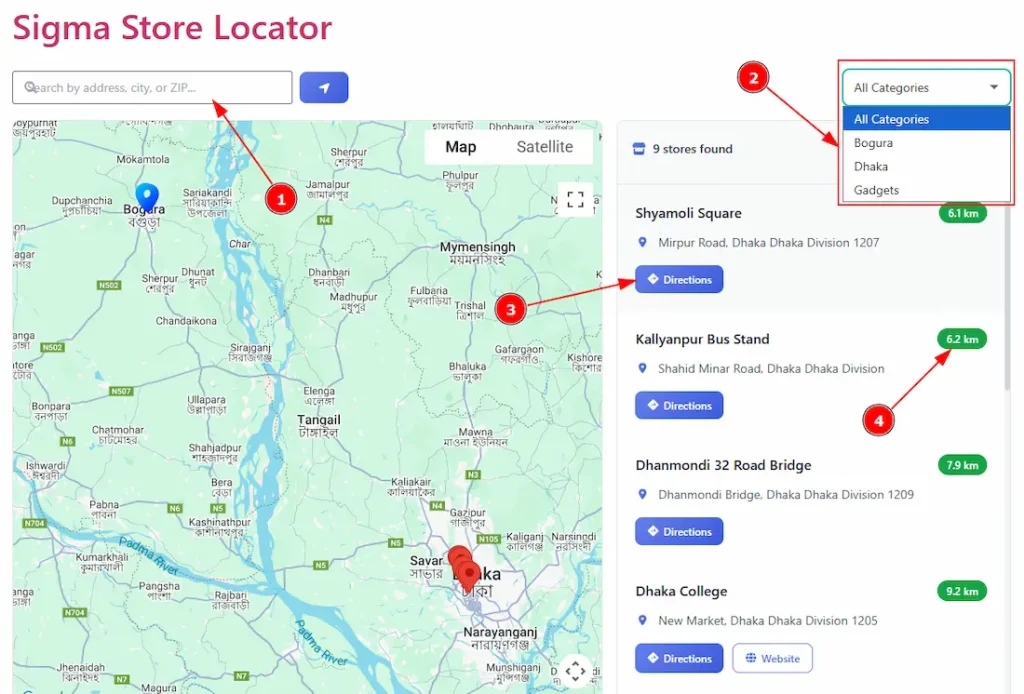
This is the preview of the Display tab. Here you can see the frontend view of (1) Searchbox, (2) Category filters, (3) Directions & (4) Distance.
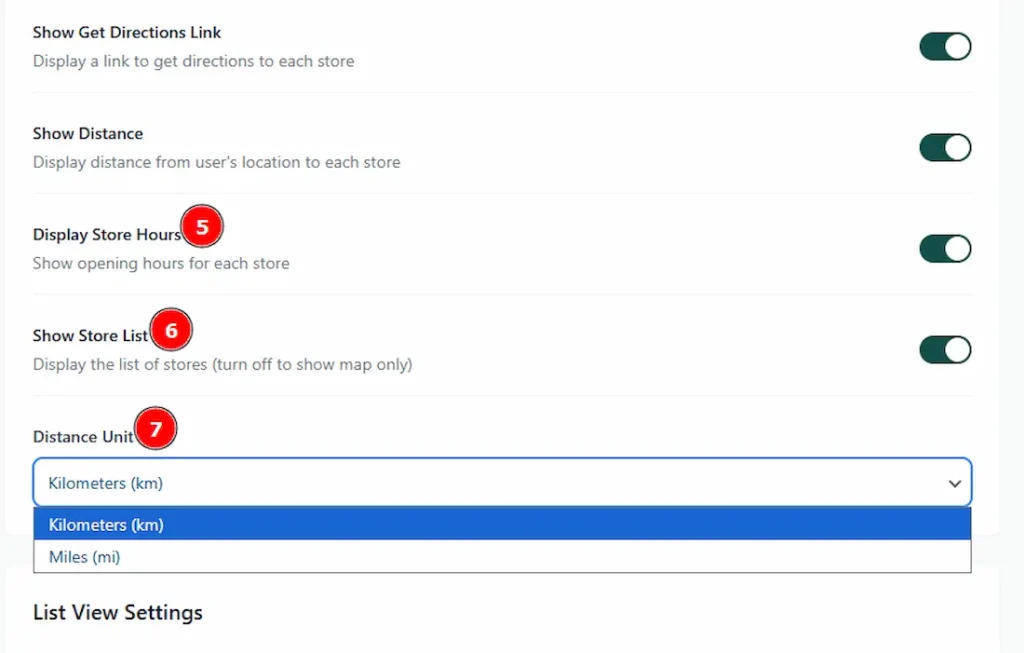
5. Display Store Hours: Enable the switcher to show the operating hours (openings & closing) for each store.
6. Show Store List: Enable the switcher to display the list of stores. By disabling the switcher, you will only show the map.
7. Distance Unit: You can choose between kilometers (km) and miles (mi) to display distance units.
Preview:
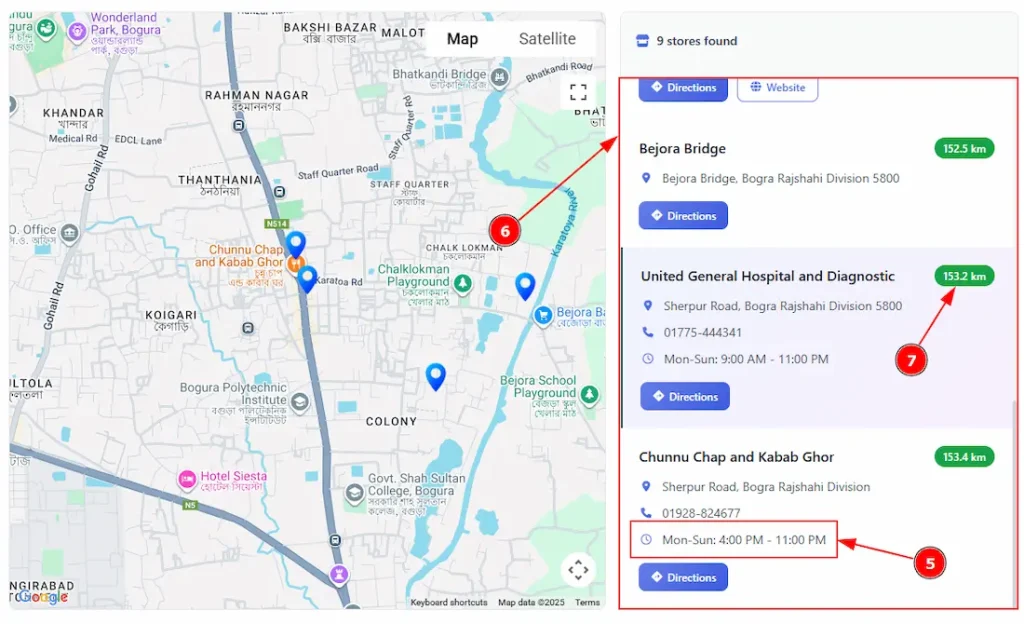
This is the preview of the Display tab. Here you can see the frontend view of (5) Store hours, (6) Store list & (7) Distance unit.
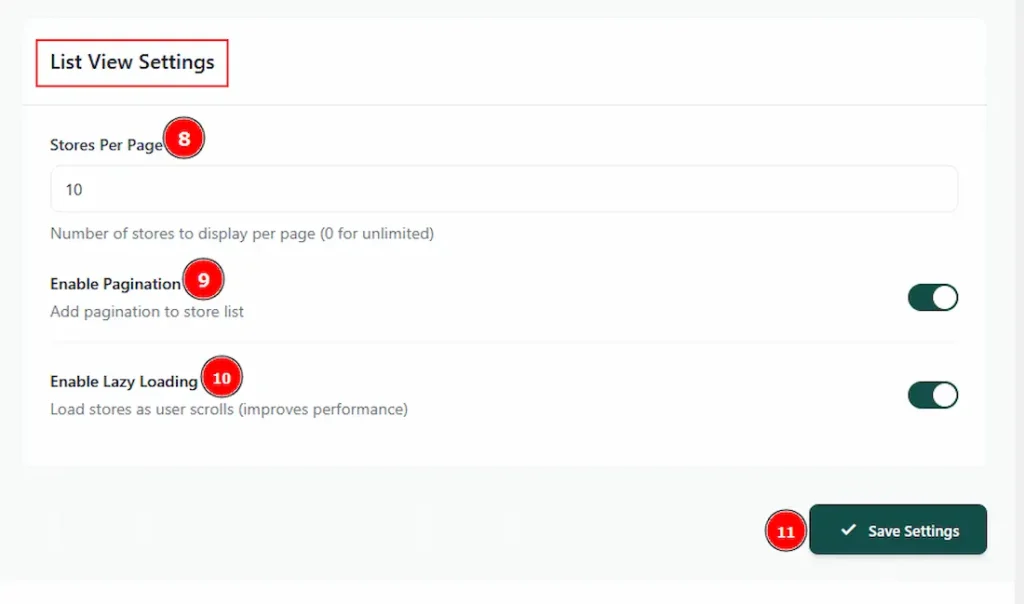
8. Stores Per Page: Here, you can add the number of stores that you want to display per page. Please remember that inputting the number 0 means unlimited stores.
9. Enable Pagination: Enable the switcher to add pagination to the store list.
10. Enable lazy loading: Enable the switcher to load stores as the user scrolls. It improves performance.
11. Save Settings: Make sure to click on the save settings button to apply the changes that you have made.
Preview:
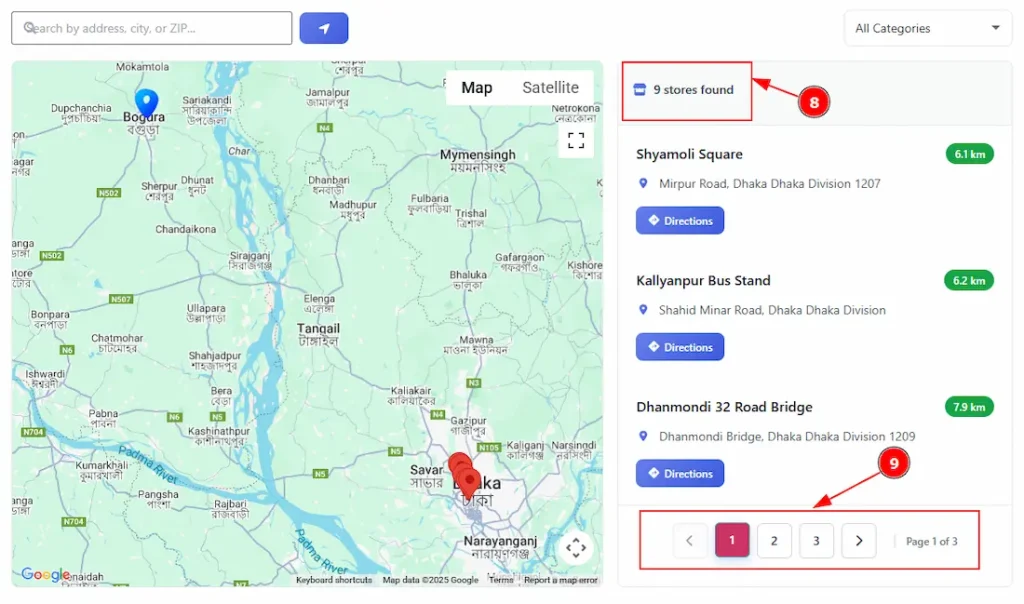
This is the preview of the Display tab. Here you can see the frontend view of (8) Store Per Pages & (9) Pagination.
Style Tab
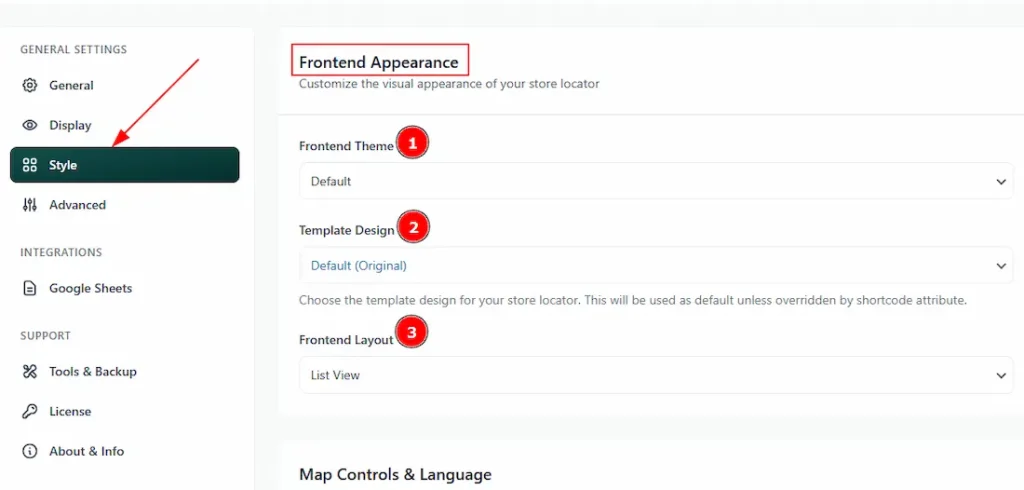
1. Frontend Theme: Here, you can select the visual appearance of your store locator from the Default, Dark Mode, Minimal, or Vibrant themes.
2. Template Design: Here, you can choose the template design for your store locator. The available templates are – Default, Classic, Split, Minimal Design & Compact View.
(Note: The template will be used as the default unless overridden by a shortcode attribute.)
3. Frontend Layout: You can select the frontend layout as List view or Accordion (Group by City) with this option.
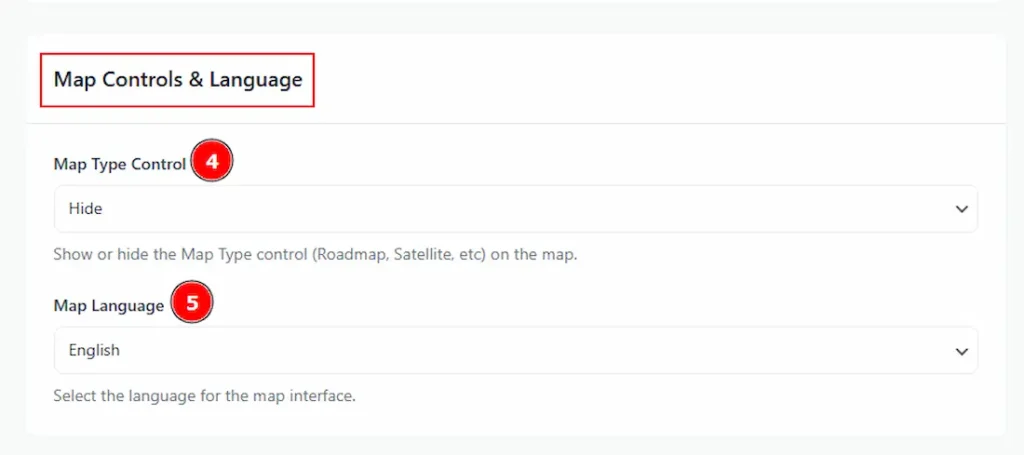
4. Map Type Control: You can make changes to the settings to show or hide the map type control for Roadmap and Satellite on the map here.
5. Map Language: You can select the language for the map interface with this option.
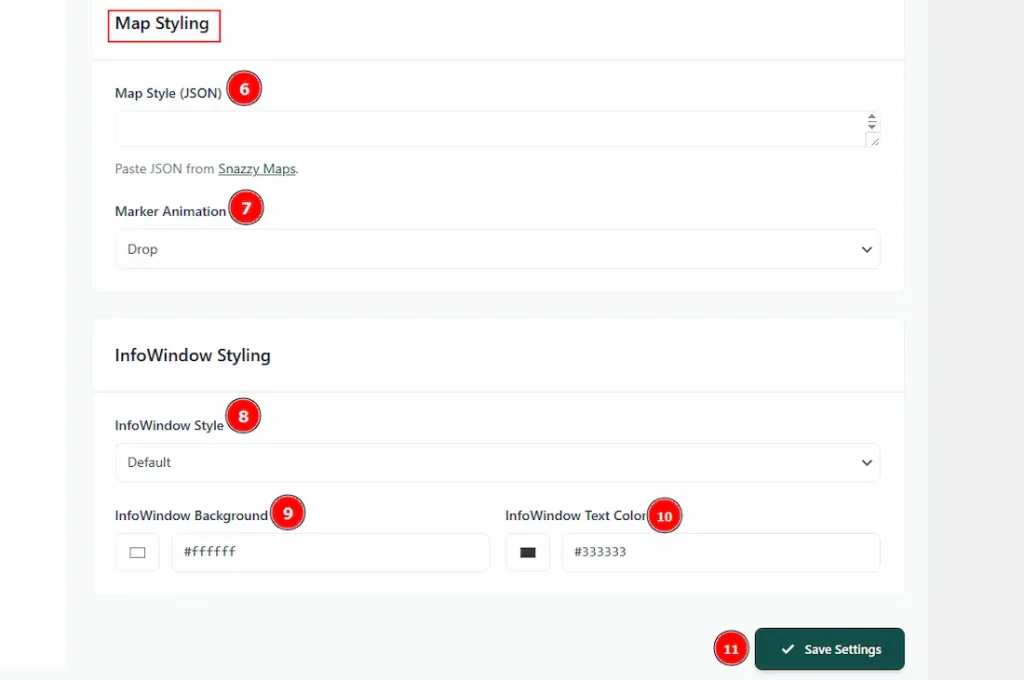
6. Map Style (JSON): You can customize your store locator map style with this option. Please click on the link named Snazzy Maps and select the style that you like, copy the JSON, and then paste it in this field.
7. Marker Animation: You can select the marker animation with this option. The available animations are Drop, Bounce & None.
8. InfoWindow Style: Here, you can select the info window style and also customize it. The available styles are Default, Modern (Dark) & Custom. By selecting the custom, you customize the background color & text color.
9. InfoWindow Background: You can make changes to the info window background color with this option.
10. InfoWindow Text Color: You can make changes to the info window text color with this option.
11. Save Settings: Make sure to click on the save settings button to apply the changes that you have made.
Advanced Tab
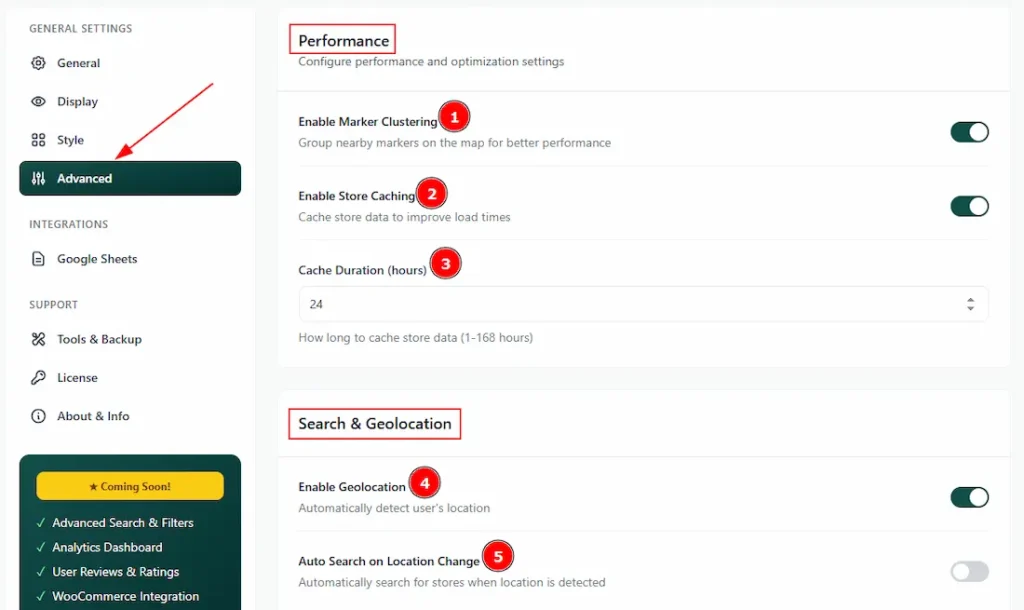
1. Enable Marker Clustering: Enable the switcher to make groups of nearby markers on the map for better performance.
2. Enable Store Caching: Enable the switcher to cache store data to improve load times.
3. Cache Duration (hours): Here, you can enter the number of hours for how long store the cache data. You can add the hours from 1 to 168 hours.
4. Enable Geolocation: This is the most important feature of Store Locator. Enable the switcher to automatically detect the user’s location.
5. Auto Search on Location Change: Enable the switcher to automatically search for stores when location is detected.
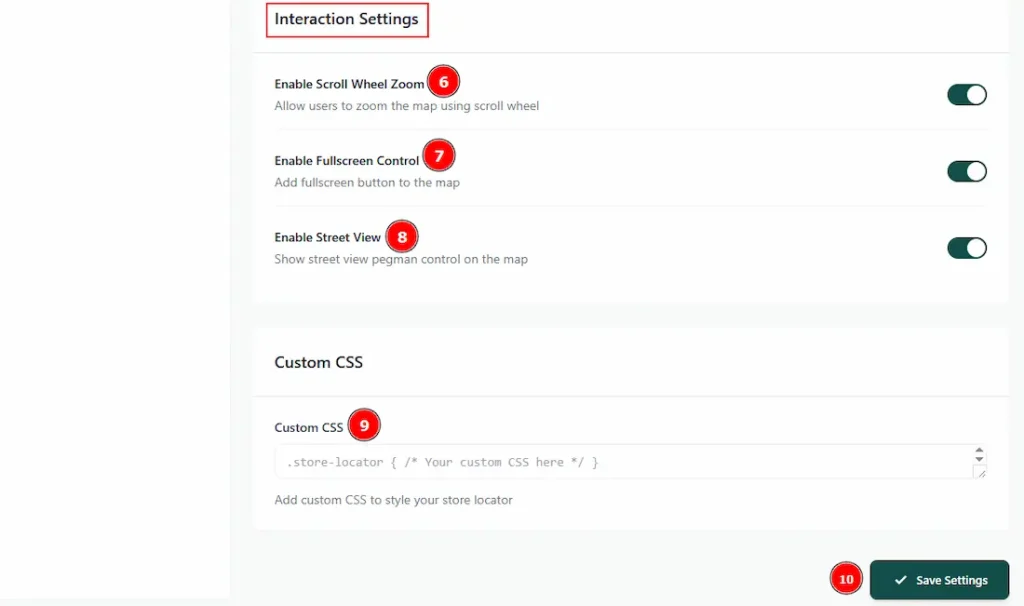
6. Enable Scroll Wheel Zoom: Enable the switcher to allow users to zoom the map using scroll wheel.
7. Enable Full Screen Control: Enable the switcher to add full screen button to the map.
8. Enable Street View: Enable the switcher to show Street View Pegman control on the map.
9. Custom CSS: In this field, you can add custom CSS to style your store locator as you want.
10. Save Settings: Make sure to click on the save settings button to apply the changes that you have made.
Google Sheets Tab
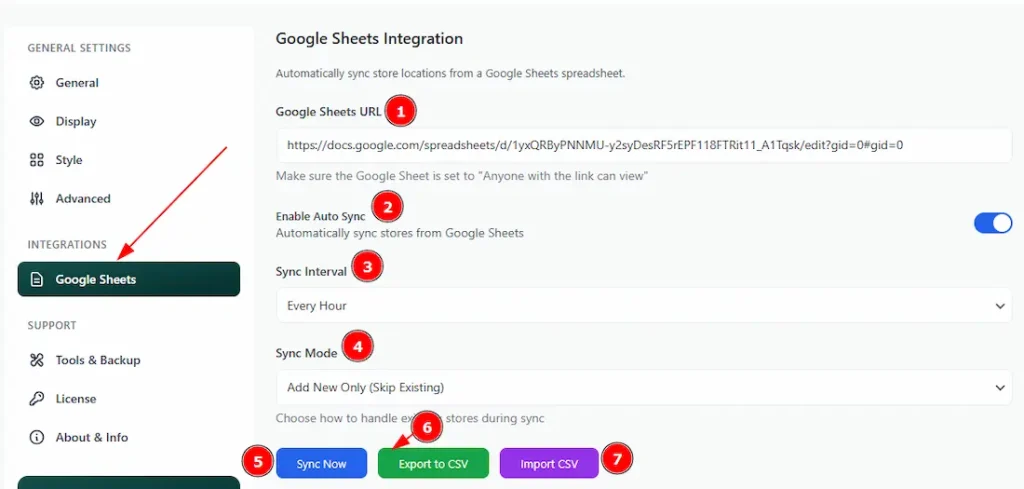
1. Google Sheet URL: You can add the Google Sheet link in this field. Make sure the Google Sheet is set to “Anyone with the link can view” mode or else it won’t be accessible.
2. Enable Auto Sync: Enable the switcher to automatically sync stores from Google Sheets.
3. Sync Interval: You can select the sync interval to every hour, daily or twice daily with this option.
4. Sync Mode: Here, you can choose how you want to handle existing stores during sync. The available modes are Add New Only (Skip Existing), Update Existing Stores, and Replace All (Delete & Re-import).
5. Sync Now: You can click on the button to sync the data instantly.
6. Export to CSV: You can click on this button to export the data as a CSV file.
7. Import CSV: You can click on this button to import the data as a CSV File.
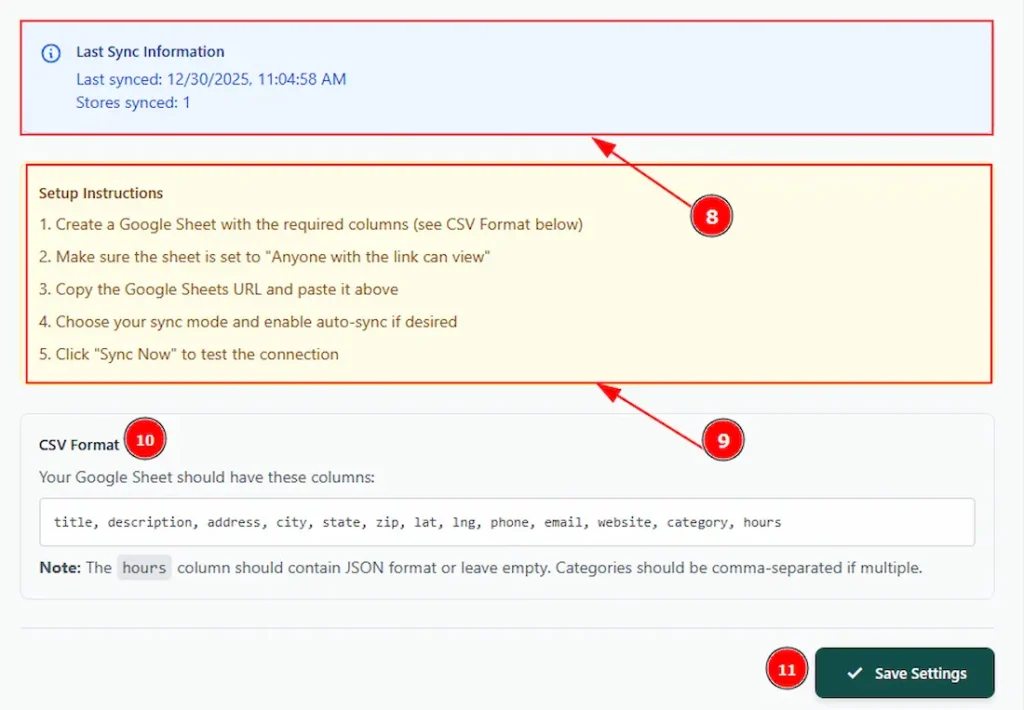
8. Here, you can see the information about the latest sync. The information contains the last sync date, time and store count.
9. Here, you can read the setup instructions to ignore any mistakes.
10. CSV Format: Here, you can check the format of the CSV file. You can check how you should arrange the files.
Note: Make sure to use the same ones that are on the box. Also, the hours column should contain JSON format or be left empty. Categories should be comma-separated if multiple.
11. Save Settings: Make sure to save the settings button to apply the changes that you have made.
Now, let’s start exploring the Support Section –
Tools & Backup
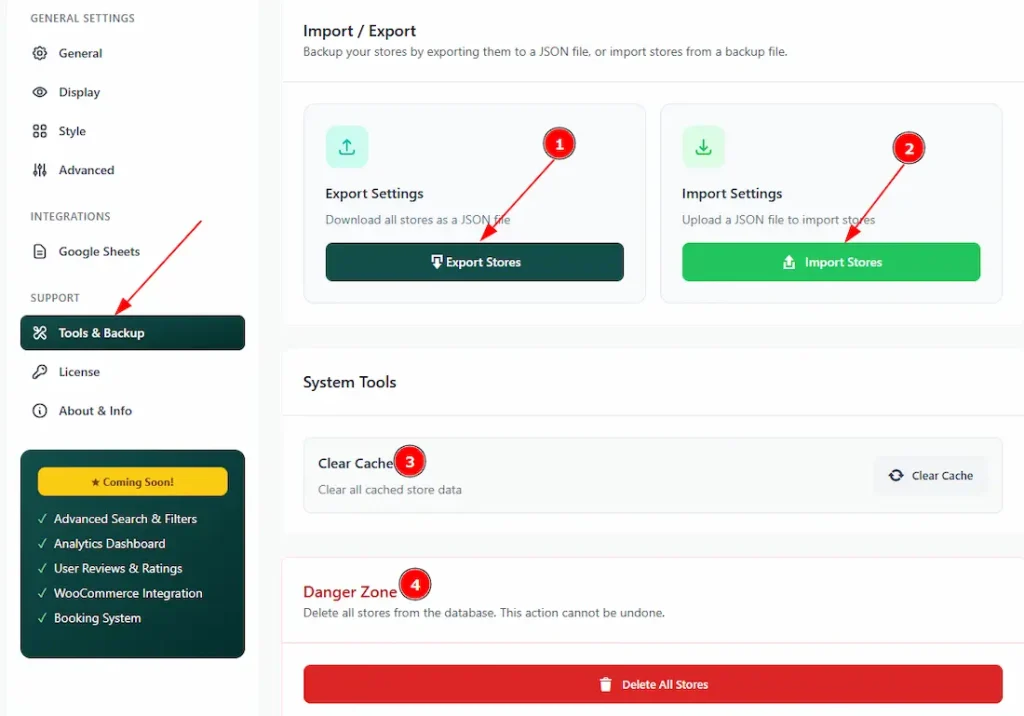
1. Export Settings: You can download all the stores’ information as a JSON file by clicking on the Export Stores button.
2. Import Stores: You can upload all the stores’ information as a JSON file by clicking on this Import Stores button.
3. Clear Cache: Clear all cached store data by clicking on the clear cache button.
4. Danger Zone: This is a sensitive area. By clicking on this button, you can delete all stores from the database, and this action can not be undone.
License Tab
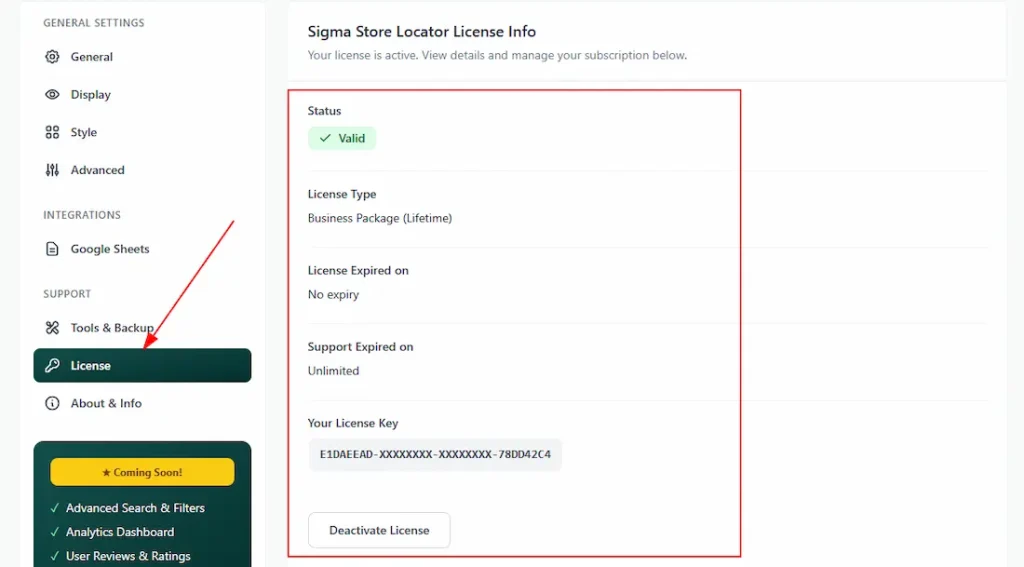
Here, you can see the license information. This information includes license status, license type, license expiry, support expiry, license key, and the deactivate license button. We have described this tab in how to install & activate license section. Please read above if you want to learn more about it.
About & Info
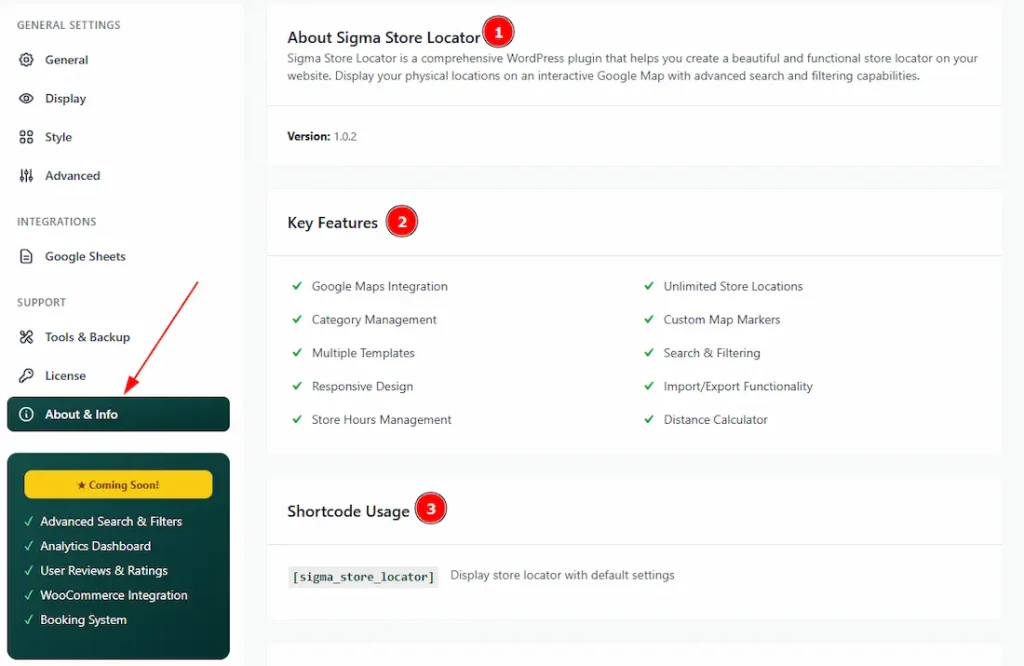
1. About Sigma Store Locator: Here, you can see the version of the plugin Sigma Store Locator you are using.
2. Key Features: You can see the key features of the plugin in this field.
3. Shortcode Usage: You will get to see the shortcode to display the store locator on your page in this field.
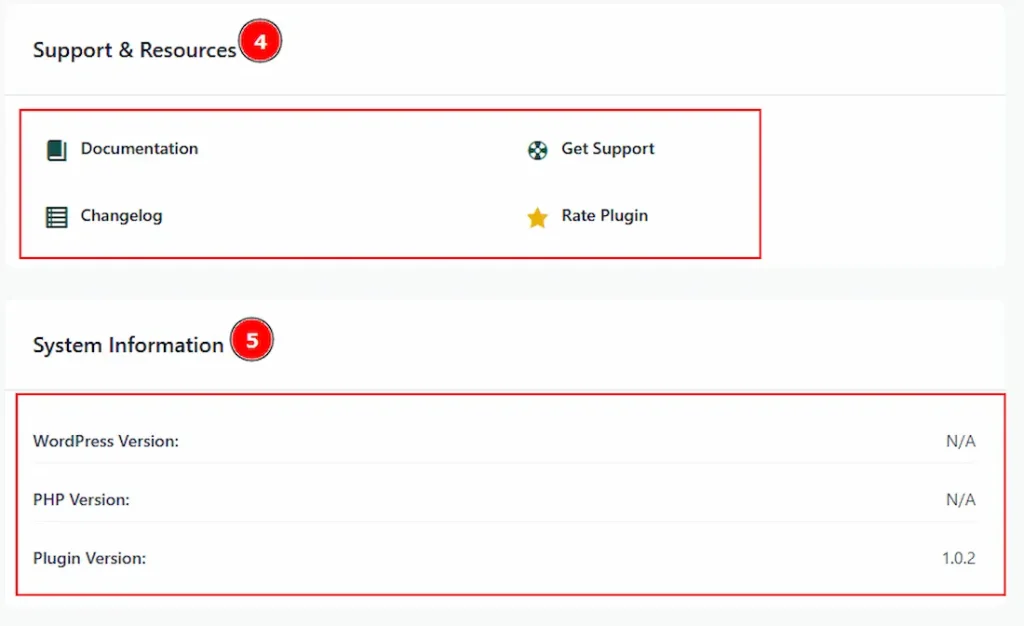
4. Support & Resources: Here you will find the documentation, support link, changelog, and review link.
5. System Information: Here you can see the WordPress version, PHP version & plugin version.
Category Section
Go to WP Dashboard > Sigma Store Locator > Category
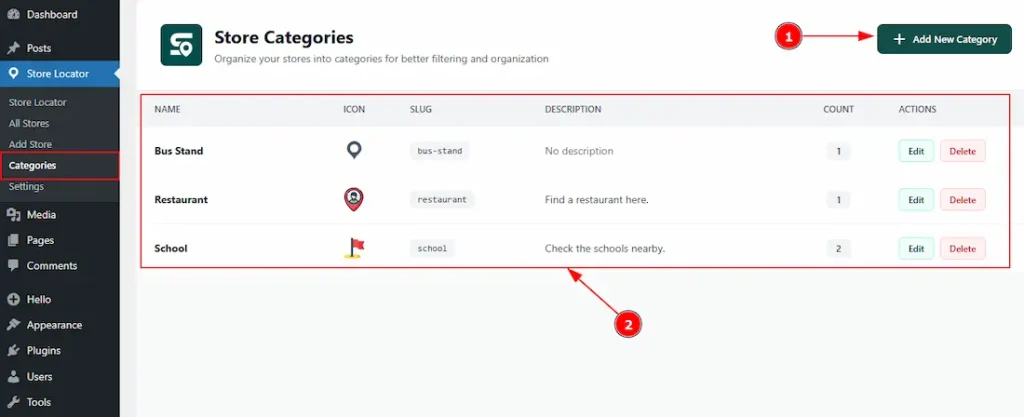
1. You can add a new category by clicking on this button.
2. Here you can see a visual of all your created categories with their name, icon, slug, description, count (how many stores are under this category) & actions. With the actions, you can easily edit or delete a category.
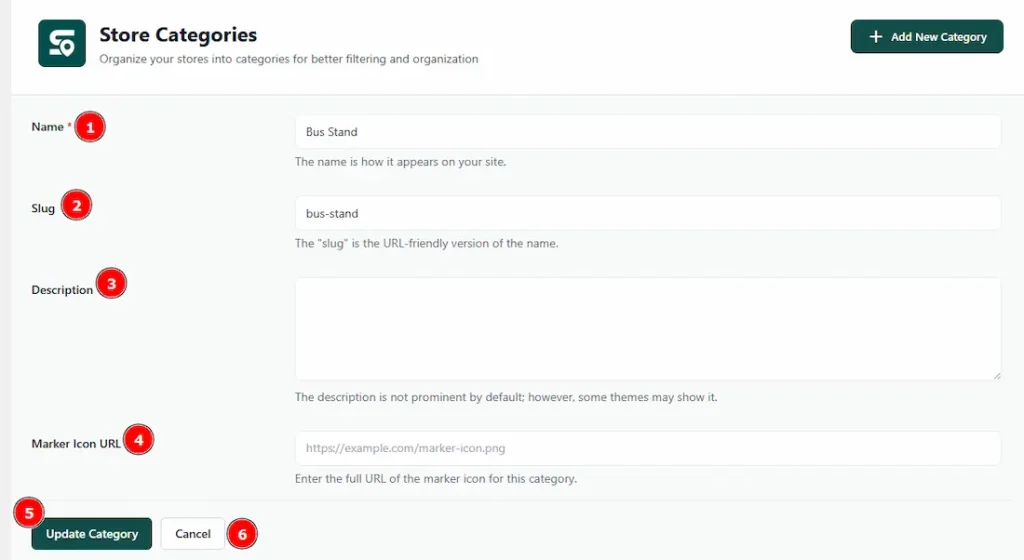
1. Name: You can add the category name with this option.
2. Slug: You can make changes to the slug with this option.
3. Description: You can add a description for your category with this option.
4. Marker Icon URL: You can enter the full URL of the marker icon for the category in this option.
5. Update Category: You can click on the update category button to complete the category creation process.
6. Cancel: You can click on the cancel button to cancel the category creation process.
Add Store Section
Go to WP Dashboard > Sigma Store Locator > Add Store
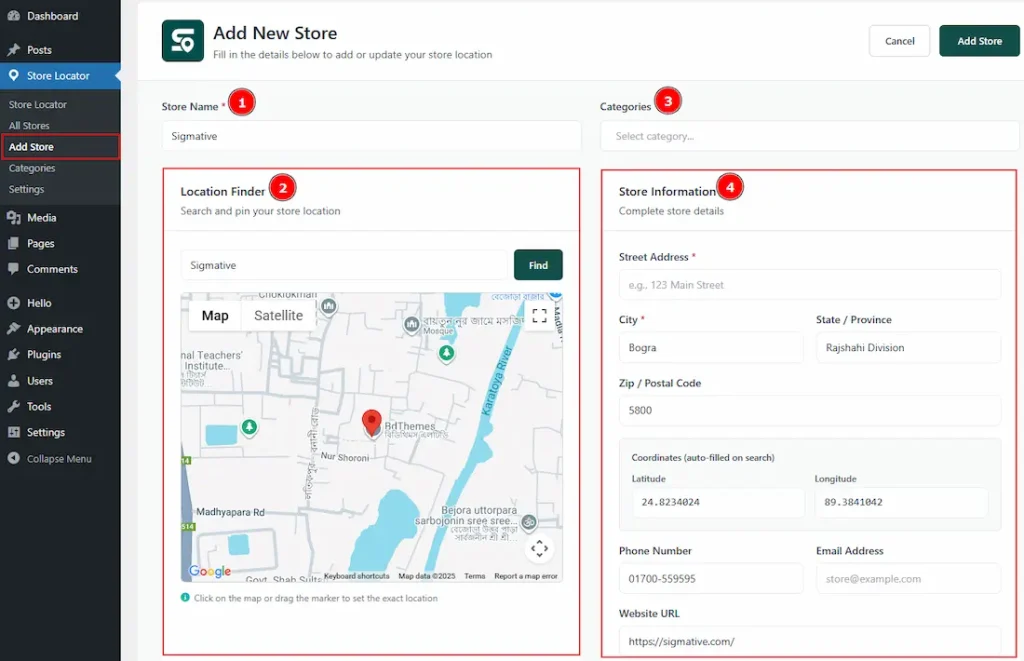
1. Store name: You can make changes to the store name with this option.
2. Location Finder: This is a very crucial part to add the store to your store locator. Here you can search for your desired location, and by clicking on the find button, it will automatically select your searched location and fill in the store information. For a better response, you can click on the map or drag the marker to set the exact location.
3. Categories: Here, you can select the category by which you want to show the store. You can even create one if you want.
4. Store Information: In this field, you have to provide the store information like Street Address, City, State/Province, Zip/Postal Code, Phone Number, Email Address, Website URL & Coordinates (latitude & longitude) – auto-filled with search. If you want, you can fill in the information manually, or else you can use the location finder to fill the information automatically.
Note: The location finder works like Google Maps and only shows stored data. Missing information needs to be added manually.
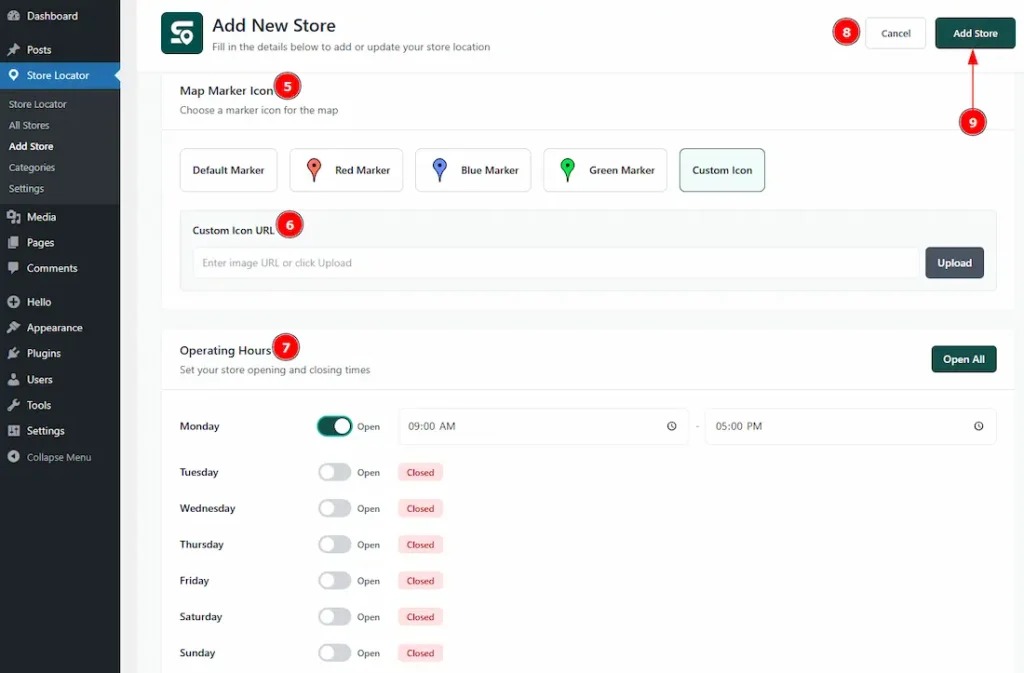
5. Map Marker Icon: You can choose a marker icon to indicate your store on the map. You can choose from the Default Marker, Red Marker, Blue Marker, Green Marker & Custom Icon.
6. Custom Icon URL: By selecting the custom icon, you have to enter the image URL or upload an image.
7. Operating Hours: You can adjust your store opening and closing times with this option. You can use the Open All button to show the store’s open status for the whole week at once or you can use the below open switcher to do it one by one manually.
8. Cancel: You can click on this button to cancel the process of adding a store.
9. Add Store: You can click on this button to complete the process of adding a store.
All Store Section
Go to WP Dashboard > Sigma Store Locator > All Stores
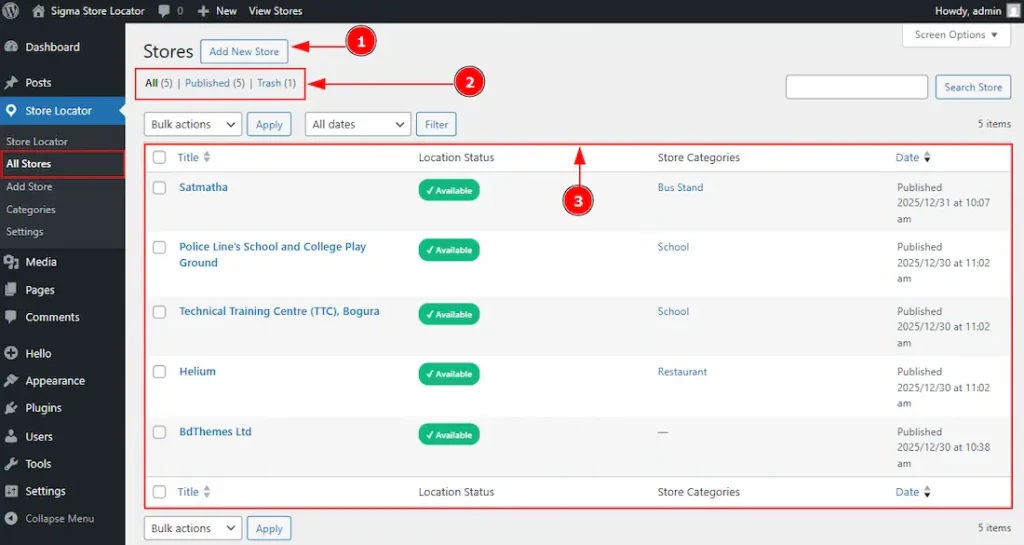
1. Add New Store: You can create a new store by clicking on this button.
2. Here you can see the created store’s information & count.
3. In this field, all the created fields are visible. You can find stores title, location status, store categories & creation date here.
(Note: If the latitude & longitude are missing, then the location status will show unavailable.)
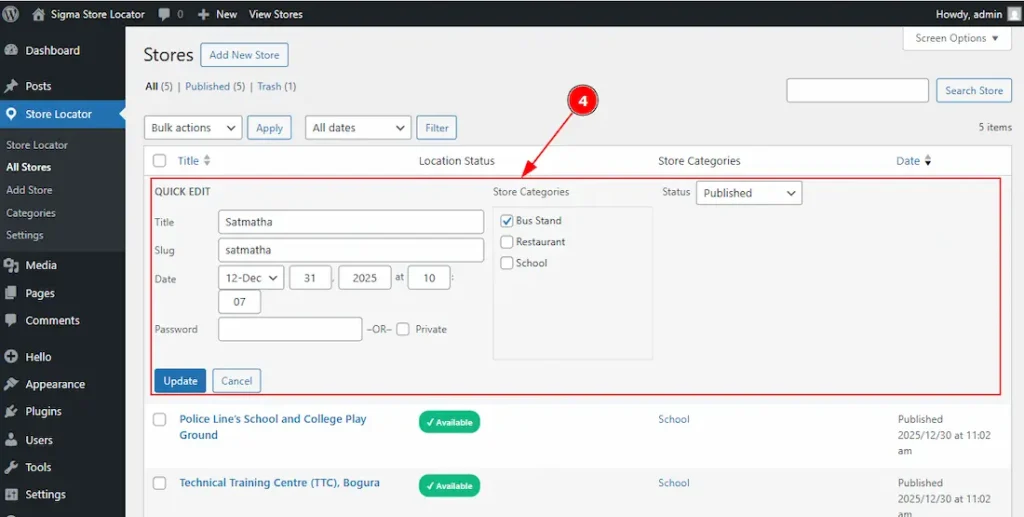
4. You can easily make changes to the category by clicking on quick edit without visiting the full edit option. You can also make changes to the tile, slug, creation date, and status.
All done, you have successfully customized the Sigma Store Locator plugin on your Site.
Video Assist
The Video will come soon. Please visit the demo page to learn more about the Sigma Store Locator Plugin.
Thanks for staying with us.