The documentation we will discuss about the Sigma Forms Based on AI. No dragging, no dropping, no hassle. Sigma AI Form build’s complete, ready-to-use forms with a simple prompt. Just describe what you need, and the form is instantly generated — smart, fast, and accurate.
Key Features
- AI-Powered – Create forms in seconds using natural language.
- Full Configuration – Every field, validation, and setting is instantly customizable.
- No Code Required – You focus on what you want, Sigma handles the rest.
- Lightning-Fast Workflow – From idea to live form in a few clicks.
Follow the step-by-step instructions below and unlock the easiest way to build professional, fully functional forms — powered by AI.
Install and Activate Sigma Form
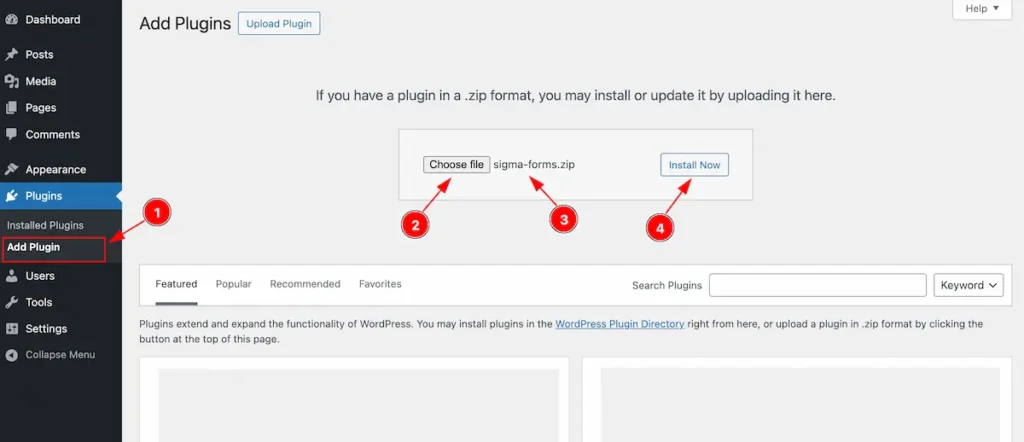
- Navigate to Plugins Section and Click on the ” Add Plugin “. It will appear the section for adding the plugin.
- Click on the “Choose file ” button and select the Plugin from the Local File.
- Check the Plugin name appears correctly. e.g.: sigma-forms.zip
- Click on the ” Install Now ” button and The installation process will start.
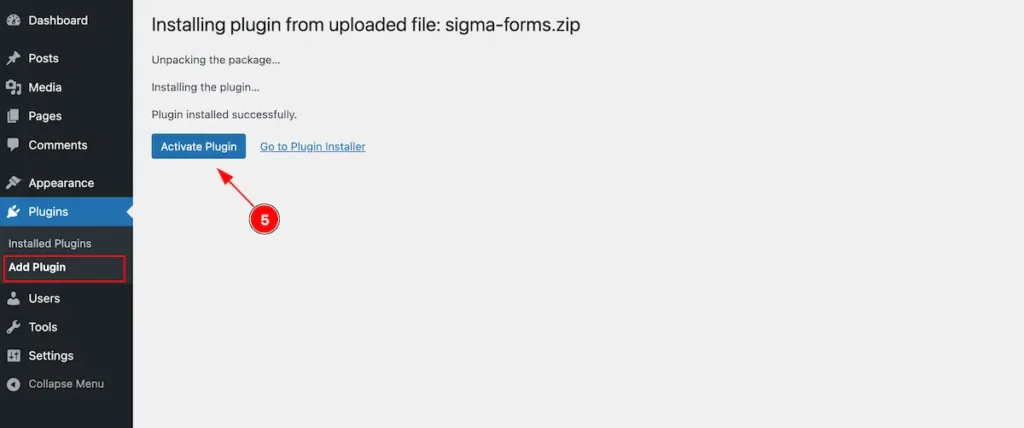
- Now click on the “Activate Plugin” button to activate the Plugin.
Check Activated Plugin
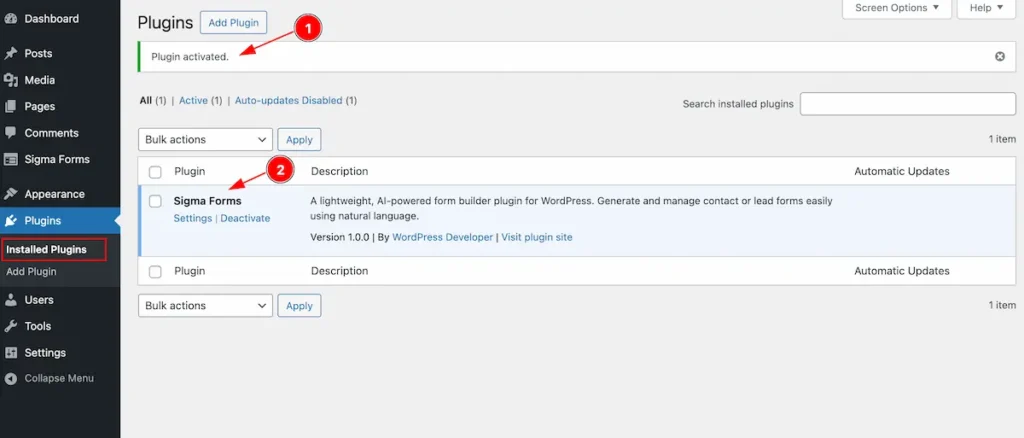
- After activation the Success Notification will appear on the Installed Plugin Section.
- Find the Plugin named ” Sigma Forms ” on the list.
License Key Activation
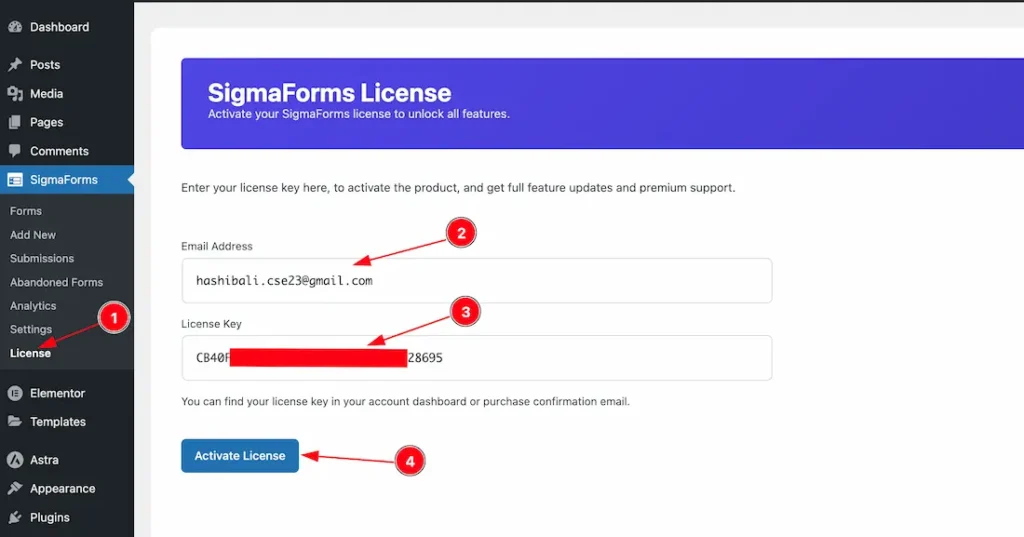
To activate the license key, just follow the below steps-
- Go to the Sigma Forms dashboard > License section.
- Enter your email to the email field.
- Enter your license key to the license field.
- Click on the Activate License button to activate the license key.
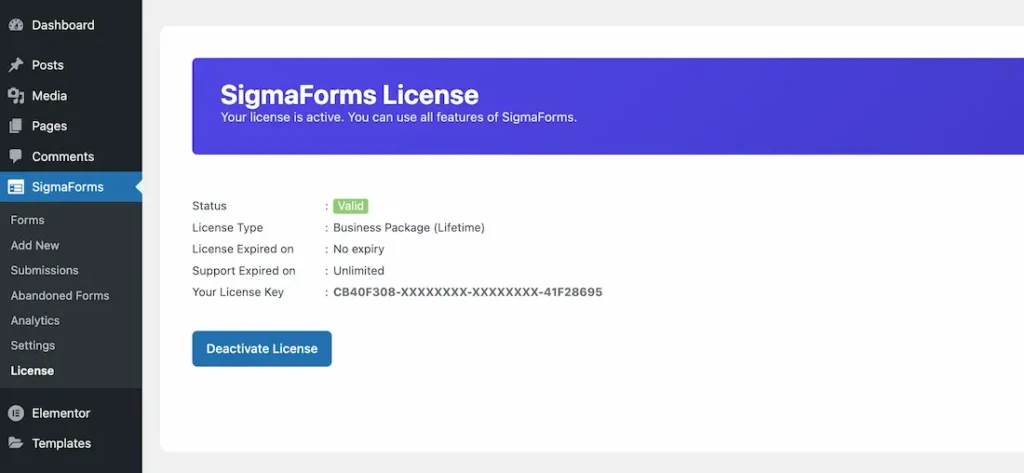
After activating the license key, you will get the preview as the above attached screenshot. After activating the license key, you will get access of the Pro features of the Sigma Forms plugin.
Build Form With Sigma Forms AI
Forms
Go to Sigma Forms > Forms
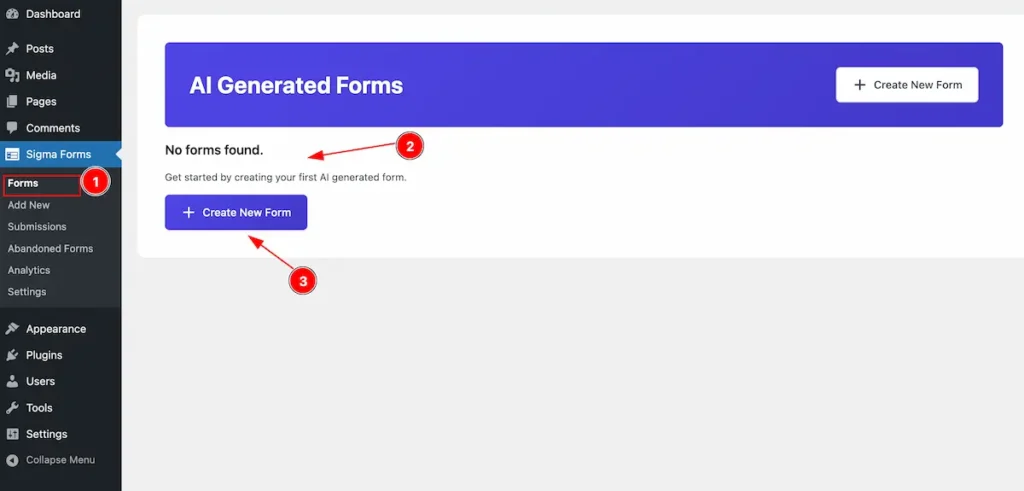
- Navigate to the Forms section of Sigma Forms.
- Initially “No Form found” message appear on there.
- Now click on the ” + Create New Form ” button to create a new sigma form.
Add New
Go to Sigma Forms > Add New
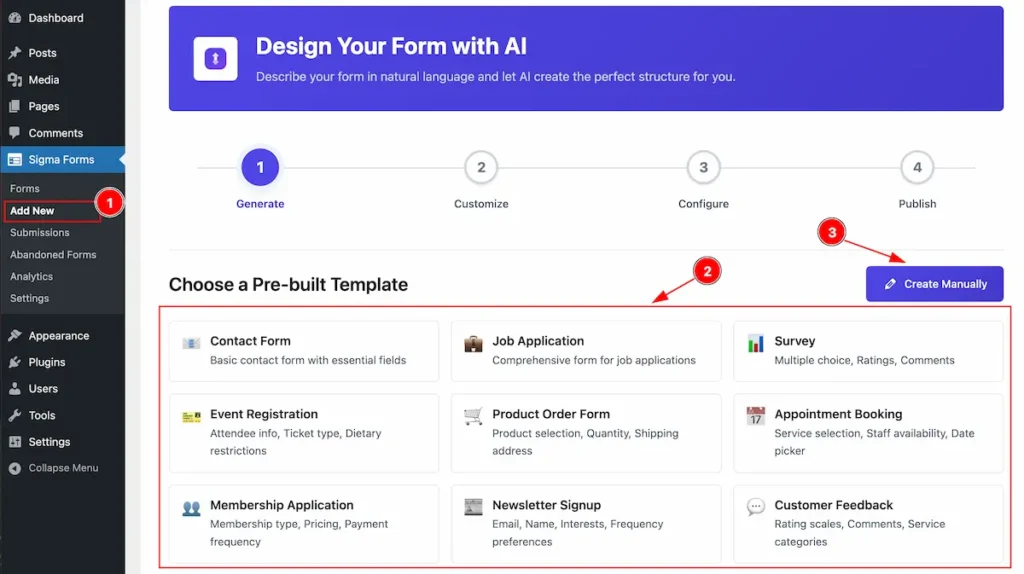
- Navigate to the Add New section and it will appear the steps to build a forms.
- Choose a Pre-built Template: Pre built templates are available for the section. Just click on the Button and it will generate a form instantly.
- “Create Manually ” button for creating the template manually. Let’s start with the Pre-built Template forms.
Create form with Pre-built Template
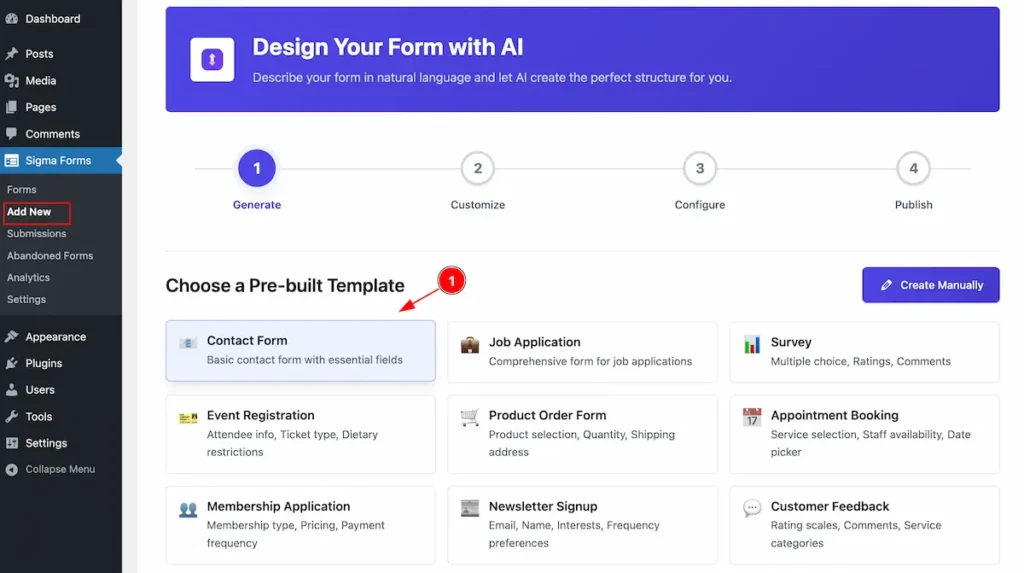
- Choose any Pre-built template from the section and Click on it. It will generate the new forms.
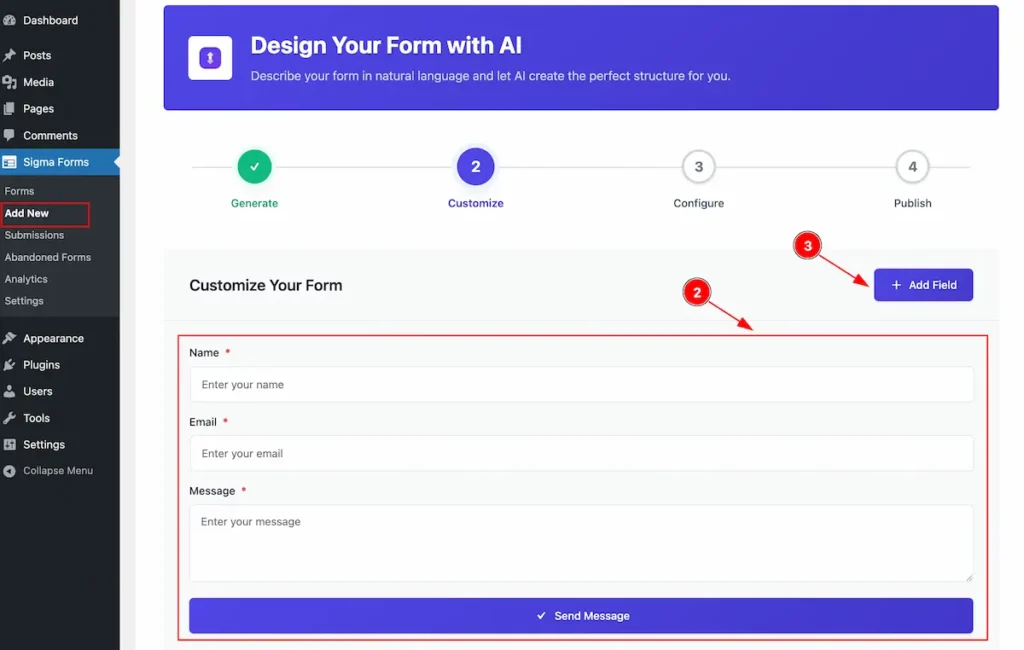
- The template generation is complete and it’s appearing the forms to customize.
- Name: The Name fields appear for the template.
- Email: The Email fields appears.
- Message: The message fields appear.
- Send Message: The Send Message Button appear of the form.
- ” + Add Field ” click on the button to add another custom Fields according to the Needs.
Customize the Form Fields
Duplicate
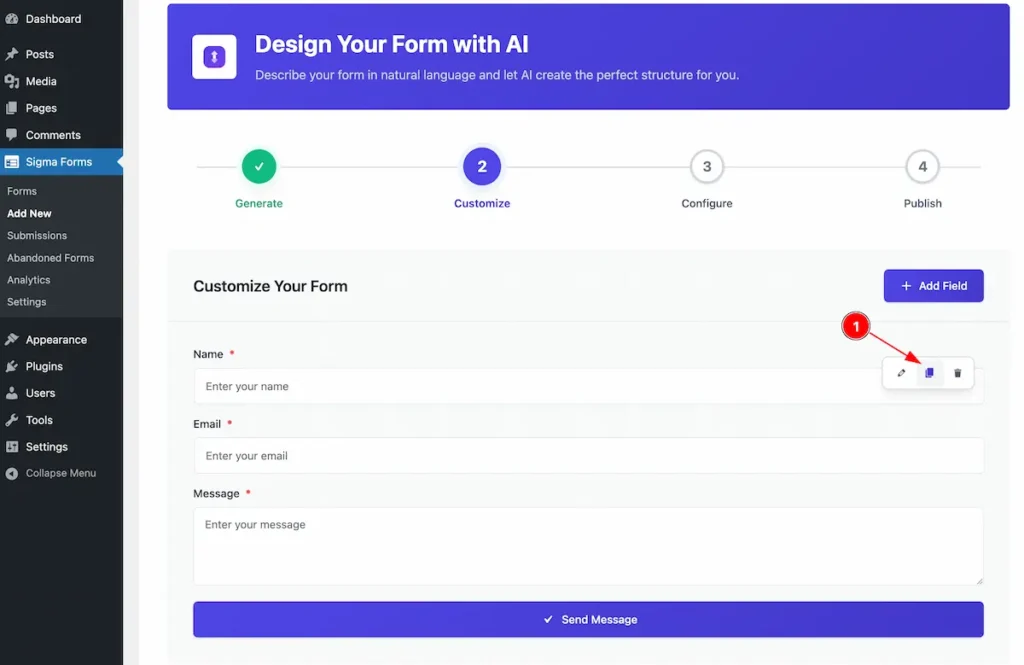
- Duplicate: Click on the Icon to Duplicate the Fields.
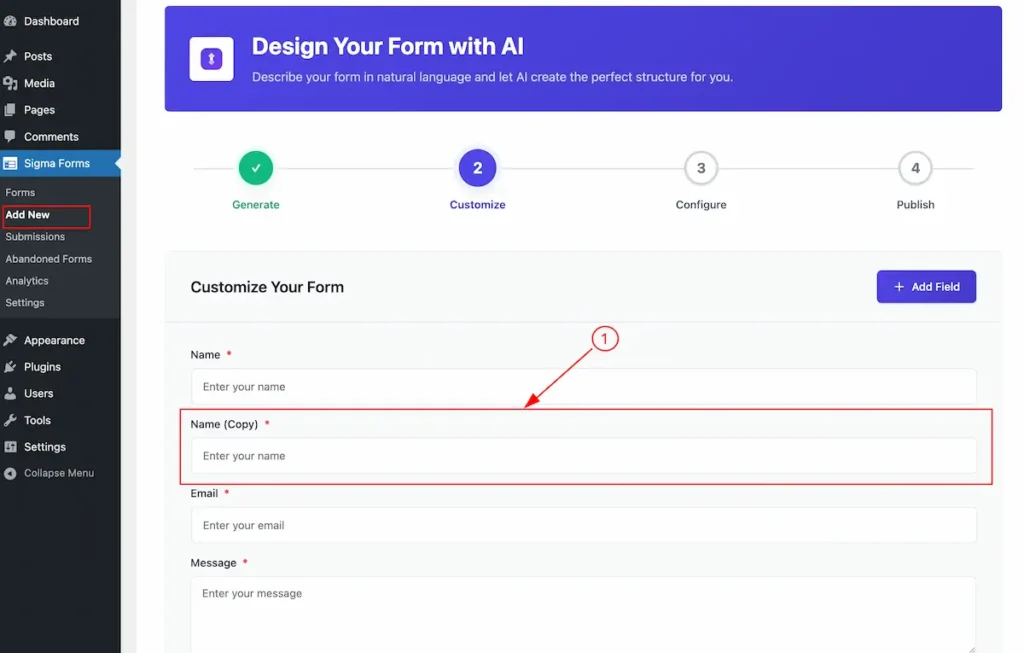
After Duplicate it named like e.g.: Name (Copy).
Remove
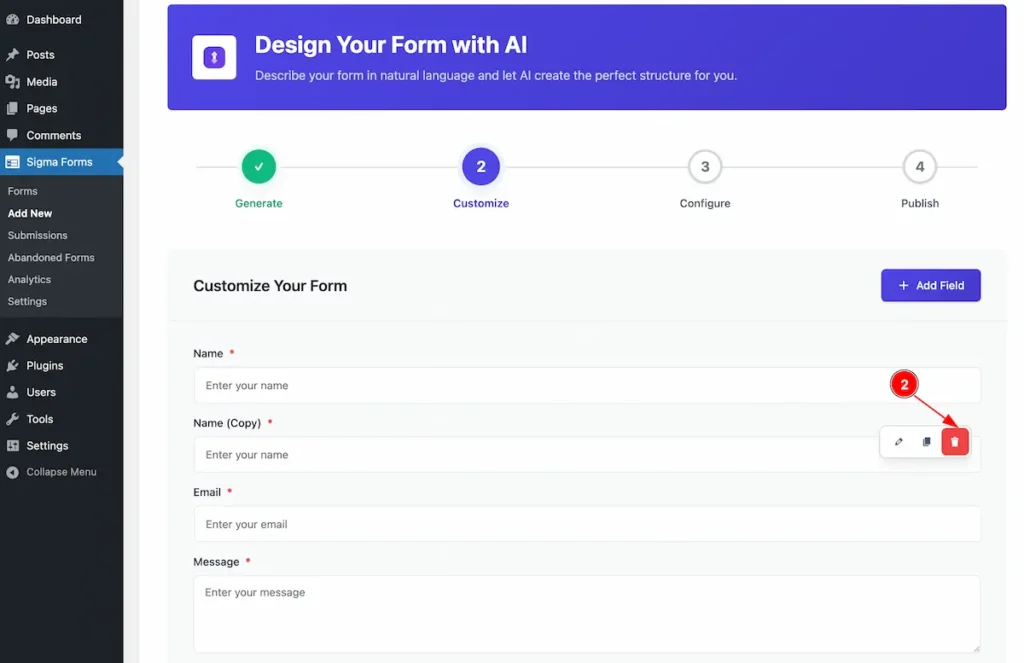
- Remove: Click on the Bin Icon to remove the Fields.
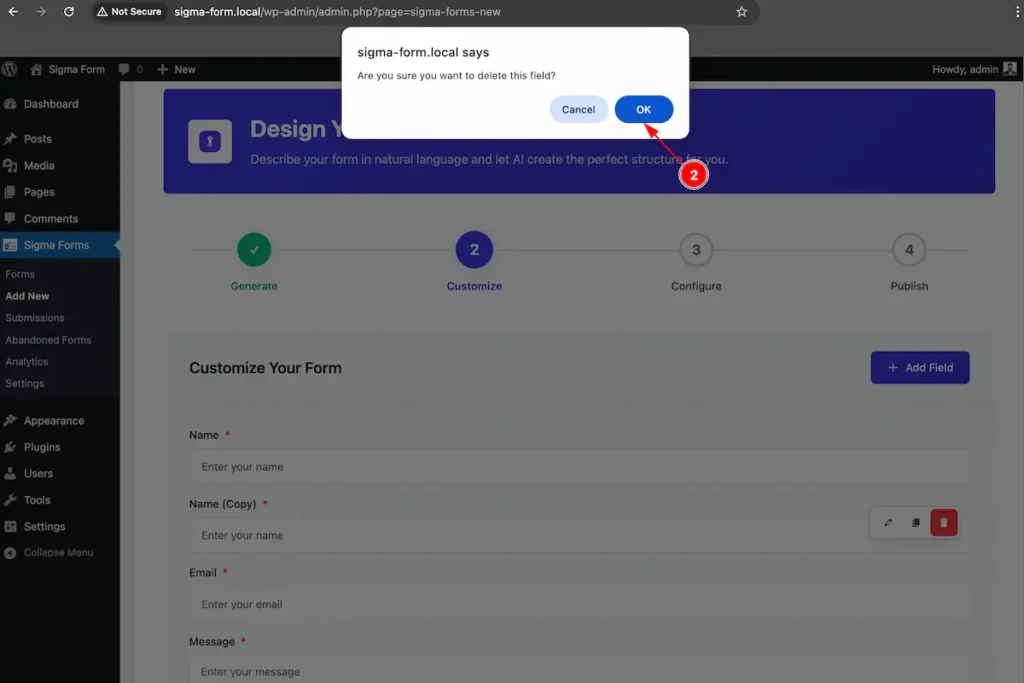
- The Confirmation notification will appear on there. Click on the ” Ok ” to remove it.
Edit
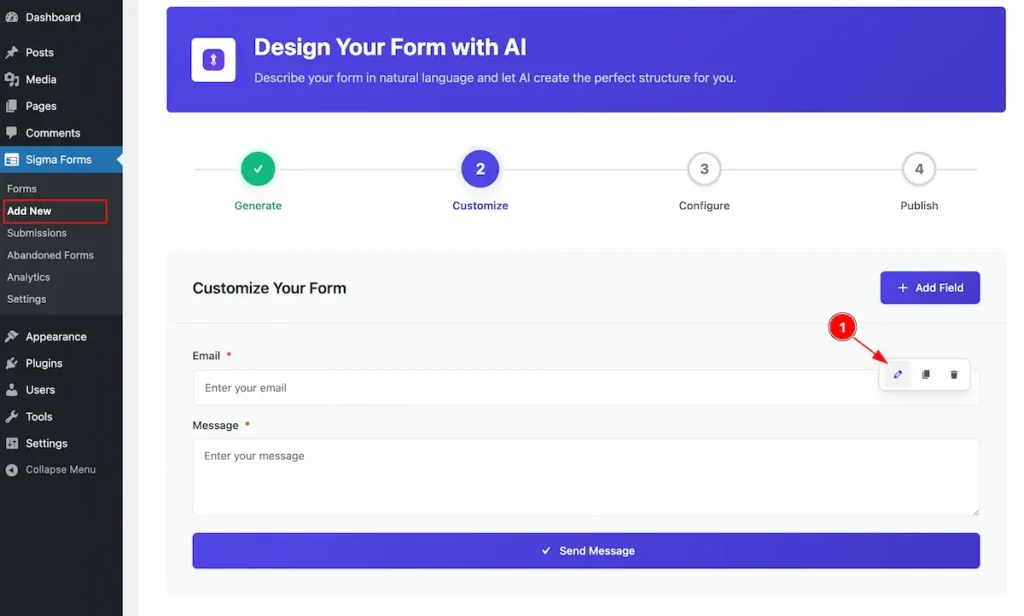
- Edit: Click on on the Edit Icon to edit the Current fields. It will appear a popup and allow to Customize according to needs.
Edit the Fields
Basic
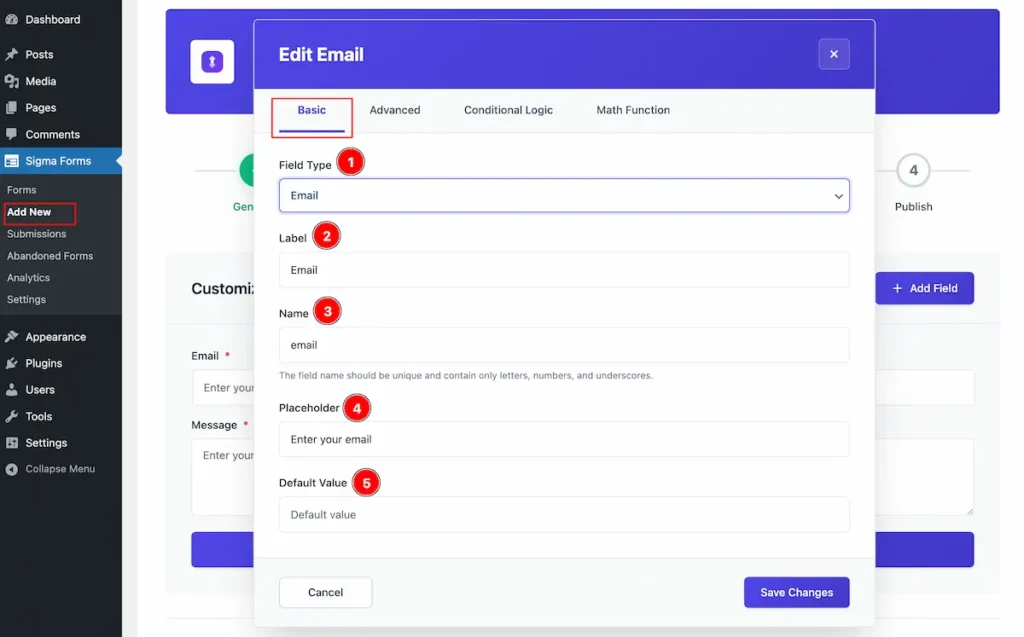
- Field Type: Choose the Field type. Different field type are available. e.g.: Name, Email, Name, Area, Phone, Select, Checkbox, Radio, File Upload.
- Label: Set the name for the Label. e.g.: Email
- Name: Set the name for the Fields. The field name should be unique and contain only letters, numbers, and underscores.
- Placeholder: Set the placeholder for the input fields.
- Default Value: Set the default value. It will appear as input if not fill the Fields.
Advanced
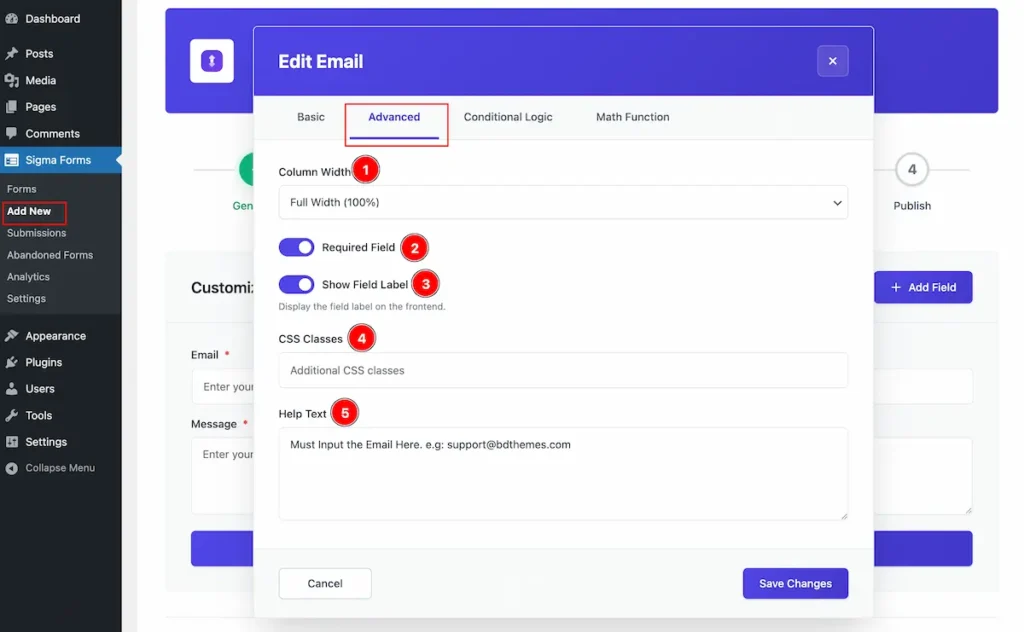
- Column Width: Set the width for the Column. Available Width are Full Width(100%), Three Quarter (75%), Two Thirds ( 66%), Half Width ( 50%), One Third ( 33%), Quarter ( 25% ).
- Required Field: Enable the switcher for input field when required.
- Show Field Label: Enable the switcher to Display the field label on the frontend.
- CSS Classes: Set the additional CSS Classes for the Input Fields.
- Help Text: Set the for the Helping instruction. It will appear right after the Fields.
Conditional Logic
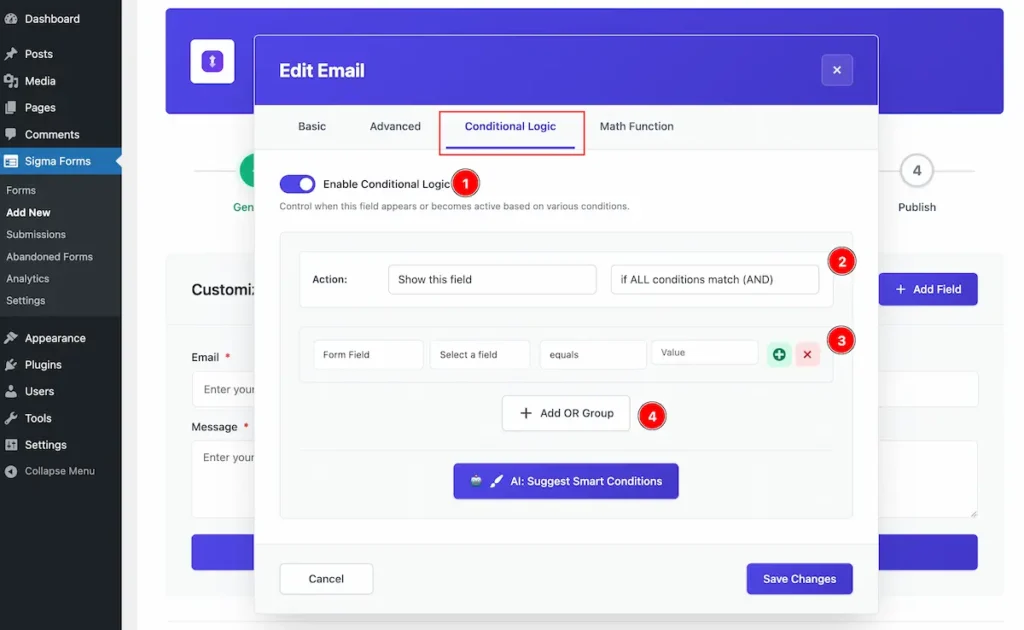
- Enable Conditional Logic: Enable the switcher to set the Condition to control when this field appears or becomes active based on various conditions.
- Action: Set the Action for the Show this fields according if ALL conditional match ( AND). And Hide this fields according to if ALL conditional match ( NO).
- Form Fields then Select a field, equals or value.
- Click on the ” + Add OR Group ” for the fields.
Math Function
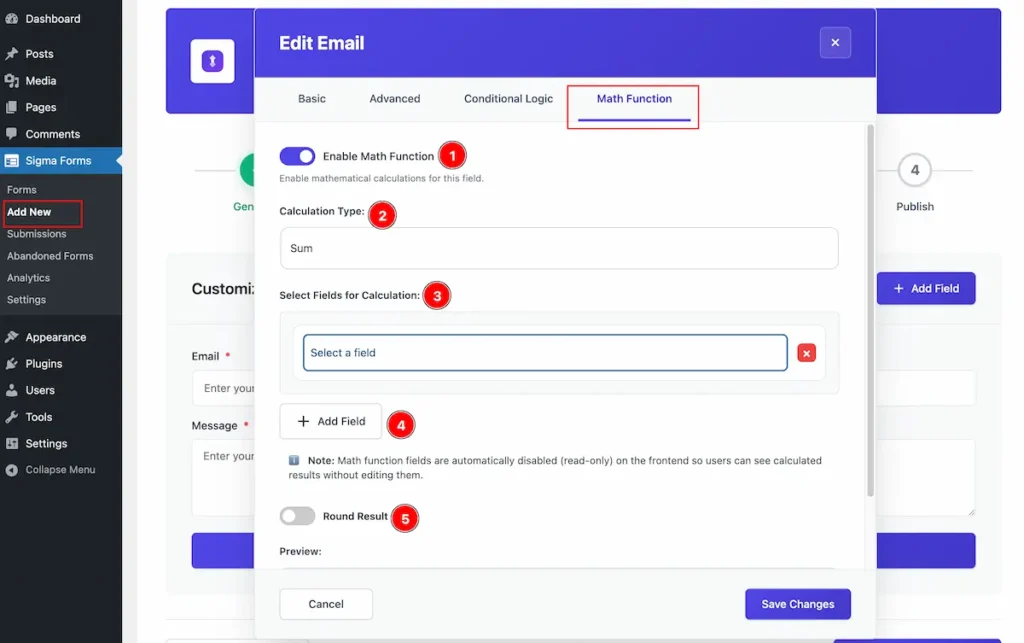
- Enable Math Function: Enable the switcher for mathematical calculations for this field.
- Calculation Type: Set the calculation type for the Sum, Divide, Multiply, Percentage, Average, Custom Formula.
- Select Fields for Calculation: Select the fields for the calculation. Select the fields of Message.
- “+ Add Field”: Click on the fields for adding new fields.
- Round Result: Enable it to demonstrate the Round Result.
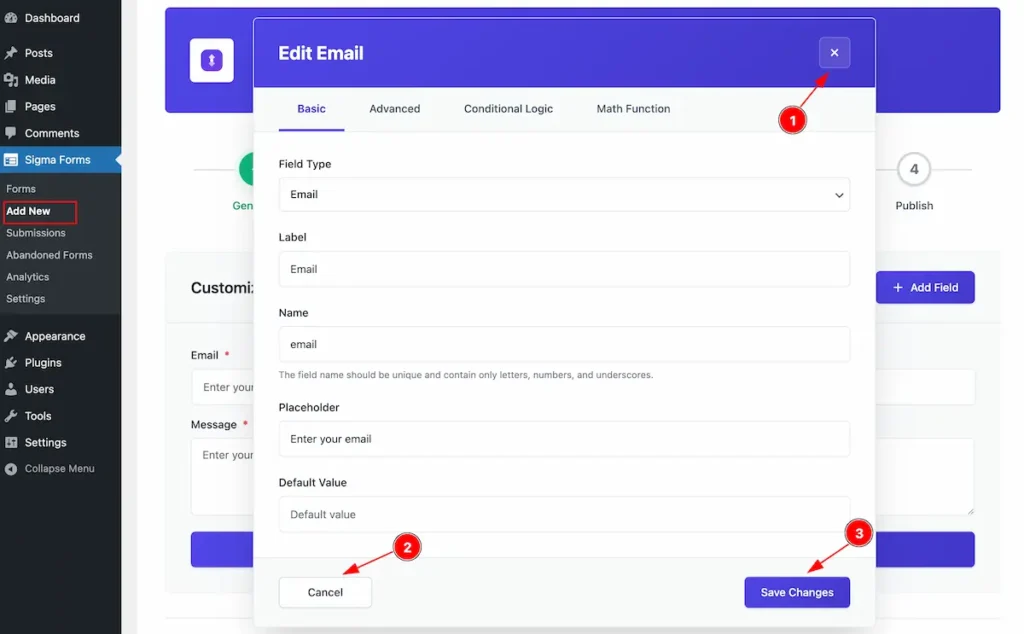
- Click on the ” Close ” icon to close It.
- Cancel button to cancel the form.
- Save Changes : Click on the “Save Changes” button to make the changes.
Configure the Generate Fields

- Click on the ” Continue to Configure ” button to continue the Configuration.
Form Details
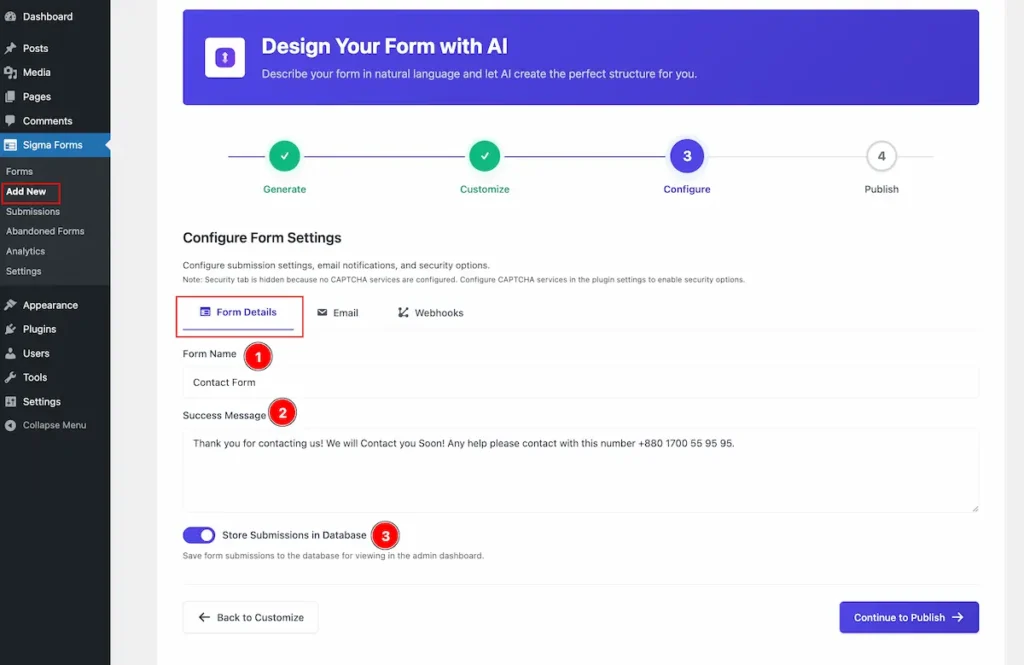
- Form Name: Set the name for the Form.
- Success Message: Set the Success Message for the Client. This message after filling the form.
- Store Submission in Database: Enable the switcher to store the submission in database.
Override Default Email Settings
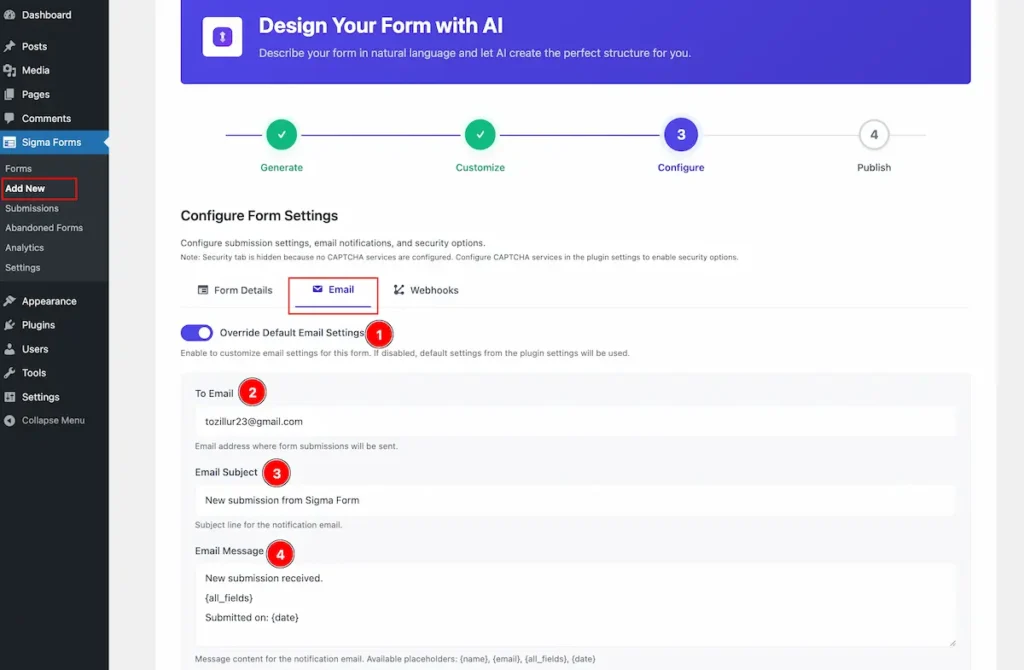
- Override Default Email Settings: Enable to customize email settings for this form. If disabled, default settings from the plugin settings will be used.
- To Email : Set the Email address where form submissions will be sent. e.g.: [email protected]
- Email Subject: Set the Subject line for the notification email.
- Email Message: Message content for the notification email. Available placeholders: {name}, {email}, {all_fields}, {date}
Send Confirmation Email to User
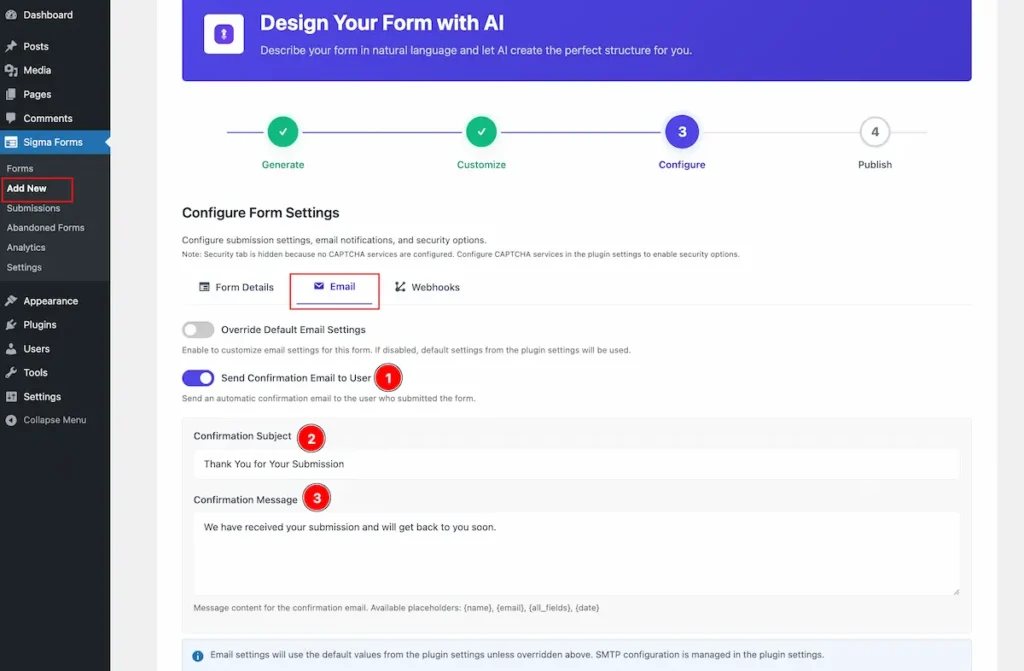
- Send Confirmation Email to User: Enable the switcher to Send an automatic confirmation email to the user who submitted the form.
- Confirmation Subject: Set the confirmation subject.
- Confirmation Message: Set the Message content for the confirmation email. Available placeholders: {name}, {email}, {all_fields}, {date}
Continue to Publish
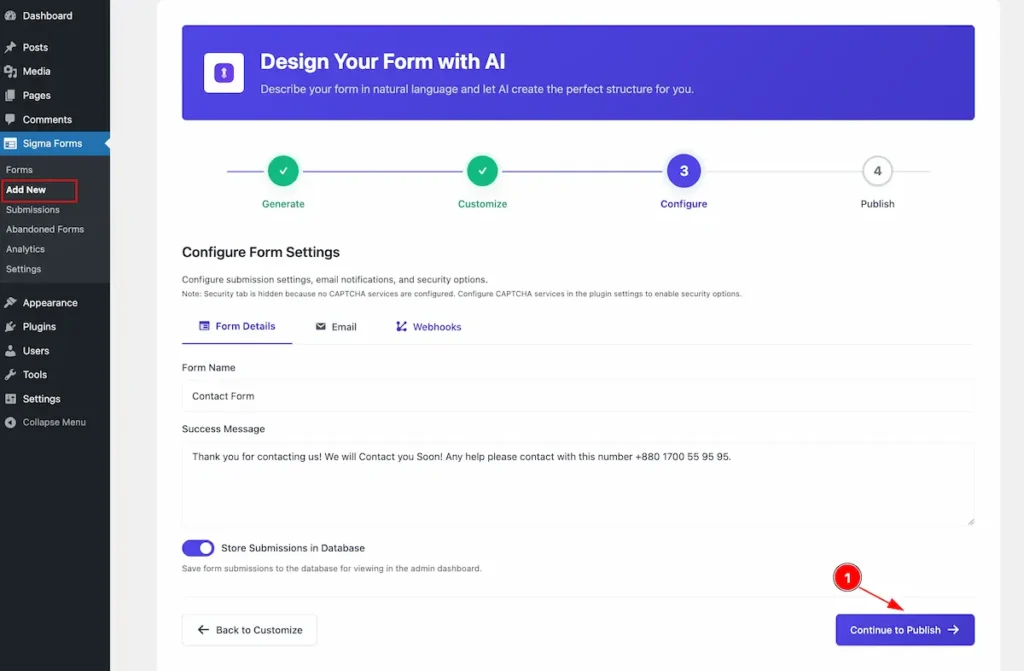
- Once finish the Configuration setup now click on the ” Continue to Publish ” button.
Publish
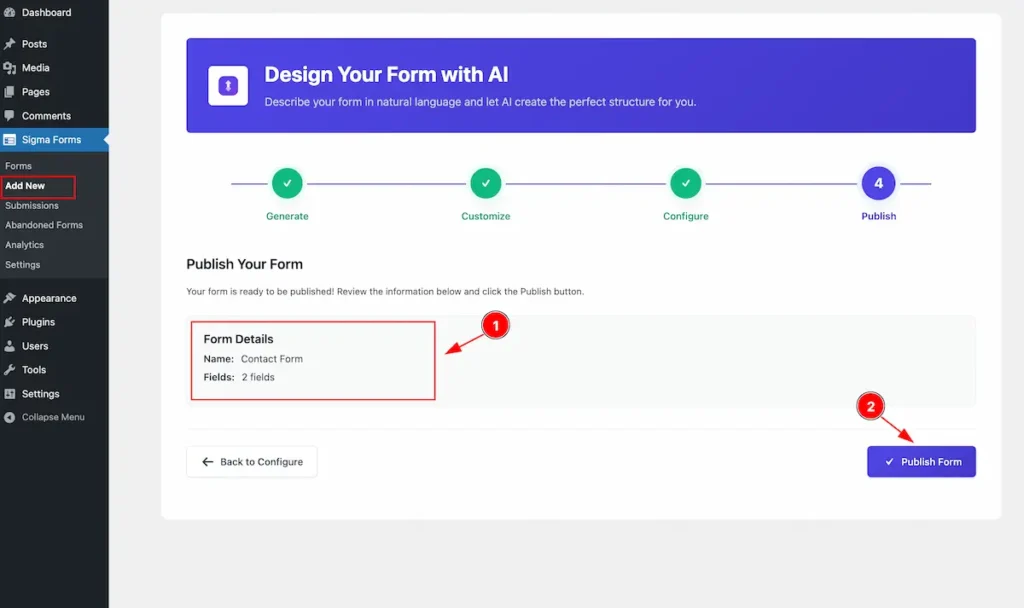
- After completing the form the Form details appear.
- Name: Appear the Name of the Form given. e.g.: Contact Form
- Fields: How Many fields are available of the Form. e.g.: 2 fields.
- After completing the checking. Now click on the ” Publish Form ” button to publish it.
Find the ShortCode
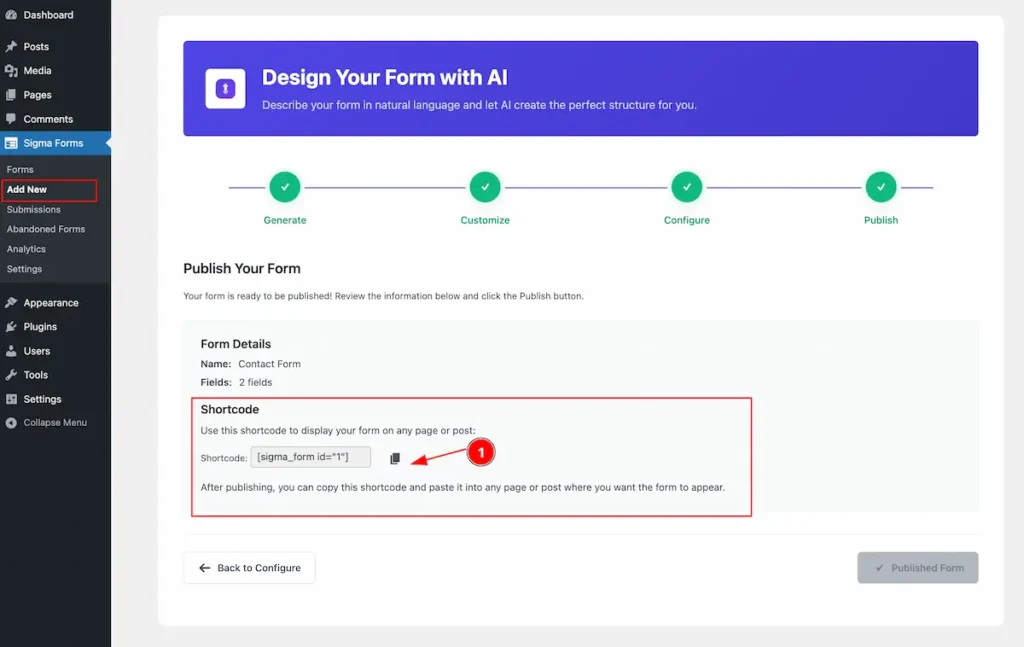
- After finishing all the steps it will generate a Shortcode of the Form. Now It can be use any where weather it Elementor or Gutenberg Editor. Shortcode will be like. e.g.: [sigma_form id=”1″]
Preview the Sigma Forms
Gutenberg Preview ( WordPress Default Page )
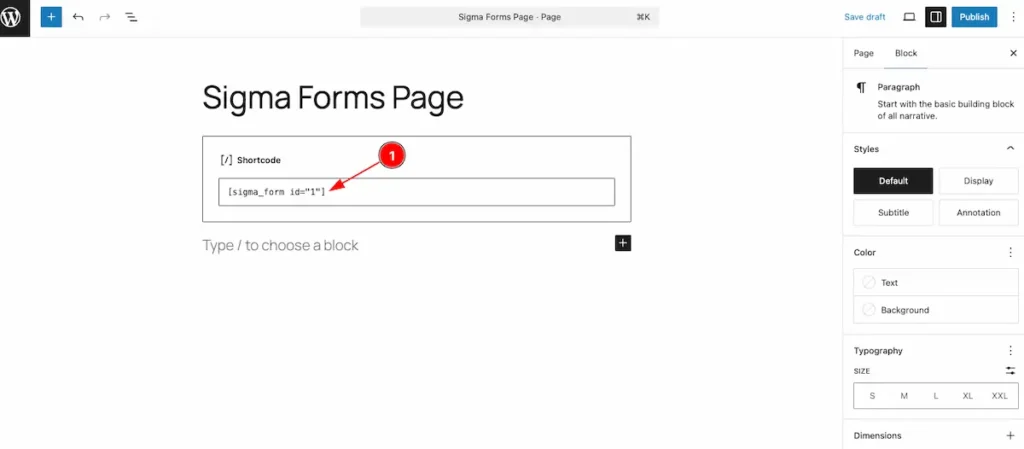
- Open the default page of WordPress and add ShortCode and paste the Sigma Forms ShortCode.
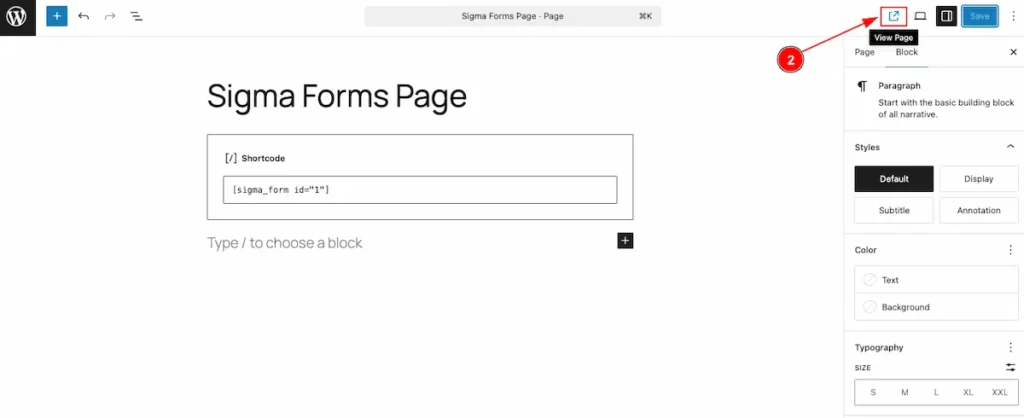
- Now Click on the ” View Page ” button and to check the preview.
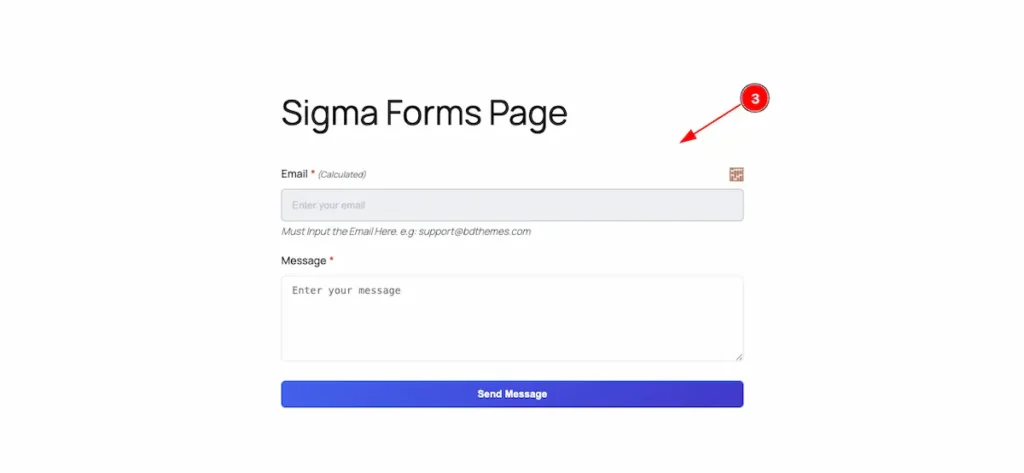
- The Form is visible on the page.
Elementor Preview

- Drag and Drop ShortCode widget on the Editor Page and paste the Sigma Forms ShortCode on it.
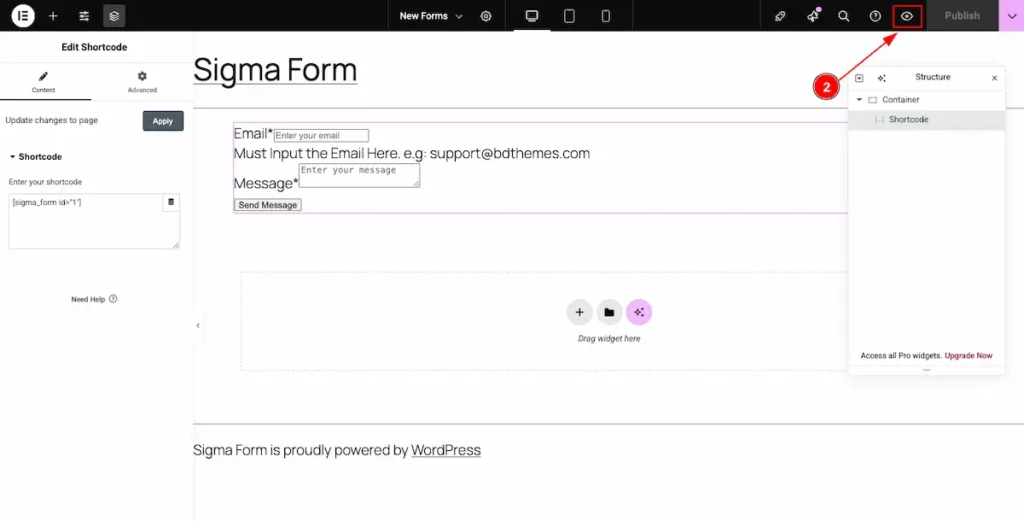
- Now Click on the Preview Icon and it will redirect to the preview page.
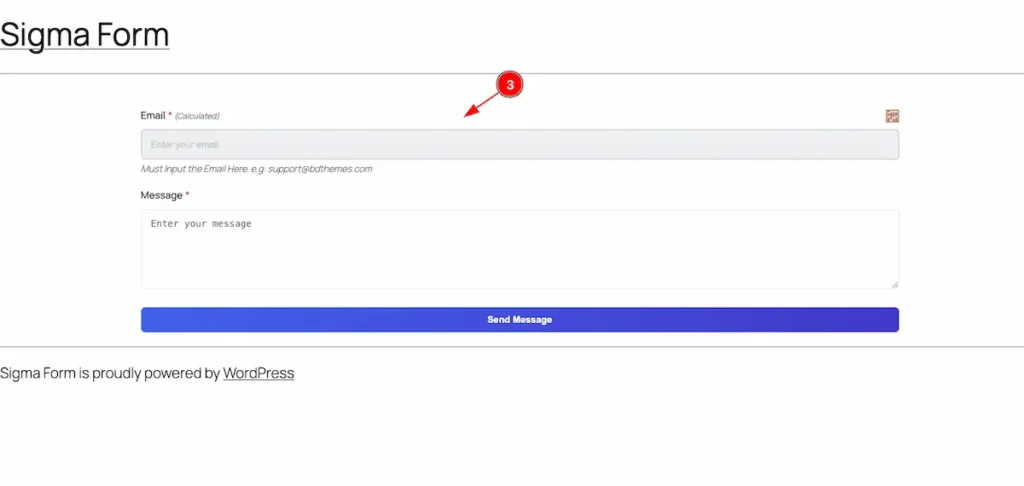
- The Sigma Form is visible now.
Submission
Navigate to Simga Forms > Submission
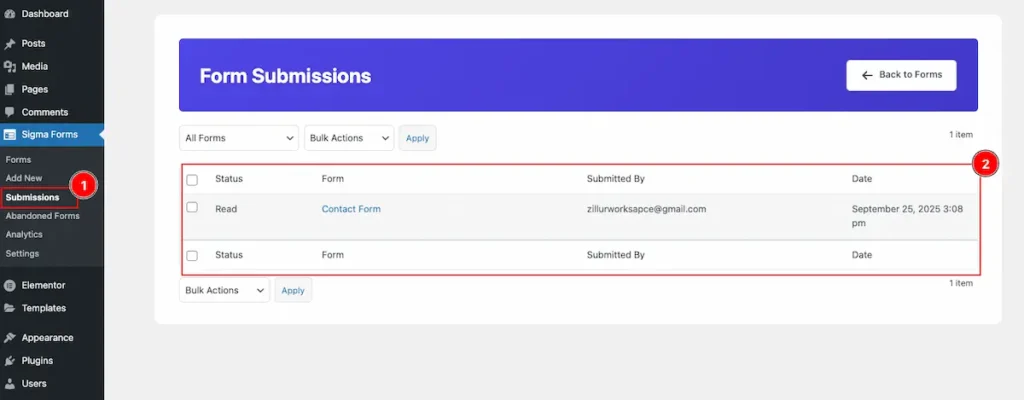
- Click on the Submission section it will appear all the submission forms.
- All the forms appear as Table
| Status | Form | Submitted By | Date |
| Show the status. Read and UnRead | Name of the Form. e.g.: Contact Form | Show the email | The submitted Date. e.g.: September 25, 2025 3:08pm |
View
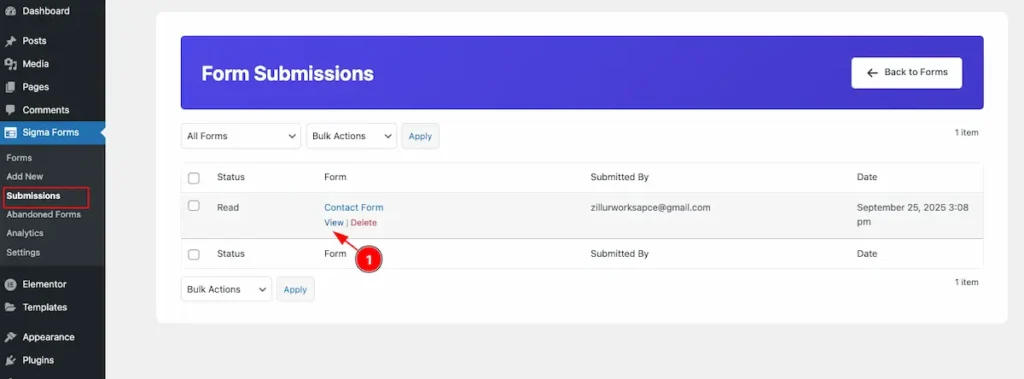
- Select any form and Click on the “View” button it will navigate to new page.
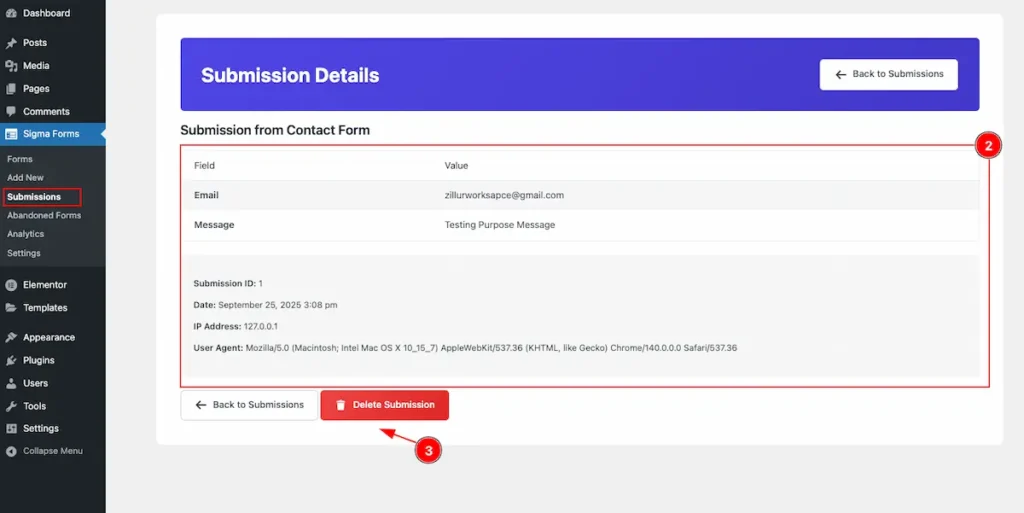
- Details view appear of the Submission form.
| Show the Submission Email. | |
| Message | Show the Message. |
| Submission ID | Show the Submission ID. |
| Date | Show the Date. |
| IP Address | Show the IP Address. |
| User Agent | Show the agent where from the form submitted. |
- To remove the Form click on the ” Delete Submission ” button.
Delete
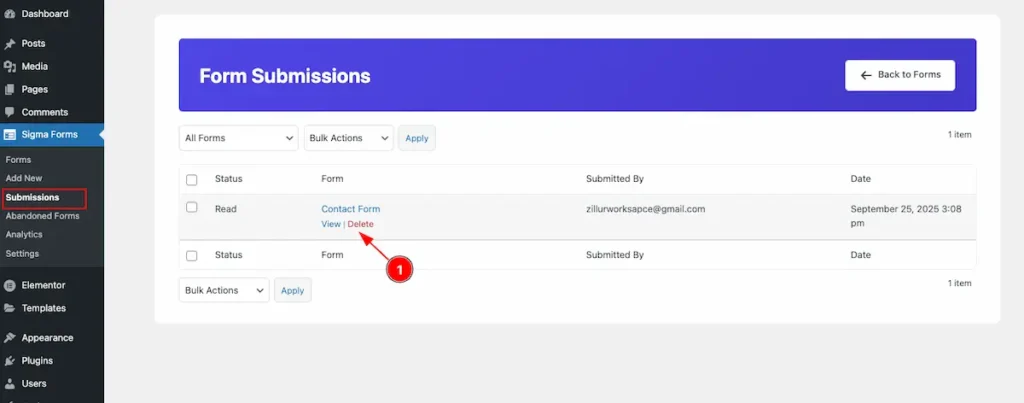
- Select the form want to Remove. Click on the “Delete” button.
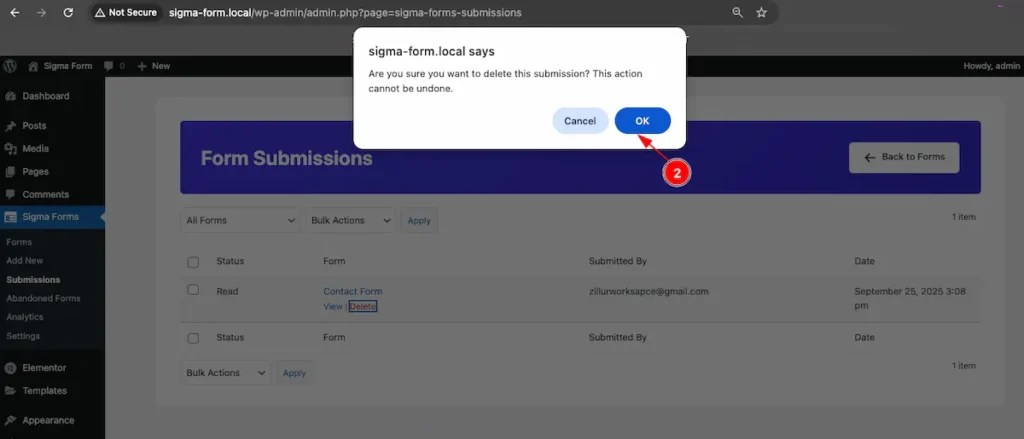
- It appear an Alert for the confirmation of the deletion. Click on the ” ok ” to delete it.
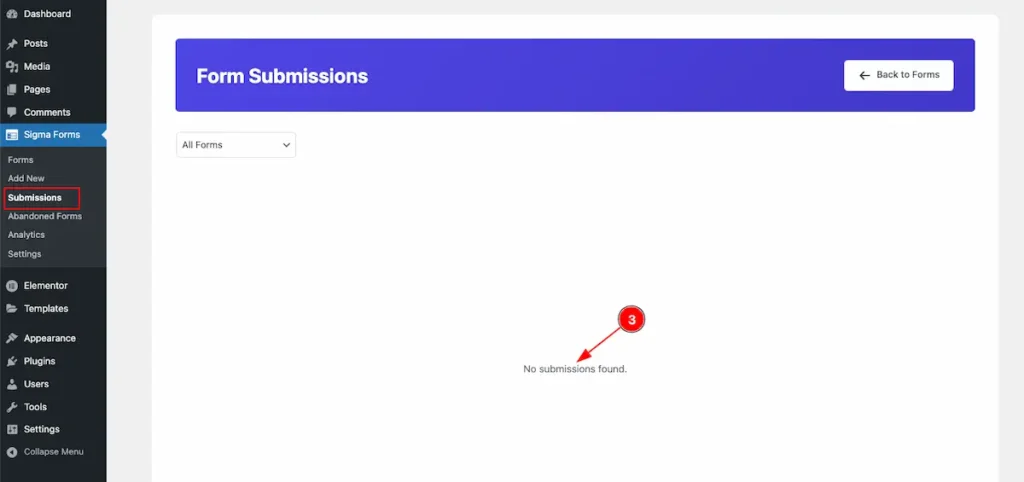
- Show the Empty form after Delete the Form.
Abandoned Forms
Navigate to Simga Forms > Abandoned Forms
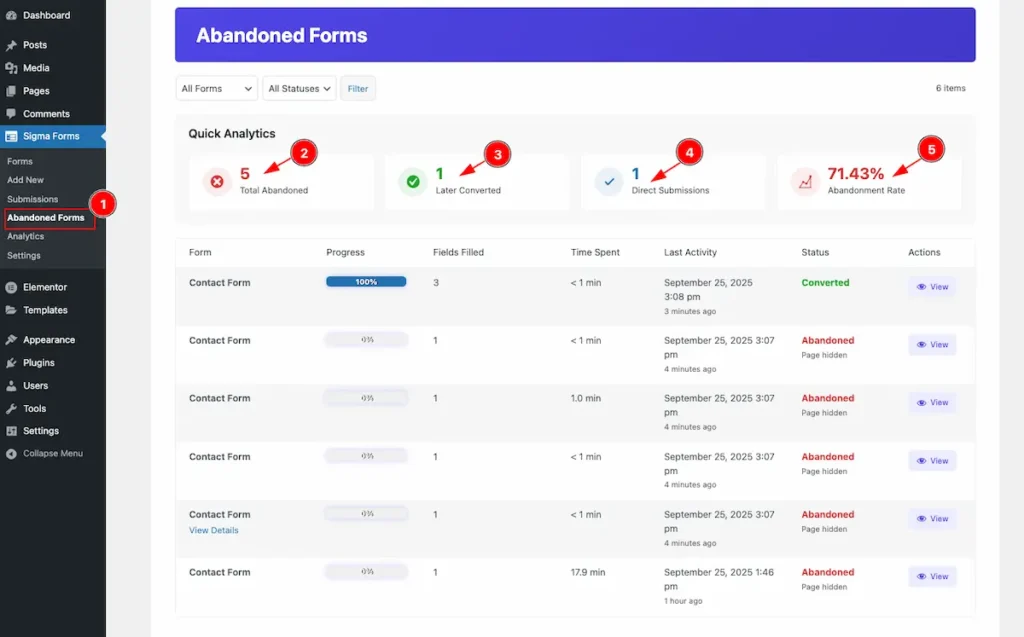
- Abandoned Form section where all the abandoned form info are listed.
Quick Analytics
- Total Abandoned: Total number of abandoned form appear.
- Later Converted: How many form are Converted later.
- Direct Submission: Show how many form are submitted Directly.
- Abandoned Rate: The total rate of Abandoned appear on Percentages. e.g.: 71.50%
Abandoned Table Info
- All the Abandoned Data appear as Table View.
| Form | Progress | Fields Filled | Time Spend | Last Activity | Status | Action |
| Name of the Form. e.g.: Contact Form | Demonstrate the Progress of the Form. e.g.: 100% | How many fields are filled.e.g.: 2 | How much time spent to fill the form | The date and Human redable time apper of last activigity | Show the status. Converted, abandoned | View button for the action. |
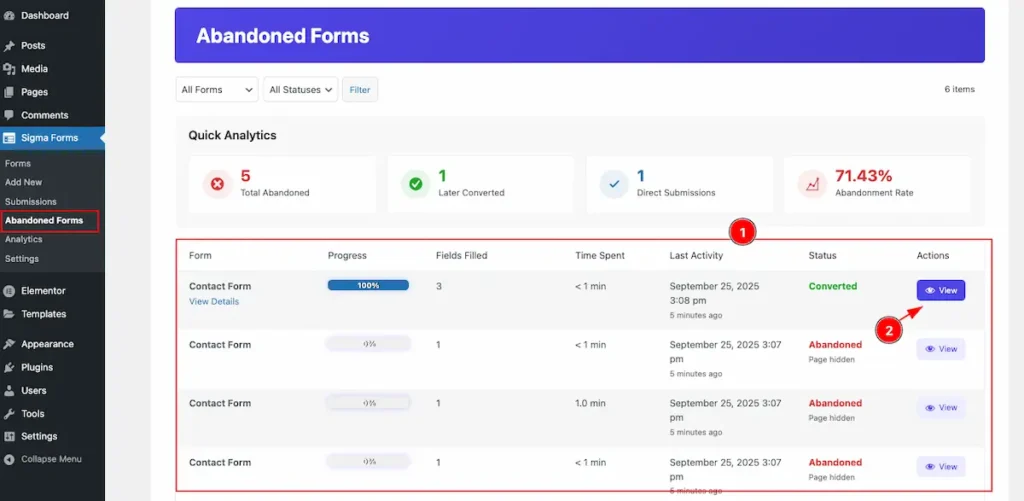
- Click on the “View” button to get it the details.

- Form Infomration:
| Abandoned Fom ID | Number of Abandoned ID |
| Form Name | Name of the Form. e.g.: Contact Form |
| Form ID | Number of ID. e.g.: 1 |
| Session ID | Session ID: saigf_1758812872803_j6j6x20p2 |
| User ID | Show the User ID. e.g.: Guest |
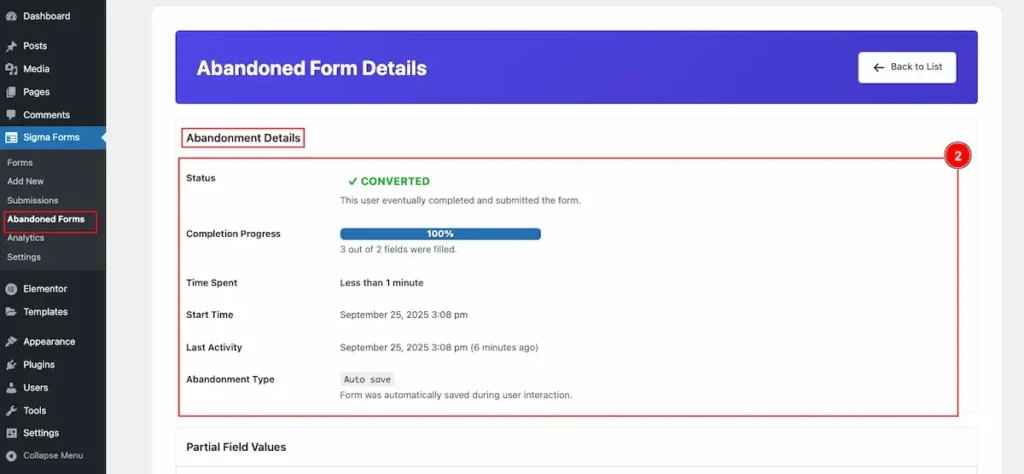
- Abandoned Details:
| Status | Show the Status. e.g.: Converted, Abandoned |
| Completion Progress | Completion of Progress. 3 to 2 fields was filled. |
| Time Spent | How much time was spent |
| Start Time | Show the Start Time. Date and Time Appear. |
| Last Activity | Show the Last Activity appear on Time. |
| Abandoned Type | Type: Auto Save. Form was automatically saved during user interaction. |
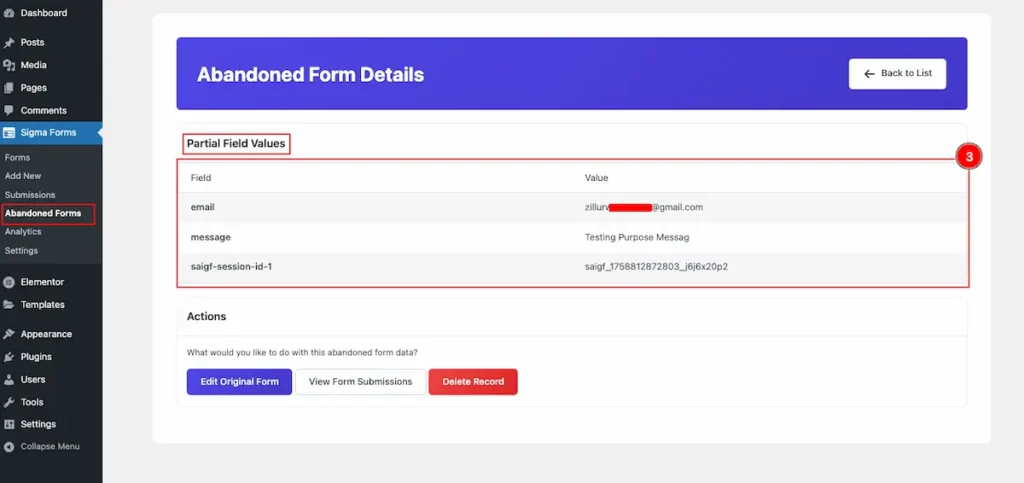
- Partial Field Values:
| Field | Value |
| show the email | |
| Message | Appear the Message submitted |
| saigf-session-id-1 | Show the seccion id: saigf_1758812872803_j6j6x20p2 |
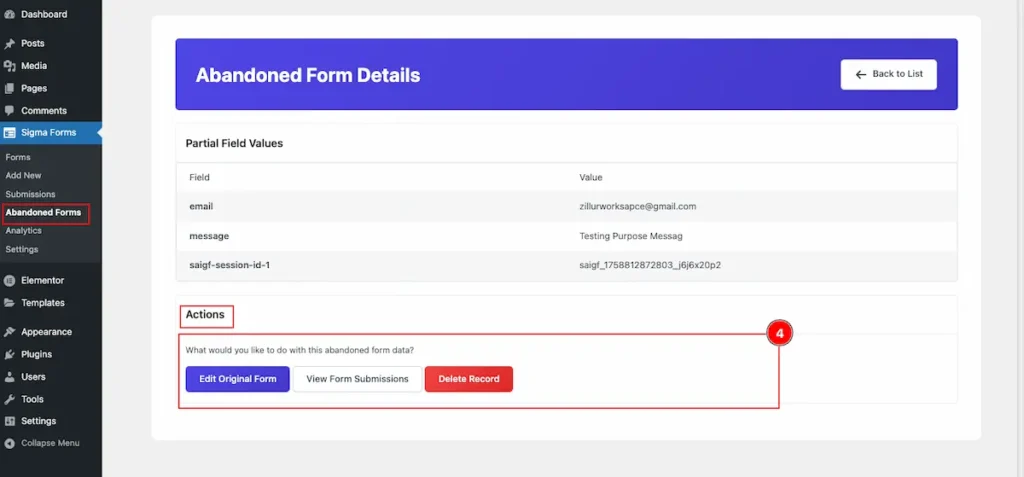
- Action: Three action button appear on the section.
- Edit Original Form: Click on the button to Edit the Original Form.
- View Form Submission: To view the Submission form to Check it.
- Delete Record: Click on it to Delete the abandoned form.
Analytics
Navigate to Sigma Forms > Analytics
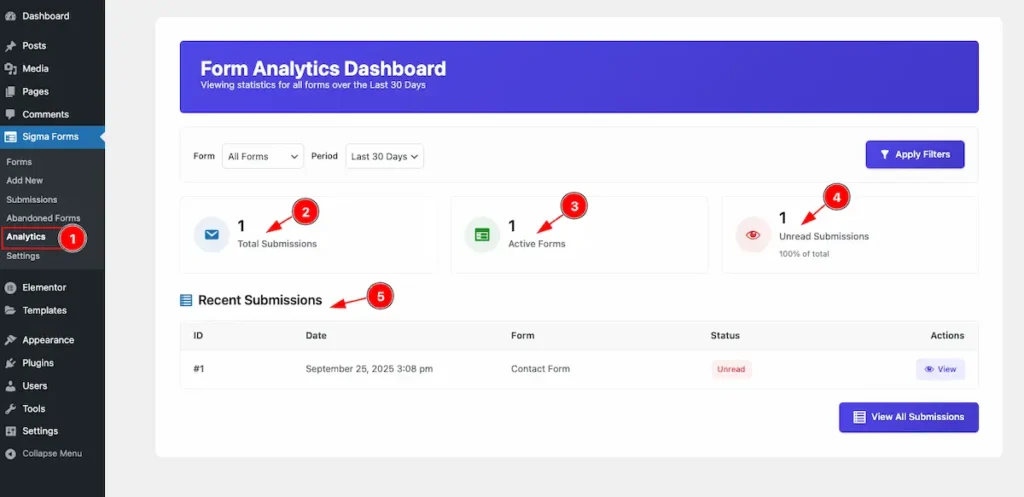
- Analytics section appear the all the inform of Submit Form.
- Total Submission: Demonstrate how many form are submitted.
- Active Forms: Showing the active forms.
- Unread Submission: Show the how many form are unread.
- Recent Submission: Showing all the form on the submission.
| ID | Date | Form | Status | Actions |
| Show the ID. e.g.: #1 | Show the Date and Time | Name of the Form | Show the Status. Read or Unread | View button to check details. |
Settings
Navigate to Sigma Forms > Settings
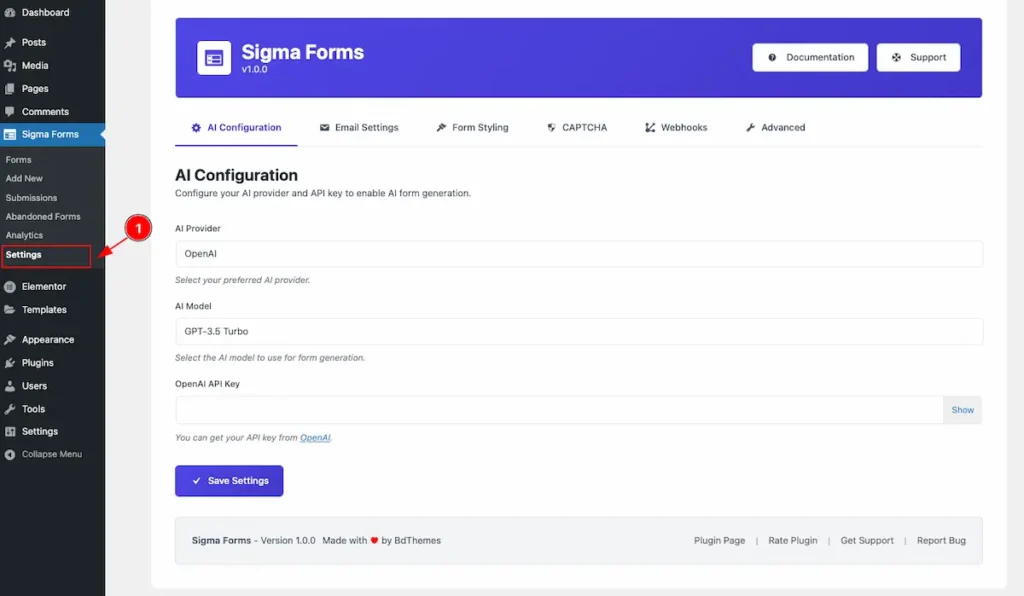
- Settings section appear all the configuration of the Sigma Form. Let’s configure them.
AI Configuration
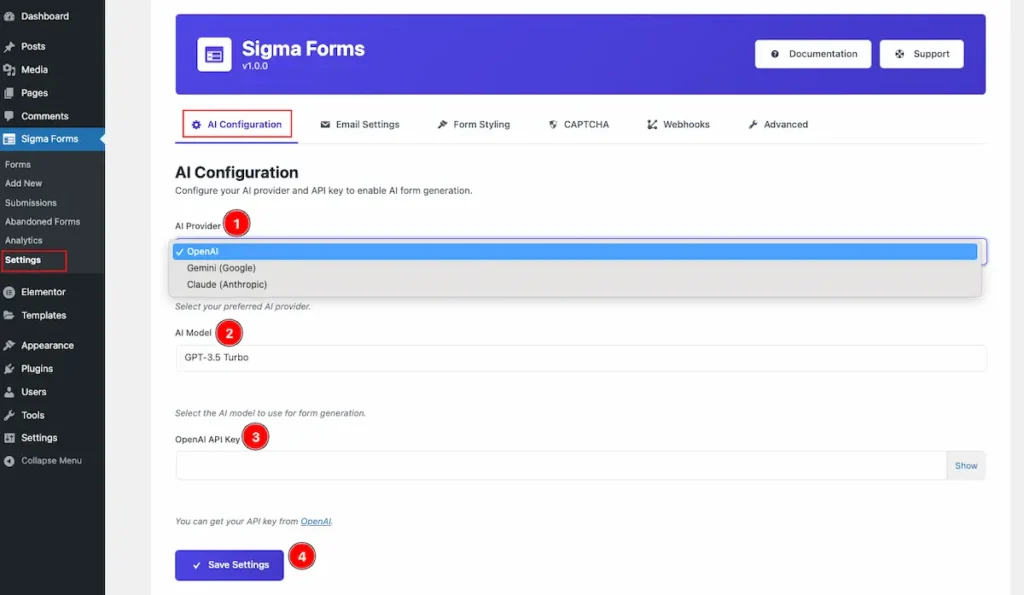
- AI Provider: Select the AI Provider. Three AI Provider are available. e.g.: OpenAI, Gemini( Google), Claude ( Anthropic ).
- AI Model: Select the AI Model based on the Selection. As selected the OpenAI, it appear the Model. e.g: GPT-3.5 Turbo, GPT-4, GPT-4o
- OpenAI API Key: Set the API Key on the Form. Don’t have the open API Key to click on it OpenAI.
- Save Settings: To save the changes click on the ” Save Settings ” Button.
Email Settings
Default Email Settings
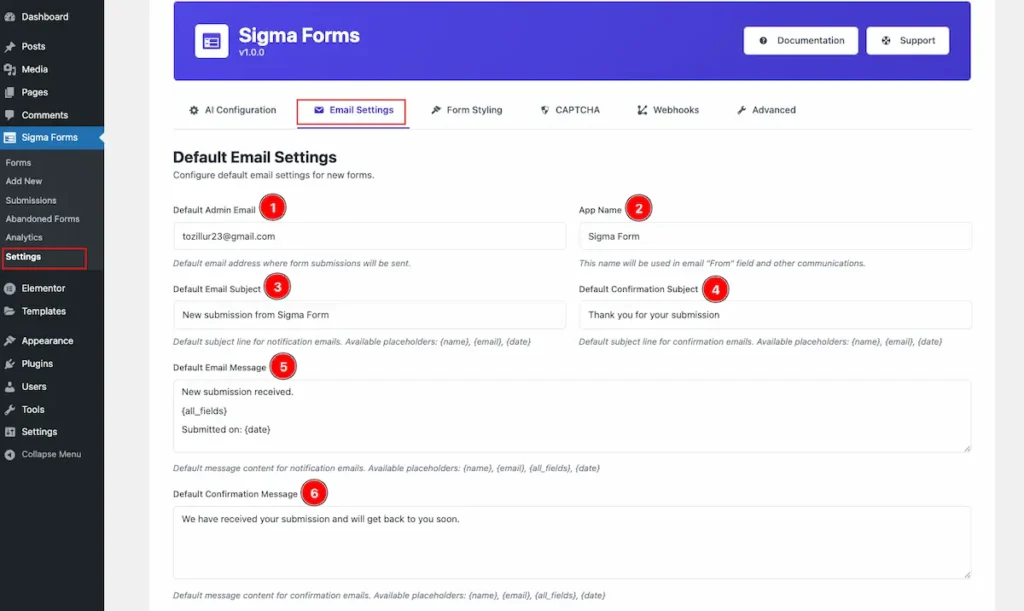
- Default Admin Email: Default email address where form submissions will be sent. The mail is taken from your WordPress site.
- App Name: Se the name of the App. e.g: Sigma Form.
- Default Email Subject: Set the subject for the email. It will set the send.
- Default Confirmation Subject: Set the default confirmation subject.
- Default Email Message: Set the message for the Default.
- Default Confirmation Message: Set the confirmation after submitting the form.
SMTP Configuration
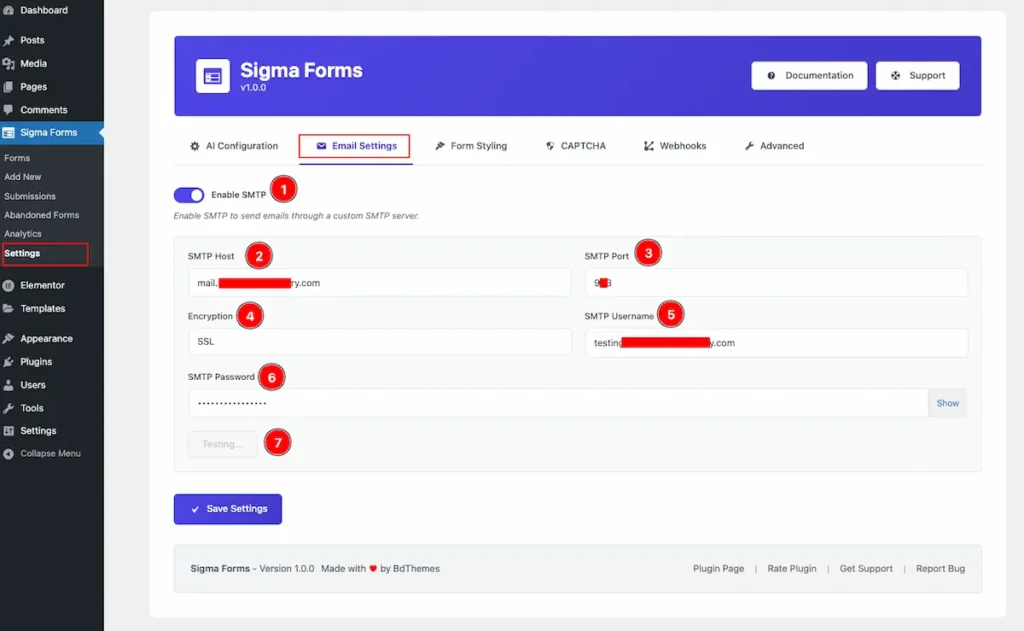
- Enable SMTP: Enable the switcher to set the custom SMTP server.
- SMTP Host: Set the Hosting for the STMP. e.g.: mail.testserver.com
- SMTP Port: Set the port for the SMTP. e.g.: 447
- Encryption: Choose the encryption method for the SMTP. Available SMTP is e.t.: TSL, SSL. None
- SMTP Username: Set the username for the SMTP. e.g.: [email protected]
- SMTP Password: Set the Password of the SMTP.
- Testing: After setting is completion click on the button it will Testing success message.
Form Styling
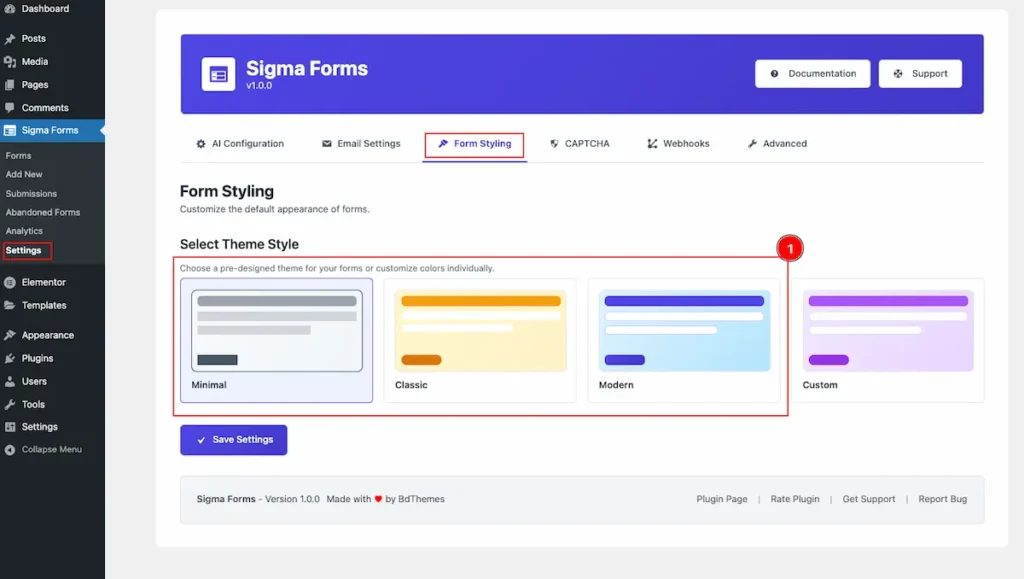
- Select Theme Style: Choose the theme for the Selecting the themes. Default themes are available. Minimal, Classic, Modern.
Custom Theme
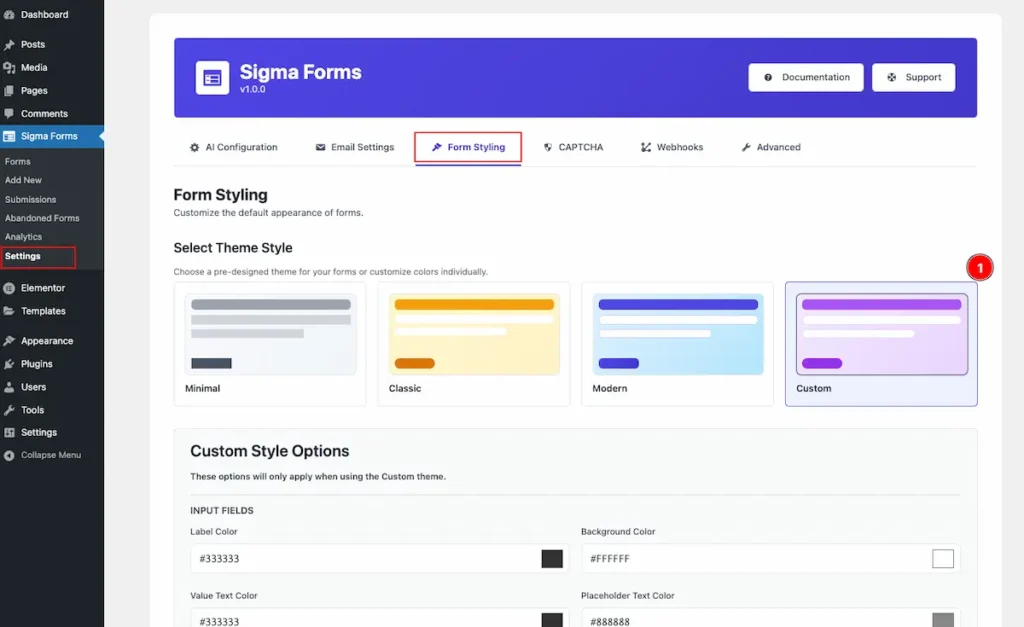
- Select on the Custom theme and edit it.
INPUT FIELDS
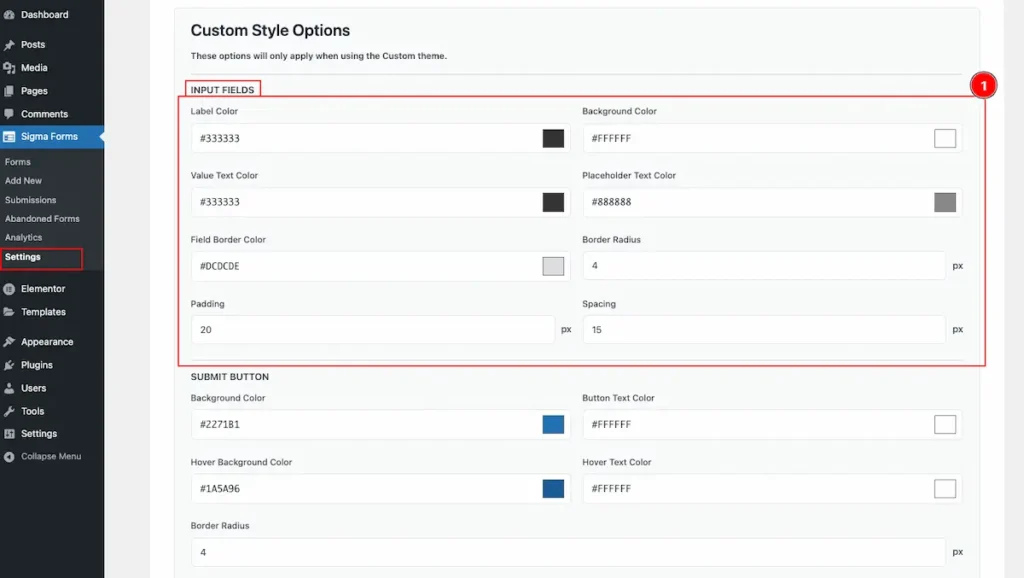
- Label Color: Choose the Label Color for the INPUT Fields.
- Background Color: Choose the Background Color.
- Value Text Color: Set the Value color for the Text.
- Placeholder Text Color: Select the Placeholder color or the text.
- Field Border Color: Set the border color for the Fields.
- Border Radius: Set the radius for the Border.
- Padding: Set the inner spacing by selecting the Padding.
- Spacing: Set the spacing for the fields.
SUBMIT BUTTON
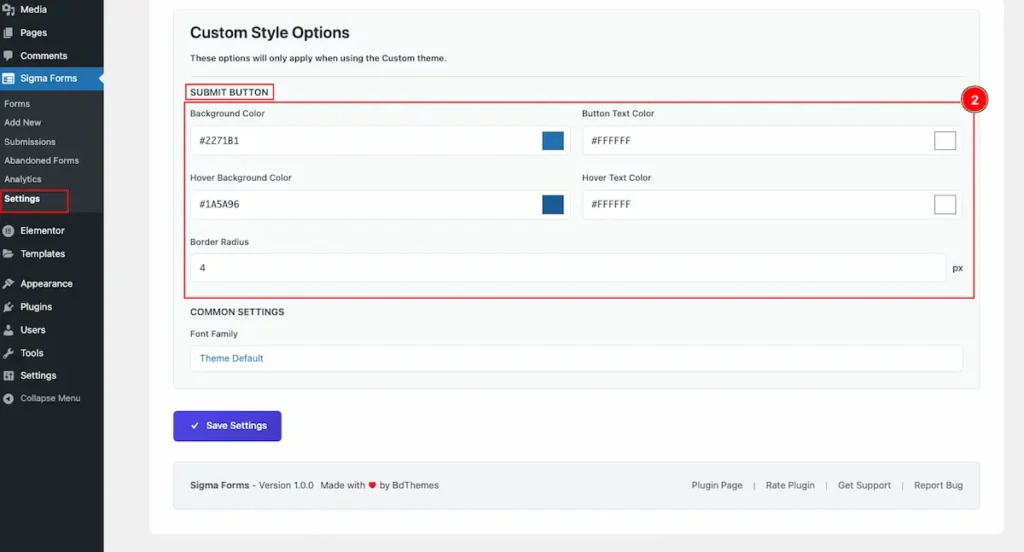
| Background Color | Choose the color for the Background. |
| Button Text Color | Choose the Button Text for the Button. |
| Hover Background Color | Choose the Hover color for the Background. |
| Hover Text Color | Choose the Button Hover Text for the Button. |
| Border Radius | Set the Make the border radius. |
COMMON SETTINGS
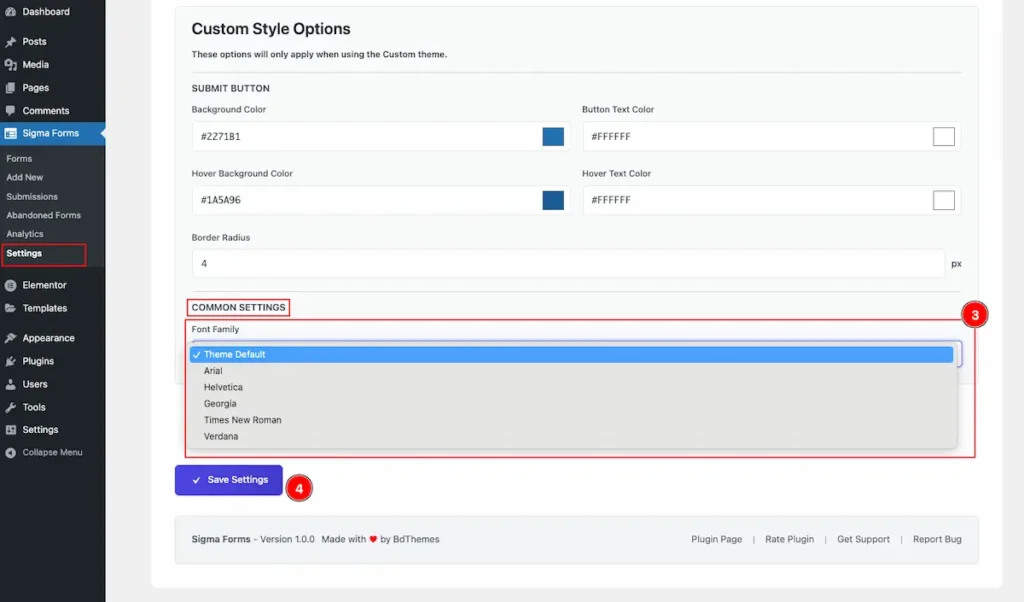
- Font Family: Choose the fonts for the button. Different font family is available for the fields. Theme Default, Arial, Helvetica, Georgia, Times News Roman, Verdana.
- Save Settings: Click on the button to save the settings.
CAPTCHA
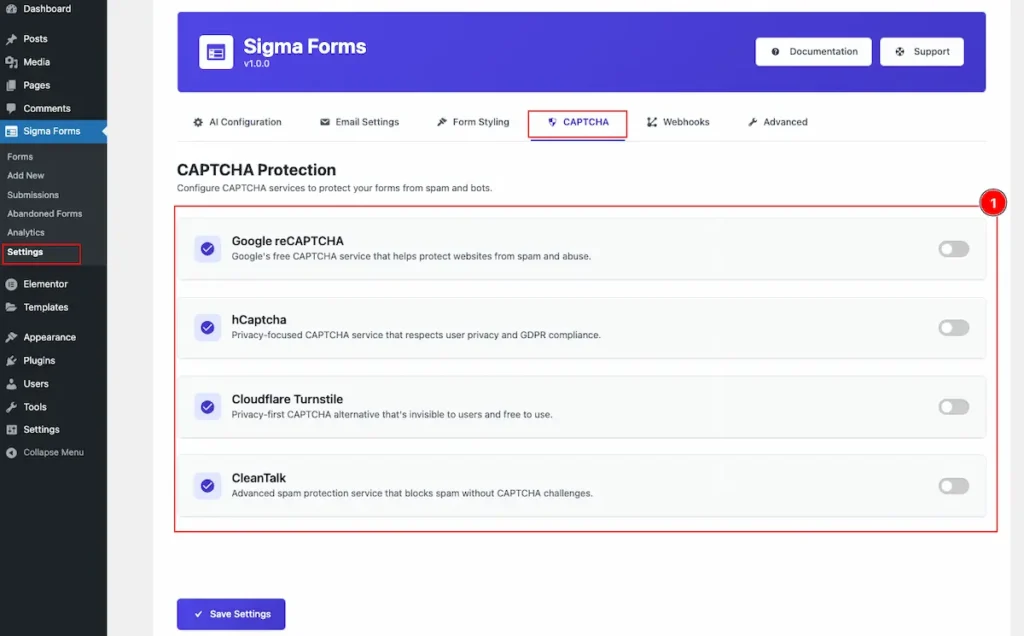
- Configure CAPTCHA services to protect your forms from spam and bots.
- Google reCAPTCHA: Google’s free CAPTCHA service that helps protect websites from spam and abuse.
- hCaptcha: Privacy-focused CAPTCHA service that respects user privacy and GDPR compliance.
- Cloudflare Turnsite: Privacy-first CAPTCHA alternative that’s invisible to users and free to use.
- CleanTalk: Advanced spam protection service that blocks spam without CAPTCHA challenges.
Google ReCaptcha
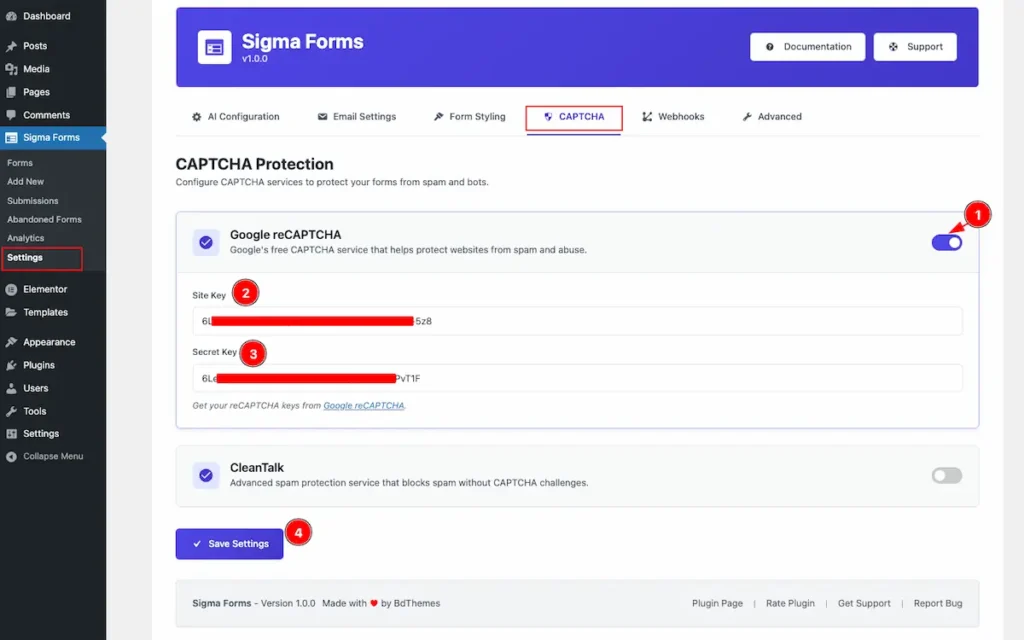
- Enable the Google reCAPTCHA switcher for setting the reCaptcha. To get the Google reCAPTCHA.
- Site Key: Input the Site Key.
- Secret key: Input the Secret Key.
- Finally click on the Save Settings button to make save changes.
Note: Only one recaptcha can be enabled at a time.
Webhooks
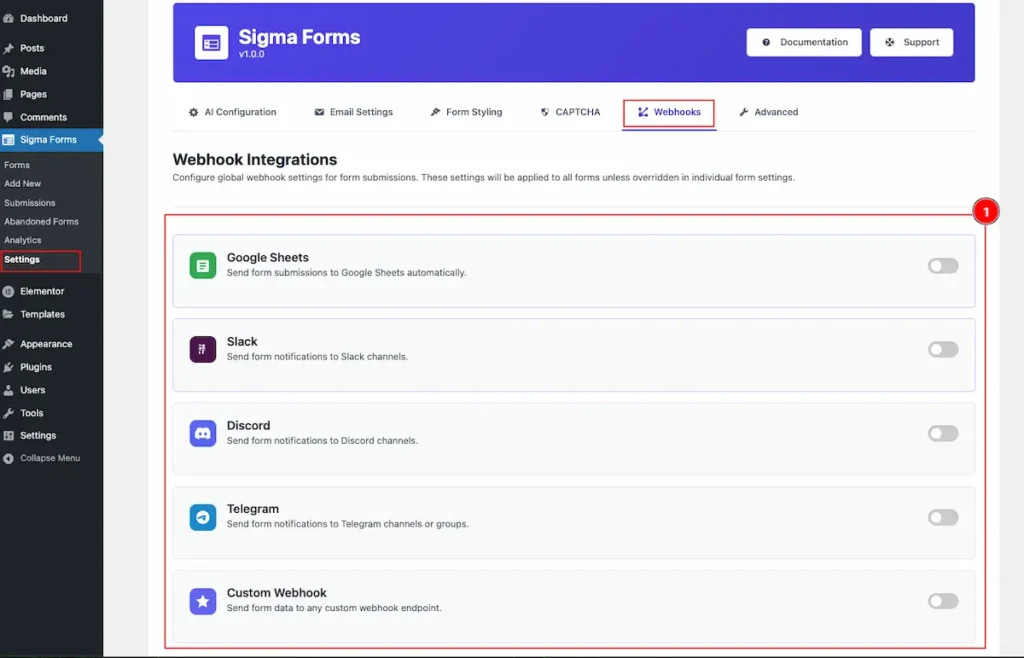
- Webhook Integrations: Configure global webhook settings for form submissions. These settings will be applied to all forms unless overridden in individual form settings.
- Google Sheets: Send form submissions to Google Sheets automatically.
- Slack: Send form notifications to Slack channels.
- Discord: Send form notifications to Discord channels.
- Telegram: Send form notifications to Telegram channels or groups.
- Custom Webhook: Send form data to any custom webhook endpoint.
Google Sheets
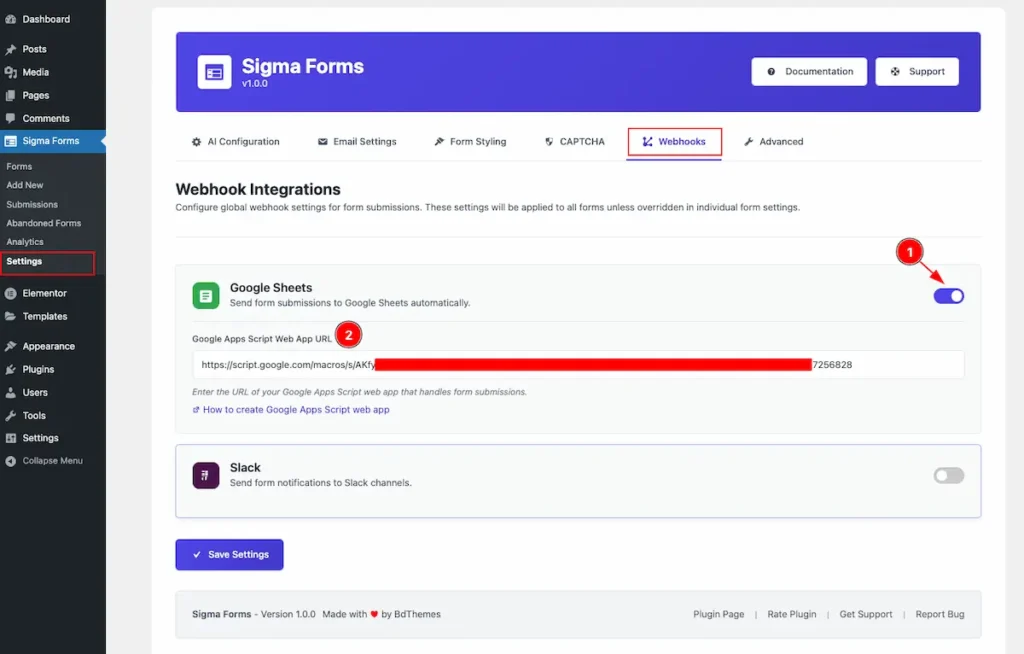
- Enable the switcher of the Google Sheets.
- Google Apps Script Web App URL: Enter the URL of google apps script web.
Advanced
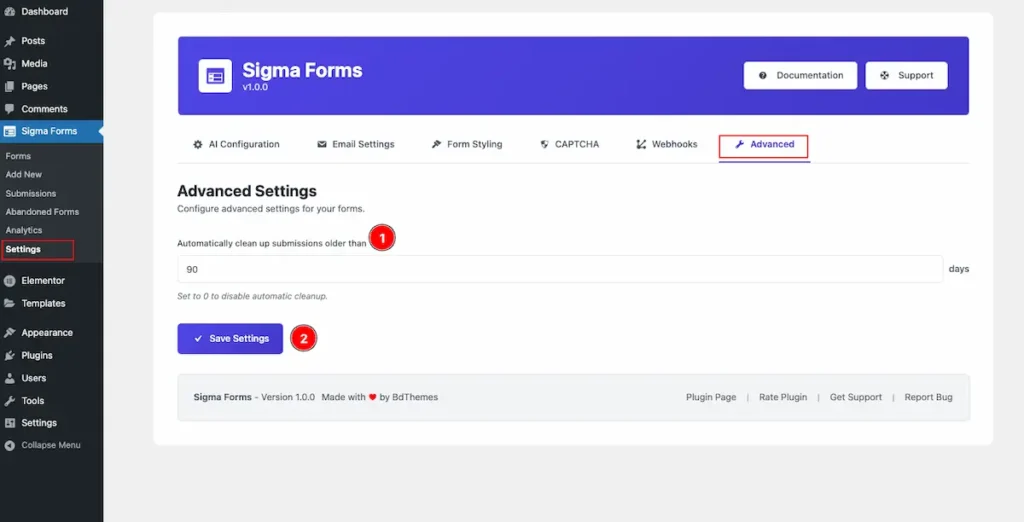
- Set the days to automatically clean up the settings for the forms. e.g.: 90 days. Set to 0 for disabling the automatically cleanup.
- Click on the save settings to save it.
By following this you can configure the Sigma Forms.
Video Tutorial
Please watch the video tutorial to learn more about the Sigma Forms plugin. Here is the demo page link of the Sigma Forms plugin.
Thanks for staying with us.