
This documentation offers a complete overview of the Smart Admin Assistant Pro Plugin. It provides an easy and efficient way to manage your WordPress dashboard, with a wide range of features to simplify administration.
Download Smart Admin Assistant Pro Plugin
Navigate to the Smart Admin Assistant Pro plugin Official website Link and Purchase the Plugin. Follow the instruction to Download the Smart Admin Assistant Pro Plugin.
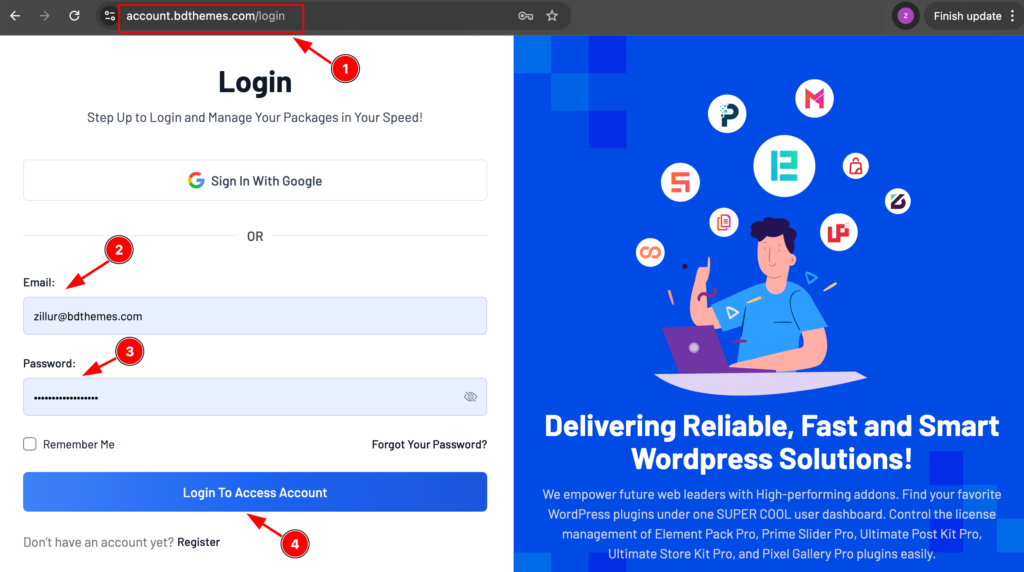
- Go to the link accounts.bdthemes.com
- Enter the Purchase email ( The email used for purchasing the Smart Admin Assistant ).
- Enter the password.
- Click on the ” Login To Access Account “ button to login to your license managements dashboard.
After successfully login, you will see the dashboard.

- Now, Navigate to ” Products ” > “ Smart Admin Assistant” tab from left side bar. It will appear the Smart Admin Assistant information.
- Find the ” Download Files ” button on the right top side and click on it.
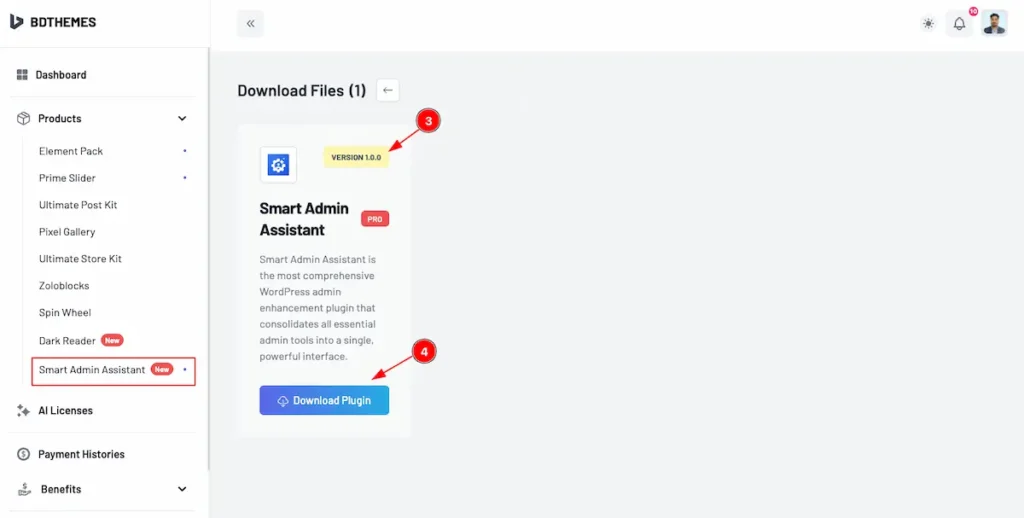
- Top right corner the latest version will appear there.
- Now you will see the Smart Admin Assistant plugin just click on the ” Download Plugin ” button and it will start to download.
Install and Activate Smart Admin Assistant Plugin Pro
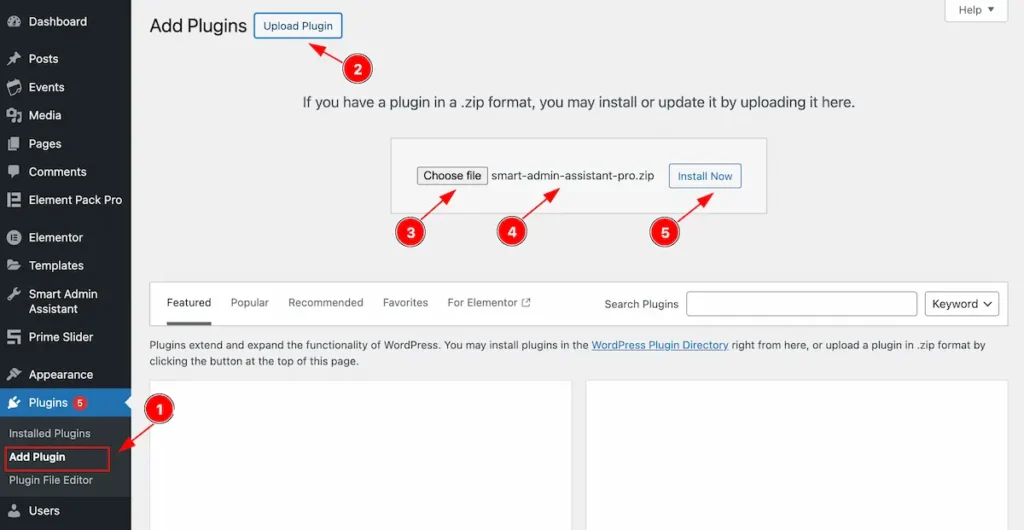
- Navigate to the Plugin Dashboard and Click on the ” Add Plugin ” section.
- Click on the ” Upload Button ” and It will appear a file choose options.
- Click on the Choose file and Choose the Download file and Select the Smart Admin Pro Plugin.
- The Selected file will appear with name e.g.: smart-admin-assitant.zip
- Click on the Install Now Button to install the Plugin.
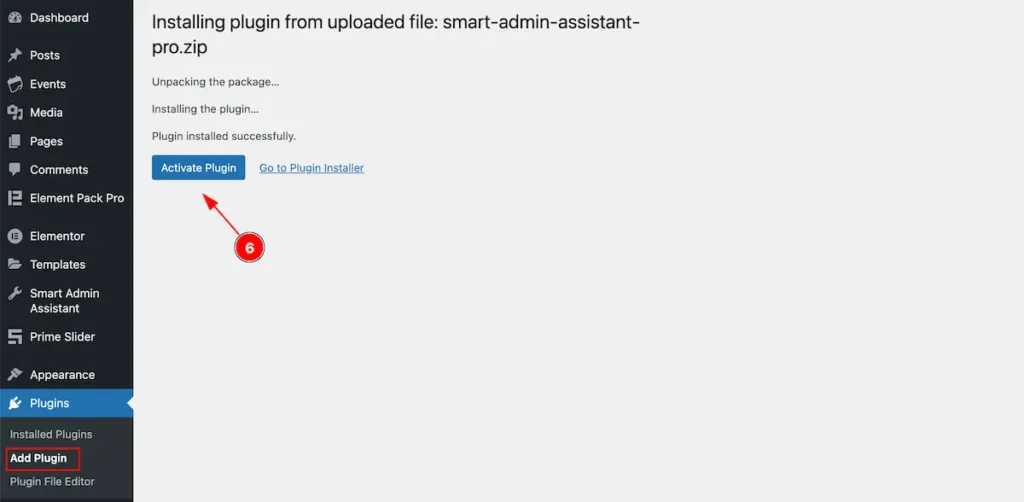
- After installing the plugin the “ Activate Plugin ” button will appear Now click on it to activate.
Activate License Key
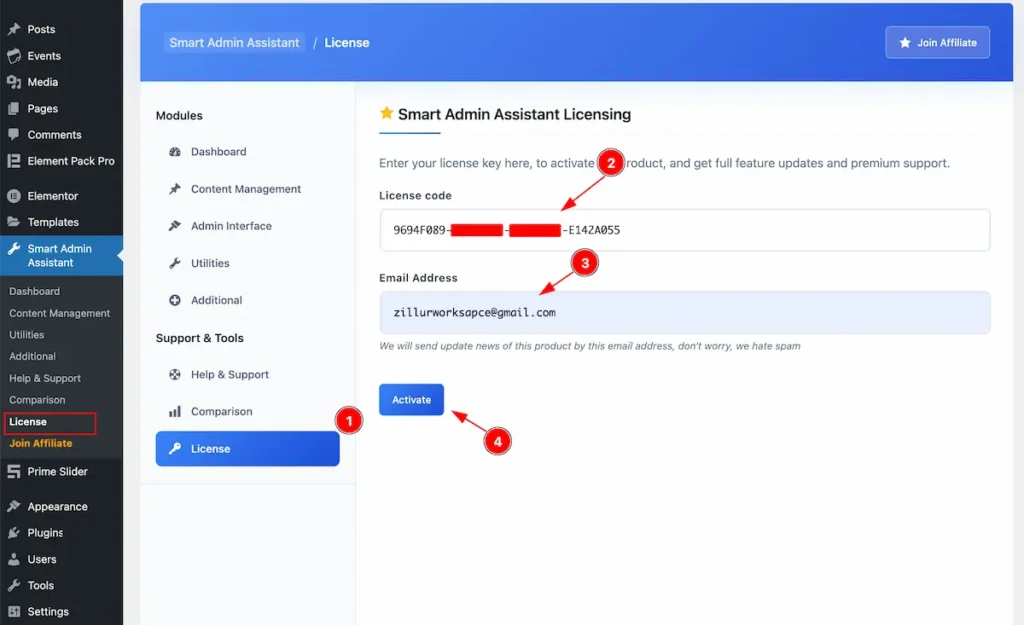
- Navigate to the License Tab and Click on it. It will appear Input Fields for License and Email.
- License Key: Input the License key on the License Code Input Fields.
- Email Address: Input the Email address on there.
- After inputting the valid license key Now hit enter the ” Activate ” button.
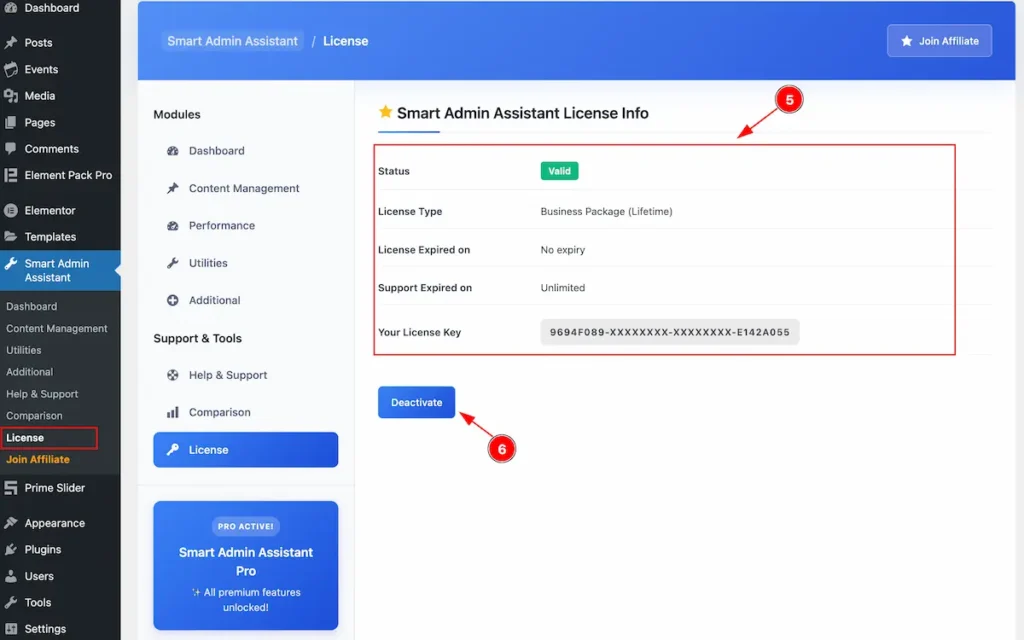
- After Successfully Activate License key it will appear the License Info.
| Name | Value |
| Status | Valid |
| License Type | Package Info appear. E.g.:Business Package ( Lifetime ) |
| License Expired On | Appear the Expiry Date. For lifetime Package . No Expiry |
| Support Expired On | Appear the Expiry Support Date. For lifetime Package . Unlimited |
| Your License Key | Appear the License key. E.g.: xxxxxx |
- ” Deactivate ” button to deactivate the license key.
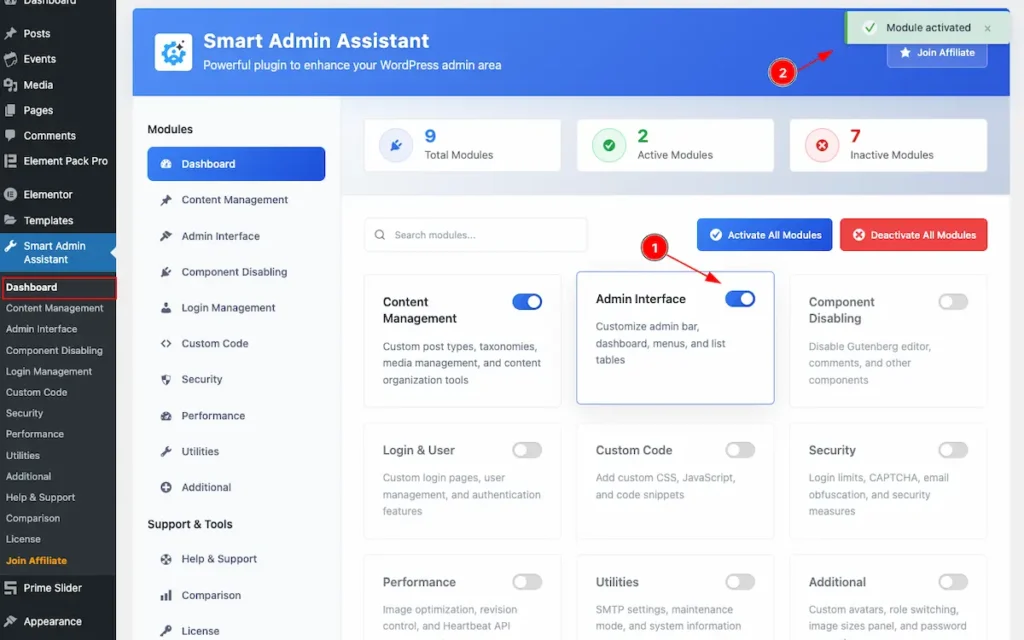
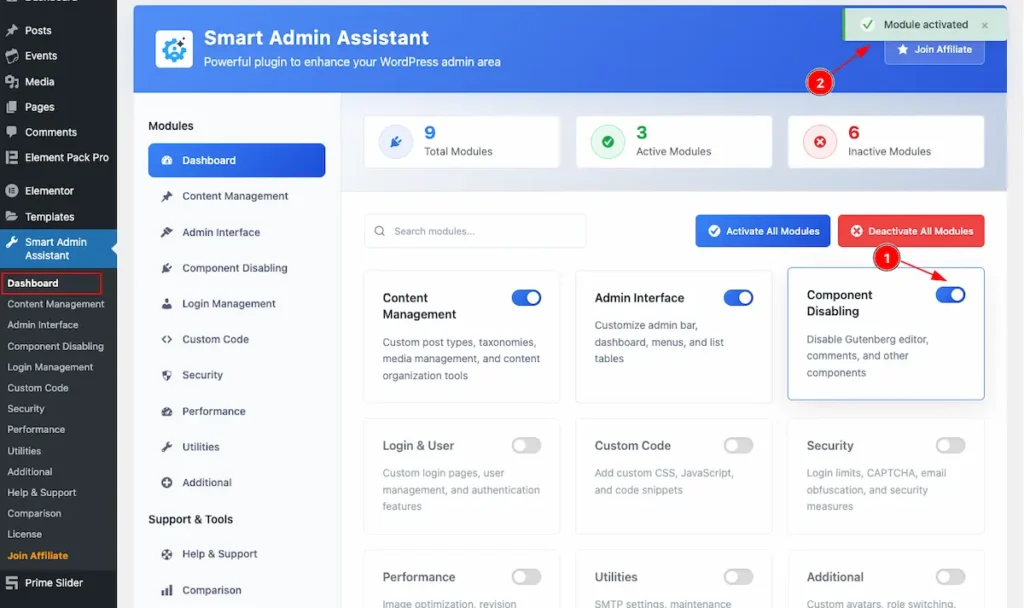
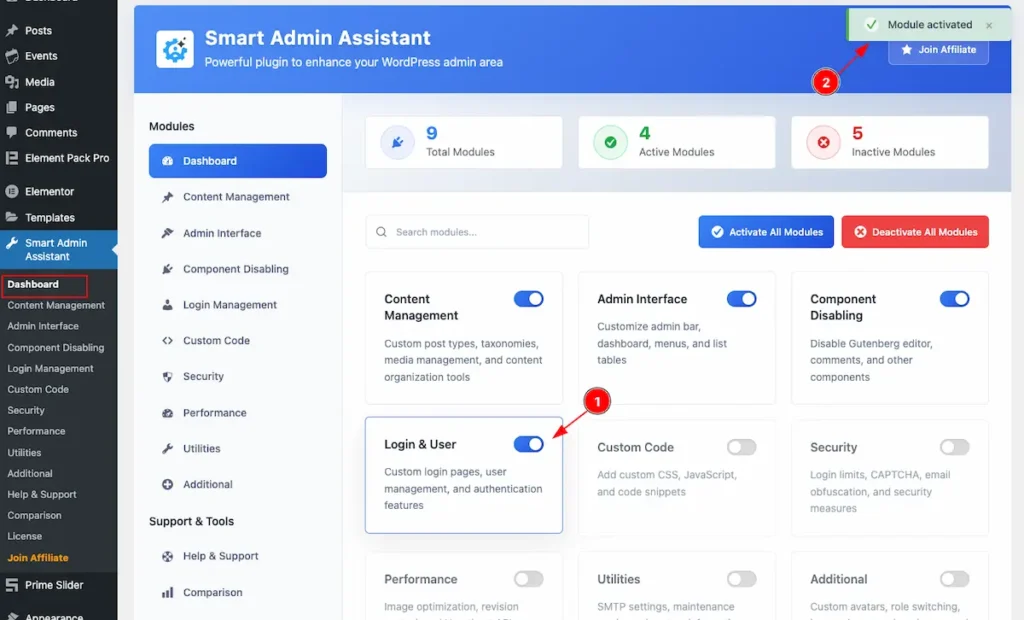
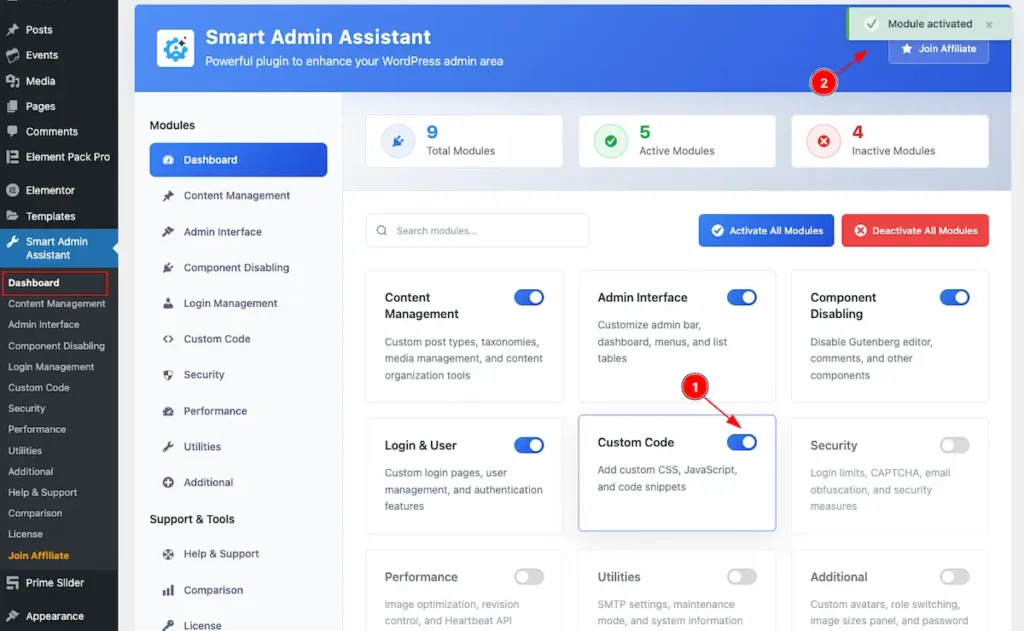
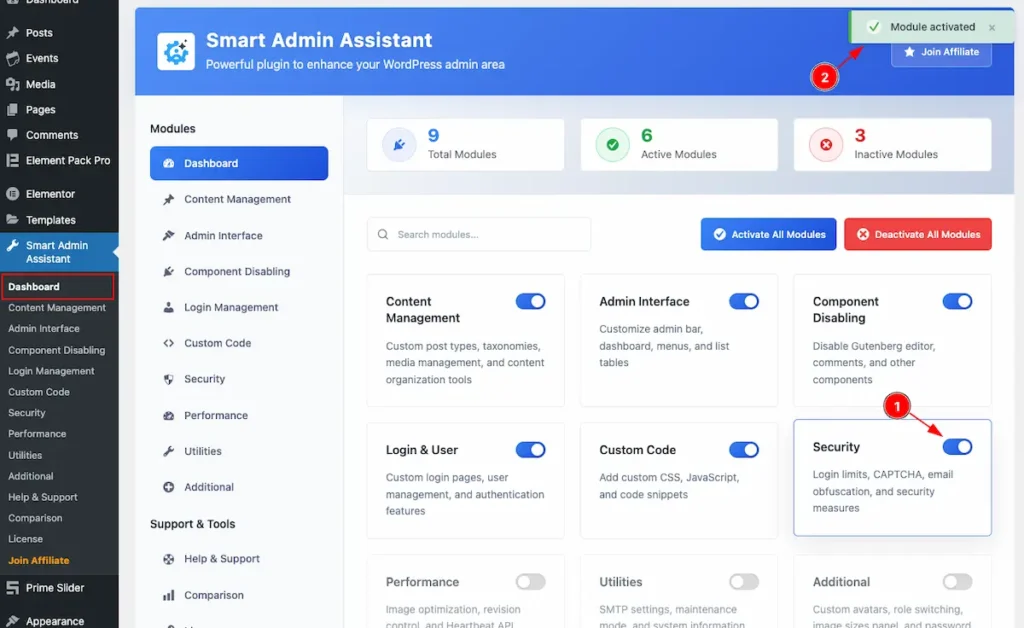
Smart Admin Assistant Dashboard
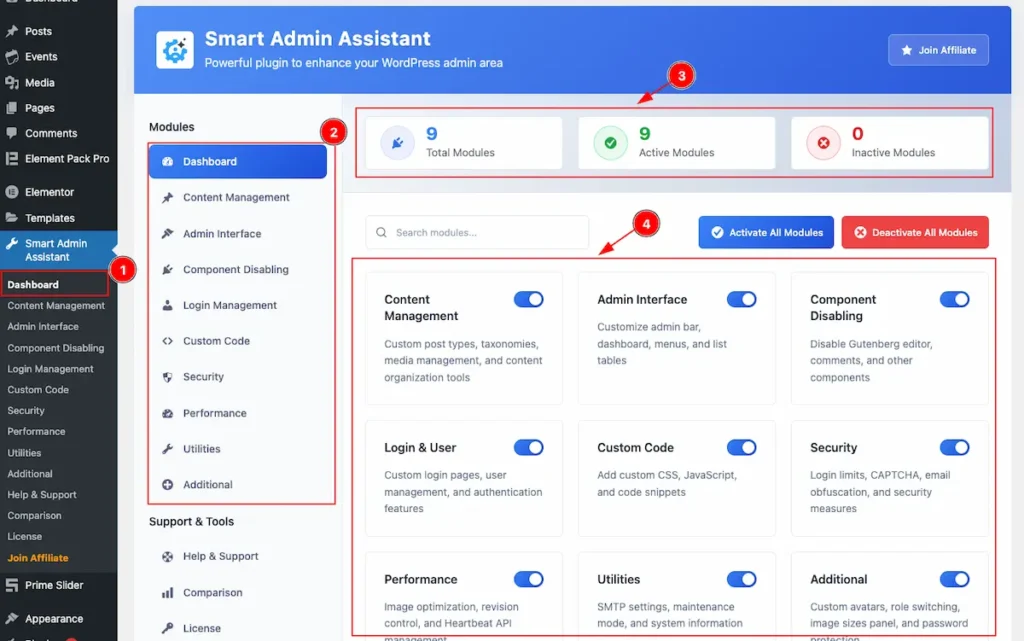
- Navigate to the Dashboard of the Smart Admin Assistant.
- On the Left all the Tabs appear. e.g.: Content Management, Admin Interface etc.
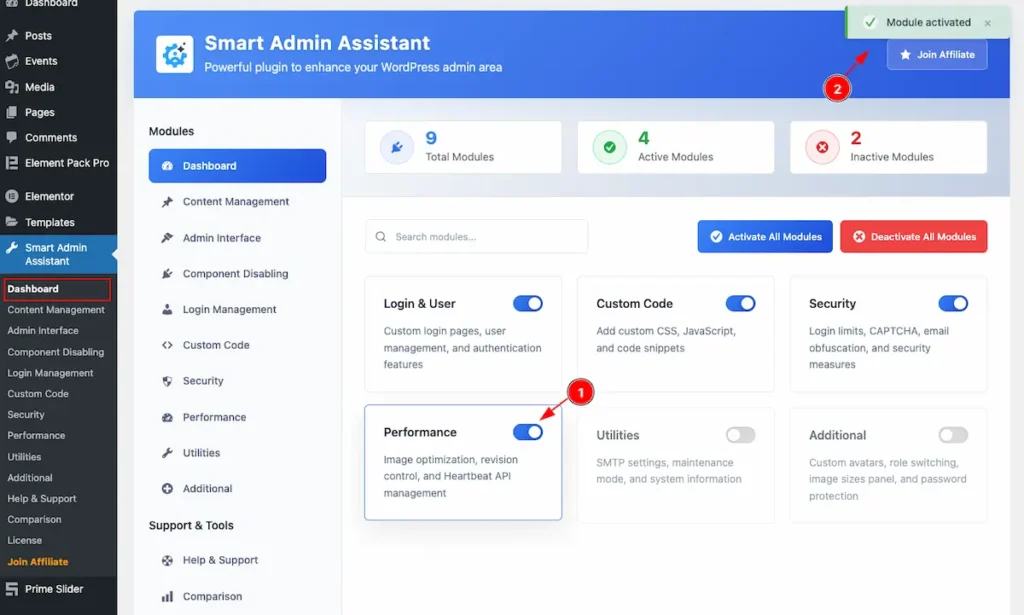
- Right Top section appear the dashboard overview of the Smart Admin Assistant Modules.
- Total Modules: Appear Total modules number.
- Active Modules: Demonstrate the Active Modules.
- Inactive Modules: The Number of the Inactive Modules appear.
- All the modules appear on here e.g.: Content Management, Admin interface, Component Disabling etc. the switcher on the right to activate the Modules.
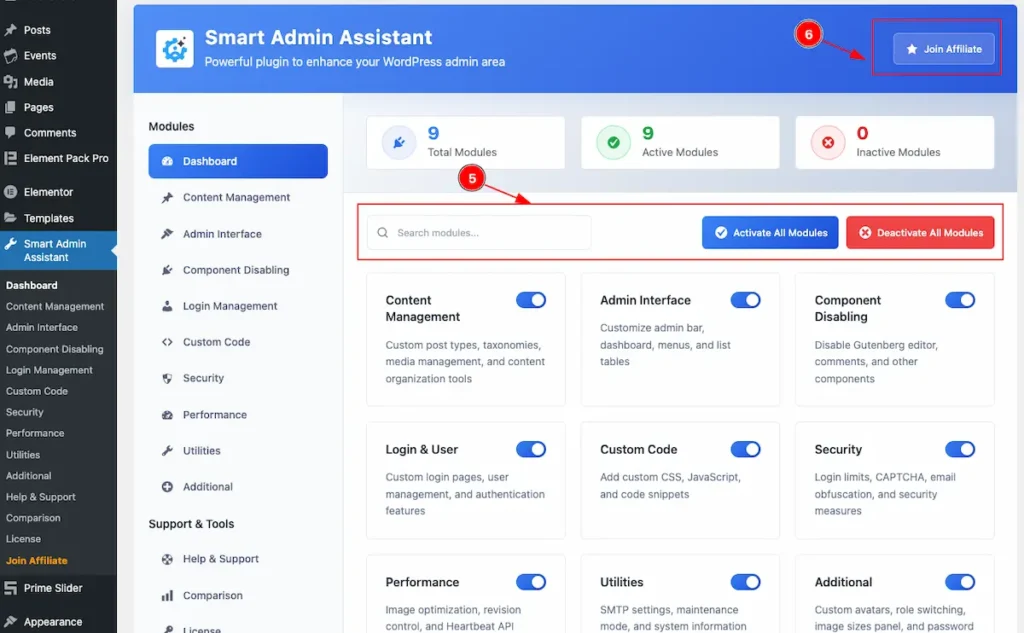
- Search the the Modules , Activate All Modules to activate all, and Deactivate All Modules to deactivate at once.
- Export Setting and Import Settings button on the top to Export and Import.
Content Management
Go to Smart Admin Assistant > Dashboard

- First Enable the switcher of the Content Management Modules.
- The Saving notification appear while Activate the Module.
Content Duplication

- Enable Post Duplication: Enable the switcher to enable the Duplication of the Pages, Posts, Custom Posts.
- After Duplication: Choose where to redirect after duplicating a post.
- Allowed Roles: Select the User Roles that can duplicate the posts. E.g.: Administrator, Editor, Author, Contributor etc.
Content Optimization
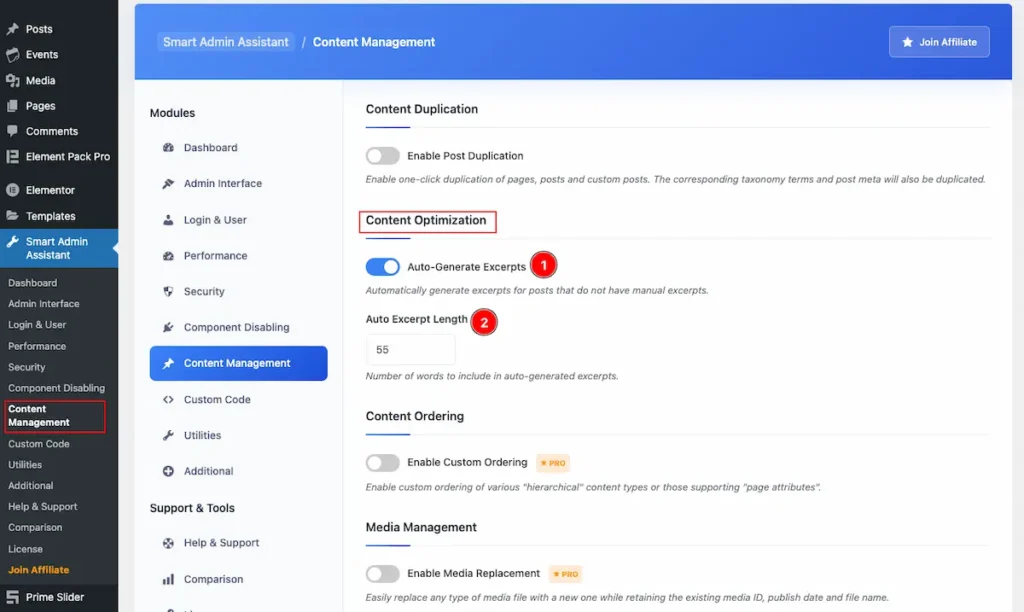
- Auto-Generate Excerpts: Enable the switcher to Automatically Generate the Excerpts.
- Auto Excerpt Length: Set the Length of auto excerpt. Number of words to include in auto-generated excerpts.
Content Ordering
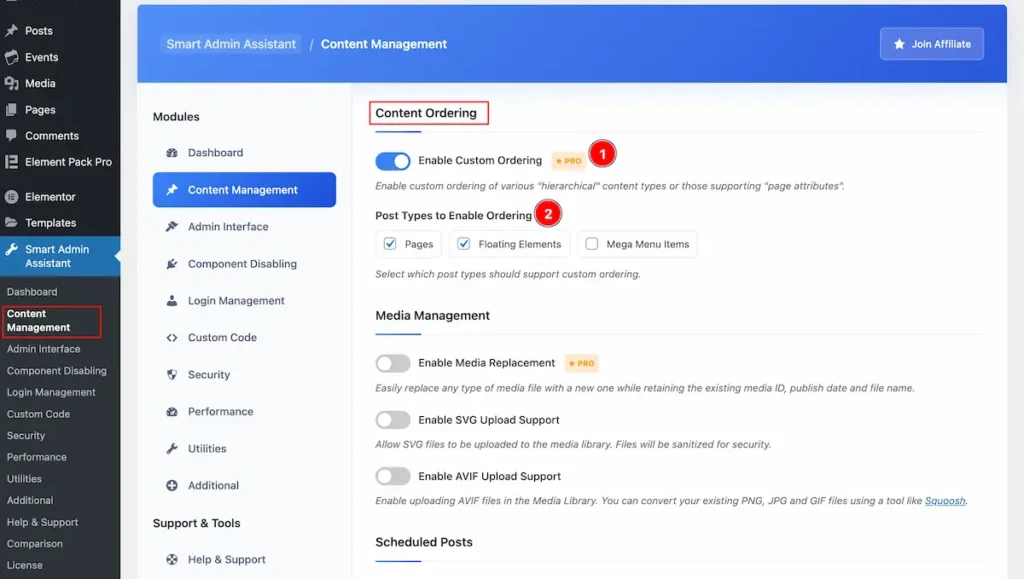
- Enable Custom Ordering: Enable custom ordering of various “hierarchical” content types or those supporting “page attributes”. Change the order of those items manually (e.g., drag-and-drop in a plugin, or by filling the order number).
- Post Types to Enable Ordering: Select which post types should support custom ordering. E.g.: Pages, Floating Elements, Mega Menu Items.
Media Management
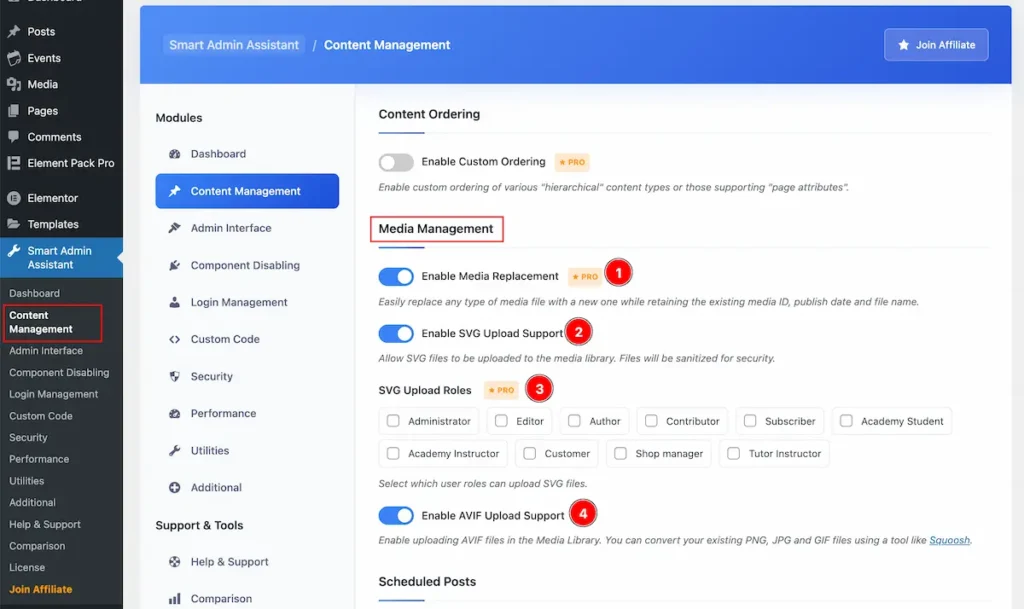
- Enable Media Replacement: Turn on the switcher to Easily replace any type of media file with a new one while retaining the existing media ID, publish date and file name.
- Enable SVG Upload Support: Enable the switcher to Allow SVG files to be uploaded to the media library. Files will be sanitised for security.
- SVG Upload Roles: Select which roles can upload the SVG Files, e.g.: Administrator, Editor, Author, Contributor, Subscriber, Academy Student etc.
- Enable AVIF Upload Support: Enable the switcher to Enable uploading AVIF files in the Media Library. You can convert your existing PNG, JPG and GIF files using a tool like Squoosh.
Scheduled Posts
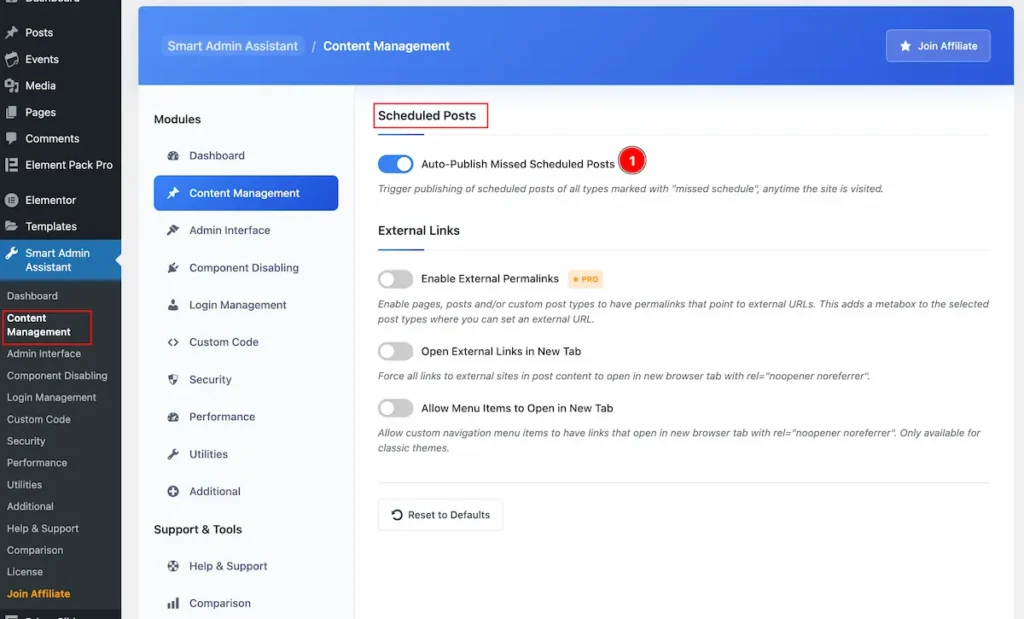
- Auto-Publish Missed Scheduled Posts: Enable the switcher to automatically trigger to Publish the posts.
External Links
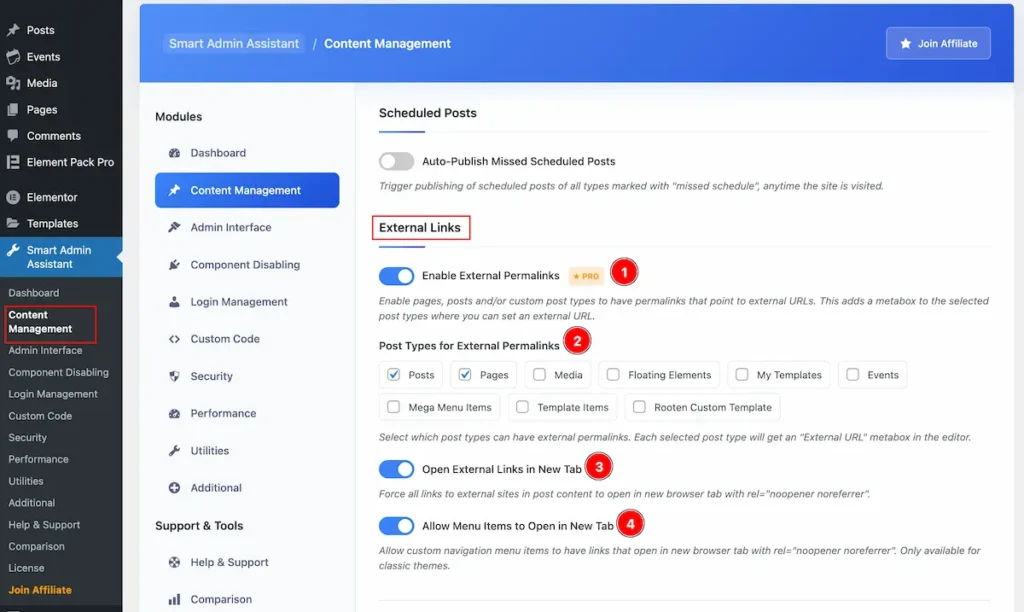
- Enable External Permalinks: Enable pages, posts and/or custom post types to have permalinks that point to external URLs. This adds a metabox to the selected post types where you can set an external URL.
- Post Types For External Permalinks: Select which post types can have external permalinks. Each selected post type will get an “External URL” metabox in the editor.
- Open External Links in New Tab: Force all links to external sites in post content to open in new browser tab with rel=”noopener noreferrer”.
- Allow Menu Items to Open in New Tab: Allow custom navigation menu items to have links that open in new browser tab with rel=”noopener noreferrer”. Only available for classic themes.
Admin Interface
Go to Smart Admin Assistant > Admin Interface
- First Enable the switcher of the Admin Interface Modules.
- The Saving notification appear while Activate the Module.
Admin Bar Cutomization
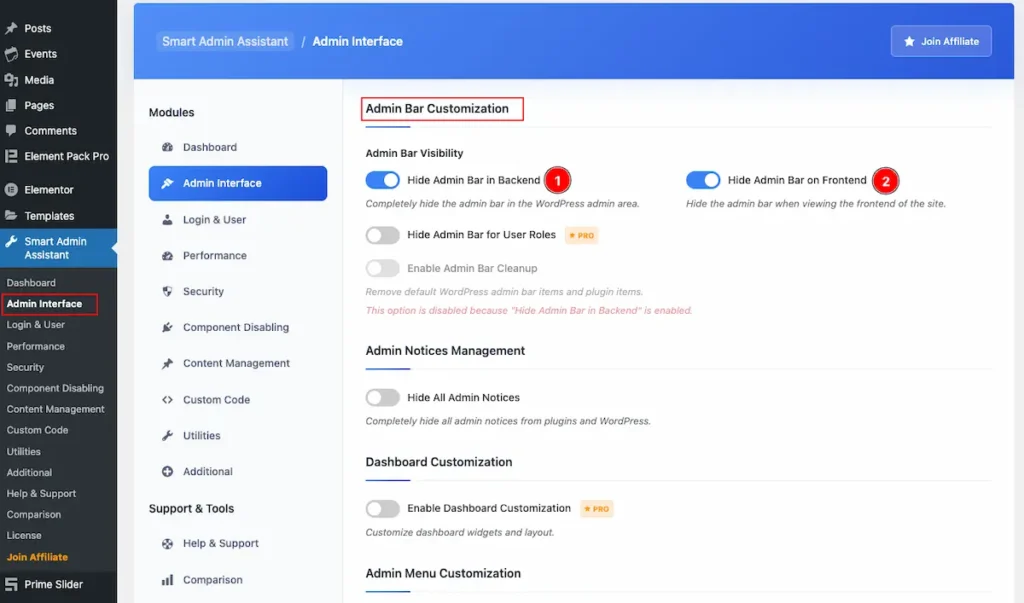
- Hide Admin Bar in Backend: Enable the switcher to hide the visibility of the Admin bar on the Backend.
- Hide Admin Bar on Frontend: Enable the switcher to hide the visibility frontend of the Admin.
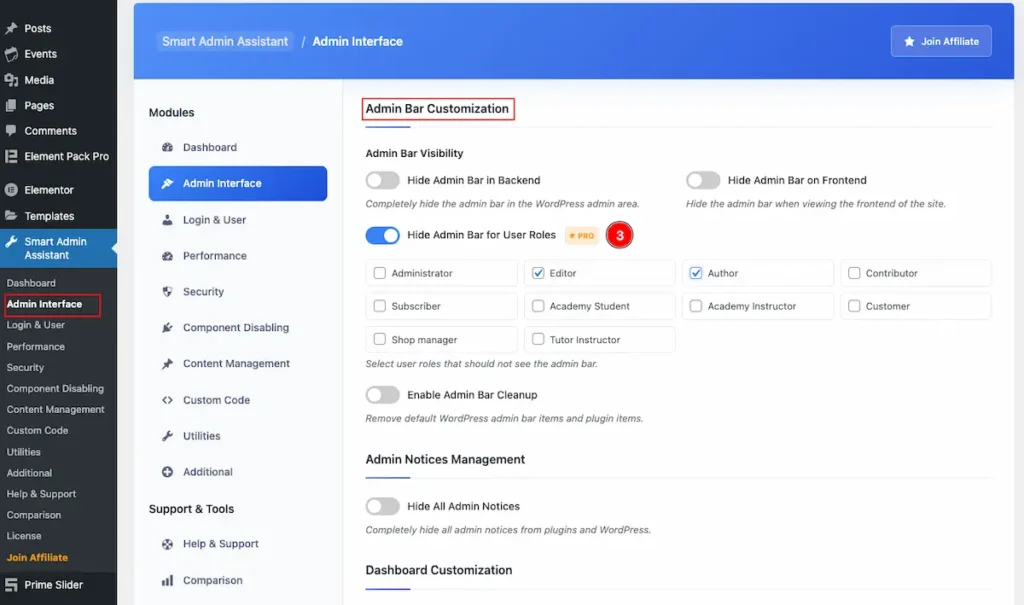
- Hide Admin Bar for Use Roles: Enable the switcher to hide the admin bar for the user Roles. Select the user Role to hide the Admin Bar. Available User are Administration, Editor, Author, Contributor, Subscriber, Customer etc.
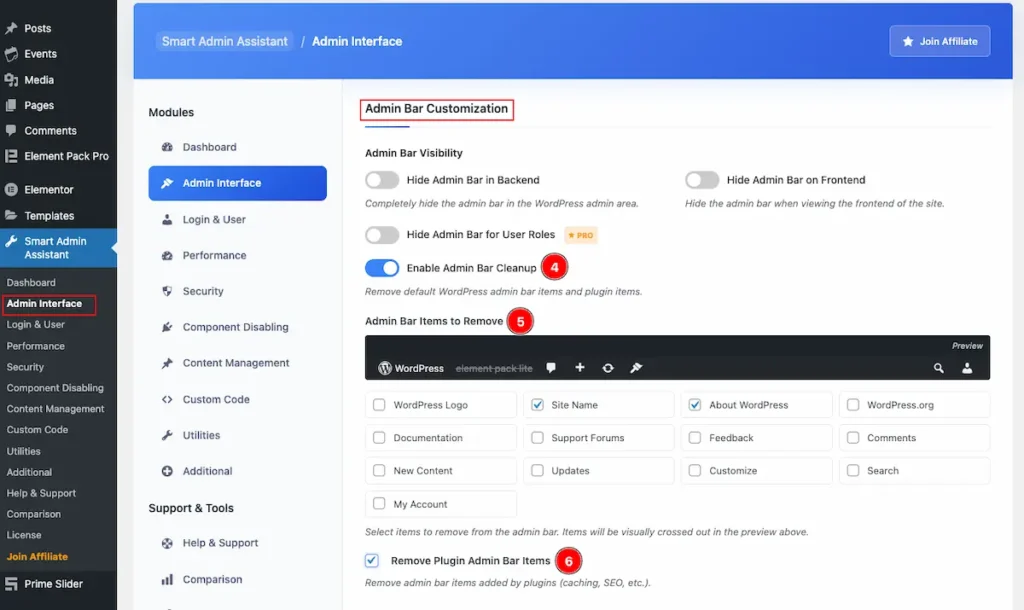
- Enable Admin Bar Cleanup: Enable the switcher to Remove default WordPress admin bar items and plugins items.
- Admin Bar Items to Remove: Select the items want to hide. E.g.: WordPress Logo, Site Name, About WordPress, Feedback, Customize, Updates, New Content, Search etc.
- Remove Plugin Admin Bar Items: Remove admin bar items added by plugins (caching, SEO, etc.).
Admin Notices Management
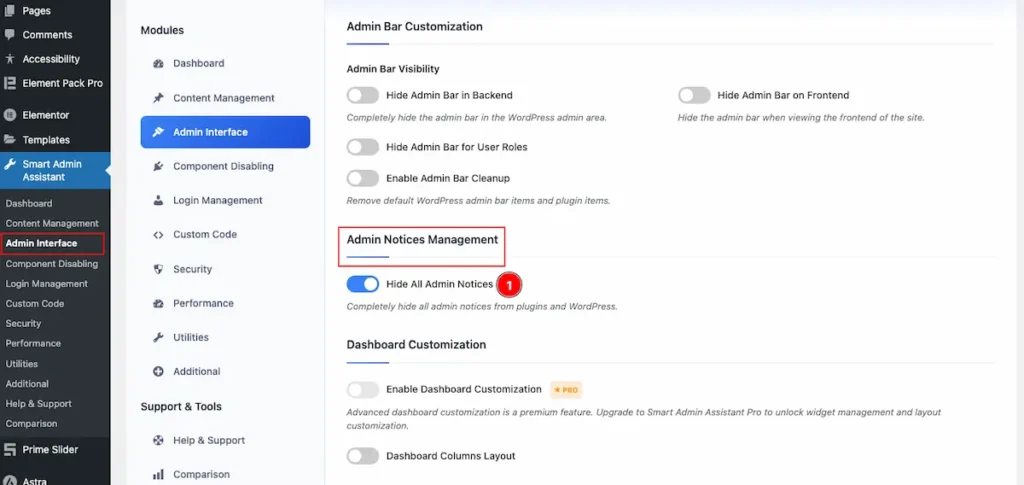
- Hide All Admin Notices: Enable to hide all the Notice on the Admin.
Dashboard Customization
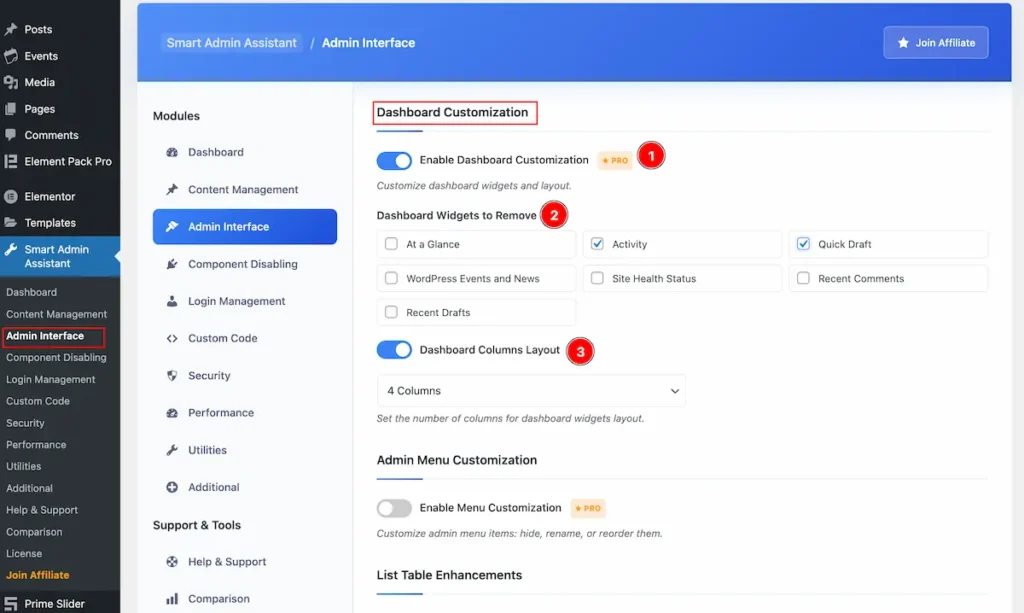
- Enable Dashboard Customization: Enable the switcher to Customize dashboard widgets and layout.
- Dashboard Widgets to Remove: Select the widget to remove from Dashboard. e.g.: At a Galce, Activity, Quick Draft, WordPress Events and News, Site Health Status.
- Dashboard Columns Layout: Set the Column for the Dashboard. Select the columns option from there.
Admin Menu Customization
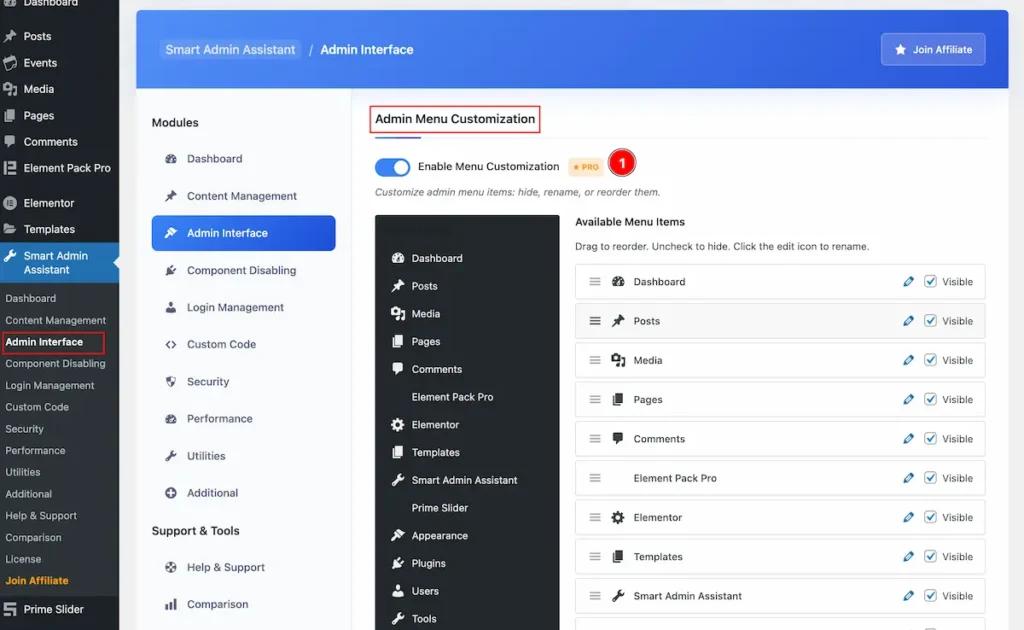
- Enable Menu Customization: Enable the switcher to Customize admin menu items: hide, rename, or reorder them. It will appear all the Menu items of the Current Dashboard.
Drag & Drop
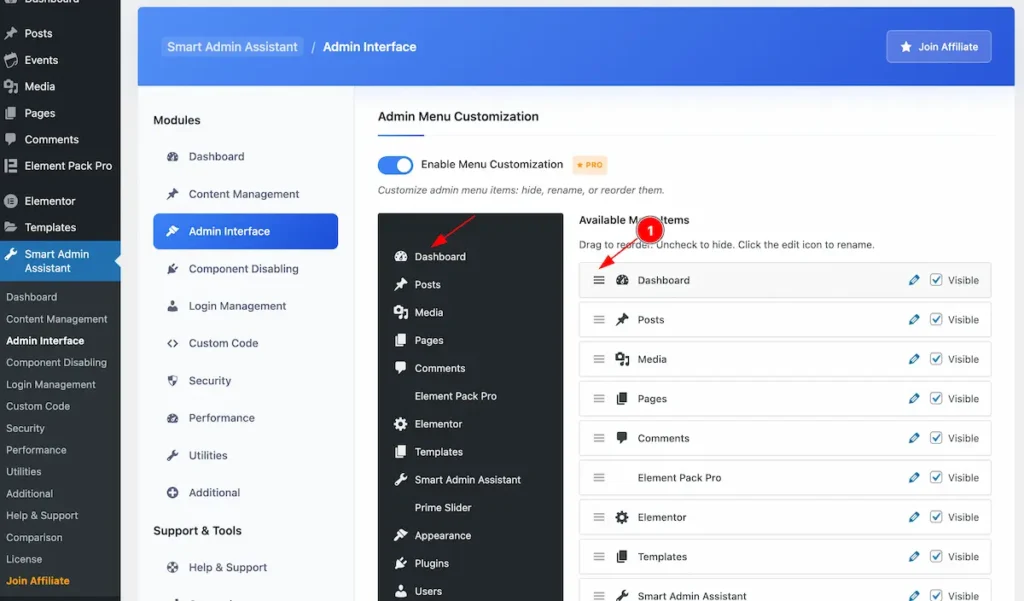
- Hover over any menu items and the Cursor turn into Draggle mode. Drag it and Drop any where. It will replace on that position.
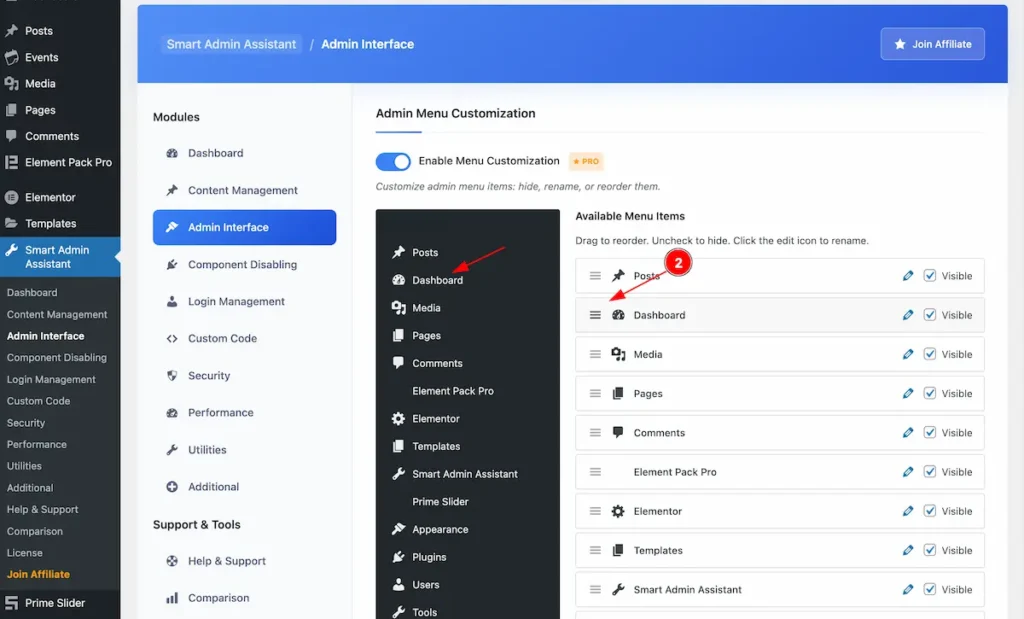
- Drop the position and it will appear the position for the Menu Items.
Edit
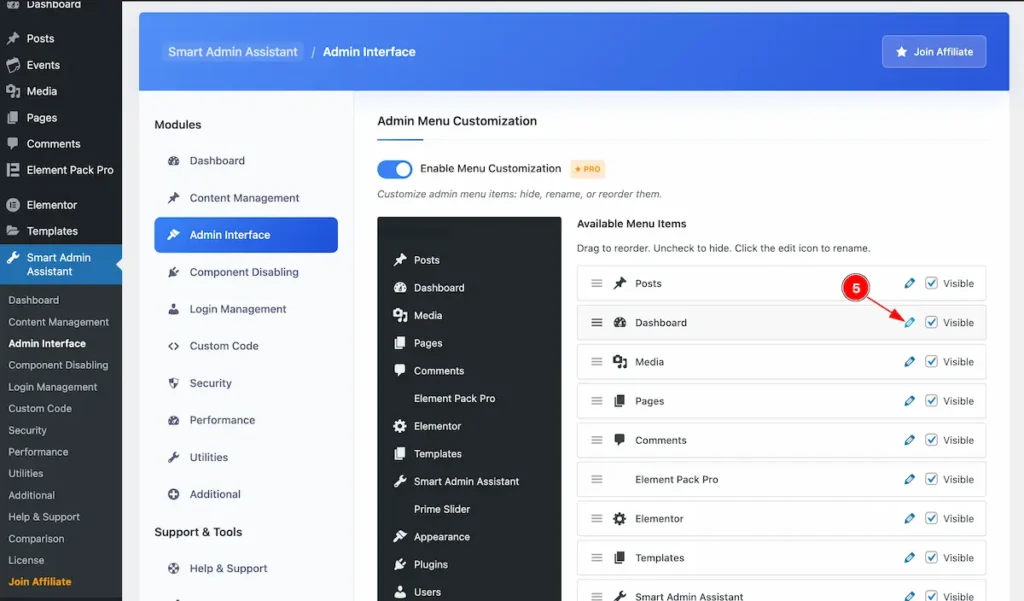
- Select any Menu Item and click on the ” Edit ” icon.
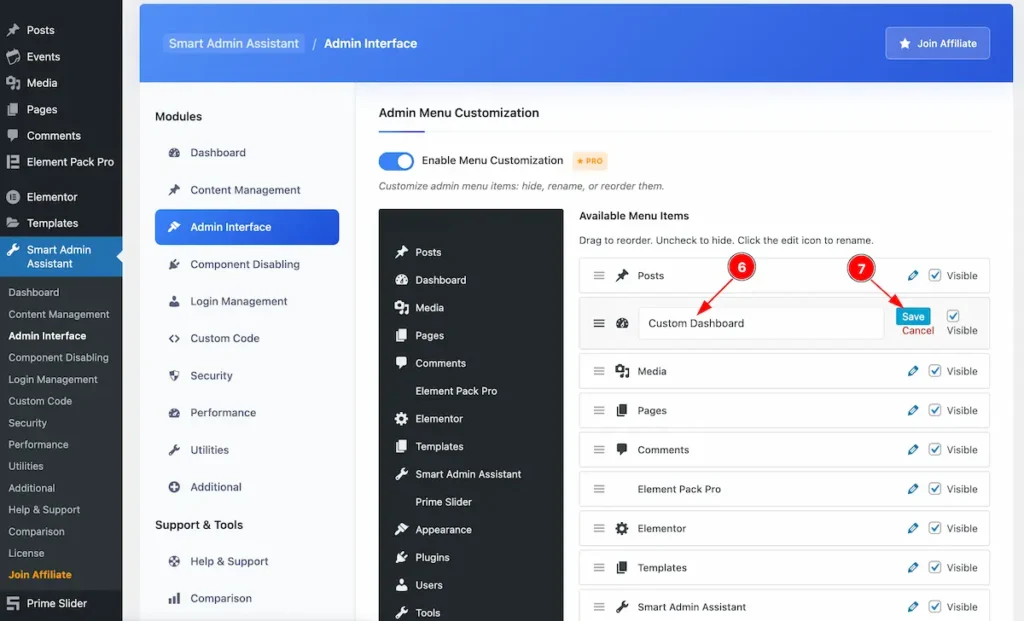
- It appear a input field to update the name of the Menu. Set any name you want.
- Click on the ” Save ” button to save the menu item.
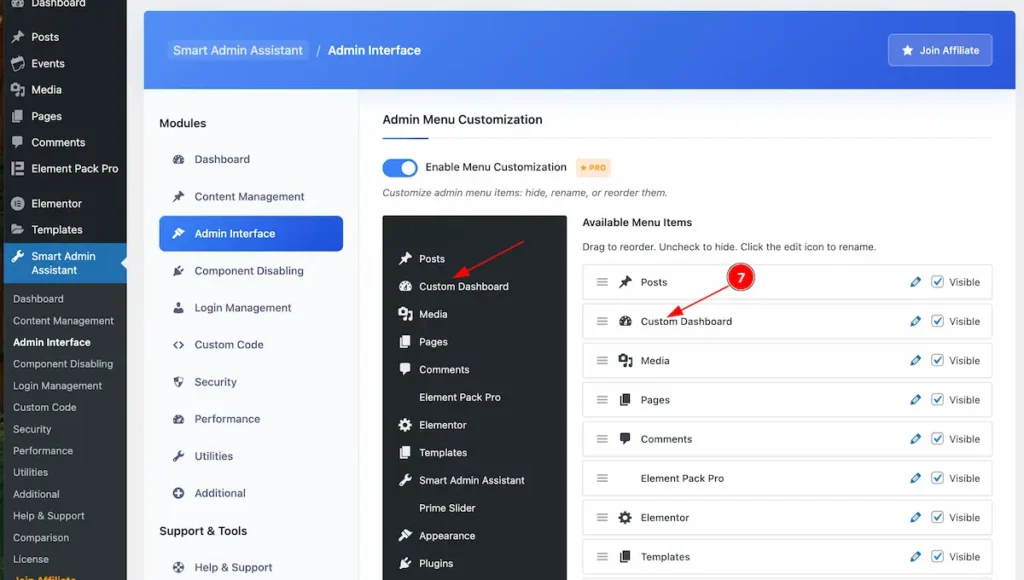
- The Custom Menu name will appear on the Menu items lists.
list Table Enhancements
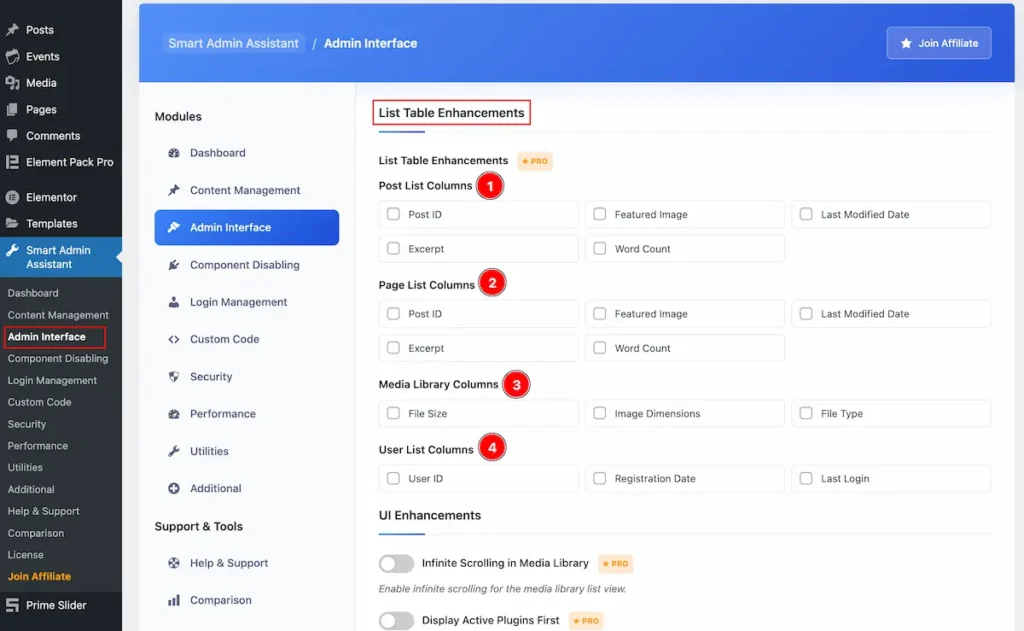
- Post List Columns: Add item for the Post list columns. Post ID, Featured Image, Last Modified Date, Excerpt, Word Count.
- Page List Columns: Add item for the Page list columns. Post ID, Featured Image, Last Modified Date, Excerpt, Word Count.
- Media Library Columns: Add item for the Media Library File Size, Image Dimensions, File Type.
- User List Columns: Add item for the User ID, Registration Date, Last Login.
UI Enhancement
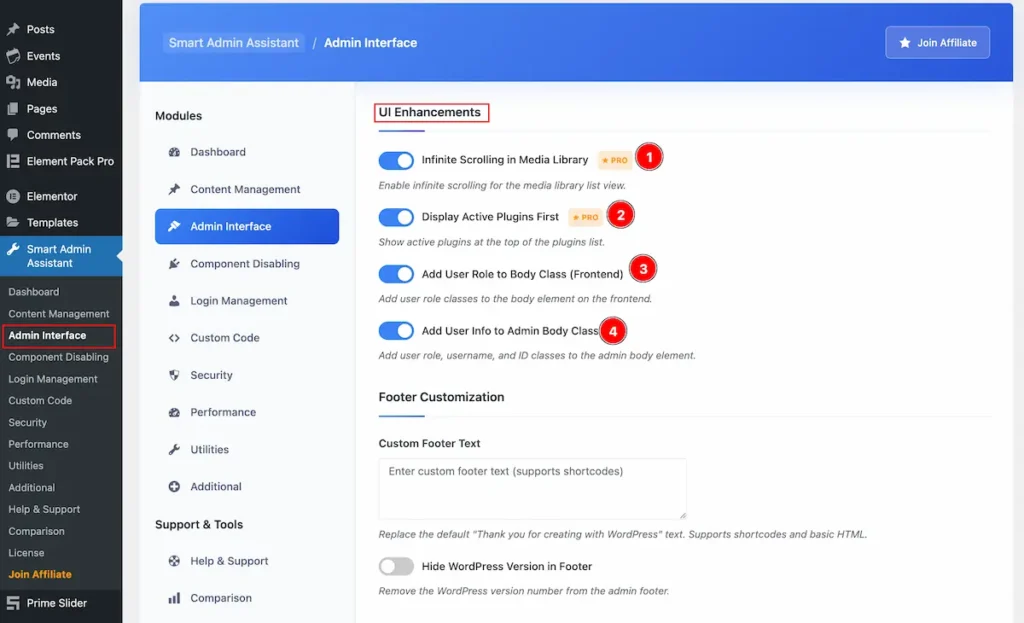
- Infinite Scrolling in Media Library: Enable infinite scrolling for the media library list view.
- Display Active Plugins First: Show active plugins at the top of the plugins list.
- Add User Role to Body Class ( Frontend): Add user role classes to the body element on the frontend.
- Add User Info to Admin Body Class: Add user role, username, and ID classes to the admin body element.
Footer Customization
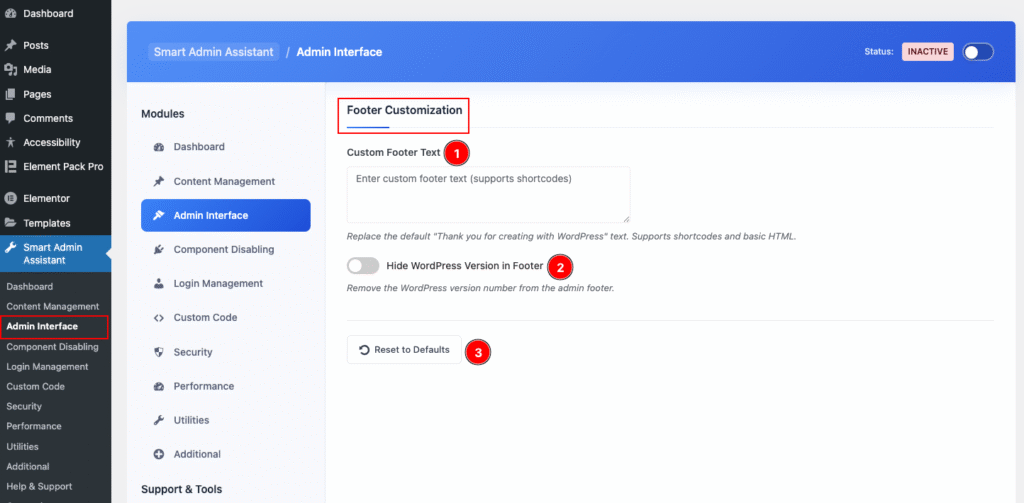
- Custom Footer Text: Set the custom text for the Footer section. It also support the ShortCode.
- Hide WordPress Version in Footer: By enabling it will hide the Version number of the WordPress.
- Reset to Default: The button will reset all the setting to default of the Admin Interface.
Component Disabling
Go to Smart Admin Assistant > Component Disabling
- First Enable the switcher of the Component Disabling Modules.
- The Saving notification appear while Activate the Module.
Gutenberg Editor Control

- Disable Gutenberg Globally: Completely the disable the Gutenberg feature for the editor for all posts and revert the classic Editor.
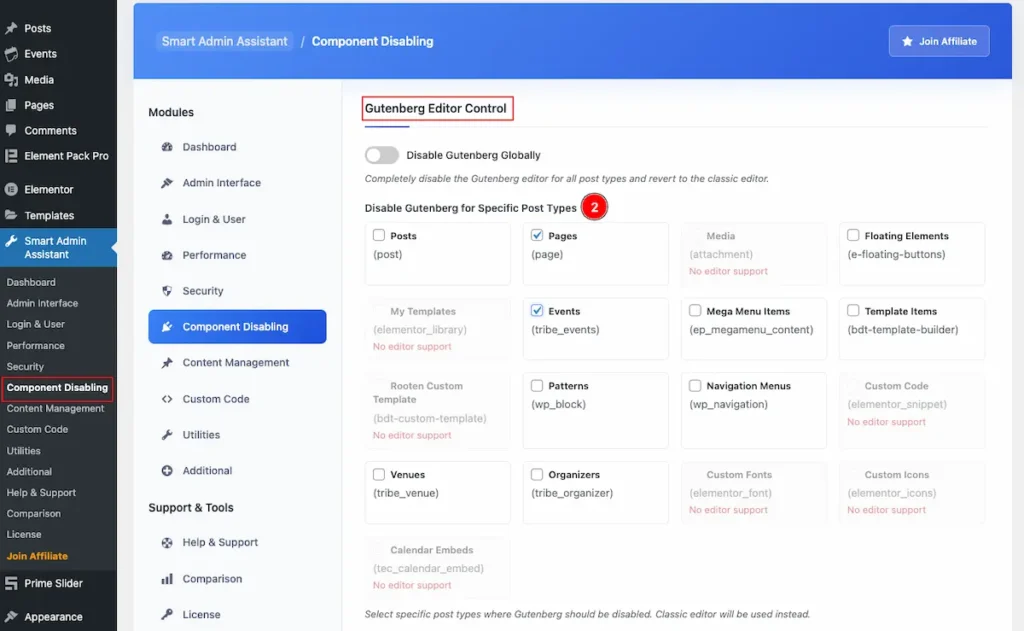
- Disable Gutenberg for Specific Post Types: Select any specific post type to disable it. E.g.: Posts, Pages, Floating Elements, Mega Menu Items, Template Items, Patterns, Navigation Menus etc.
Comments System Control
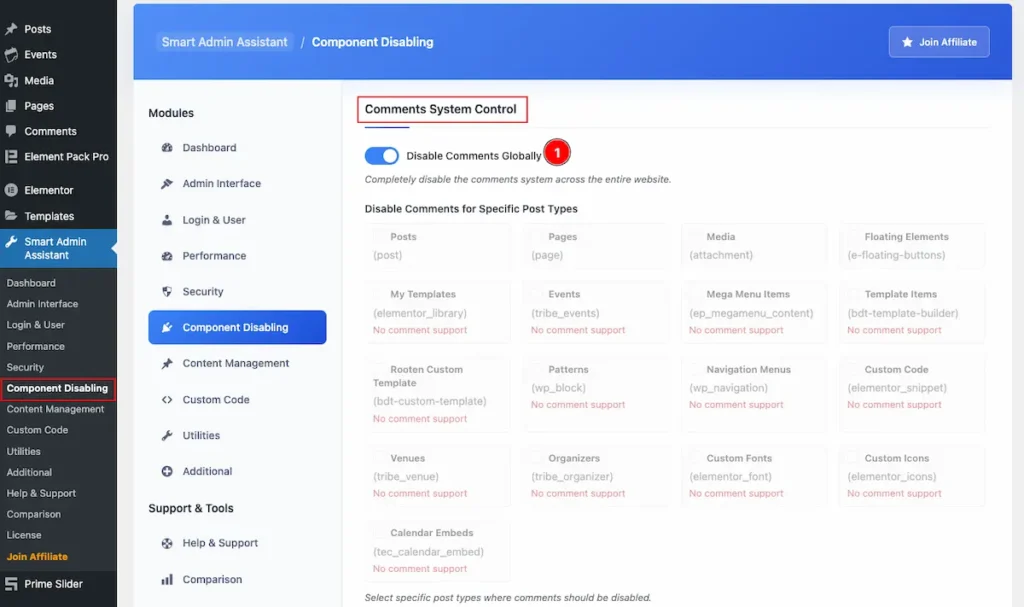
- Disable System Control: It will Disable all the comments system from Entire website.

- Disable Comments for Specific Post Type: Select the specific post types. e.g.: Posts, Pages, Media, Floating Elements.
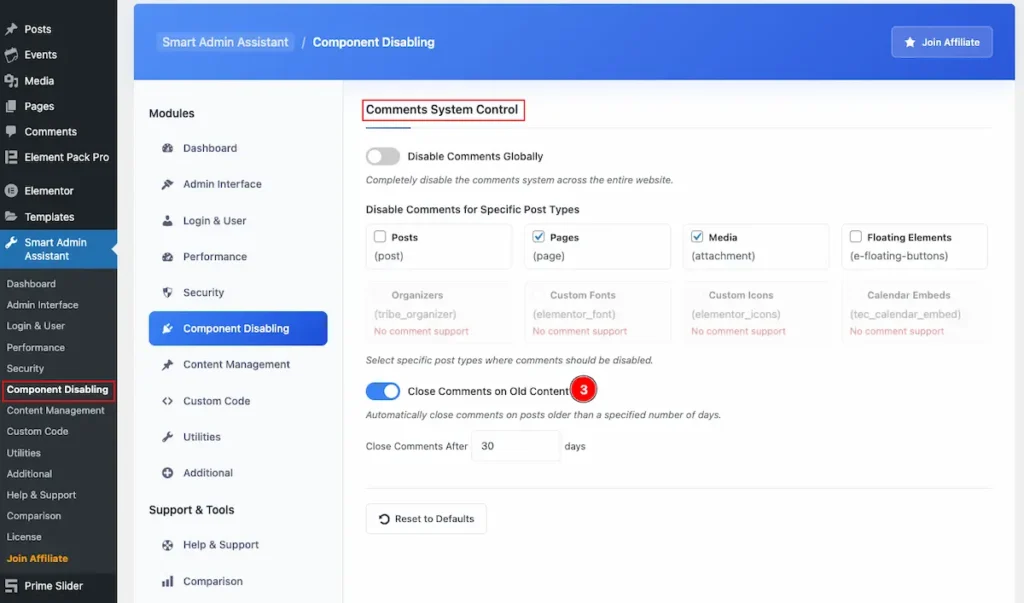
- Close Comments on Old Content: It will close the comments automatically on posts older than specific of days. Set the number of days to close the comments.
Login Management
Go to Smart Admin Assistant > Login Management
- First Enable the switcher of the Login & User Modules.
- The Saving notification appear while Activate the Module.
Custom Login URL
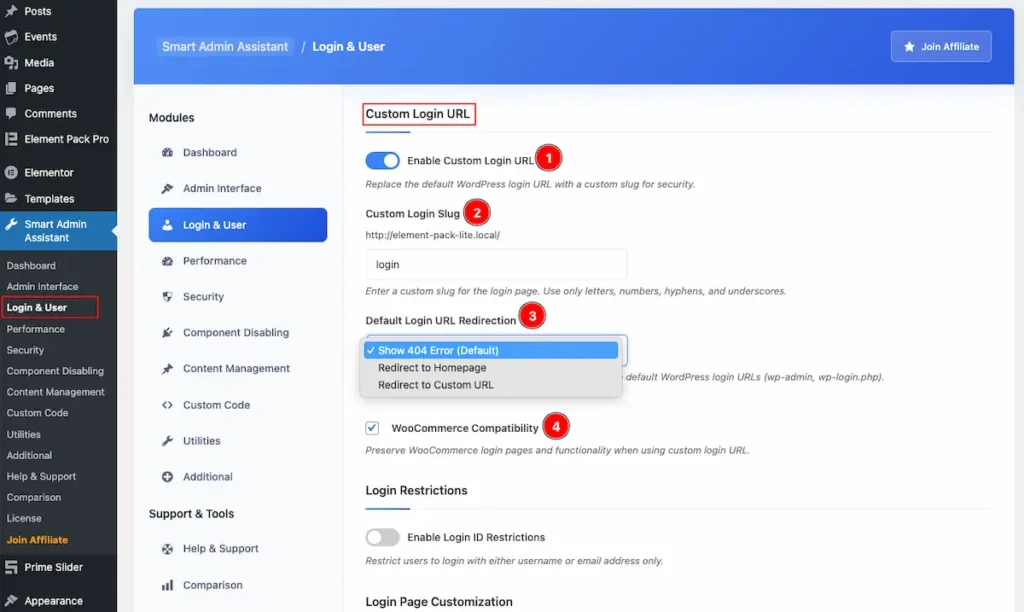
- Navigate to Login Management system controls section.
- Enable Custom Login URL: Enable the switcher to allow the custom URL For the login.
- Custom Login Slug: Set the slug for the login. e.g : login
- Default Login URL Redirection: Set the redirection link for navigating the link.
- Show 404 Error( Default): It will redirect to the 404 Error.
- Redirect to Homepage: Select it to redirect to the Homepage.
- Redirect to Custom URL: Select it and choose the custom URL to redirect to the page.
Login Restrictions
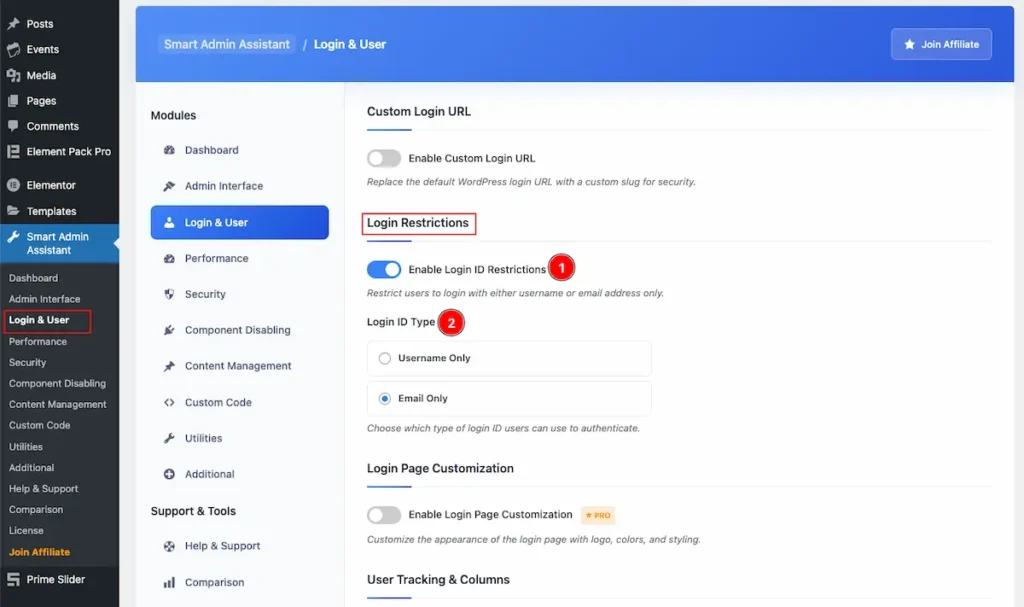
- Enable Login ID Restrictions: Enable it to restrict user to login with either username or email address only.
- Login ID Type: Select which type of Login ID user can use to authenticate. Username Only or Email Only.
Login Page Customization
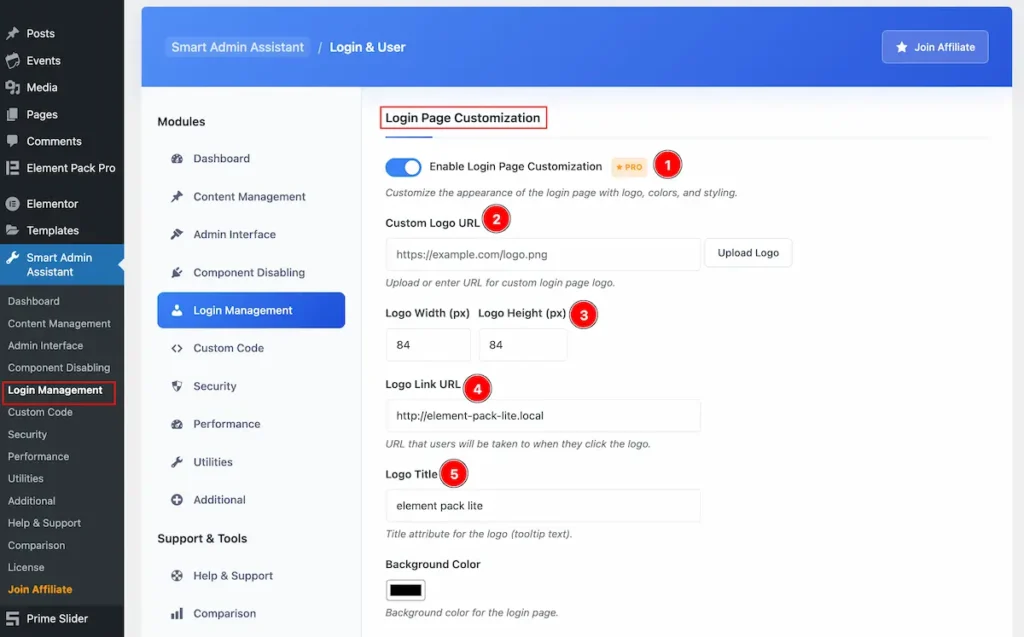
- Enable Login Page Customization: Customize the appearance of the login page with logo, colors, and styling.
- Custom Logo URL: Upload or enter URL for custom login page logo.
- Logo Width(px) Logo Height (px): Set the Width and Height for the Logo.
- Logo Link URL: URL that users will be taken to when they click the logo.
- Logo Title: Set the Title attribute for the logo (tooltip text).
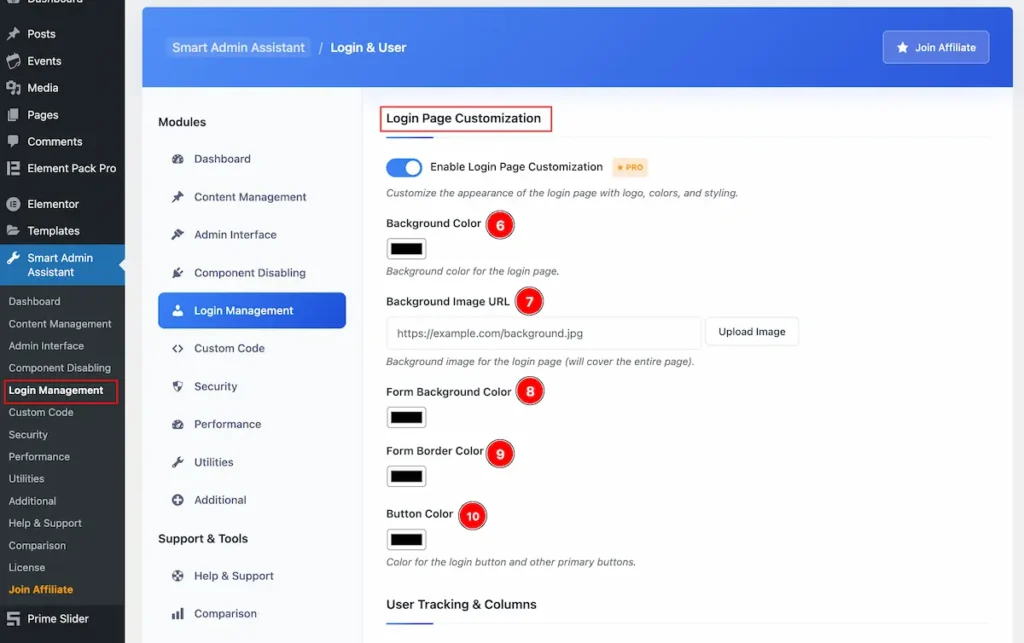
- Background Color: Set the Background color for the login page.
- Background Image URL: Set the Background image for the login page (will cover the entire page).
- Form Background Color: Set Form Background Color.
- Form Border Color: Set the Form Border Color.
- Button Color: Set the Color for the login button and other primary buttons.
User Tracking & Columns
- Enable User Tracking: Record when users last logged in to the site.
- Show Last Login Column: Display last login date and time in the users list table.
- Show Registration Date Column: Display registration date and time in the users list table.
- Track Login IP Address: Record the IP address from which users log in (adds IP column to users table).
- Track User Agent: Record browser and device information for login tracking.
- Date Format: Format for displaying dates in the users table columns.
LogOut Redirects
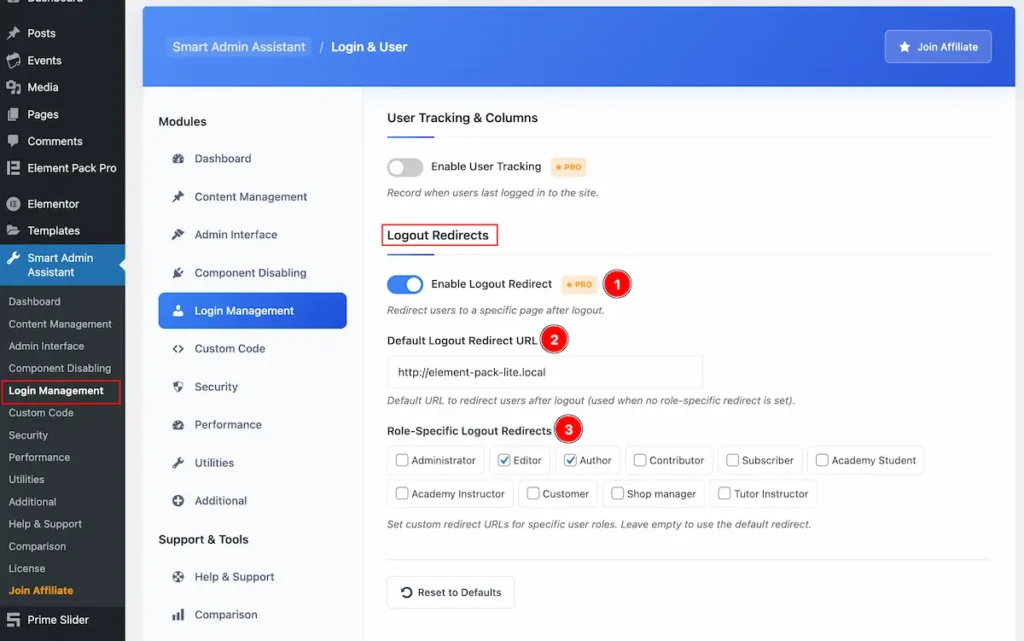
- Enable Logout Redirect: Redirect users to a specific page after logout.
- Default Logout Redirect URL: Default URL to redirect users after logout (used when no role-specific redirect is set).
- Role-Specific Logout Redirects: Set custom redirect URLs for specific user roles. Leave empty to use the default redirect. Available roles are Administrator, Editor, Author,Contributor, Subscriber, Academy Student. etc.
Custom Code
Go to Smart Admin Assistant > Custom Code
- First Enable the switcher of the Custom Code Modules.
- The Saving notification appear while Activate the Module.
General Settings
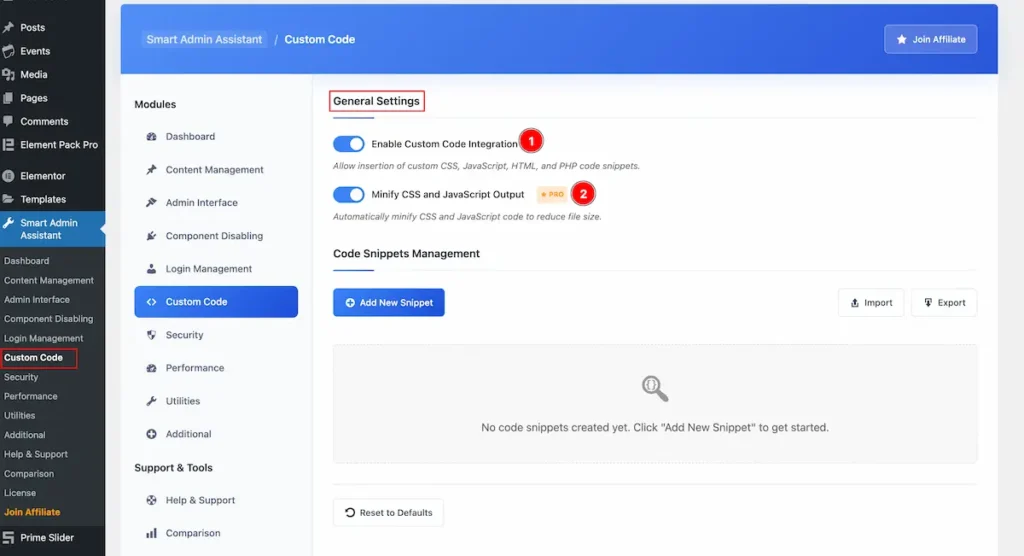
- Enable Custom Code Integration: Enable the switcher to allow the custom code integration. HTML, CSS, PHP Code snippets are allowed.
- Minify CSS and Javascript Output: Automatically minify CSS and JavaScript code to reduce file size.
Code Snippets Management
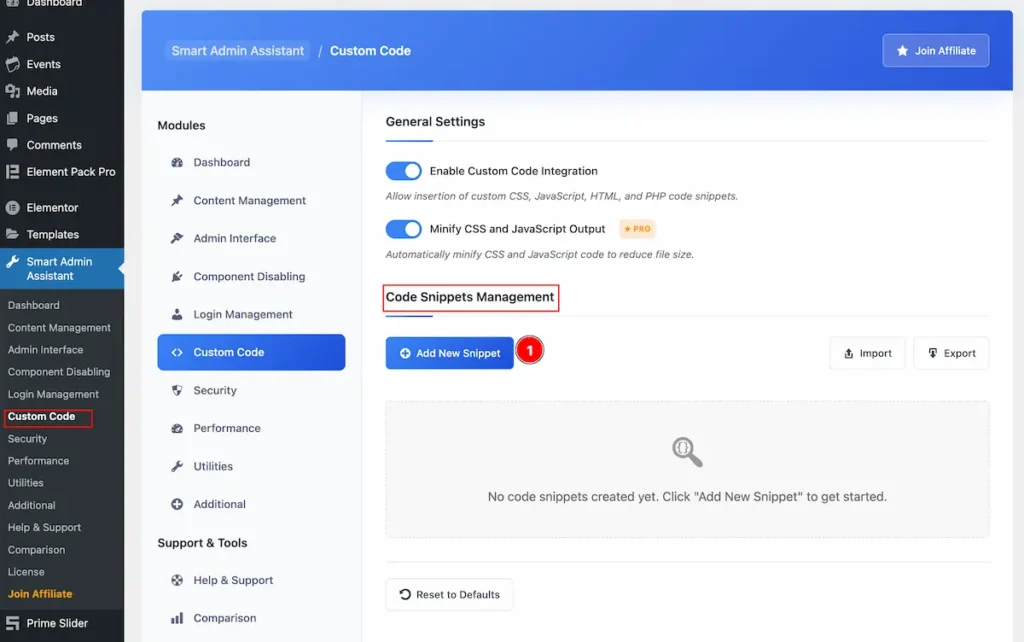
- Click on the ” Add New Snippet ” button to add Custom code on it. It will appear a Form for Custom Code. Follow the steps to added the snippets.
Add New Code Snuppet
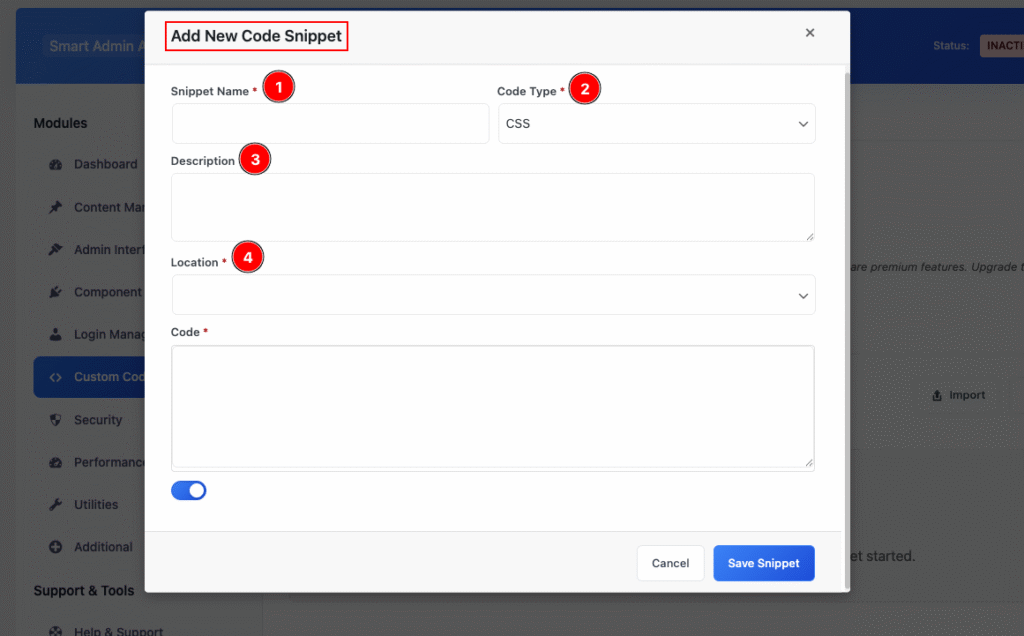
- Snippet Name: Set the name of the snippet. e.g.: Custom CSS for Heading.
- Code Type: Choose the Code type. e.g.: HTML, CSS, PHP ,JS are available.
- Description: Set the description of the snippets.
- Location: Set the Location where It will render the Code Snippet.
- Head Section: It will load the code before closing the </head> Tag.
- Body Start: After opening the <body> Tag.
- Footer: Before closing the </body> Tag.
- Admin Head: Admin Area Head Section.
- Admin Footer: Admin Area Footer Section.
- Login Head: Login Page Head Section.
- Login Footer: Login Page Footer Section.
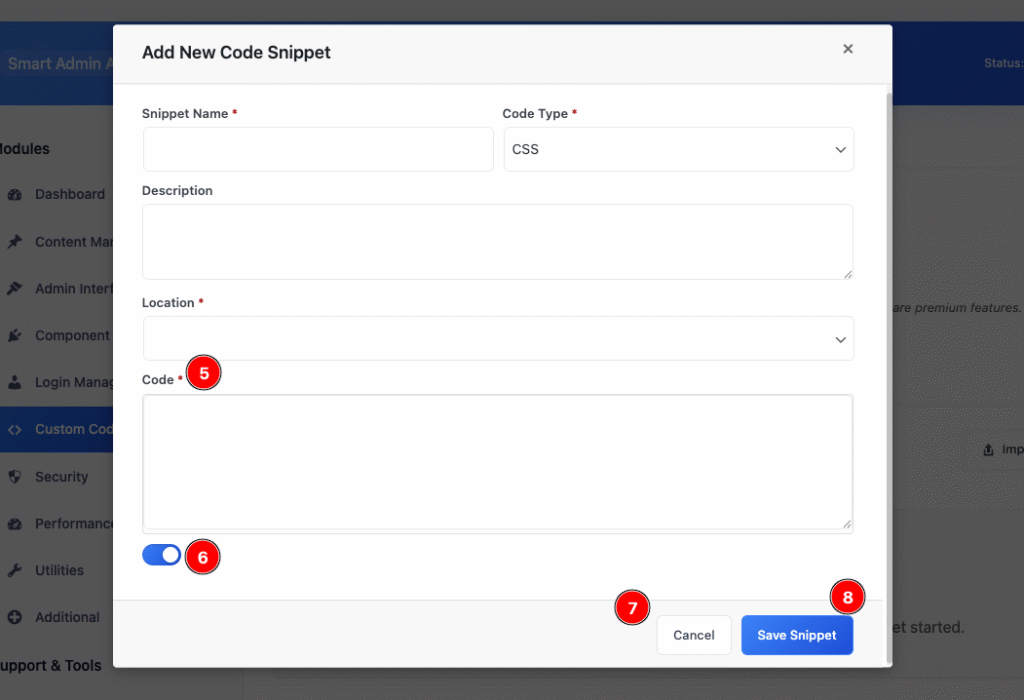
- Code: Input the Code here.
- Enable the switcher.
- Cancel: The cancel button is to cancel the Form.
- Save Snippet: Click on the Save Snippet button to save it.
Import or Export the Custom Code
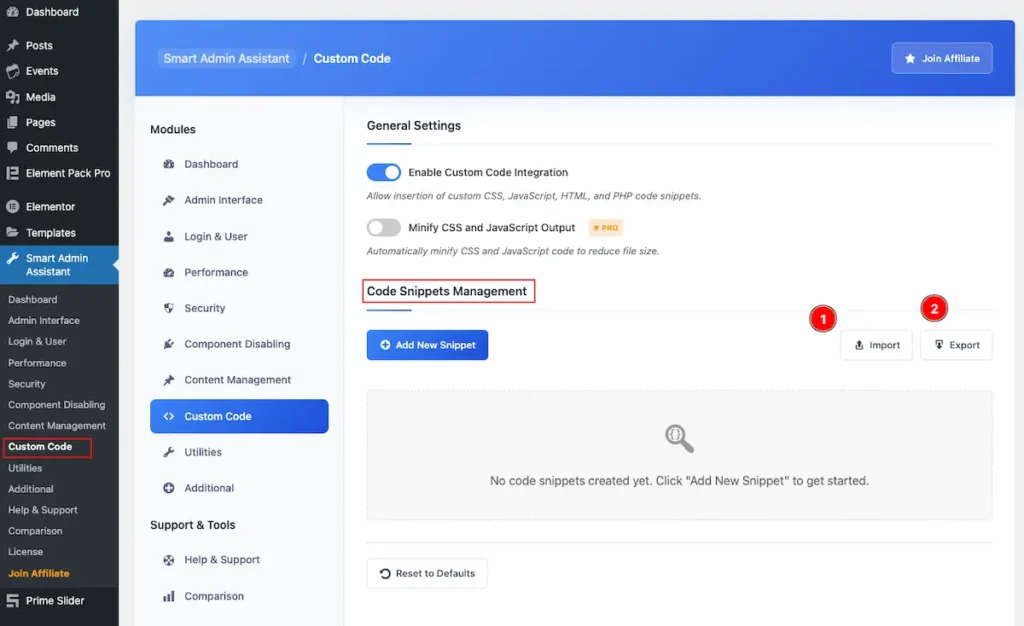
- Import: To import the Button click on the ” Import ” button.
- Export: Click here to Export the file. It will export and save as zip file.
Security
Go to Smart Admin Assistant > Security
- First Enable the switcher of the Security Modules.
- The Saving notification appear while Activate the Module.
Login Protection
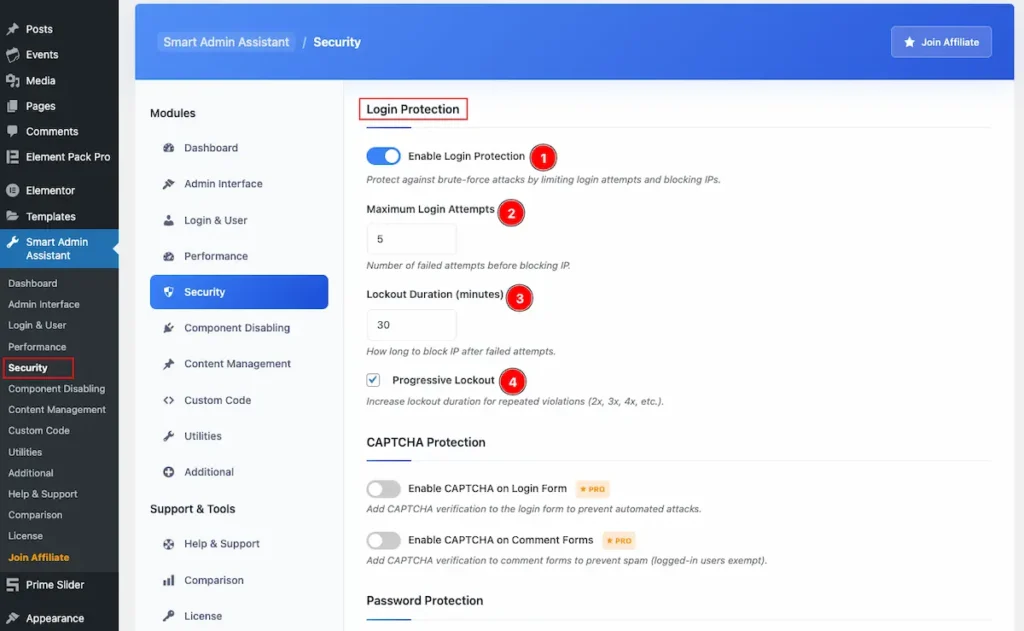
- Enable Login Protection: Enable the switcher to protect against the brute-force attacks by limiting the Login and blocking IP.
- Maximum Login Attempts: Set the maximum number of attacks. After reaching the attack it will block the IP Address.
- Lockout Duration ( minutes ): Set the duration for lockout the blocking. It will block the IP certain period of time and Allow the try again.
- Progressive Lockout: Check on TickBox to set the Progressive Lockout time. It will increase it 2x, 3x, 4x, time after blocking.
CAPTCHA Protection
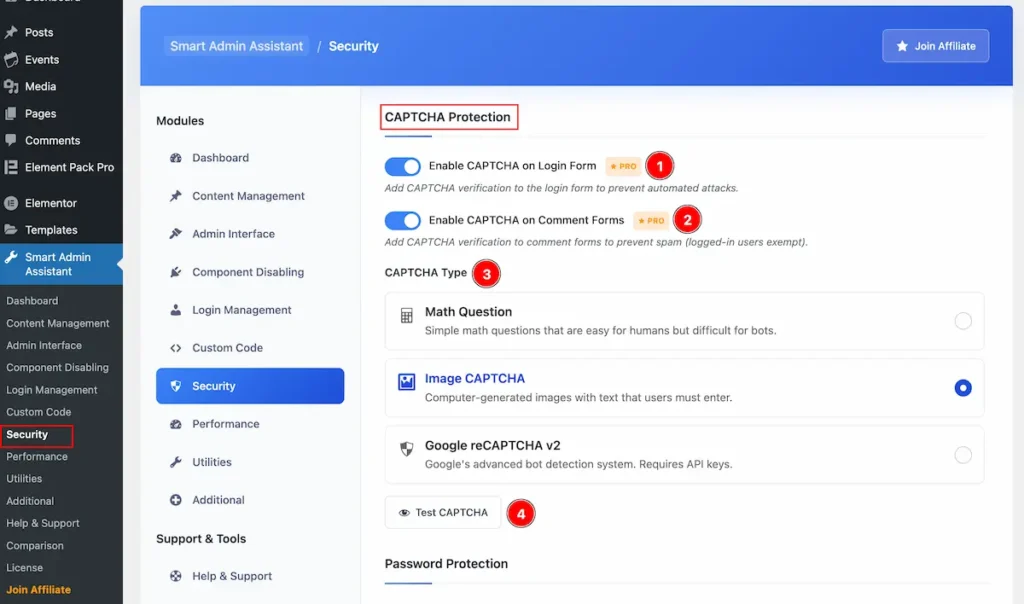
- Enable CAPTCHA on Login Form: Add CAPTCHA verification to the login form to prevent automated attacks.
- Enable CAPTCHA on Comment Forms: Add CAPTCHA verification to comment forms to prevent spam (logged-in users exempt).
- CAPTCHA Type
- Math Question: Simple math questions that are easy for humans but difficult for bots.
- Image CAPTCHA: Computer-generated images with text that users must enter.
- Google reCAPTCHA v2: Google’s advanced bot detection system. Requires API keys.
- Test CAPTCHA: Click on the button to preview the Captcha.
Email Obfuscation
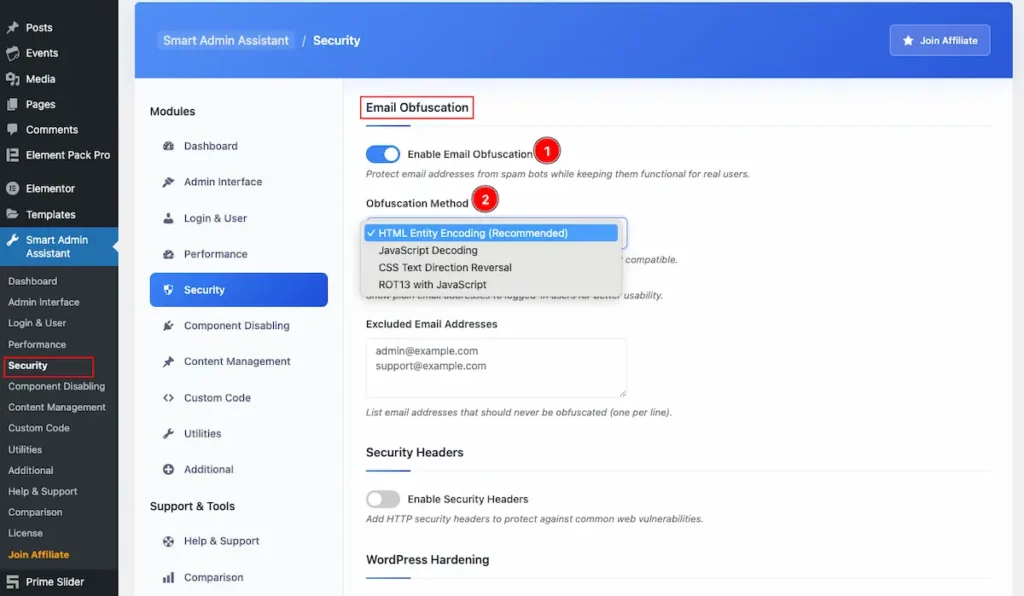
- Enable Email Obfuscation: Protect email addresses from spam bots while keeping them functional for real users.
- Obfuscation Method: Choose the obfuscation method. HTML encoding is most compatible.
- HTML Entity Encoding: It hiding or encoding an email address in your HTML so that spam bots can’t easily scrape it, while still allowing real visitors to click and use it.
- Javascript Decoding: This method hides the email address in your HTML so bots don’t see it directly, and then uses JavaScript to decode or reconstruct the email when the page loads.
- CSS Text Directional Reversal: This method writes the email backwards (or scrambled) in the HTML, and then uses CSS direction properties to display it correctly to human readers — while making it harder for spam bots to harvest.
- ROT13 With Javascript: ROT13 is a simple substitution cipher: Each letter is replaced with the one 13 places later in the alphabet. Applying ROT13 twice gives you the original text again. This method stores your email encoded with ROT13, and then uses JavaScript to decode it in the browser before showing it.
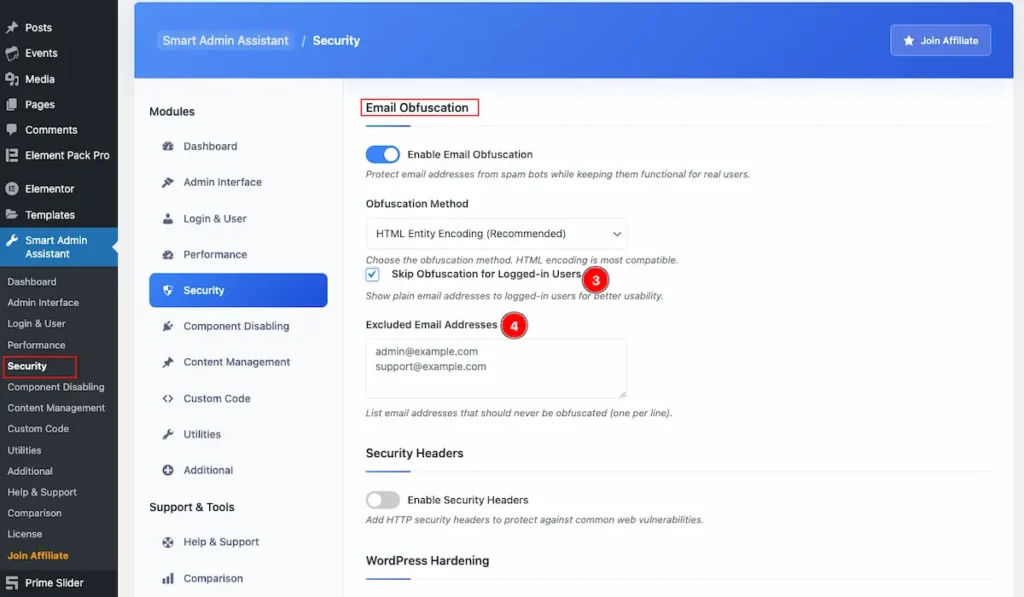
- Skip Obfuscation for Logged-in Users: Show plain email addresses to logged-in users for better usability.
- Excluded Email Address: List email addresses that should never be obfuscated (one per line).
Security Header
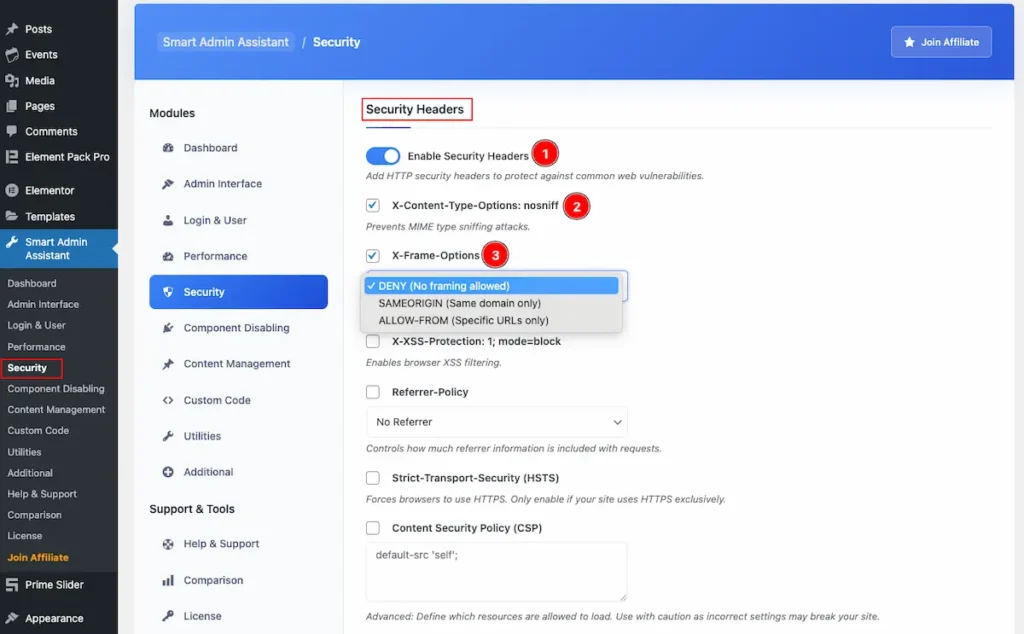
- Enable Security Headers: Add HTTP security headers to protect against common web vulnerabilities.
- X-Content Type-Options:nosniff: Prevents MIME type sniffing attacks.
- X-Frame Options: Prevents clickjacking attacks.
- DENY ( No Framing Allowed ): The page cannot be displayed in an
<iframe>, no matter what website is trying to load it. - SAMEORIGIN ( Same domain only ): The page can only be embedded in an
<iframe>if the parent page is on the same domain (origin). - ALLOW FORM ( Specific URL Only ):
ALLOW-FROM <url>→ ✅ Only a specific domain (URL) is allowed to embed.
- X-XSS-Protection 1: mode-block: Enables browser XSS filtering.
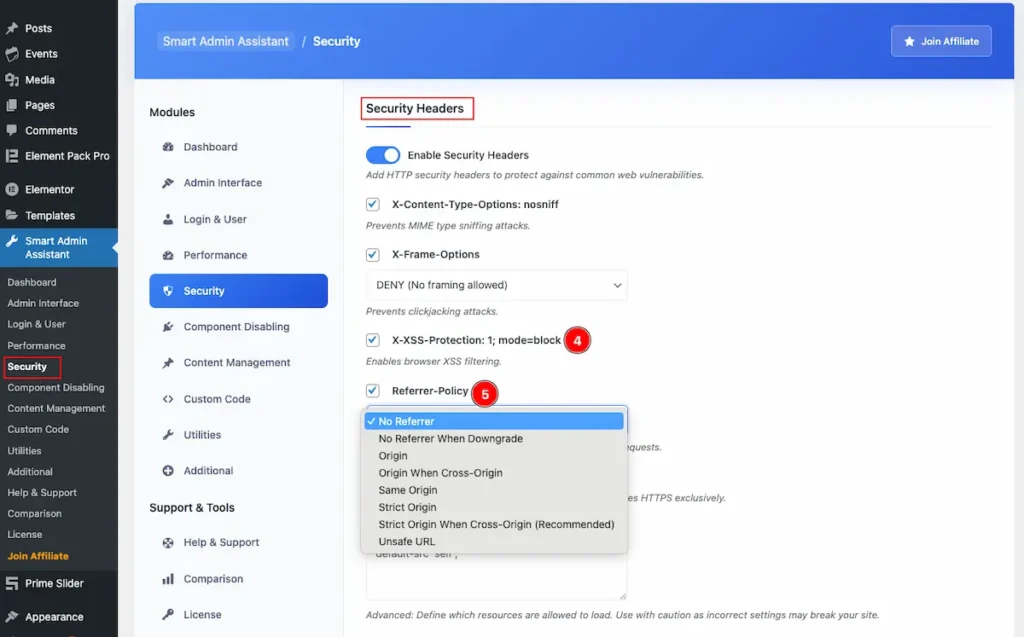
- Referrer-Policy: Controls how much referrer information is included with requests.
- No Referrer
- No Referrer when Downgrade
- Origin
- Origin when Cross Origin
- Same Origin
- Strict Origin
- Strict Origin when Cross Origin
- Unsafe URL
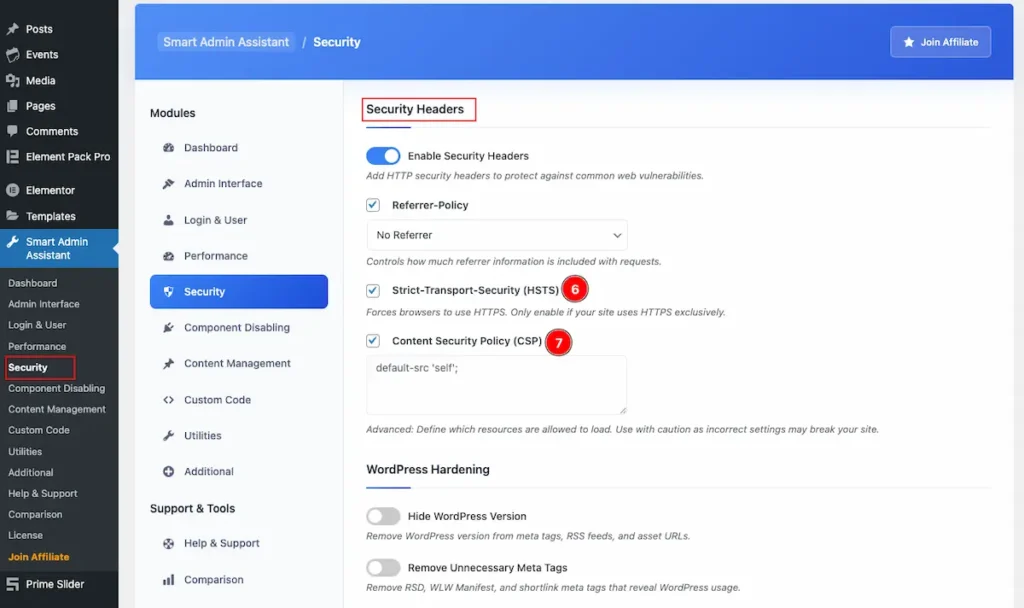
- Strict-Transport-Security (HSTS): Forces browsers to use HTTPS. Only enable if your site uses HTTPS exclusively.
- Content Security Policy (CSP): It’s a powerful security header that helps protect your website against: Cross-Site Scripting (XSS), Click jacking, Data injection attack
Advanced: Define which resources are allowed to load. Use with caution as incorrect settings may break your site.
- Strict-Transport-Security ( HSTS ): Forces browsers to use HTTPS. Only enable if your site uses HTTPS exclusively.
- Content Security Policy ( CSP ): Advanced: Define which resources are allowed to load. Use with caution as incorrect settings may break your site.
WordPress Hardening
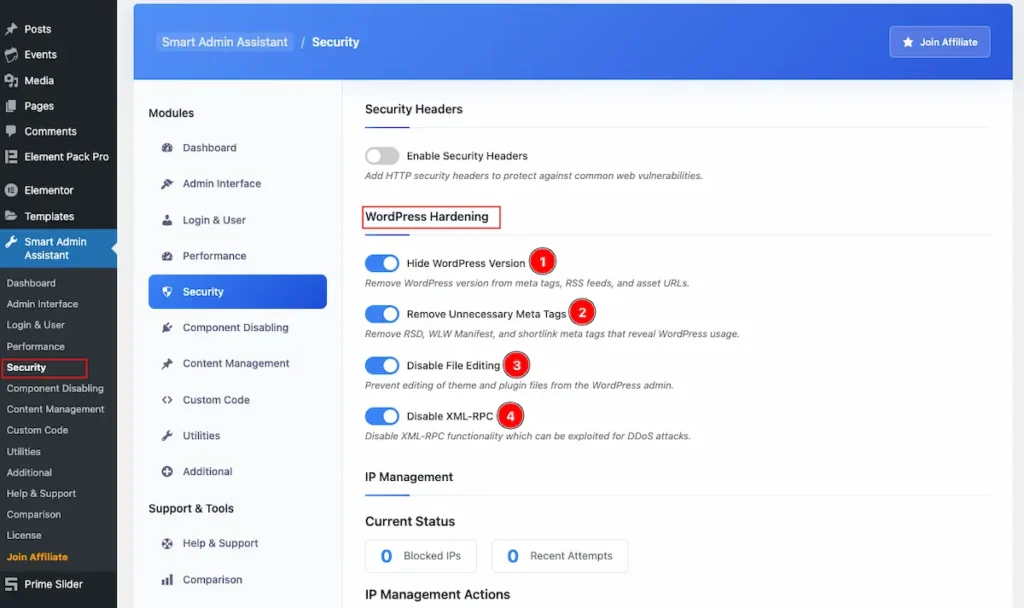
- Hide WordPress Version: It Remove WordPress version from meta tags, RSS feeds, and asset URLs.
- Remove Unnecessary Meta Tags: Remove RSD, WLW Manifest, and shortlink meta tags that reveal WordPress usage.
- Disable File Editing: Prevent editing of theme and plugin files from the WordPress admin.
- Disable XML-RPC: Disable XML-RPC functionality which can be exploited for DDoS attacks.
IP Management
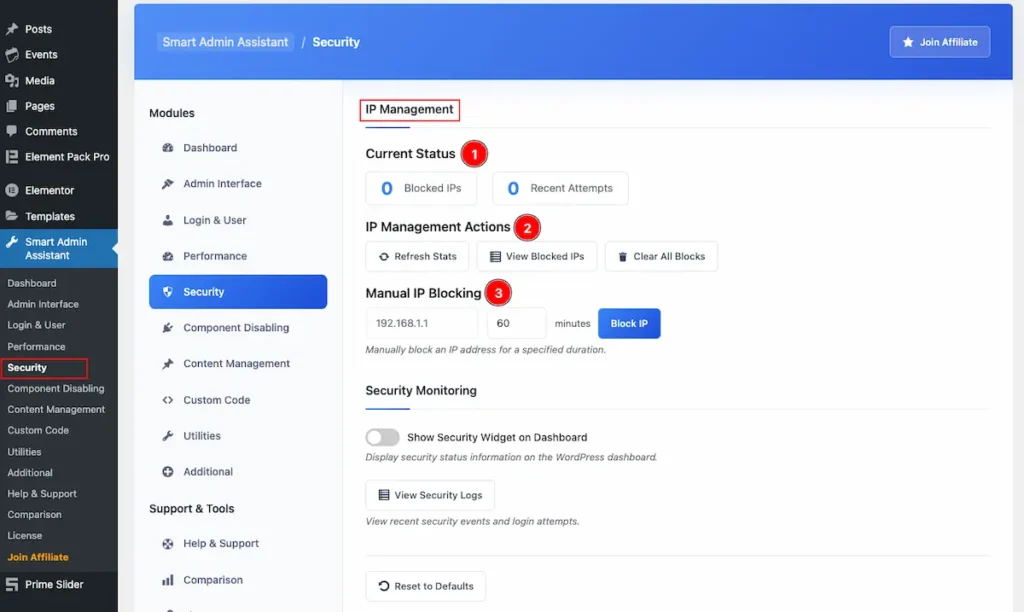
- Current Status: Appear the current status of your IP Blocking and Recent Attempts.
- IP Management Actions: Check the action of IP Management.
- Refresh Stats: Synch with the current stats.
- View Blocked IPs: View all the blocked IPS number by click on it.
- Clear All Blocks: Clear all the blocks by clicking on it.
- Manual IP Blocking: Set the IP to block Manually and set the Time period of blocking.
Security Monitoring
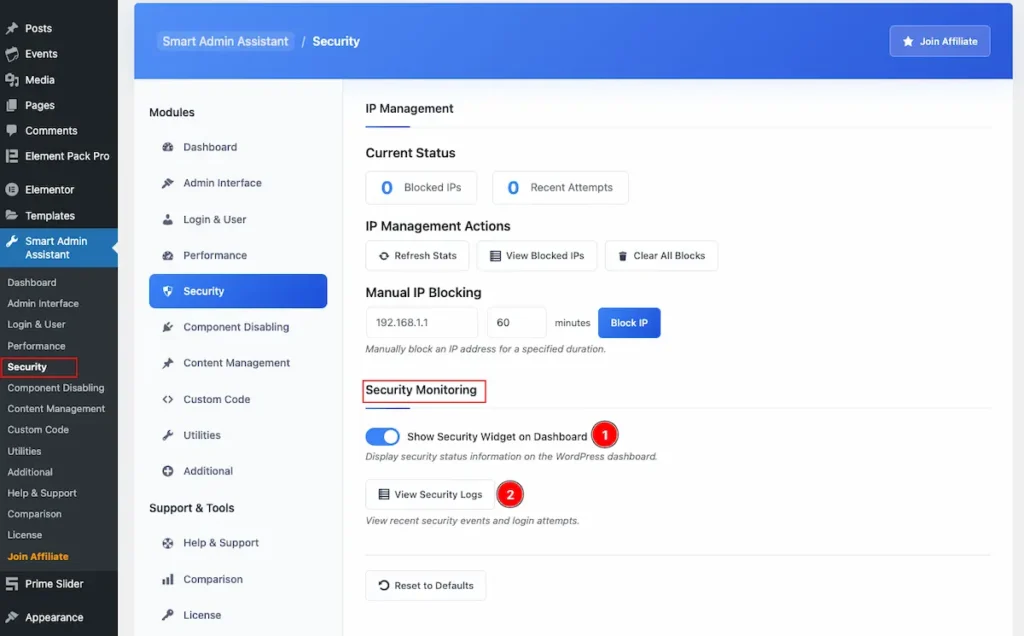
- Show Security Widget on Dashboard: Enable the switcher to Display security status information on the WordPress dashboard.
- View Security Logs: Click on the button to view recent security events and login attempts.
Performance
Go to Smart Admin Assistant > Performance
- First Enable the switcher of the Performance Modules.
- The Saving notification appear while Activate the Module.
Revision Control
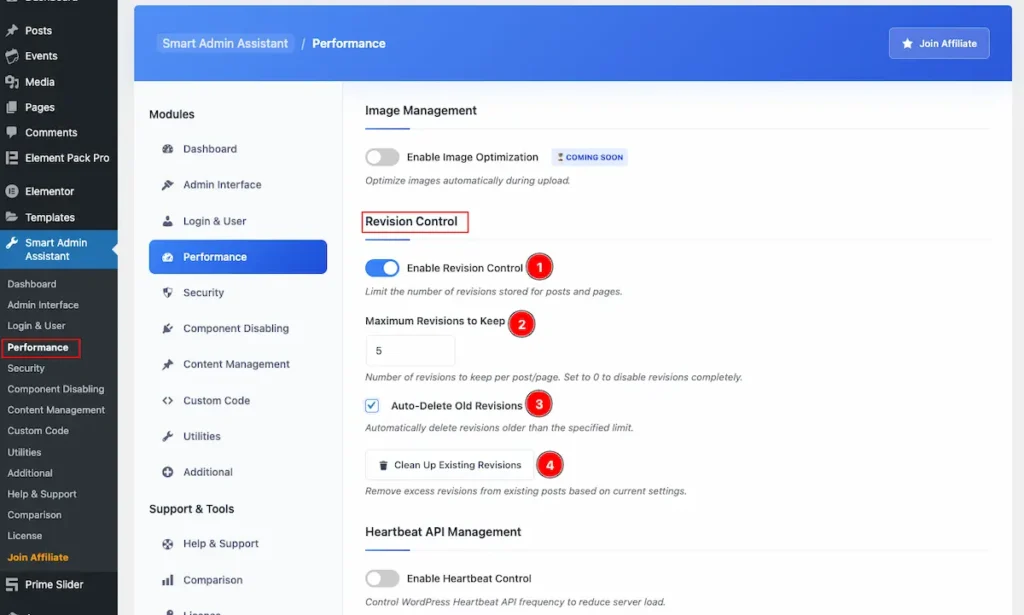
- Enable Revision Control: Set Limit the number of revisions stored for posts and pages.
- Maximum Revisions to Keep: Number of revisions to keep per post/page. Set to 0 to disable revisions completely.
- Auto-Delete Old Revisions: Automatically delete revisions older than the specified limit.
- Clean UP Existing Revisions: Remove excess revisions from existing posts based on current settings.
Heartbeat API Management
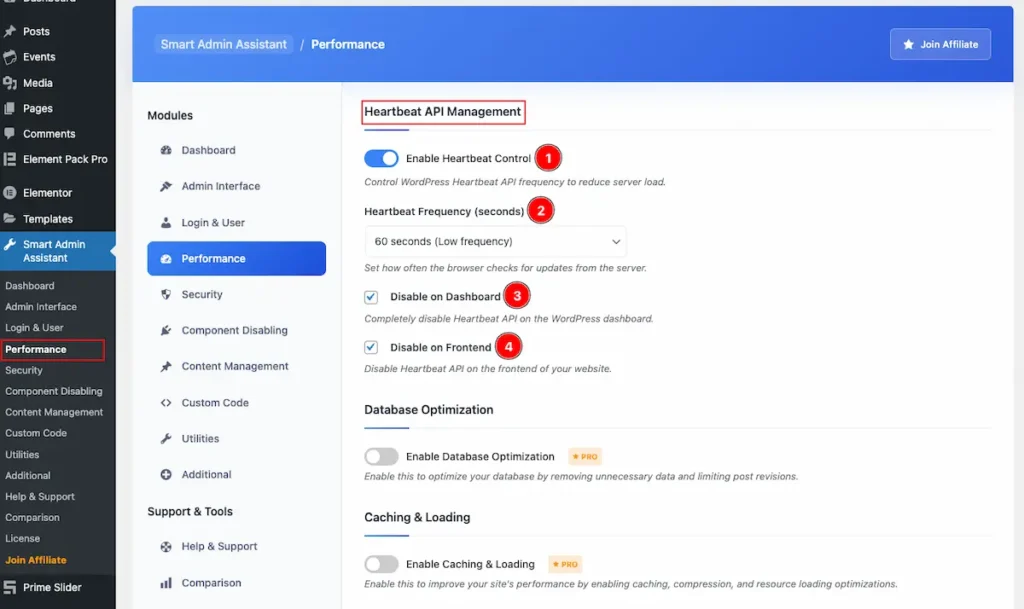
- Enable Heartbeat Control: Enable the switcher to Control WordPress Heartbeat API frequency to reduce server load.
- Heartbeat Frequency (seconds ): Set how often the browser checks for updates from the server. Default time 15 seconds( High Frequency), 30 seconds ( Medium ), 60 seconds ( Medium Frequency), 2 minutes ( Very Low), 5 minutes ( Minimal).
- Disable on Dashboard: Completely disable Heartbeat API on the WordPress dashboard.
- Disable on Frontend: Disable Heartbeat API on the frontend of your website.
Database Optimization
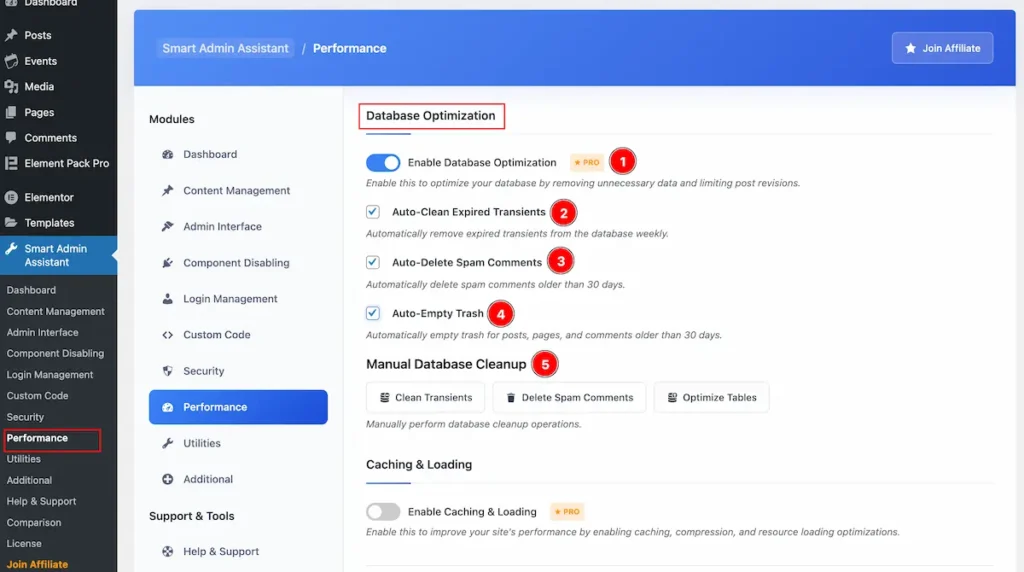
- Enable Database Optimization: Enable this to optimize your database by removing unnecessary data and limiting post revisions.
- Auto-Clean Expired Transients: Automatically remove expired transients from the database weekly.
- Auto-Delete Spam Comments: Automatically delete spam comments older than 30 days.
- Auto-Empty Trash: Automatically empty trash for posts, pages, and comments older than 30 days.
- Manual Database Cleanup: Manually perform database cleanup operations. Clean Transients, Delete Spam Comments, Optimize Tables
Caching & Loading
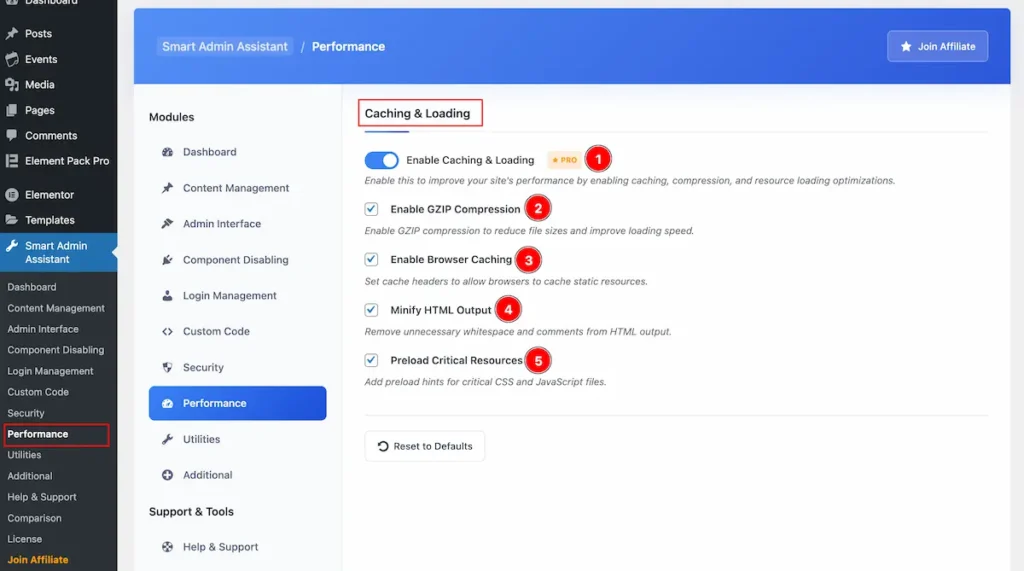
- Enable Caching & Loading: Enable this to improve your site’s performance by enabling caching, compression, and resource loading optimizations.
- Enable GZIP Compression: Enable GZIP compression to reduce file sizes and improve loading speed.
- Enable Browser Caching: Set cache headers to allow browsers to cache static resources.
- Minify HTML Output: Remove unnecessary whitespace and comments from HTML output.
- Preload Critical Resources: Add preload hints for critical CSS and JavaScript files.
Utilities
Go to Smart Admin Assistant > Utilities
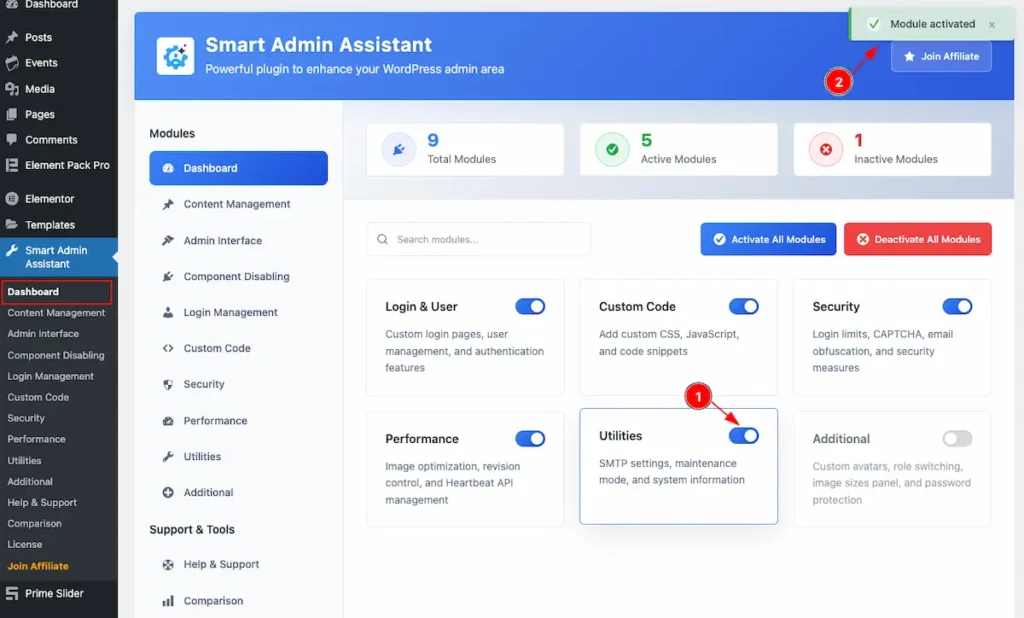
- First Enable the switcher of the Utilities Modules.
- The Saving notification appear while Activate the Module.
Maintenance Mode
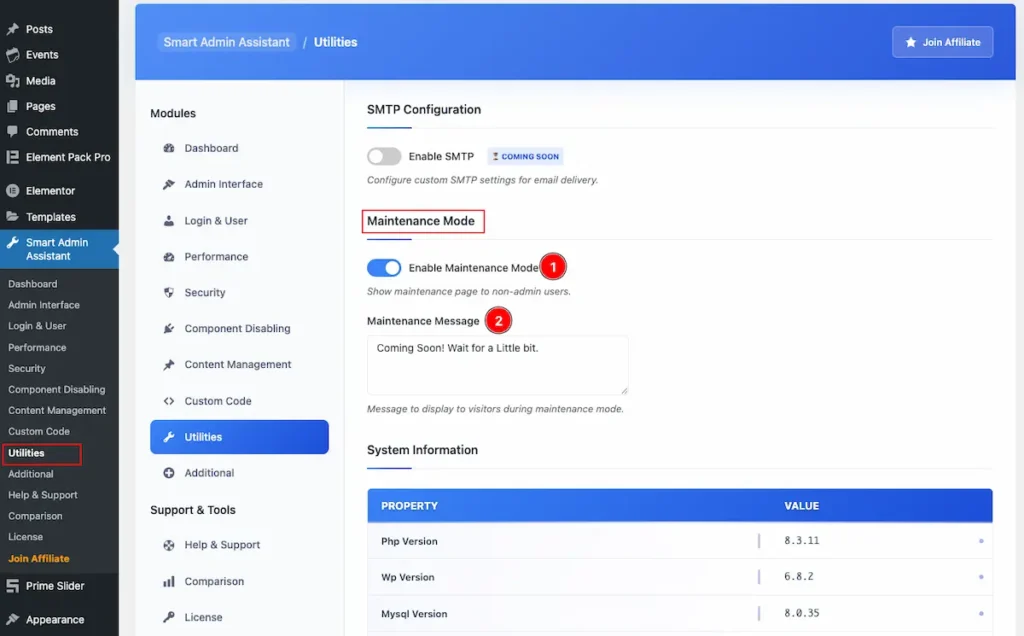
- Enable Maintenance Mode: Enable the switcher to Show maintenance page to non-admin users.
- Maintenance Message: Set the message to display while Maintenance mode is on.
System Information
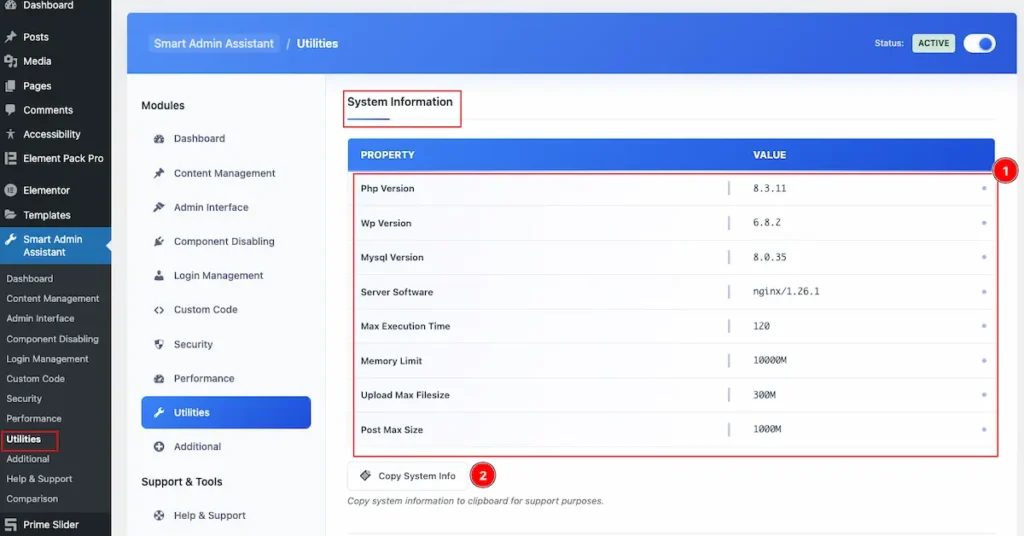
- This table referee all the info of the System.
| Property | Value |
| PHP Version | 8.3.11 |
| WP Version | 6.8.2 |
| Mysql Version | 8.0.35 |
| Max Execution Time | 120 |
| Memory Limit | 1024M |
| Upload Max Filesize | 300M |
| Post Max Size | 1000M |
| Server Software | ngnix/1.26.1 |
- Copy System Info: Click on the button to Copy the System Info.
Additional
Go to Smart Admin Assistant > Additional
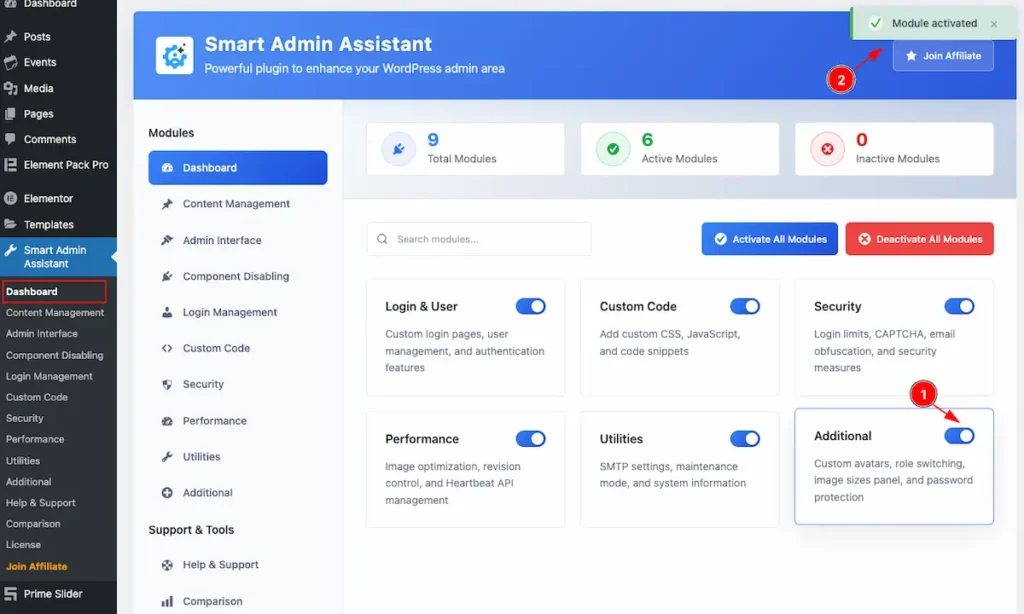
- First Enable the switcher of the Additional Modules.
- The Saving notification appear while Activate the Module.
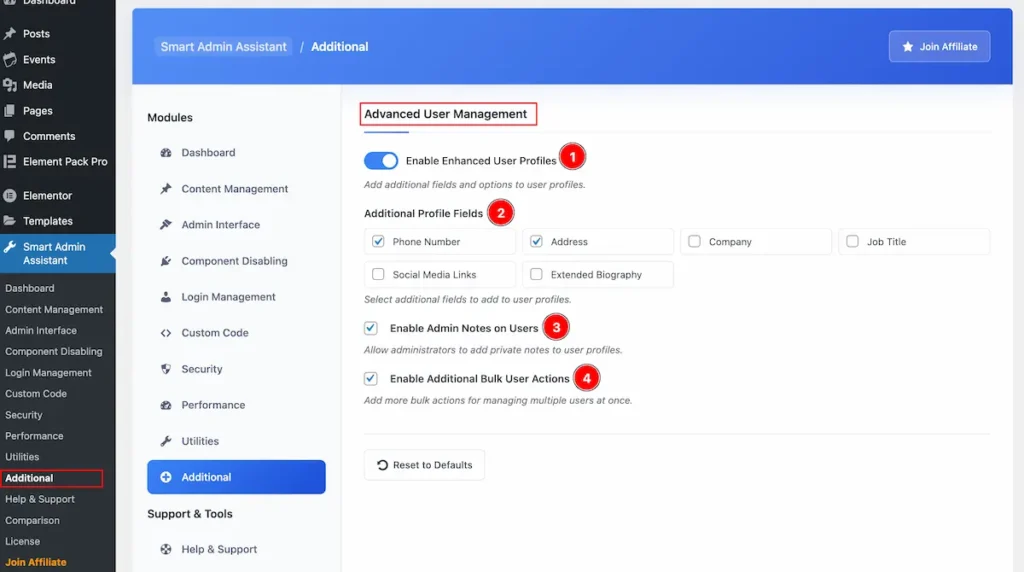
Advanced User Management
- Navigate to the Additional Tab and all the additional controls will appear here.
- Enable Enhanced User Profiles: Add additional fields and options to user profiles.
- Additional Profile Fields: Select additional fields to add to user profiles. Phone Number, Address, Company, Job Title, Social Media Links, Extended Biography
- Enable Admin Notes on Users: Allow administrators to add private notes to user profiles.
- Enable Additional Bulk User Actions: Add more bulk actions for managing multiple users at once.
Additional
Role Switching
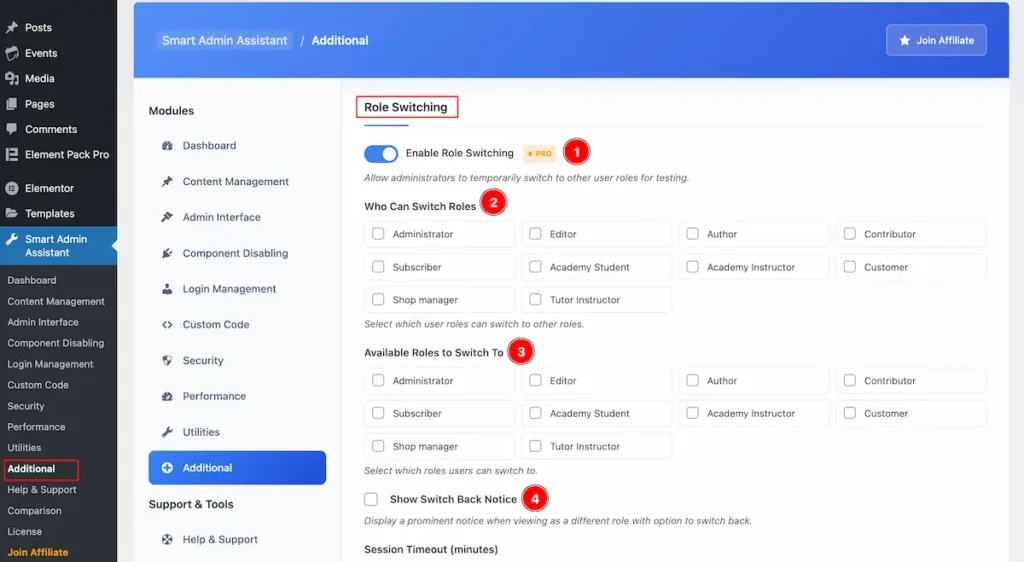
- Enable Role Switching: Allow administrators to temporarily switch to other user roles for testing.
- Who Can Switch Roles: Select which user roles can switch to other roles. Administrator, Editor, Author, Contributor, Subscriber, Academy Student, Academy Instructor, Customer, Shop Manager, Tutor Instructor.
- Available Roles to Switch To: Select which roles users can switch to. Administrator, Editor, Author, Contributor, Subscriber, Academy Student, Academy Instructor, Customer, Shop Manager, Tutor Instructor.
- Show Switch Back Notice: Display a prominent notice when viewing as a different role with option to switch back.
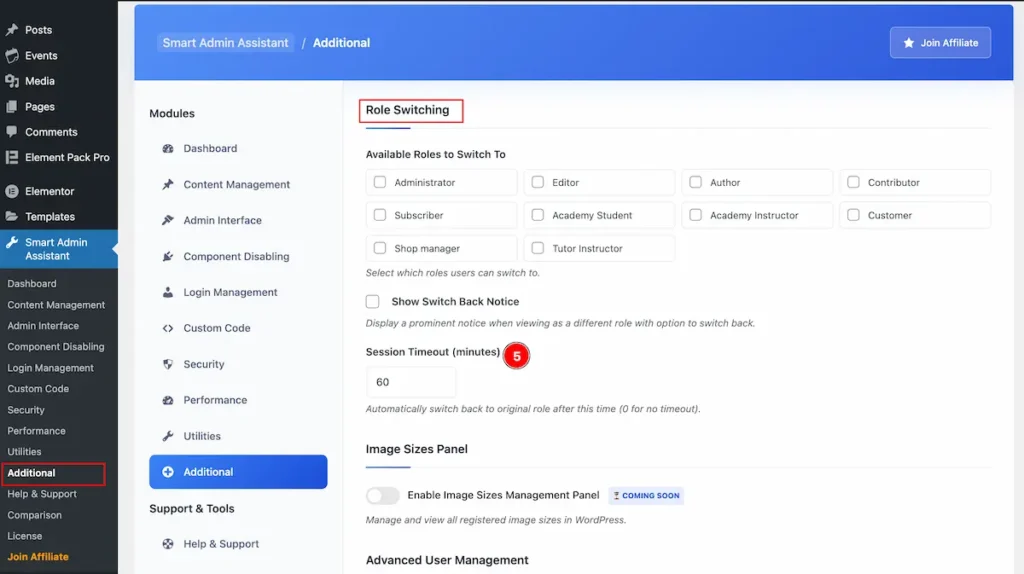
- Session Timeout ( minutes ): Automatically switch back to original role after this time (0 for no timeout).
Advanced User Management
- Enable Enhanced User Profiles: Add additional fields and options to user profiles.
- Additional Profile Fields: Select additional fields to add to user profiles. Phone Number, Address, Company, Job Title, Social Media Links, Extended Biography.
- Enable Admin Notes on Users: Allow administrators to add private notes to user profiles.
- Enable Additional Bulk User Actions: Add more bulk actions for managing multiple users at once.
Video Tutorial
Navigate to Official Page of Smart Admin Assistant.
Thanks for choosing us.