In this documentation, we will discuss the customization of the Particles Extension, brought to you by Zoloblocks.
Enable the Particles Extension
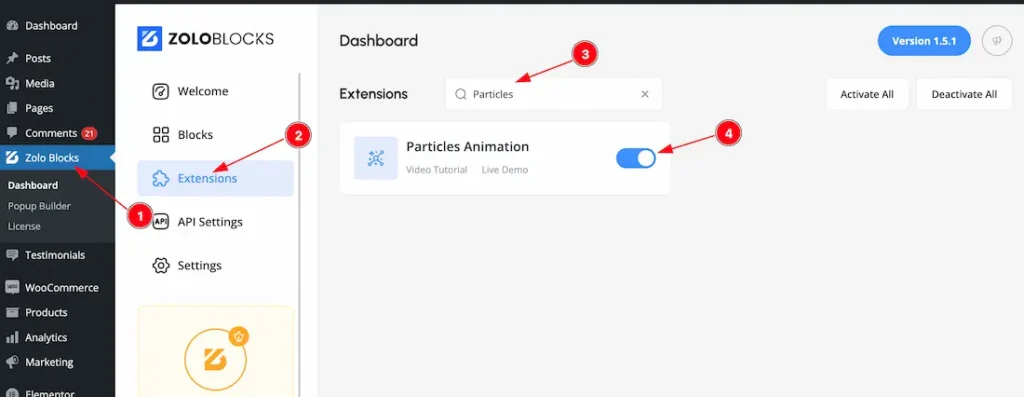
To use the Particle Extension from Zoloblocks, you must first enable the Extension.
- Go to WordPress Dashboard > Zoloblocks Plugin dashboard.
- Then Click the Extension Tab.
- Search the Particle extension Name.
- Enable the Particle extension.
Start With Any Design to show the Particle Effects
To start with the feature, let’s first take an existing design inside the page. This is for a better understanding of the functions of this feature. Here I have designed a section to show you the Section Particle effects.
Where You Find the Extension
After Completing a section or container design, just select the container or section and go to the container or section > Extra Tab > Background > Particles.
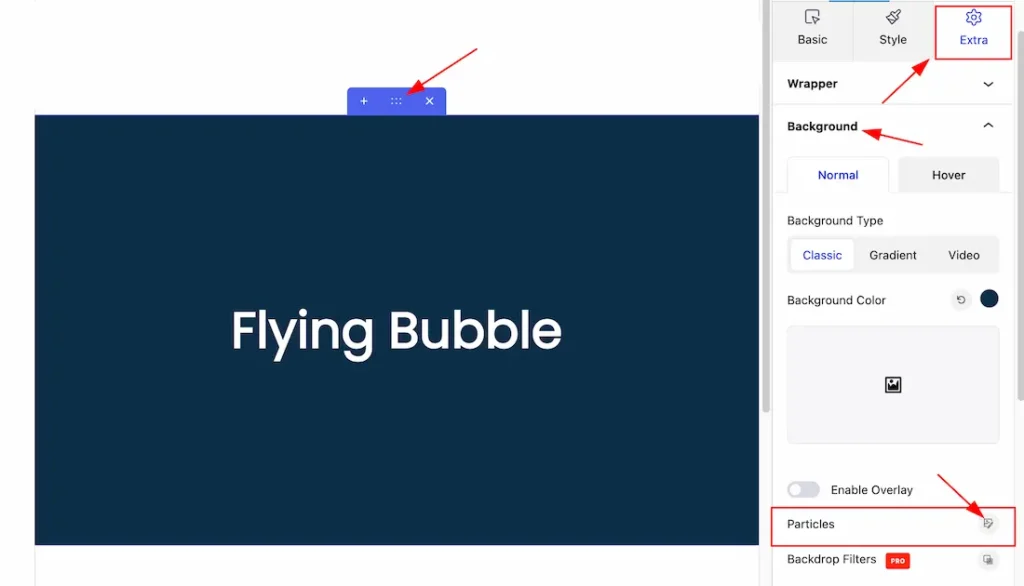
Let’s Explore the Internal Function of Particles Extension
After hitting the Particles icon, a set of customization options will appear. As like Presets, Direction, Shape Size, Color, etc. Let’s explore all the features-
Describe the Preset Feature
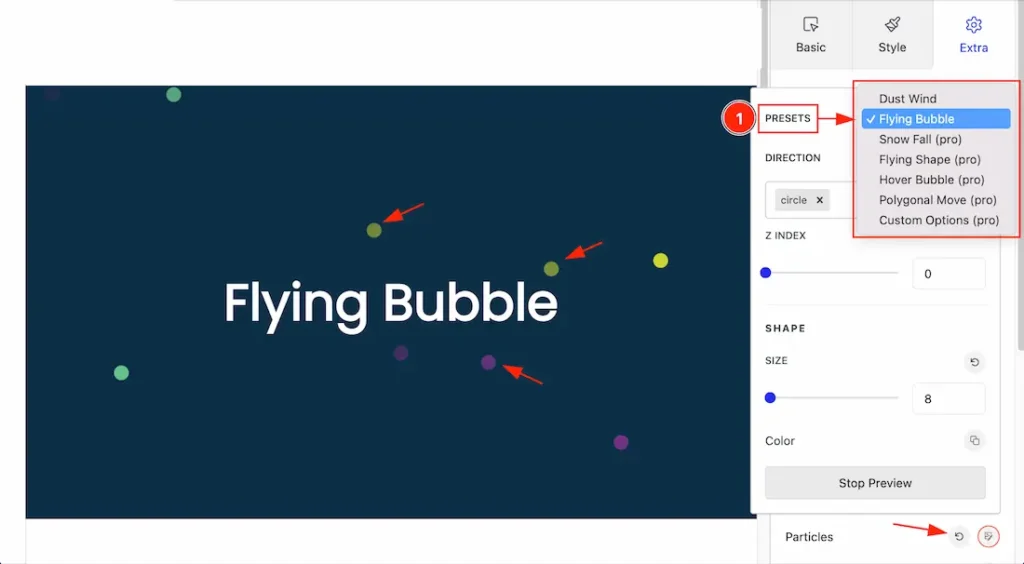
1. Presets: In the Preset section, you can choose different particle animations to enhance the visual experience. Some of the available options include:
- Dust Wind: Simulates particles moving in a wind-like pattern.
- Flying Bubble: Displays colorful bubbles moving randomly across the screen.
- Snow Fall: Shows a snowflake falling effect (pro version).
- Flying Shape: Creates moving shapes with customizable settings (pro version).
- Hover Bubble: Displays bubbles that move on hover (pro version).
- Polygonal Move: Particles move in a polygonal pattern (pro version).
- Custom Options: Allows for advanced customization of particle effects (pro version).
These presets help you create dynamic and visually appealing animations quickly. Here we select the Flying Bubble.
How to Customize the Custom Particles Option
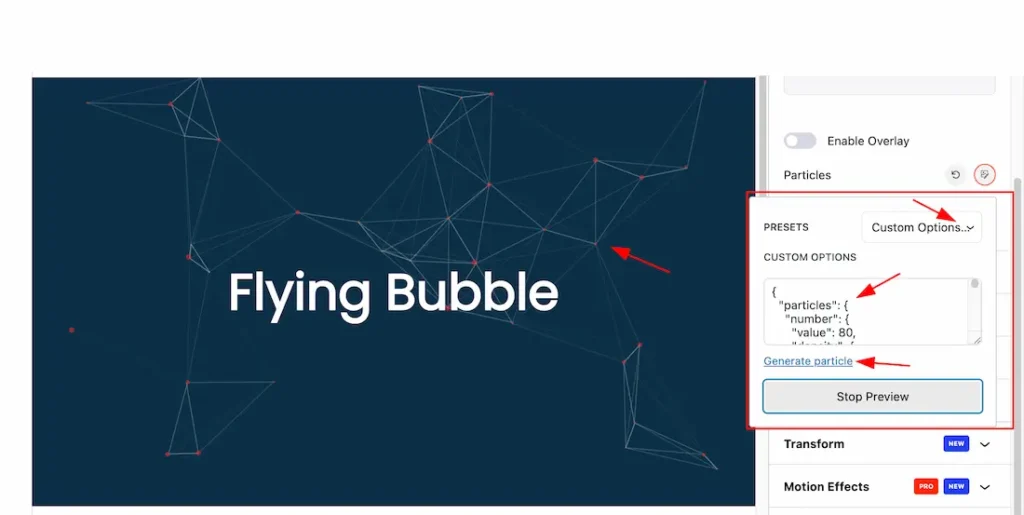
Custom Option: First select the Custom Option from the Preset. After selecting the custom option, click the Generate Particles option then you will be redirected to the custom particles generator page. Please follow the below screenshot-
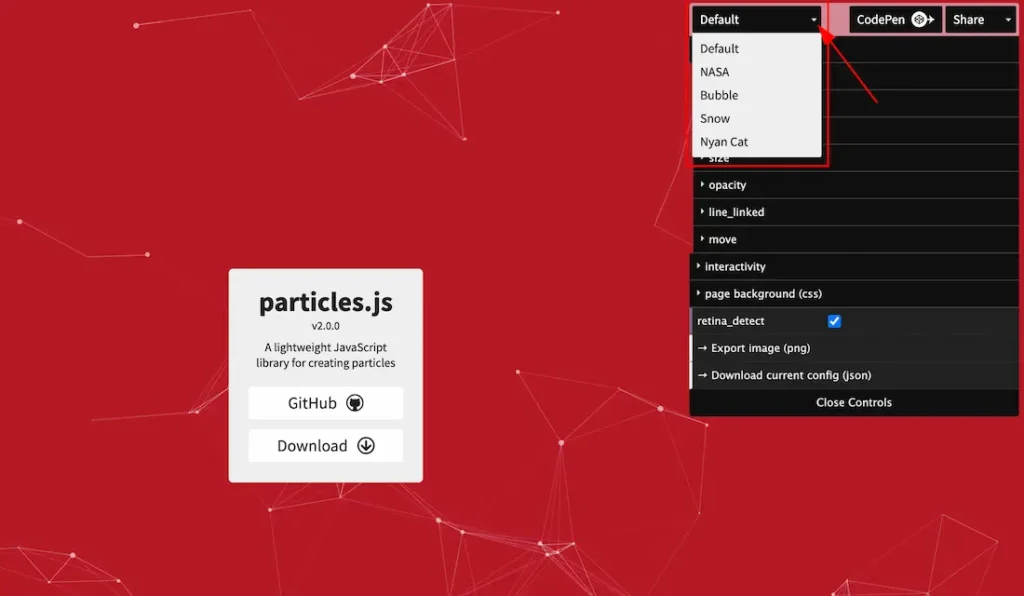
Come to the Custom Paricles Generator page, you will get various particle options and select any option from there. We select the default particles. You can choose any one of them that you like.
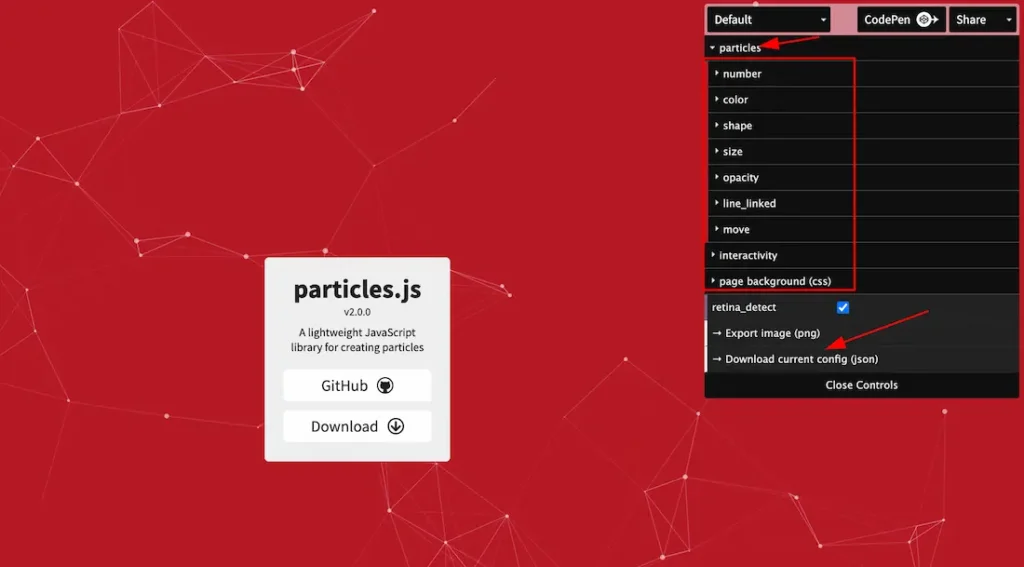
When you click the Particles Section, you’ll see various options for customizing the particle effects. You can adjust the following elements: Number, Color, Shape, Size, Opacity, Line_Linked, Move, etc That I marked in the screenshot. Please customize those options to your working demand.
After customizing those options, you can download the JSON file from here and just open the JSON file in your editor and copy the JSON code, and paste the JSON code inside the Custom Option field. If you want then just click the Preview button to show the preview of the Particles effects.
Explore the Direction Feature
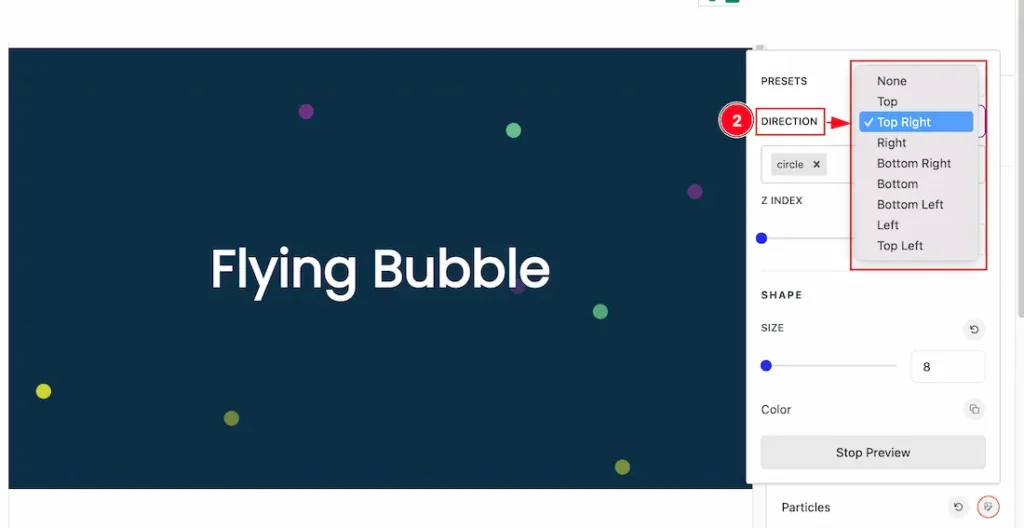
2. Direction: The Direction feature in the Particles section allows you to control the movement of the particles on the screen. You can select different directions like Top, Right, Bottom Right, Bottom, Bottom Left, Left, and Top Left. By choosing a direction, you define how the particles will flow, adding dynamic movement to your design. For example, selecting “Top Right” will make the particles move diagonally toward the upper right corner of the screen. This feature gives you control over the visual behavior of particles, helping you create an engaging and interactive user experience.
Explore the Shape Type option
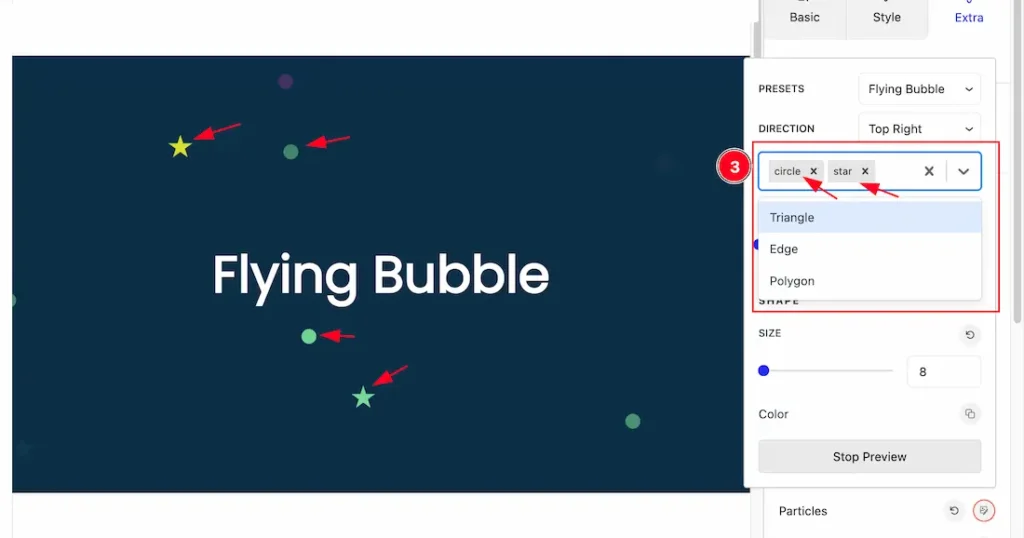
3. Shape Type: Here you will get some shape types as like – Circle, Star, Triangle, Edge, and Polygon. Here we select Circle and Star. If you want you can select the single or multiple particles share from here.
Describe the Z Index and Shape Size feature
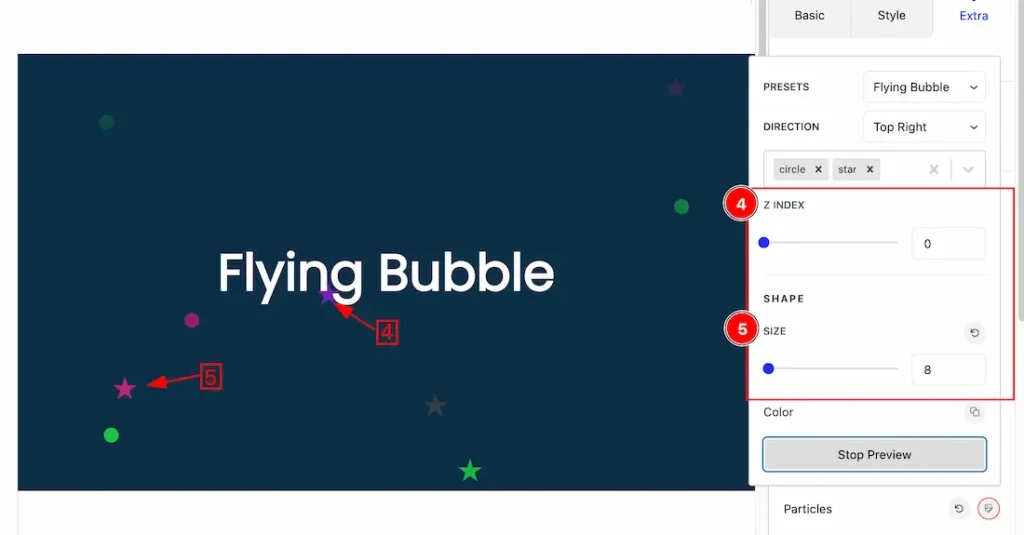
4. Z Index: Controls the layering of particles in relation to other elements, allowing you to move particles in front of or behind other objects on the screen.
5. Shape Size: Adjusts the size of the particles, letting you scale them to smaller or larger dimensions to fit your desired design or visual effect.
Explore the Color option
In the Color option section, you can customize the visual elements of your design. Here’s a breakdown of the features:
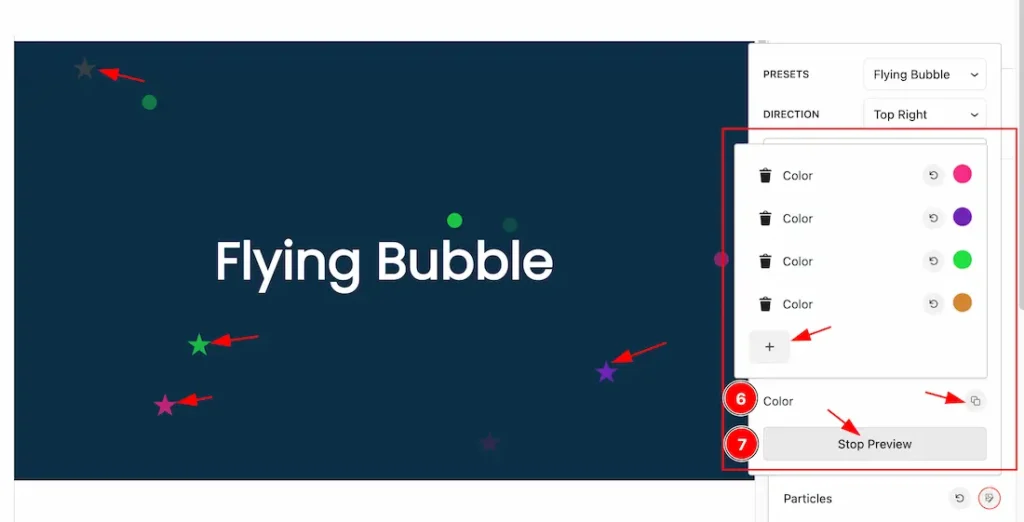
6. Color: You can add multiple color palettes for the particles by clicking the “+” icon button and you can also choose multiple colors from here for the particles.
7. Preview: The preview button allows you to see the preview of the Particles that you set or change. If you don’t want to show the preview then please hit the preview button again then your preview will stop.
We successfully customize the Particles Effects Extension.
Video Assist
You can also watch the video tutorial Learn more about the Particles Effects Extension. Please visit the demo page for examples.
Thanks for being with us.
