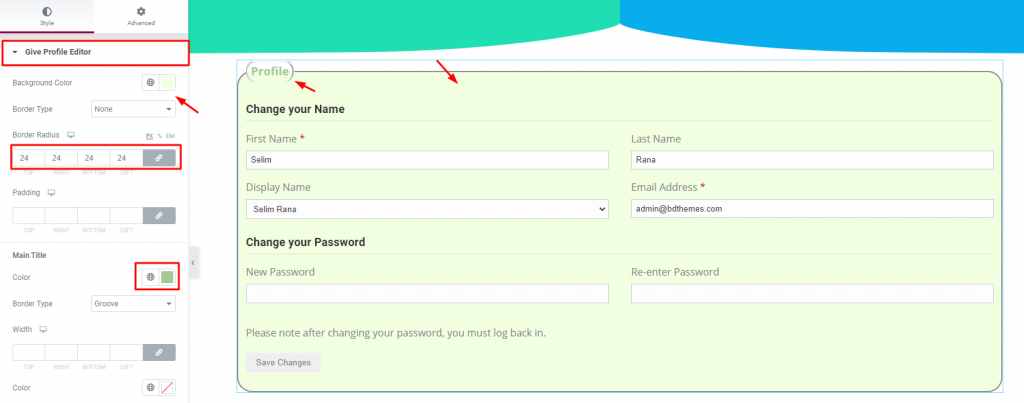
The Give Profile Editor widget helps you make a profile form for editing and storing the personal information of the donor on your website.
Note that this donation profile widget is a by default setup provided by the Give plugin. So, there is no Content tab for it, and has only the Style tab and Advanced tab.
Let’s see how to use the style tab for this widget in the tutorial.
Inserting widget

Find the Elementor Give Profile Editor from the widget menu and place it inside your webpage.
Style tab
There are a bunch of sections here commanding different part of the actual content.
Give Profile Editor

Go to Style> Give Profile Editor
This section is to customize the whole form by changing the background color, border. and padding.
There is a sub-section on it for customizing the title of the form. You can color it, add border and border-radius, margin, padding, and typography.
Title

Go to Style> Title
Customize the inner field titles by changing their color, border color underneath, and typography of the WordPress prfile for donations. Use the margin for alignment adjustments.
Label

Go to Style> Label
From this section, you can customize the labels above the fields by changing their color and typography.
Input Fields

Go to Style> Input Fields
This section lets you change the color, border, typography of the input fields of the profile form. There are 6 input fields on the screen customized from this section.
Submit Button

Go to Style> Submit Button
The submit button is also customizable. You can change its shape and color from this section for the Give Profile Editor widget.
Reset Password Notice

Go to Style> Reset Password Notice
And lastly, change the color and typography of the reset password notice message above the submit button.
Conclusion
Watch this video to get more visuals on the Give Profile Editor widget, developed by Bdthemes, and check out this demo page for more examples.
Thanks for staying up.

