In this documentation, we will discuss the customization of the Google Map block, brought to you by Zoloblocks.
Set The Google Map API key
Before using the Google Map block, you need to set the Google Map API key first.
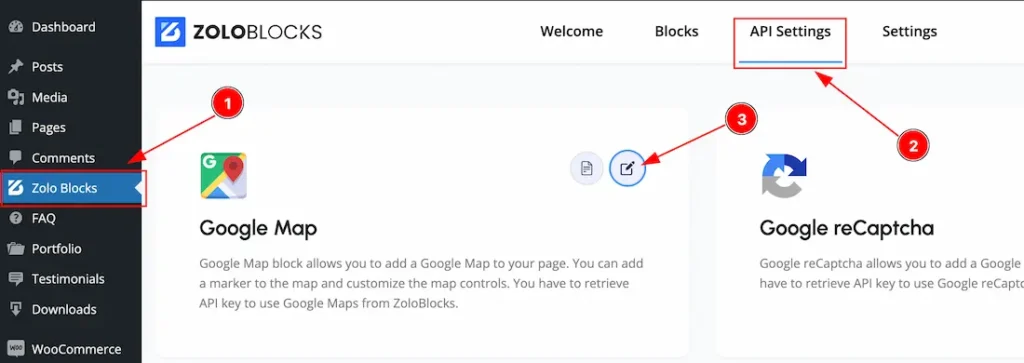
- Go to WordPress > Zolo Blocks plugin dashboard.
- Hit the API Settings tabs.
- Click the Google Map API settings Icon.
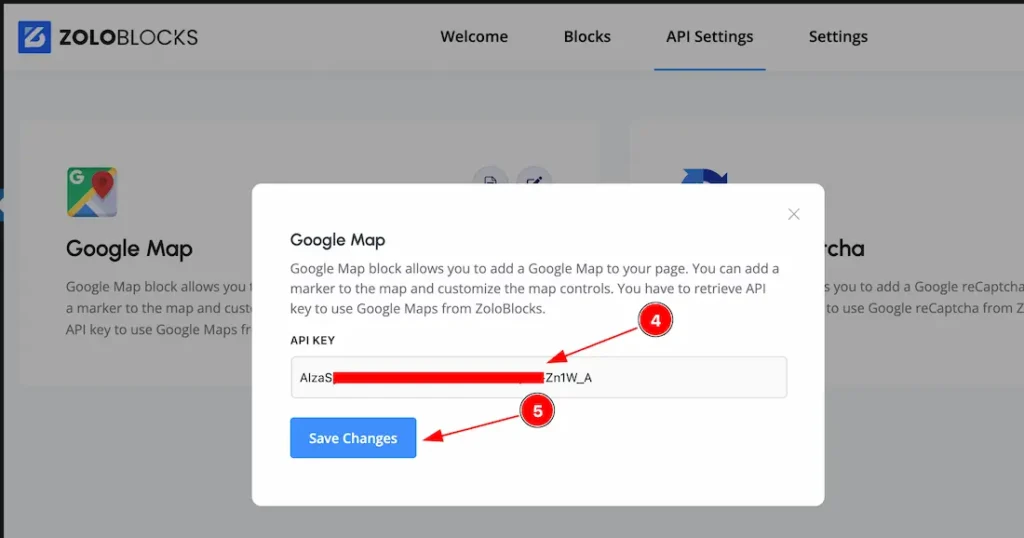
4. Keep the Google Map API key in the API key inbox.
5. Hit the Save Changes Button.
Inserting The Block into the Editor
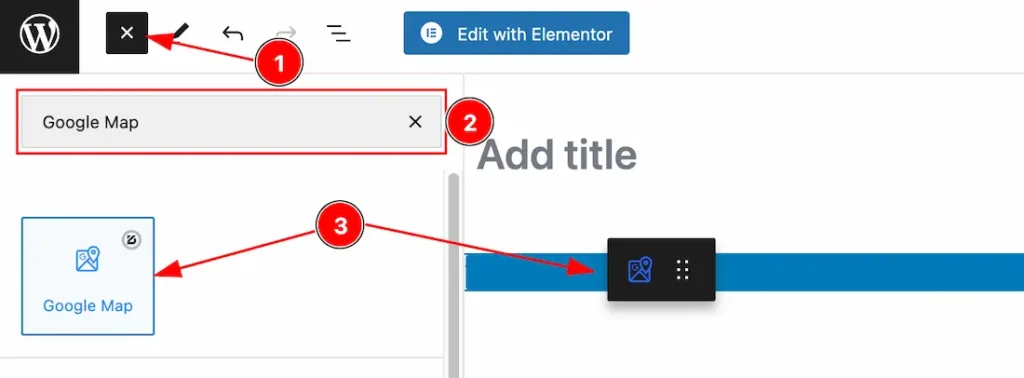
- Click the Toggle Block Inserter icon and a sidebar will appear on the left side, All the blocks will be visible here.
- Search the Google Map Block Name inside the search Box. otherwise, select the Google Map blocks ( with Zoloblocks logo T.R corner).
- Then Drag and Drop it on the page.
After Inserting the blocks, Follow this.
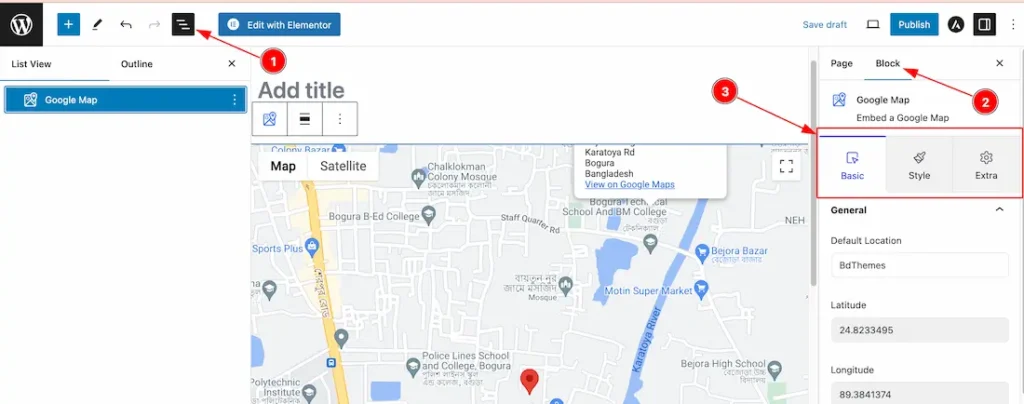
- Click on the Document Overviewer button and the Blocks list view will appear.
- After on the right side, Click on the Block.
- Here show all the control tabs( Basic, Style, Extra ) of a block.
Basic Tab Customization
The Basic tab controller displayed here offers the flexibility to adjust the layout of blocks according to your preferences.
General Section
Go to Basic > General
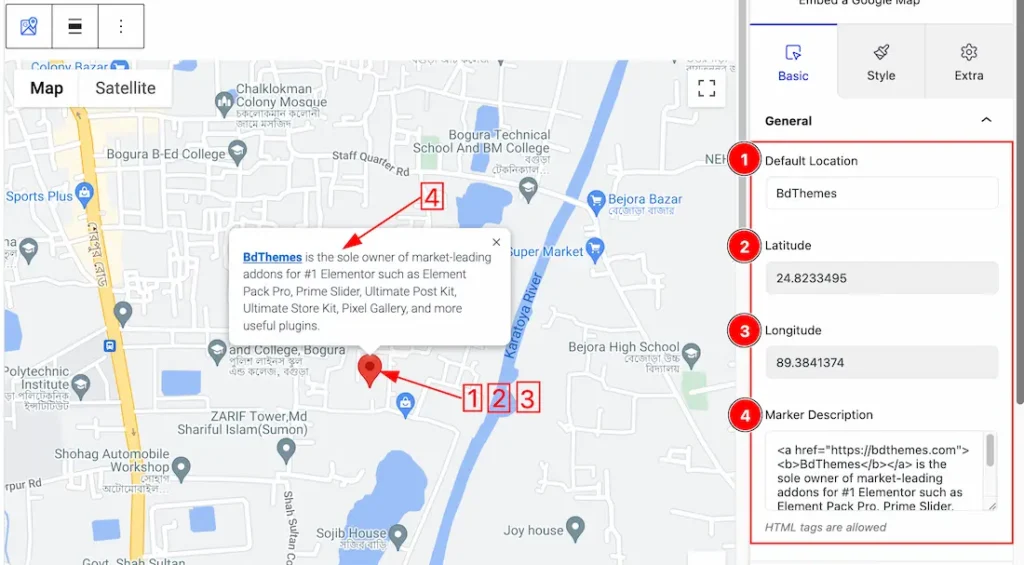
1. Default Location: you can set a default location here. We set a default location as Bdthemes.
2. Latitude: Put the default location Latitude.
3. Longitude: Put the default location Longitude.
4. Marker Description: Put the default location Marker description in the HTML tag.
More Locations Section
Go to Basic > More Locations
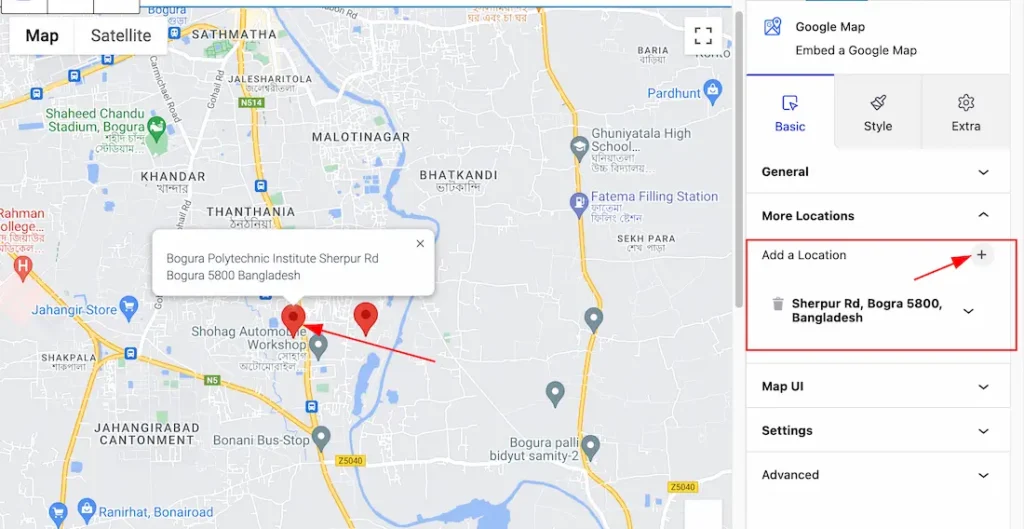
Add a Location: you can easily add a location by clicking the “+” sign icon. you can add multiple locations. Also, remove any location by clicking the delete icon.
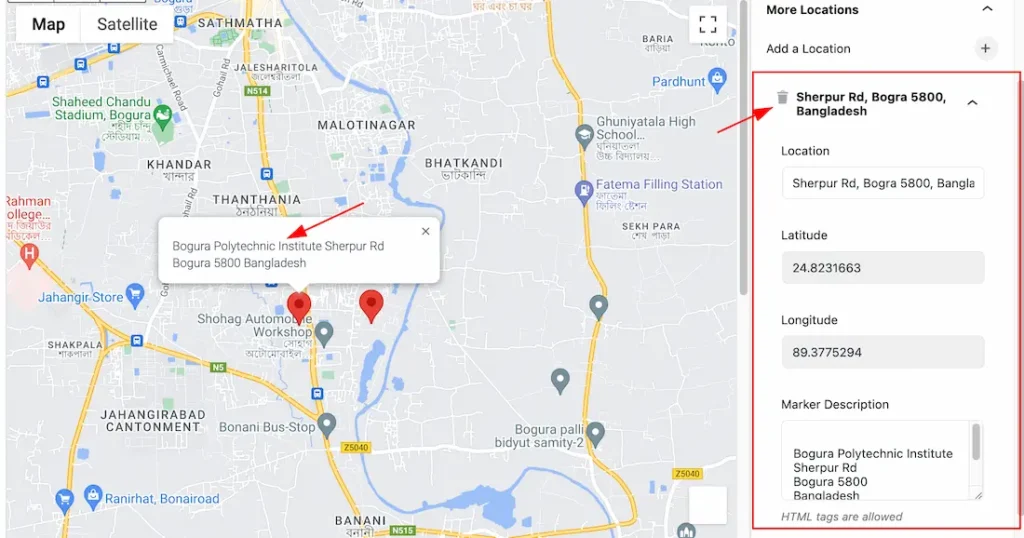
When you click on the location then you will get more options like Location, Latitude, Longitude, and Marker Description that we shown in the General section.
Map UI Section
Go to Basic > Map UI
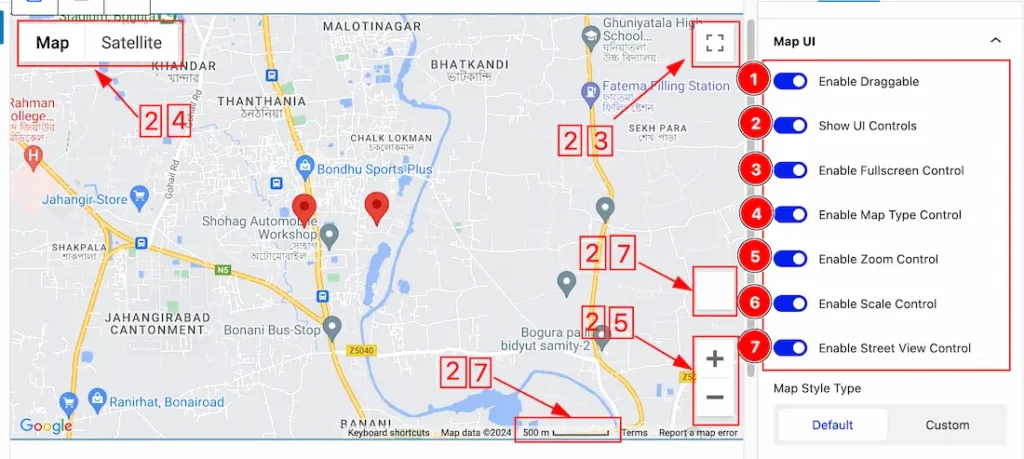
1. Enable Draggable: Enable or Disable the Draggable switcher button to show or hide the Draggable option or symbol on the Map. This option lets you drag the map.
2. Show UI Controls: Enable or Disable the UI Controls switcher button to show or hide the UI Controls options on the Map. if you enable the switcher button, more UI Controls switcher buttons will appear.
3. Enable Fullscreen Control: Enable or Disable the Fullscreen Control switcher button to show or hide the Fullscreen Control options on the Map.
4. Enable Map Type Control: Enable or Disable the Map Type Control switcher button to show or hide the Map Type Control options on the Map.
5. Enable Zoom Control: Enable or Disable the Zoom Control switcher button to show or hide the Zoom Control options on the Map.
6. Enable Scale Control: Enable or Disable the Scale Control switcher button to show or hide the Scale Control options on the Map.
7. Enable Street View Control: Enable or Disable the Street View Control switcher button to show or hide the Street View Control options on the Map.
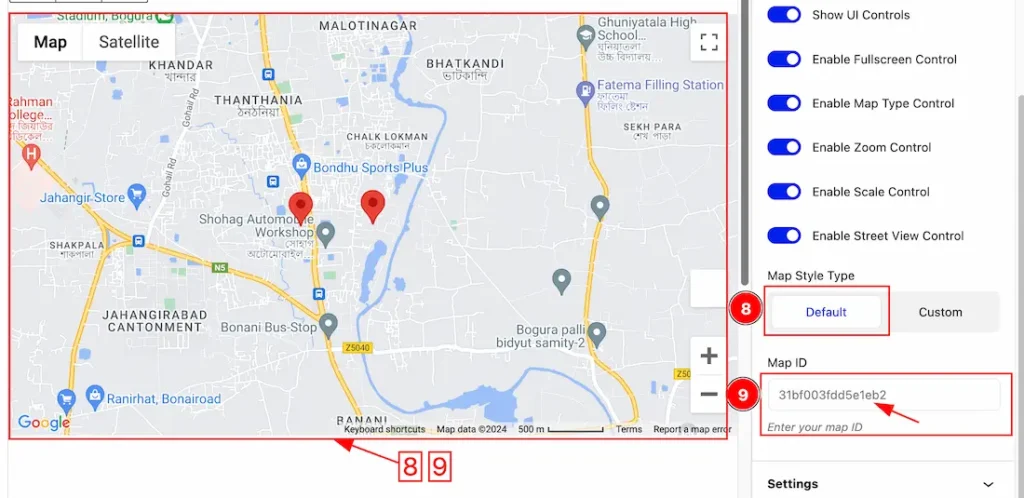
8. Map Style Type: Here you will get two options to set the Map Style Type. You will get a default Type and the other is a Custom Type. We show the Default Type first.
9. Map ID: If you select the Default Style Type then you will get the Map ID box. Just put your Map ID inside the Map ID box. Then the Default map will appear.
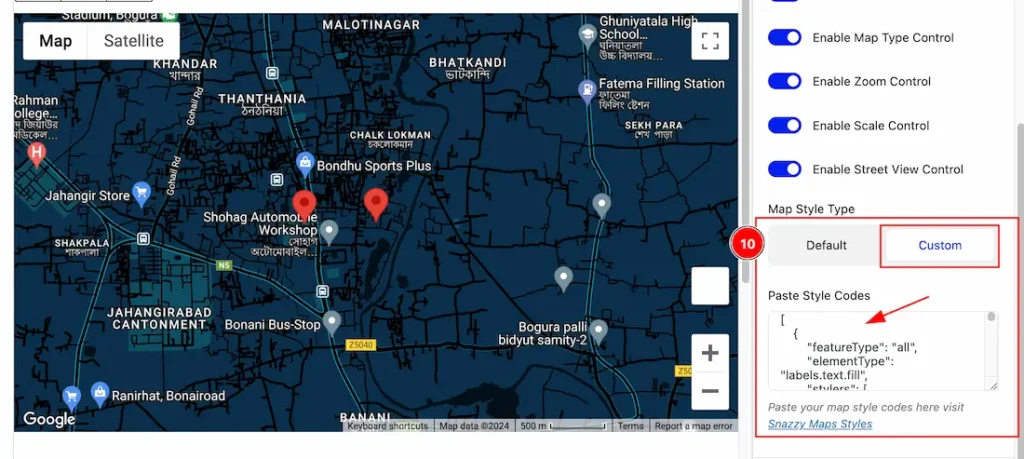
10. Map Style Type Custom: if you select the Custom Style Type then you will get a Paste Style Codes box. Just put the custom codes inside the box and the custom style map will appear. you will get many custom-style maps under the Snazzy Maps Styles link. Just visit the link and choose one of them.
Settings Section
Go to Basic > Settings
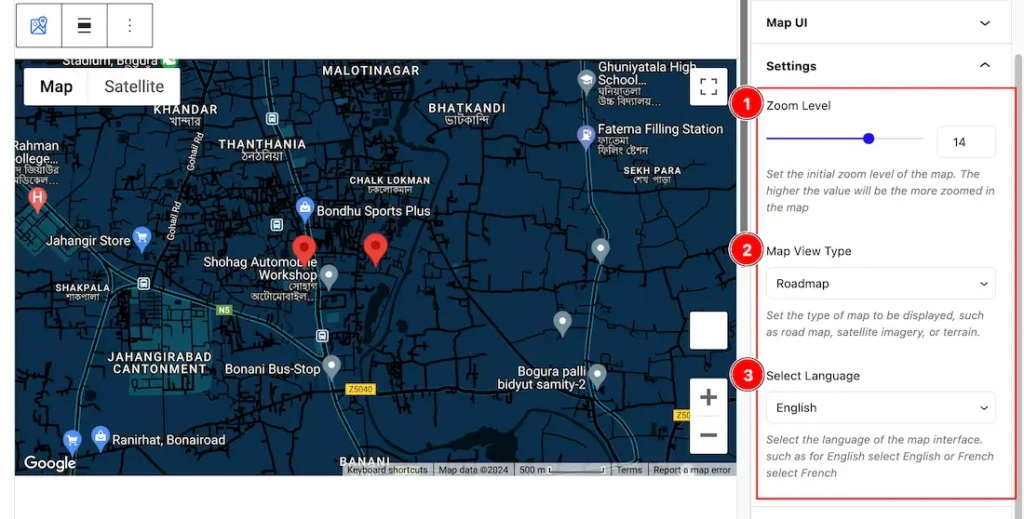
1. Zoom Level: This option lets you set the initial zoom label of the map.
2. Map View Type: Select the Map View Type from here that you want to display. You will get this Map view type, such as Road map, Satellite, Hybrid, and Terrain. you can choose any one of them.
3. Select Language: you can select the Map Language from here. Select the language of the map interface. such as for English choose English or French select French.
Note: Please follow the footnote. The footnote helps you to understand those options.
Work with The Style Tab
Map Section
Go to Style > Map
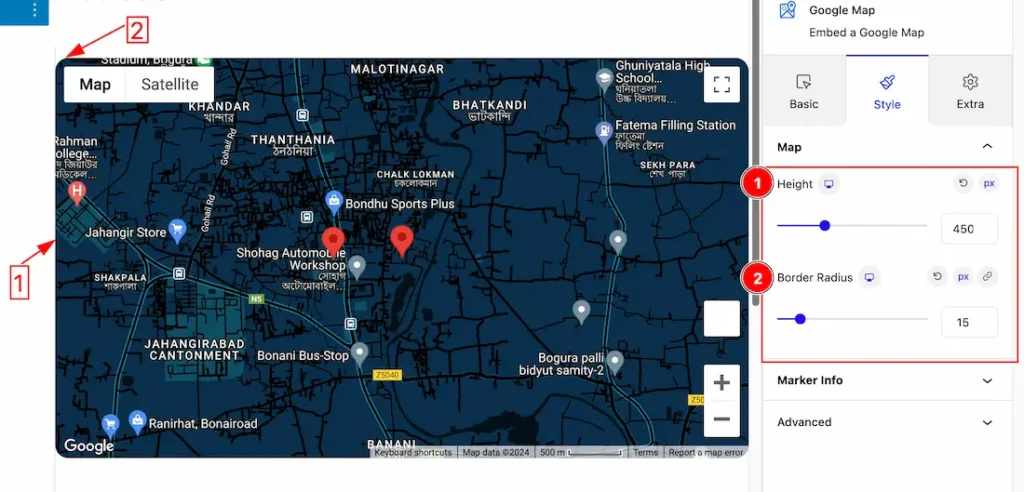
1. Height: This option lets you set the Height of the Map.
2. Border Radius: This option lets you set the Border Radius for the Map.
Marker Info Section
Go to Style > Marker Info
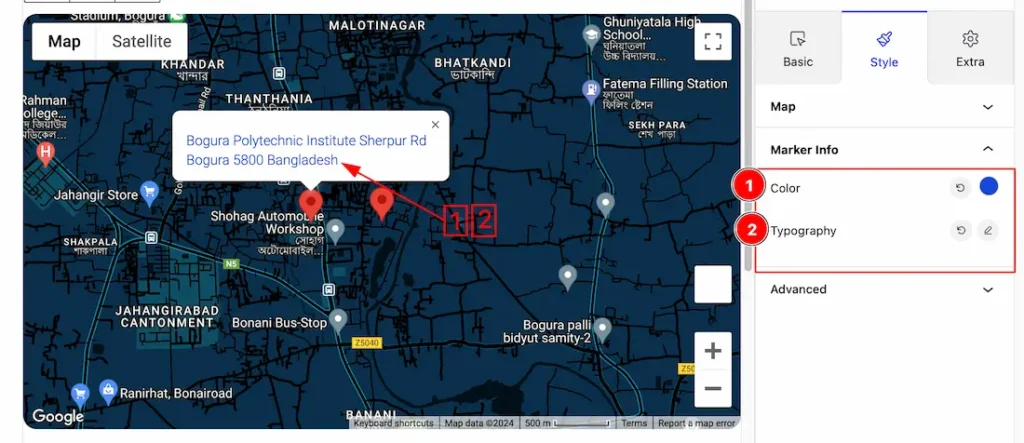
1. Color: This option lets you change the Color of the Marker Info.
2. Typography: Change the font family, size, weight, style, transform, decoration, line height, letter spacing, and word spacing from here for the Marker Info.
Extra Tab Controls
The extra tabs provide the controls of any blocks. You can make different visual layouts by following these Controls.
Click to learn more>>.
Video Assist
The Video will help you to learn more about the Advanced Google Map Block. Please visit the demo page for examples.
Thanks for being with us.