

The Document Library feature in Sigma Media Manager allows you to organize, manage, and securely share documents directly from your WordPress media library.
Whether you are working with PDFs, DOC files, presentations, spreadsheets, or other downloadable resources, this feature helps you create a more structured and professional document management system for your website.
In this documentation, we will guide you through the complete process of using the Document Library feature in Sigma Media Manager.
Configuring Settings for Document Library
The Document Library feature is a Pro feature of the Sigma Media Manager plugin, which means you need to install and activate the Pro version on your WordPress site. Simply follow the documentation to know how to install and activate the Pro plugin to start using this feature.
Set up the Document Library Feature
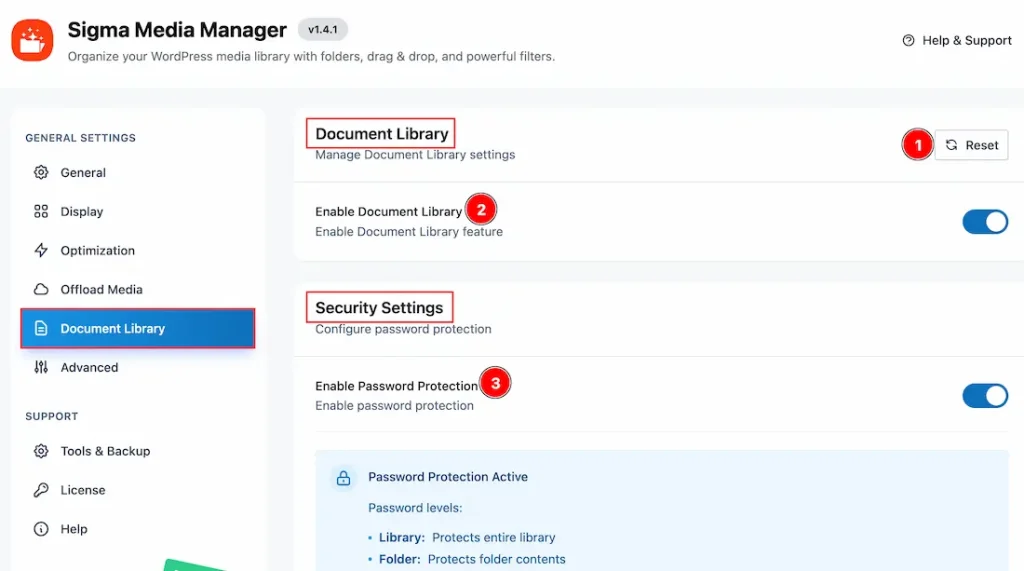
Before using the Document Library feature, you need to configure the required settings first. To do this, navigate to WP Dashboard > Settings > Sigma Media Manager > Document Library Settings. From here, you can access and customize all available options based on your requirements.
Let’s take a look at the available settings:
- Reset: Click this button to restore all settings to their default values.
- Enable Document Library: Turn on this switch to activate the Document Library feature on your site.
- Enable Password Protection: Enable this option to secure your media files. You can set a password to protect the entire library, specific folders, or individual elements displayed to your audience.
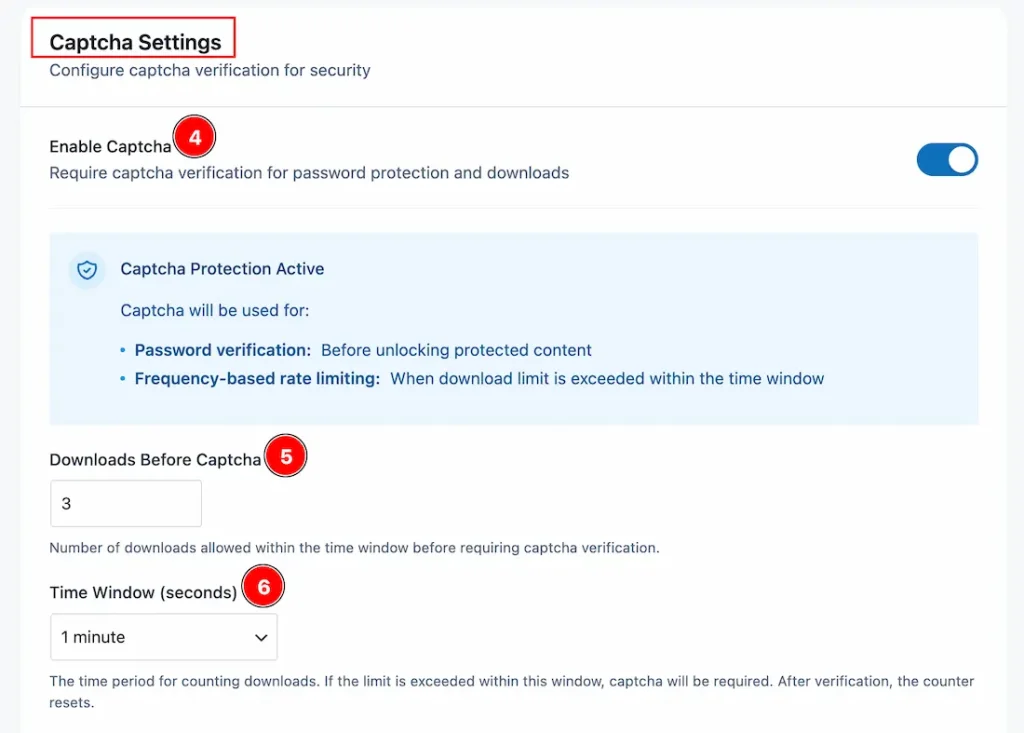
4. Enable Captcha: Enable the switcher to require the captcha verification for password protection and download. The Captcha Protection can be used for –
- Password Verification: You can set a password for your content, allowing only authorized users to unlock and view it.
- Frequency-Based Rate Limiting: Configure captcha visibility based on a specific duration. Once verified, the captcha will remain hidden within the defined time window and will only reappear after the time limit has expired.
5. Download Before Captcha: You can set the number of downloads allowed within the time window before requiring captcha verification again.
6. Time Window (seconds): You can set up the time period for counting downloads. If the limit is exceeded within the window, CAPTCHA will be required. After verification, the counter will reset.
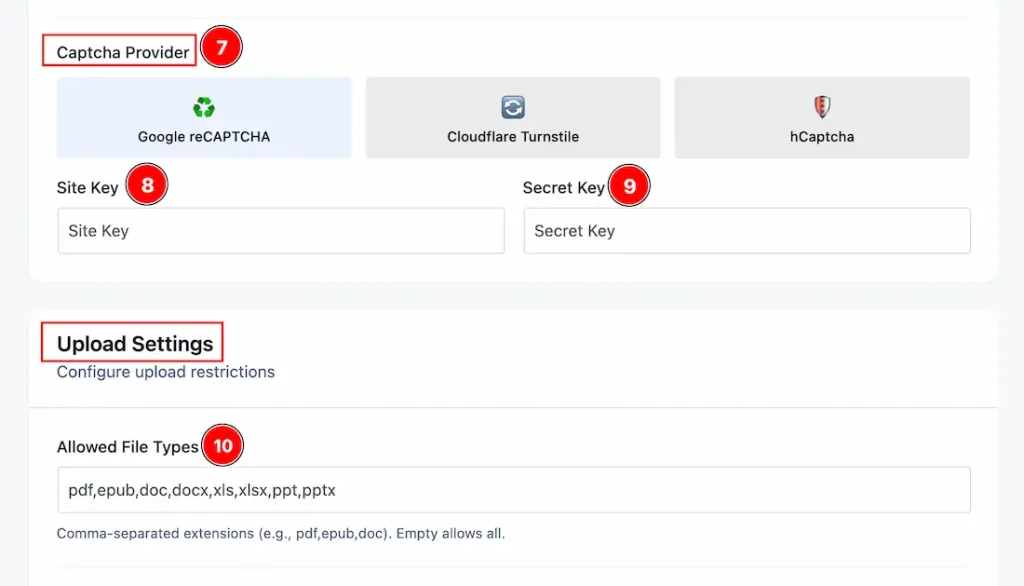
7. Captcha Provider: You can select your preferred captcha provider from this field. Available options include Google reCAPTCHA, Cloudflare Turnstile, and hCaptcha. In this example, we have selected Google reCAPTCHA.
8. Site Key: Since Google reCAPTCHA is selected, you must enter the Site Key in this field to complete the setup.
9. Secret Key: Since Google reCAPTCHA is selected, you need to enter the Secret Key here to finalize the reCAPTCHA configuration.
10. Allowed File Types: You can choose which file types are allowed in your Document Library. If left blank, all file types will be permitted, including PDF, EPUB, DOC, DOCX, XLS, XLSX, PPT, and PPTX.
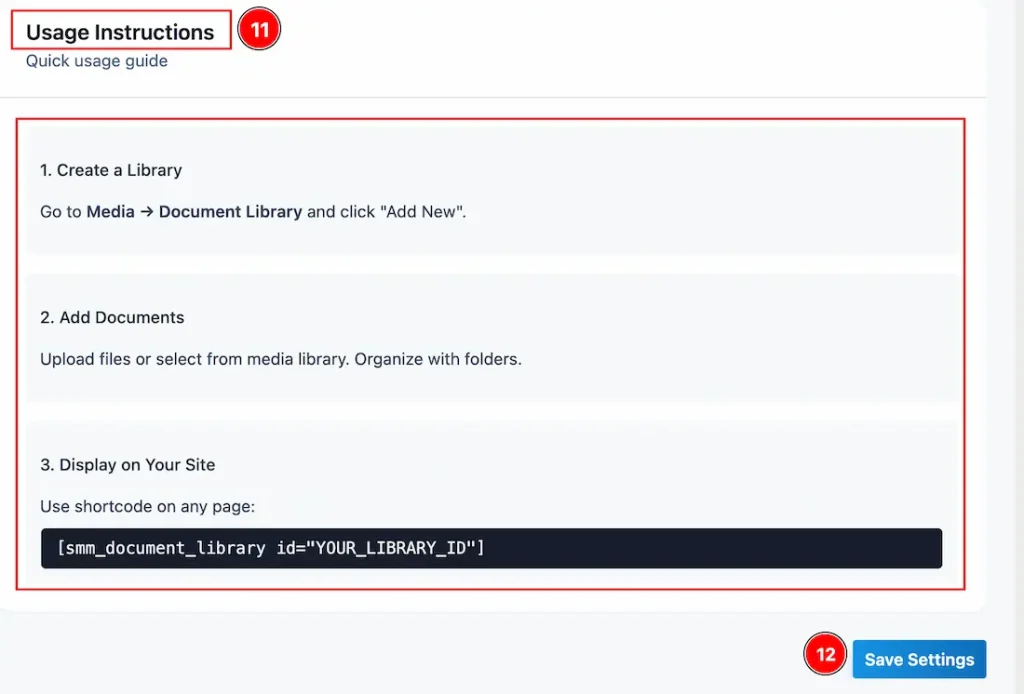
11. Usage Instructions: This section provides helpful guidance on how to use the Document Library feature. It outlines the next steps you should follow after completing the setup in the settings panel.
12. Save Settings: Make sure to click on the save settings button to apply the changes that you have made.
Creating The Document Library
Here is the polished version of your text:
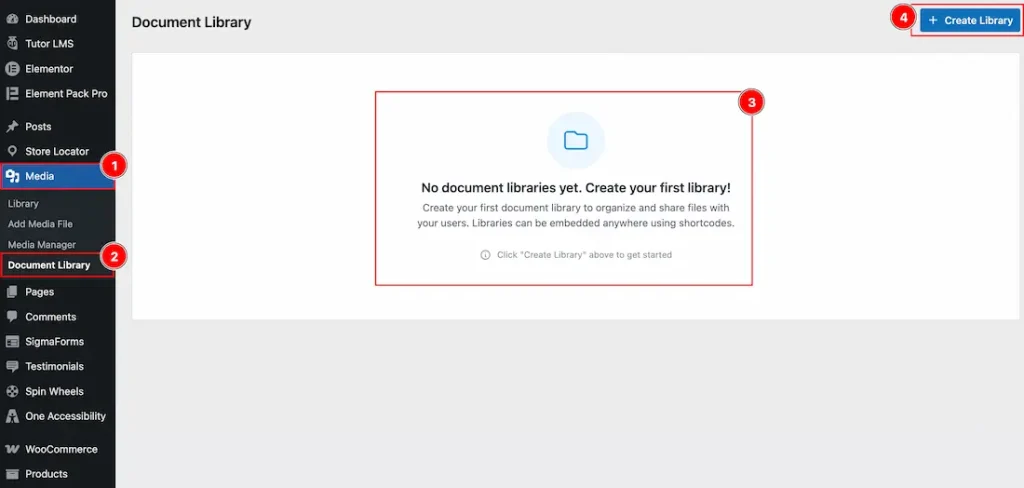
- After configuring the Document Library settings, go to WP Dashboard > Media.
- From the Media dropdown, you will see the Document Library option. Click on it to open the Document Library dashboard.
- Since no library has been created yet, you will see the default layout of the Document Library dashboard.
- Click the Create Library button in the top-right corner to create your first library.
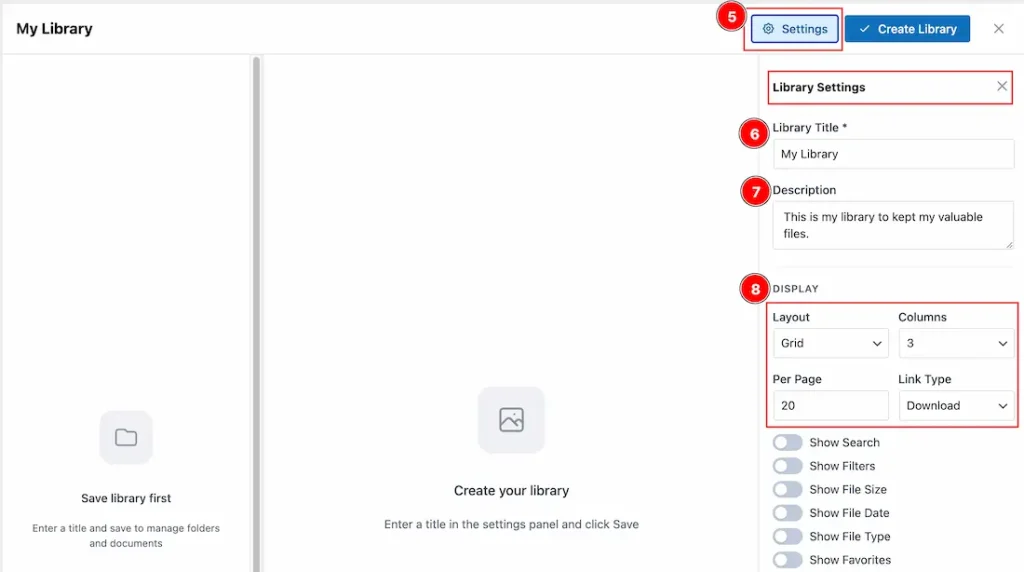
- After clicking Create Library, a new dashboard will appear where you can configure the settings to create your library. The available settings are as follows:
- Library Title: Use this option to edit and set the title of your library.
- Description: Add a description for your library in this field.
- Display: Customize the visual layout of your document library using the available options:
- Layout: Choose how your documents will appear. You can select either Grid or List layout.
- Column: Since the Grid layout is selected, you can define the number of columns to display.
- Per Page: Set how many files will be shown per page.
- Link Type: Choose how files will open—Download, Open in New Tab, or Lightbox.
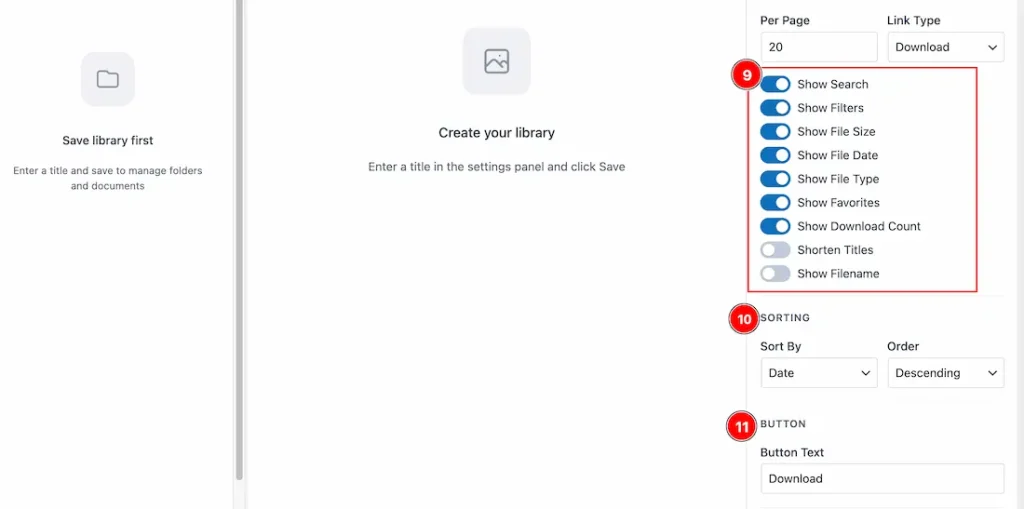
- You can enable or disable several display settings to control what users see in the document library. These options include:
- Show Search: Enable this to display a search bar in the document library for users.
- Show Filters: Enable this to show filtering options for better file navigation.
- Show File Size: Enable this to display the size of each file.
- Show File Date: Enable this to show the file creation date.
- Show File Type: Enable this to display the file format/type.
- Show Favourites: Enable this to allow users to mark files as favorites.
- Show Download Count: Enable this to display how many times a file has been downloaded.
- Shorten Title: Enable this to shorten long file titles, and set a maximum character limit if needed.
- Show Filename: Enable this to display the original file name in the library.
- Sorting: Configure the default sorting behavior for files shown to users. You will find two options here:
- Sort By: Choose how files should be arranged, such as by date, title, modified date, or custom order.
- Order: Set the sorting direction to ascending or descending.
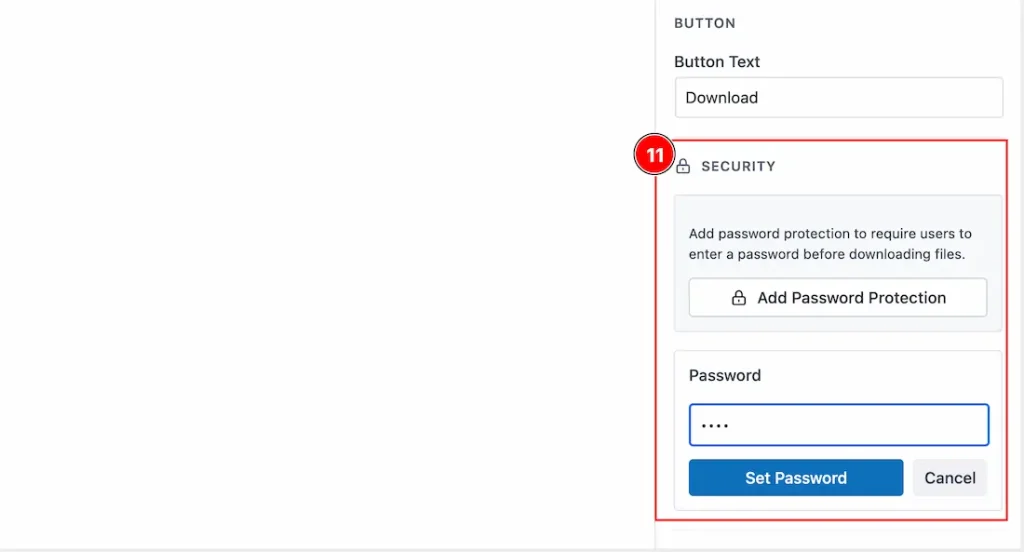
- Security: In this section, you can enable password protection for your document library. This ensures that only authorized users can access the files by entering the correct password to unlock them.
After configuring the security settings, click the Save Settings button to create your library with the selected options. Once saved, you can begin adding content to your document library and customize its appearance for your audience.
Adding Files & Customizing the Document Library
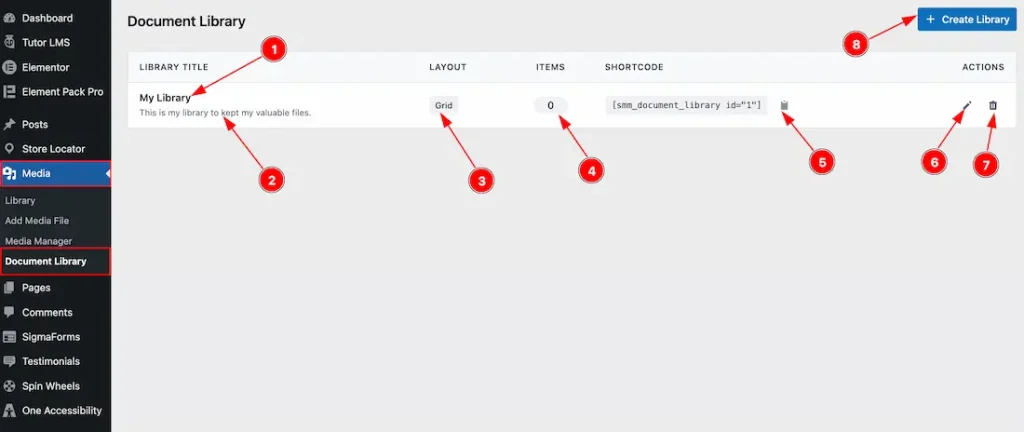
After creating a library, it will be stored in the Document Library Dashboard, where you can easily view, manage, and customize it anytime. Let’s take a look at what’s available here:
- Here you can see the title of the document library you have created.
- Here you can see the description you have added for the library.
- Based on your selected layout, the library will appear accordingly. If you choose grid layout, it will display in a grid format. If you select list layout, it will appear as a list.
- This field shows the total number of items available in the document library.
- This is an important option. You will find a shortcode here that allows you to display the document library anywhere on your pages or posts. Simply click the copy icon, and the shortcode will be copied automatically.
- Click on the Edit icon to customize the document library.
- Click on the Delete button to remove the document library.
- You can also click the Create Library button to create additional libraries.
Now let’s move on to the customization options inside the Document Library and explore what’s available within the library settings.
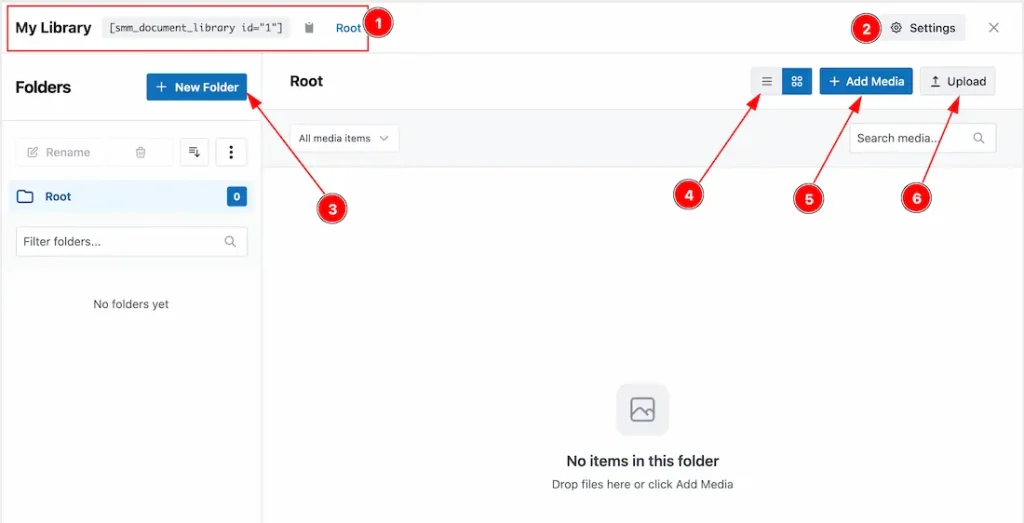
- In the top-left corner, you will find the shortcode, which you can use to display the document library anywhere on your site.
- Click on the Settings button to open a sidebar where you can modify and adjust the library settings as needed.
- Use this button to create a new folder inside your document library.
- You can switch between grid and list layouts using this option.
- Click this button to add media files that already exist in your WordPress site.
- Use this option to upload new media files directly from your local storage.
Now, let’s go ahead and create some folders and add media files to the document library to see how it looks in practice and explore the additional options available.
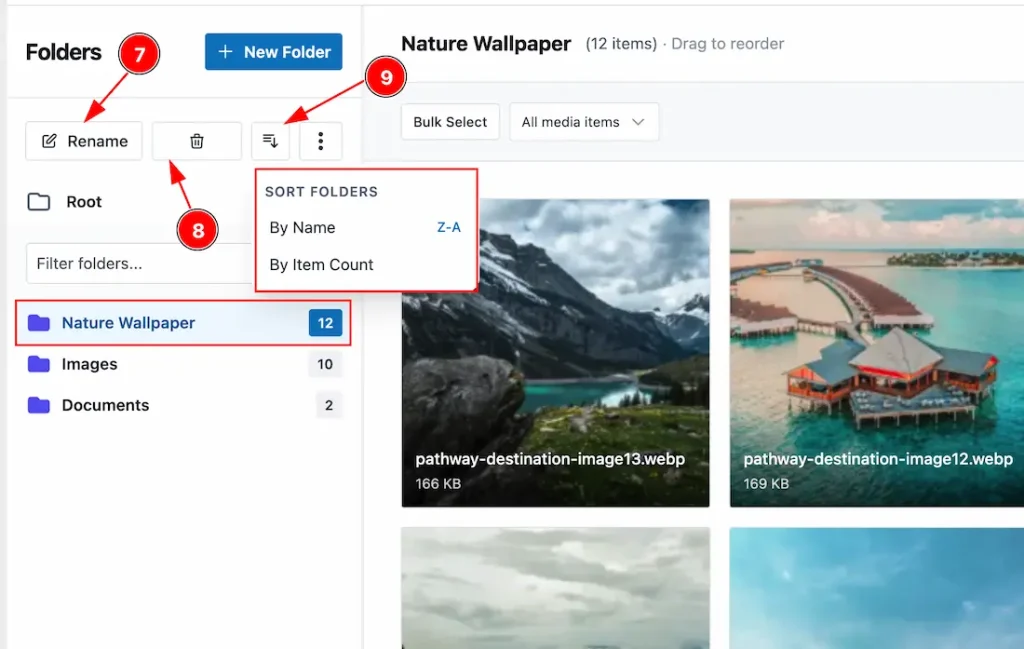
7. Select a folder and click this button to rename the folder.
8. Click this button to delete or remove the folder.
9. Use this option to sort folders by name or by item count.
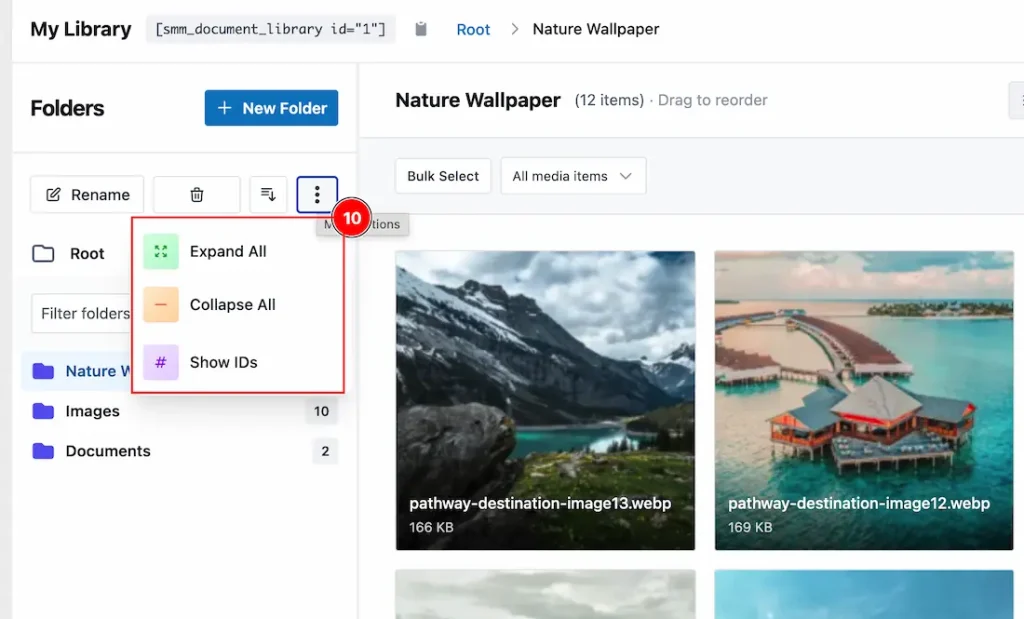
10. You can click on these three dots to get more options like expand all folders, collapse all folder & shows id of the folder.
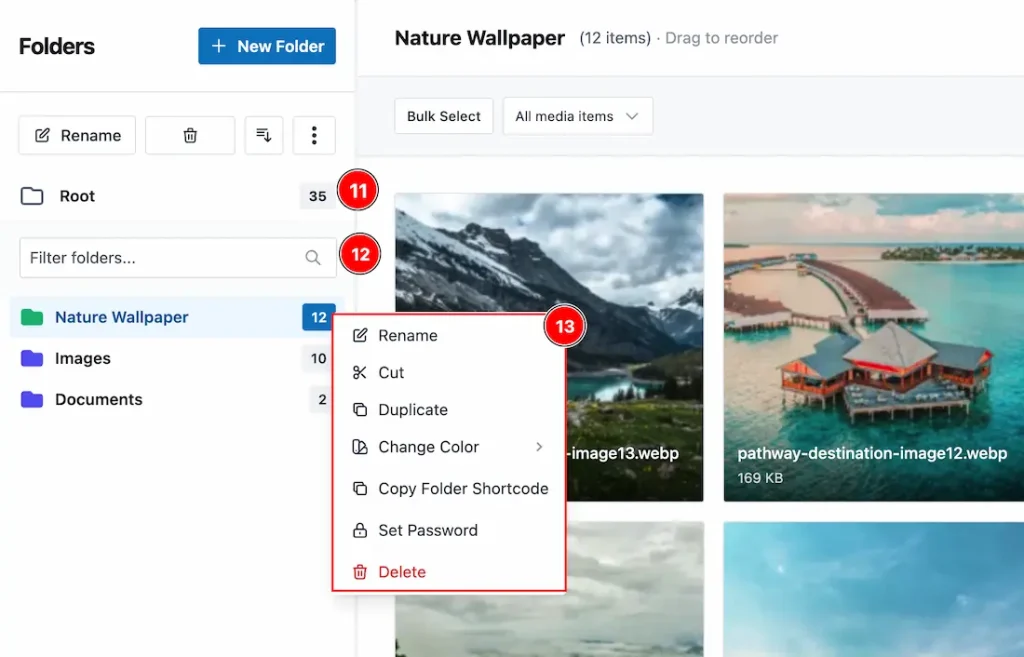
- You can see the root folder, where all media files are available.
- Use the search bar to quickly find folders.
- Select a folder and right-click to access more options, such as Rename, Cut, Duplicate, Change Color, Copy Folder Shortcode, Set Password, and Delete. You can choose any option to customize the folder as needed.
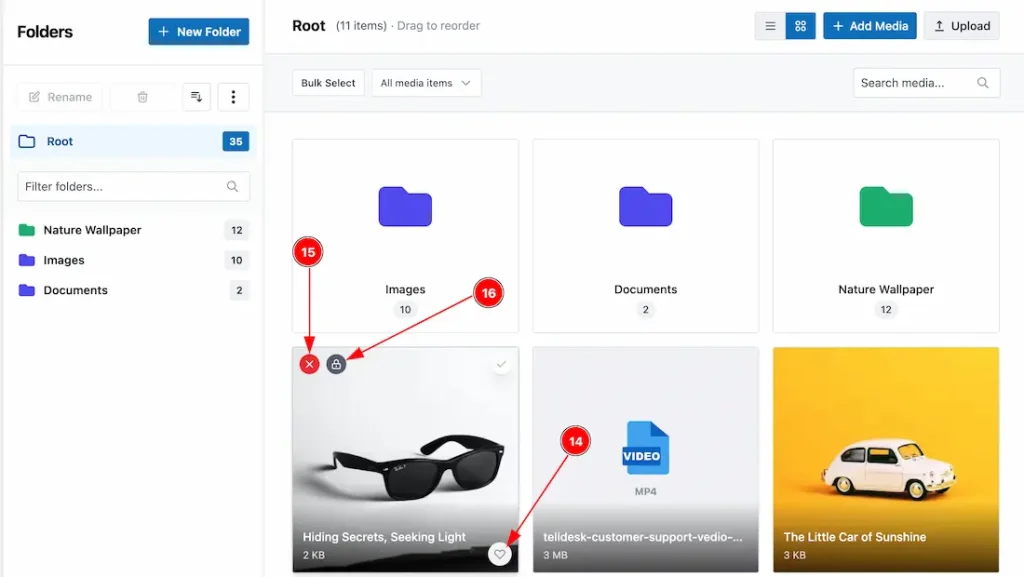
Now, let’s move to the right side of the Document Library dashboard and see what we have here:
- You can click on the favorite icon to add the item to your favorites list.
- Click on the close icon to remove the media file from the Document Library.
- Click on the lock icon to set a password for that specific file.
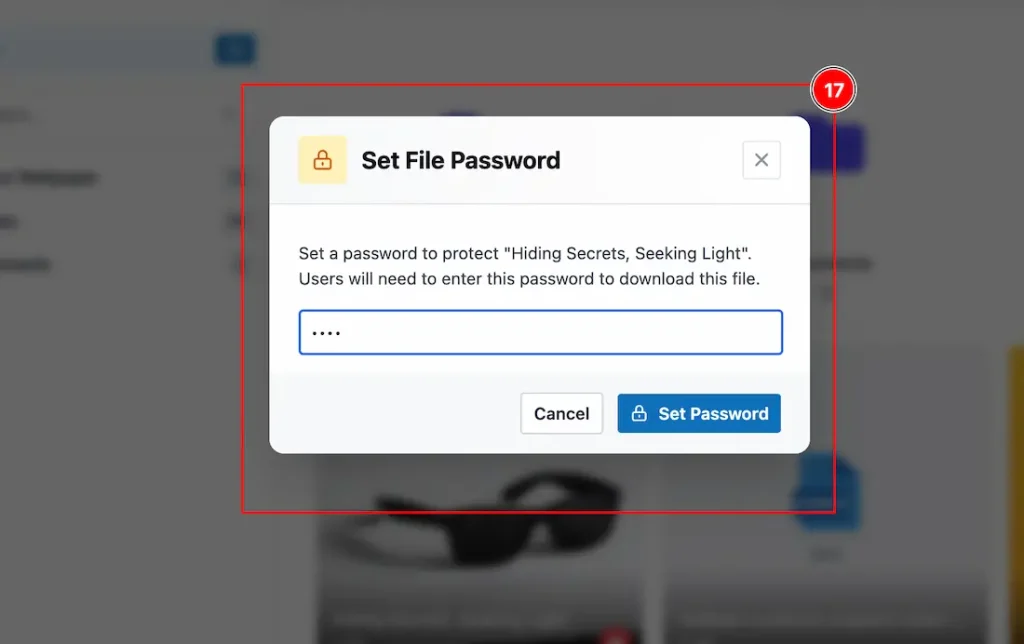
17. After clicking on the lock icon, a new pop-up will appear where you can set the password for that specific file.
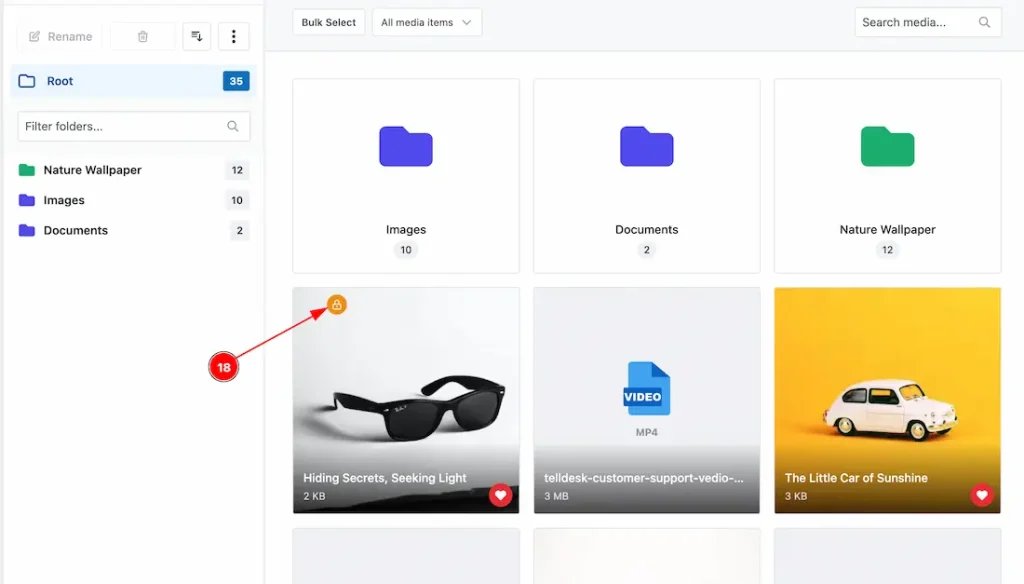
18. After that, you can see the icon is visible, and that means you have protected the item.
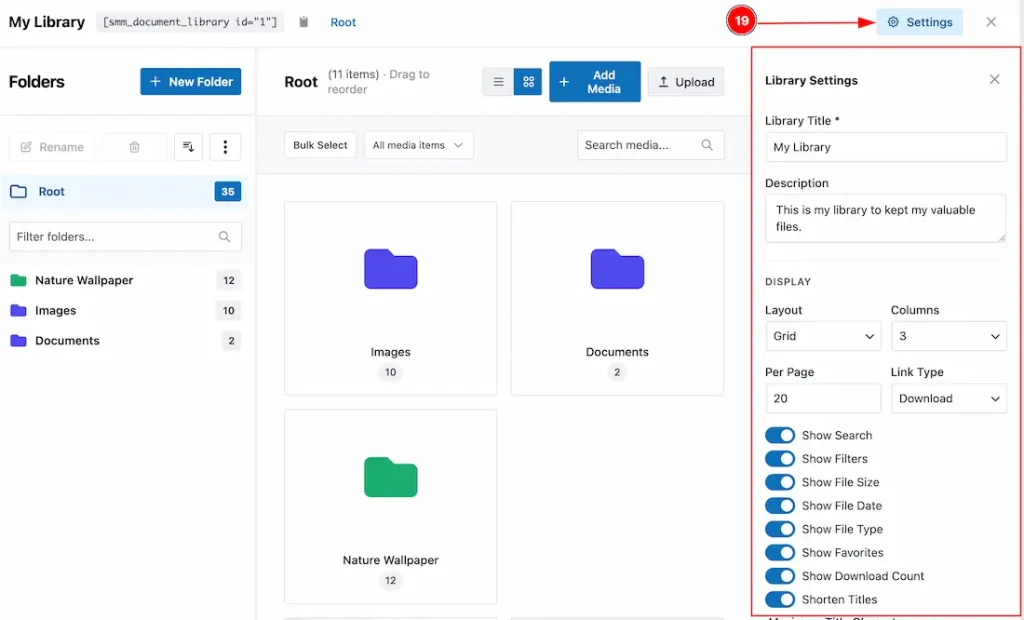
- You can click on the Settings button to open the settings panel, where you can make changes as needed. Since we have already configured these settings while creating the library, we will keep them unchanged for now.
The Document Library creation and customization process is now complete. Next, let’s see how to showcase the Document Library to your audience.
Showcasing the Document Library on the Frontend
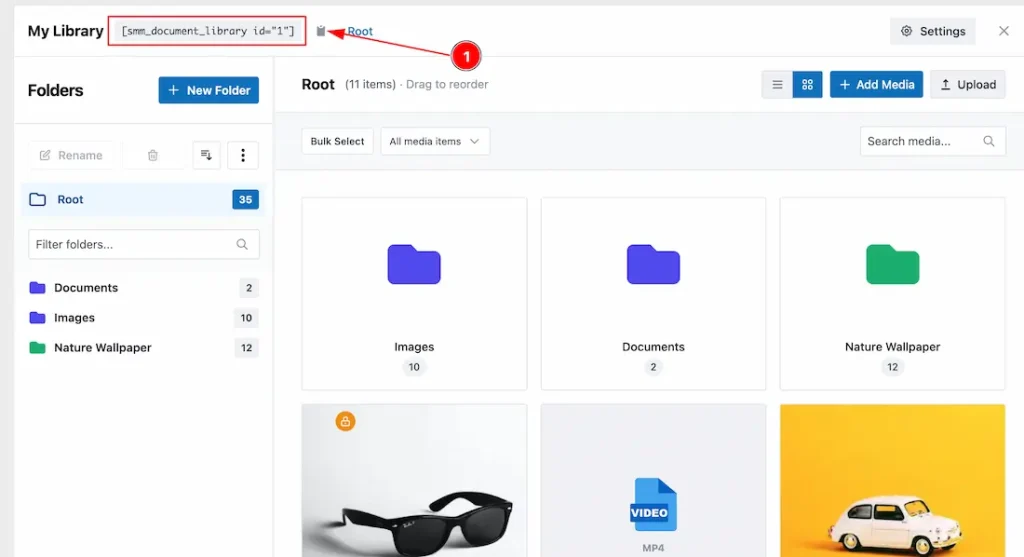
To showcase the document library, as we have mentioned earlier, you need to copy the shortcode first.
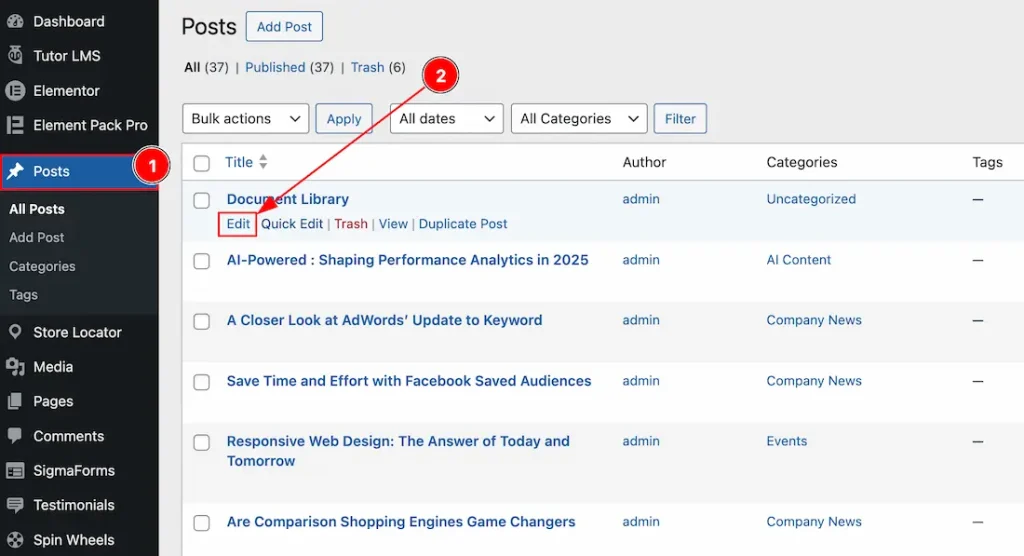
- Go to WP Dashboard > Posts.
- Select the post where you want to showcase the Document Library. I have chosen an existing post; if you want, you can start from scratch as well.
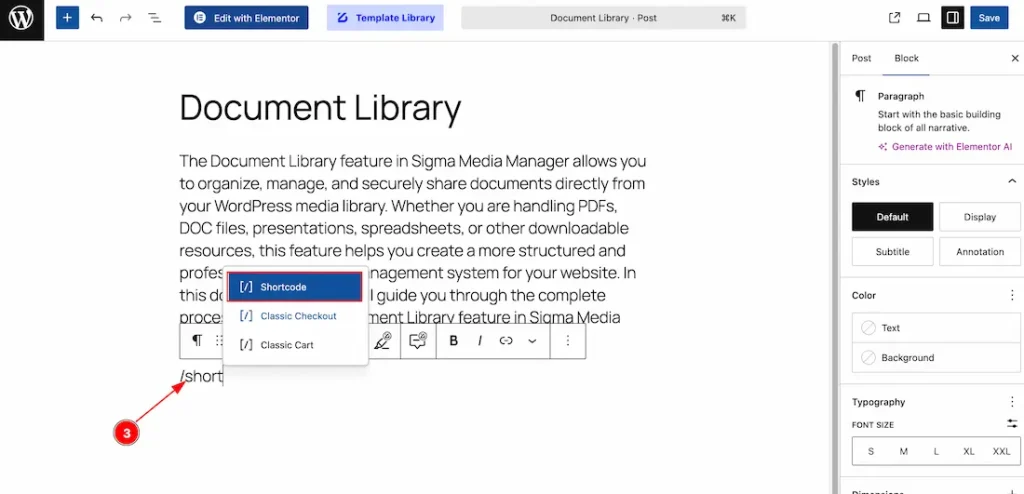
3. You have to insert the shortcode block here.
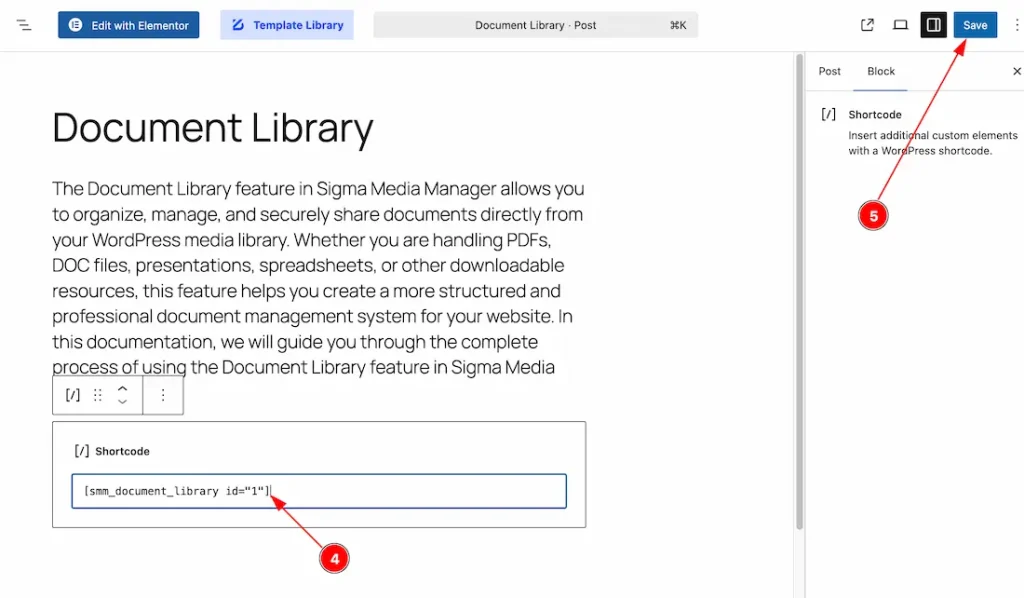
- Now paste the shortcode you copied from the Document Library.
- After that, publish and preview the page.
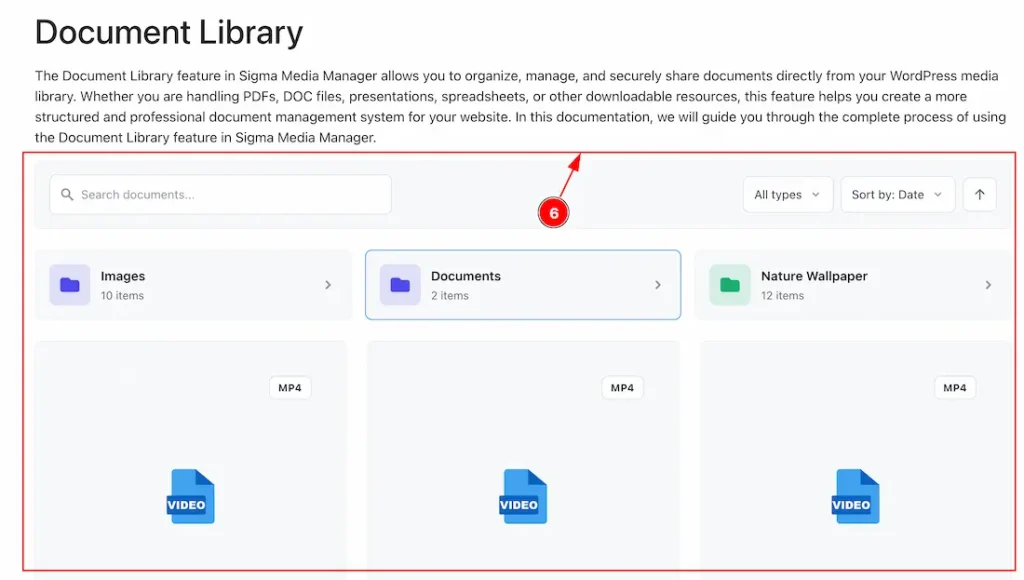
6. This is the visual of the document library on your frontend.
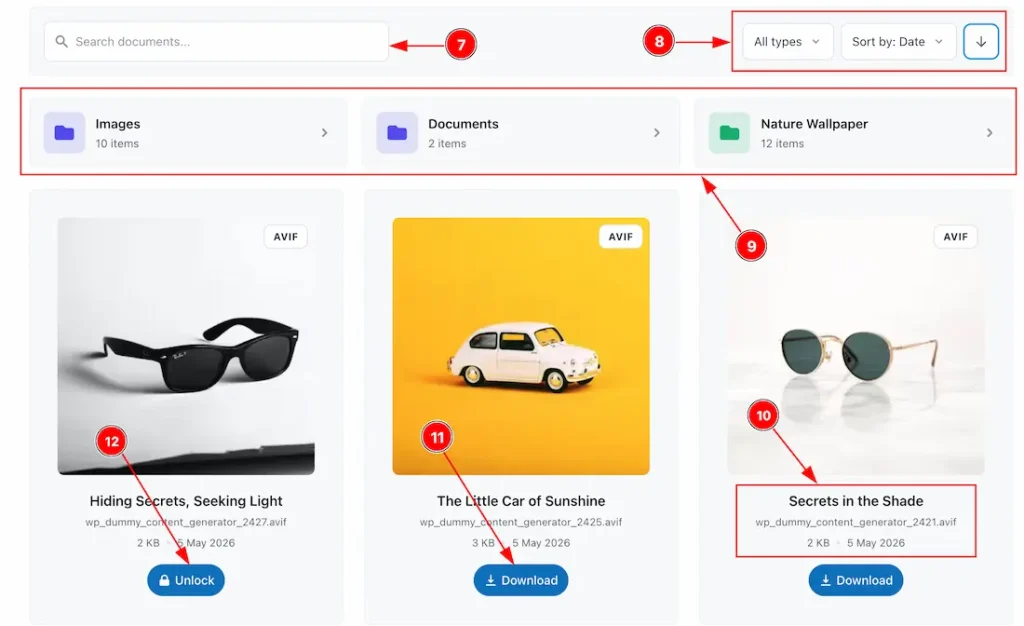
- You will see a search bar that allows users to quickly find specific media files within the document library.
- Sorting options are available, enabling users to organize files based on their preferred criteria.
- All the folders you created in the document library will be displayed here for easy navigation.
- File details such as name, type, size, and date will be shown in this section for better clarity.
- A download button will be available for each item, allowing users to download files directly from the library.
- Any password-protected items will appear with a lock indicator, ensuring restricted access where applicable.
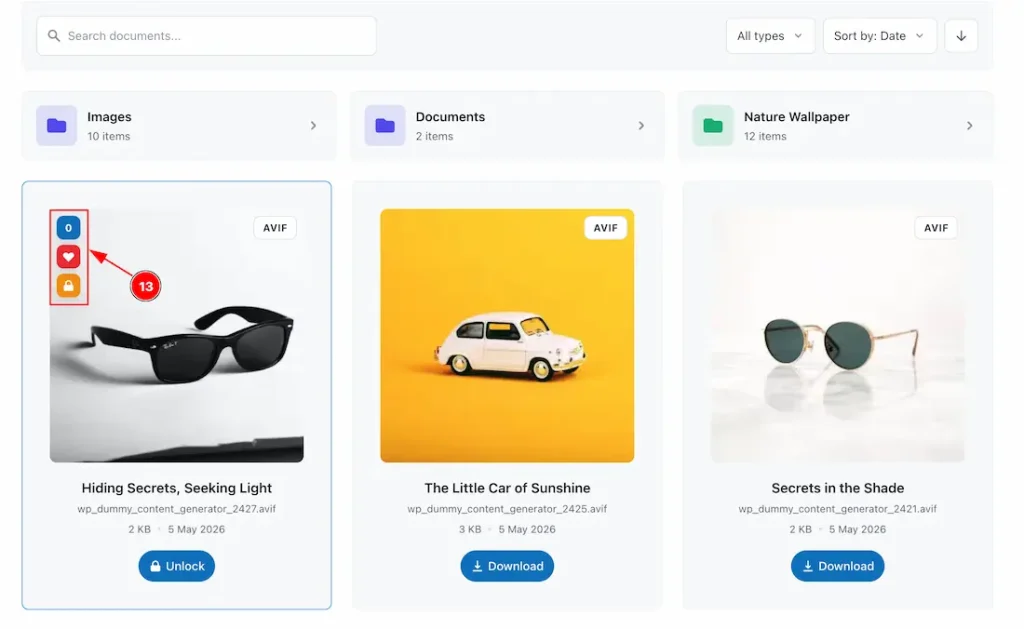
13. You will find the download count, favorites icon, and locked icon (if a password is set) on the media files.
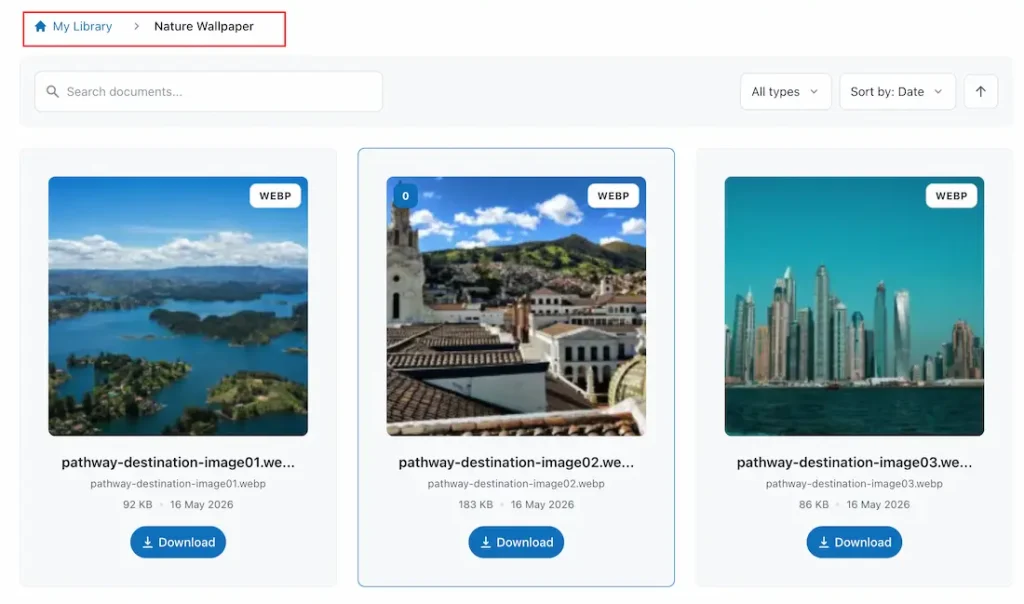
If you move to any folder, you can see the breadcrumb as well.
All done, you have successfully created and set up the Document Library on your site.
Video Assist
The video will come soon. If you want, you can try the Pro plugin features directly from here.
Thanks for staying with us.