

You have purchased a domain name and signed up for a hosting plan, but your website is still not live. Many beginners assume that buying a domain automatically includes hosting.
It does not. These are two completely separate services that must be manually linked before visitors can access your site.
The good news is that connecting a domain to hosting is straightforward.
It involves updating your nameservers or DNS records so your domain knows where to send visitors.
Once configured correctly, your domain will point to the server where your website files live, and you will be ready to build and launch.
In this guide, you will learn exactly how to connect a domain to hosting, step by step, from finding your nameservers to verifying the connection is live.
What Does It Mean to Connect a Domain to Hosting?
Before diving into the steps, it helps to understand what connecting a domain to hosting actually does at a technical level.
When someone types your domain name into a browser, a system called DNS (Domain Name System) runs a lookup in the background to find which server holds your website files. That lookup only works when you have told your domain where to point.
What Is a Domain Name?
A domain name is the human-readable address people type to reach your website, for example, yoursite.com.
You purchase it from a registrar like Namecheap, GoDaddy, or Google Domains. On its own, a domain is just a label with no destination.
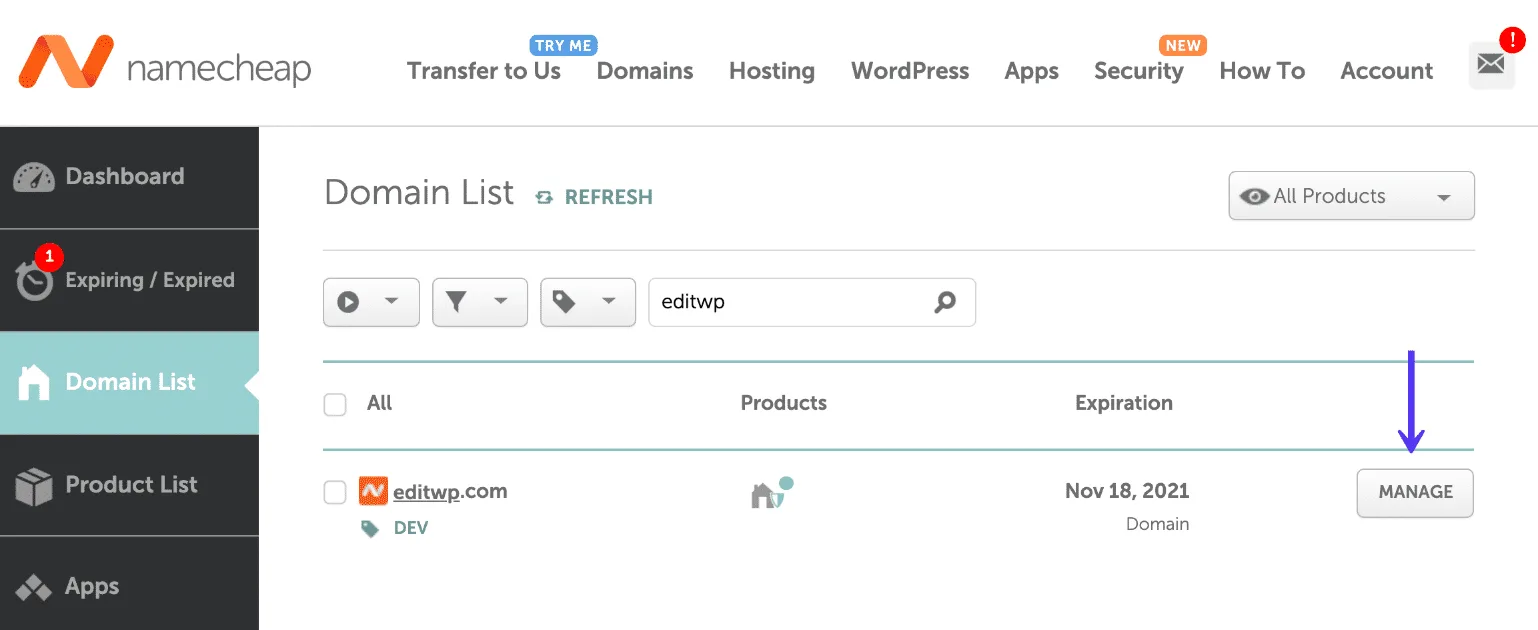
A registered domain shown inside a registrar account (Namecheap Domain List).
If you are still planning yours, the BdThemes guide on how to create a website for your business covers how to choose a domain name, which registrars to use, and the naming rules to follow before you register.
What Is Web Hosting?
Web hosting is the service that stores your website's files, database, images, and code on a physical server connected to the internet.
When someone visits your domain, their browser requests those files from the server, which then delivers your website content. Hosting comes in several types including shared, VPS, cloud, and managed WordPress hosting.
If you are unsure which type suits your needs, the BdThemes guide on best WordPress cloud hosting providers breaks down each option with performance comparisons, pricing, and recommendations for different use cases.
Why Must They Be Connected?
When you purchase a domain, the registrar has no idea which server your hosting account is on.
When you purchase hosting, the host has no idea what domain name you want to use. The connection is made by updating the nameservers on your domain to match the ones provided by your hosting provider.
Once that update propagates across the global DNS network, traffic for your domain is routed to your hosting server, where your website files live.
Domain vs Hosting: Understanding the Difference
A common source of confusion for new WordPress users is treating a domain and hosting as if they are the same thing.
They are not, and understanding the difference is important before you try to connect them. Many people who follow a guide on turning a WordPress blog into a full website run into problems at exactly this stage because their custom domain is not pointed at their new host.
| Domain Name | Web Hosting |
|---|---|
| Your website's address (e.g. yoursite.com) | The server that stores your website files |
| Purchased from a domain registrar | Purchased from a hosting provider |
| Points visitors to a server | Delivers your website content to visitors |
| Renewed annually, managed at registrar | Monthly or annual fee, managed at host |
Can You Buy Them From Different Companies?
Yes, and many people do.
Registering a domain at one company and hosting at another is completely normal. The connection is made entirely through nameserver settings, which are explained in detail below.
Which One Controls Your Website Address?
Your registrar controls where your domain points.
Your hosting provider controls what content is served when visitors arrive. If your domain is pointing to the wrong nameservers, your site will never load regardless of what you do on the hosting side.
What You Need Before Connecting a Domain to Hosting
Getting these four things in place before you start avoids delays and confusion.
- A registered domain name with login access to the registrar account where it lives
- An active hosting plan that has been set up and provisioned by your host
- Access to your domain registrar dashboard so you can edit nameserver settings
- Your hosting nameservers which look like ns1.yourhostingprovider.com and ns2.yourhostingprovider.com, found inside your hosting control panel or welcome email
If you want to build and test your site before going live with a real domain, you can also install WordPress locally on your computer first using MAMP or a similar local server. This lets you work in a localhost environment without any DNS configuration.
How to Connect a Domain to Hosting Using Nameservers (Recommended Method)
Updating nameservers is the recommended way to connect a domain to hosting for most beginners. It is the simplest method, requires the fewest steps, and hands your hosting provider full control over your DNS settings going forward. This is the method used in practically every beginner tutorial on how to build a WordPress website step by step.
Step 1: Find Your Hosting Nameservers
- Log in to your hosting account dashboard
- Look for a section labelled nameservers, DNS information, or account details
- Note all nameservers provided, they usually look like ns1.examplehost.com and ns2.examplehost.com
- If you cannot find them in the dashboard, check your hosting welcome email or contact your host's support
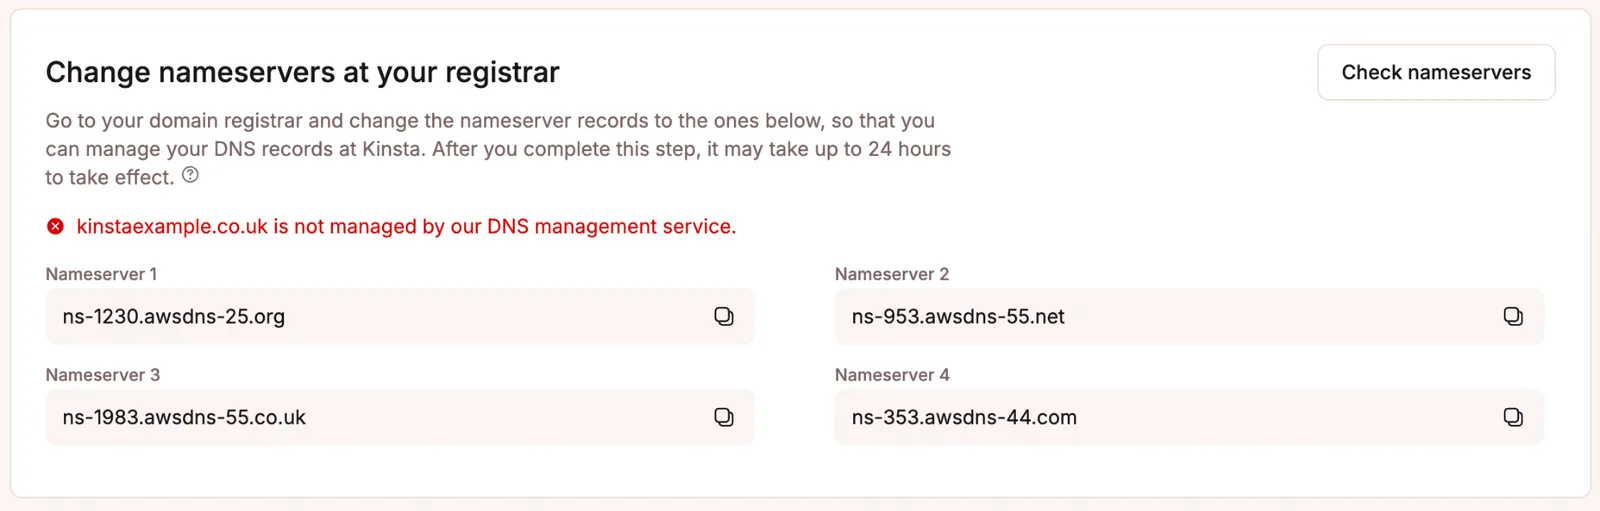
Your hosting panel lists the nameservers to copy (example: MyKinsta).
Step 2: Log In to Your Domain Registrar
- Open a new browser tab and log in to the account at the registrar where you purchased your domain
- Common registrars include Namecheap, GoDaddy, Google Domains, BigRock, and Crazy Domains
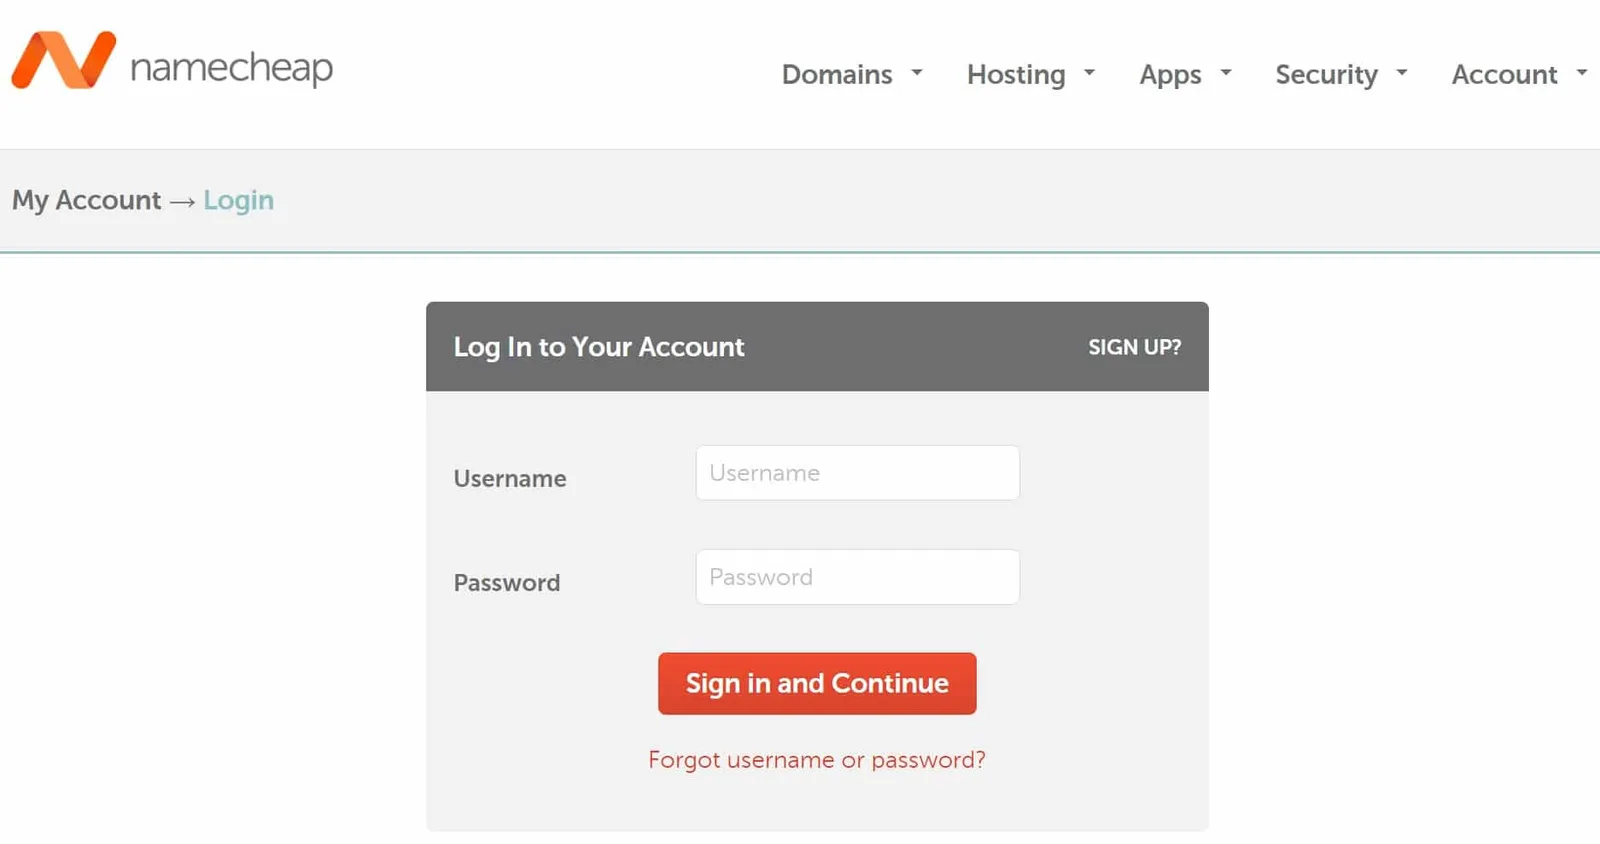
Log in to the registrar where your domain is registered (example: Namecheap).
Step 3: Navigate to Domain Management
- Go to the section labelled My Domains, Domain Management, or Domain Portfolio
- Click on the specific domain you want to connect to your hosting
- Inside the domain panel, look for an option labelled Nameservers, DNS Settings, or Custom Nameservers
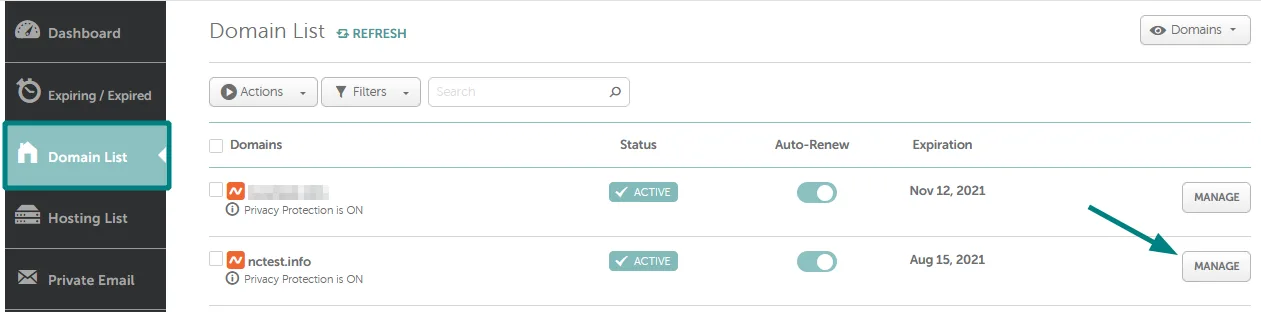
Open the domain's management panel from your Domain List.
Step 4: Replace the Existing Nameservers
- Select the option for custom nameservers or edit nameservers
- Delete the existing registrar default nameserver entries
- Type in each nameserver your hosting provider gave you, entering them exactly as shown
- Copy and paste rather than typing manually to avoid typos, which are the most common cause of connection failures
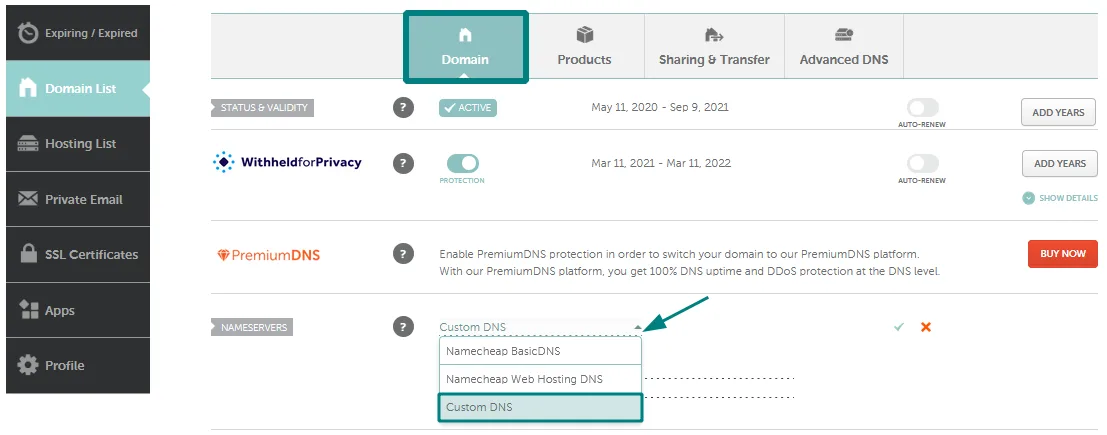
Set the NAMESERVERS option to Custom DNS, then enter your host's nameservers.
Step 5: Save Your Changes
- Click Save, Confirm, or Update Nameservers
- Accept any confirmation prompts or verification emails your registrar sends

Save the custom nameserver entries (look for the green confirmation check).
Step 6: Wait for DNS Propagation
After saving, the change does not take effect instantly. DNS propagation is the process of your updated nameserver information spreading across internet servers worldwide.
This typically takes between a few hours and 48 hours. During propagation, some visitors may still see your registrar's parking page while others already reach your hosting server. This is normal and temporary.
A practical way to manage this window is to set up a coming soon page while DNS propagates. This gives visitors a professional holding page instead of an error or empty screen. BdThemes Launch Guard is purpose-built for this.
Step 7: Verify the Connection
- Type your domain into a browser and see if your hosting server responds
- Use a free tool like whatsmydns.net or dnschecker.org to check propagation from multiple global locations
- Run a WHOIS lookup at your registrar to confirm the nameservers on record match your host's nameservers
How to Connect a Domain to Hosting Using DNS Records
Sometimes you need more granular control over which traffic goes where. For example, if your email runs through a separate provider, you do not want to move all DNS management to your host. In this case, connecting via individual DNS records gives you that control.
This method is also useful when managing multiple domains and subdomains in WordPress, where different parts of a site point to different servers.
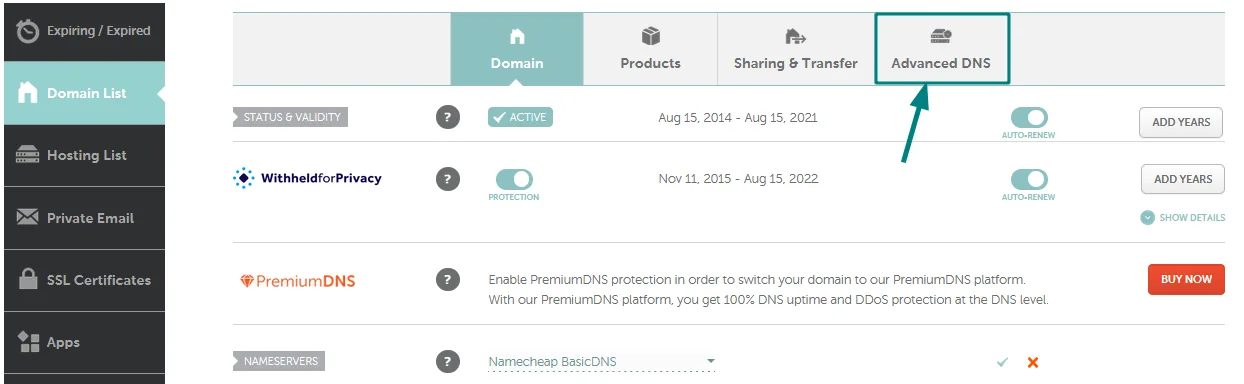
Use the Advanced DNS tab to add A and CNAME records instead of changing nameservers.
What Are DNS Records?
DNS records are individual entries inside your domain's DNS settings that control how different types of traffic are handled.
- A Record: Maps your domain directly to an IP address. Your hosting provider gives you a server IP, and you create an A record pointing your root domain (@ symbol) to that IP
- CNAME Record: Maps one domain name to another domain name. Commonly used for subdomains like www. Cannot be used on root domains in most configurations but is useful for using separate domains and subdomains in WordPress staging environments and microsites
When Should You Use DNS Records Instead of Nameservers?
Use DNS records when you need to keep email MX records and other services managed by your registrar while only pointing web traffic to your hosting server.
Use nameservers when you want your hosting provider to manage everything, which is simpler and recommended for most beginners.
Nameservers vs DNS Records: Which Should You Choose?
| Feature | Nameservers | DNS Records (A/CNAME) |
|---|---|---|
| Ease of setup | Very easy | Moderate |
| Control over individual records | Host controls all | Full control retained |
| Best for beginners | Yes | No |
| Best for advanced setups | No | Yes |
| Email compatibility | Host manages all DNS | Can keep email at registrar |
| Propagation speed | Up to 48 hours | Often faster, 1 to 4 hours |
For most people starting their first WordPress website, the nameserver method is the right choice. It is simpler and your hosting provider's support team can help troubleshoot if anything goes wrong.
How Long Does It Take for a Domain to Connect to Hosting?
After updating nameservers, you will commonly ask: why is my site not loading yet? In most cases, DNS propagation is still in progress.
What Is DNS Propagation?
DNS propagation is the time it takes for nameserver changes to spread across the global network of DNS servers. Each server has a TTL (Time to Live) value that controls how long it caches your previous DNS information before checking for updates.
Typical Propagation Timeframes
- Best case: A few minutes to a couple of hours
- Average case: 4 to 12 hours
- Worst case: Up to 48 hours, usually due to a long TTL on your previous DNS records or aggressive ISP caching
If you are working toward a specific launch date, whether for a personal blog, business site, or a complete WordPress eCommerce store, schedule your nameserver update at least 48 hours beforehand to account for the maximum propagation window.
Factors That Affect Propagation Speed
- The TTL value set on your previous DNS records
- Your internet service provider's DNS caching behaviour
- How quickly your domain registrar processes the nameserver update
- Global DNS server refresh cycles
How to Check If Your Domain Is Connected Successfully
After waiting for propagation, use these four methods to confirm everything is working.
- Visit your domain in a browser: If your hosting server responds with a WordPress page, default hosting page, or any content you have uploaded, the connection is working
- Use a DNS lookup tool: Go to whatsmydns.net or dnschecker.org, enter your domain, and check the NS or A records to see which nameserver or IP address it resolves to from different parts of the world
- Run a WHOIS lookup: Check your registrar's WHOIS tool or whois.domaintools.com to confirm the listed nameservers match your host
- Check your hosting dashboard: Log in and look for a section showing active or connected domains
Once your domain is confirmed live, the most important immediate next step is to fix any "Not Secure" warning on your WordPress site by enabling SSL. Every website needs HTTPS enabled before publishing real content.
Common Problems When Connecting a Domain to Hosting
Even when you follow every step carefully, problems can occur. Here are the issues that trip people up most often.
Website Not Loading After 48 Hours
- Log in to your registrar and double-check that the nameserver entries are correct and were saved successfully
- Confirm that WordPress or another application is actually installed on your hosting server
- Try checking your domain from a different device or network to rule out local DNS caching on your side
Incorrect Nameserver Entries
- Typos are the most common cause of connection failures
- A single wrong character will silently fail because the nameserver simply does not exist
- Always copy and paste nameserver values rather than typing them manually
DNS Changes Not Propagating
- Clear your browser cache and try again from a different device
- Change your local DNS resolver temporarily to 8.8.8.8 (Google) or 1.1.1.1 (Cloudflare) in your network settings and test again
- If propagation appears stuck after 48 hours, re-enter and re-save your nameservers at the registrar
SSL Certificate Errors After Connection
After your domain connects successfully, your browser may show a "Not Secure" warning. This means SSL has not yet been enabled. Your hosting provider usually offers a free Let's Encrypt SSL certificate that you activate from your hosting dashboard.
For a complete walkthrough, see the BdThemes guide on how to fix a Not Secure WordPress website.
Domain Still Showing a Parking Page
- Propagation may still be in progress
- If the parking page persists after 48 hours, log back in to your registrar and confirm the nameserver changes were actually saved, some registrars require an extra confirmation step
Site Redirecting to the Wrong URL or Server
- Check your hosting dashboard to confirm that WordPress is installed under the correct domain directory
- If you have multiple addon domains on one hosting account, verify the installation path matches the domain you connected
Once these issues are resolved, the next priority is performance. The BdThemes guide on how to speed up an Elementor website covers caching, image optimisation, and lightweight theme selection, all of which matter from day one.
Frequently Asked Questions
How do I connect my domain to hosting?
Log in to your domain registrar, navigate to nameserver settings, and replace the default nameservers with those provided by your hosting provider. Save the changes and wait up to 48 hours for DNS propagation. Once complete, your domain will point to your hosting server.
Do I need to change nameservers to connect a domain?
In most cases, yes. Changing nameservers is the recommended method for beginners because it is the simplest approach. An alternative is to create an A record pointing your domain to your server's IP address, which is better suited to advanced setups where you need to keep some DNS settings at the registrar level.
Can I connect a domain and hosting from different companies?
Yes. This is a common setup. Register your domain at a registrar like Namecheap or GoDaddy, host your site at a provider like SiteGround or Hostinger, and connect them by updating nameservers. They work together seamlessly regardless of which companies you use.
What happens if I enter the wrong nameservers?
Your domain will either show an error page or continue showing the registrar's default parking page after propagation. Incorrect nameservers do not damage your domain or hosting account. Simply log back in to your registrar, correct the nameserver entries, and wait for propagation again.
How long does DNS propagation take?
Propagation typically takes between a few hours and 48 hours. Most updates complete within a few hours. If your site is not loading after 48 hours, double-check your nameserver entries at the registrar rather than continuing to wait.
Can I connect multiple domains to one hosting account?
Yes. Most hosting plans support addon domains, which let you host multiple websites under a single account. You add each domain through cPanel under Addon Domains and then update nameservers for each domain separately at their respective registrars.
What is the difference between nameservers and DNS records?
Nameservers tell the internet which DNS server is authoritative for your domain. DNS records are the individual entries stored on that DNS server, such as A records (domain to IP), MX records (email), and CNAME records (domain to domain). Changing nameservers moves all DNS management to your hosting provider. Changing individual DNS records at your registrar lets you point specific traffic to your host while keeping everything else managed locally.
Why is my domain still not working after updating nameservers?
First check that your nameserver entries are correct and were saved at the registrar. Then confirm that propagation has had at least 24 to 48 hours. Finally, verify that WordPress or another application is actually installed on your hosting server at the directory associated with your domain. A domain can point correctly to a server that has nothing installed on it.
Do I need hosting before buying a domain?
No. You can purchase a domain name independently and it will park at your registrar's default page until you connect it to a server. Many people register domains well in advance of building their site. Having both ready at the same time simply makes the setup process smoother.
Is connecting a domain to hosting free?
The connection itself costs nothing. It is a configuration step you perform within your existing accounts. The domain registration and hosting plan each carry their own fees, but the act of pointing one to the other involves no additional charge.
Final Thoughts
Connecting a domain to hosting is one of the most fundamental steps in launching a WordPress website.
Once you understand that a domain and a hosting plan are separate services that communicate through nameservers, the process becomes straightforward. Update your nameservers at your domain registrar to match the ones your host provides, wait for DNS propagation, and your site will be live.
After your domain is confirmed live and WordPress is installed, the real work of building your site begins. If you are setting up a store, we recommend you read the complete guide on how to build a WordPress eCommerce site as it walks you through WooCommerce installation, product setup, and launching with Elementor.
If you are building a service site or portfolio, start with how to use WordPress as a beginner for a full orientation of the dashboard before you start designing pages.
The domain connection is the foundation. Once it is in place, everything you build on top of it will stand.
Supreakshya Shrestha
The BdThemes team builds WordPress plugins trusted by 3M+ users worldwide. We write about web accessibility, WCAG compliance, and inclusive design.