

The Next Order Coupon feature of the Ultimate Store Kit Pro allows you to automatically generate and offer a discount coupon to customers after they complete a purchase. By encouraging customers to return with an exclusive discount for their next order, you can increase repeat purchases and improve customer retention. This helps build long-term customer loyalty while creating an additional incentive for shoppers to come back and make future purchases from your store.
Configuring Settings for Next Order Coupon
The Next Order Coupon feature is a Pro feature of the Ultimate Store Kit plugin, which means you need to install and activate the Pro version on your WordPress website to access and use it. Once the plugin is enabled and the feature is set up, it will allow you to display targeted product offers directly on the WooCommerce thank you page, encouraging customers to add complementary items to their order before completing their purchase. Simply follow the documentation to know how to install and activate the Pro plugin to start using this feature.
Where to Find The Next Order Coupon Feature

After properly installing and activating the Ultimate Store Kit Pro plugin, follow the steps below to find the Next Order Coupon feature:
- Go to WP Dashboard > Ultimate Store Kit and click on it to open the Ultimate Store Kit Dashboard.
- In the Ultimate Store Kit Dashboard, you will see the Upsell & Cross-Sell tab. Click on this tab.
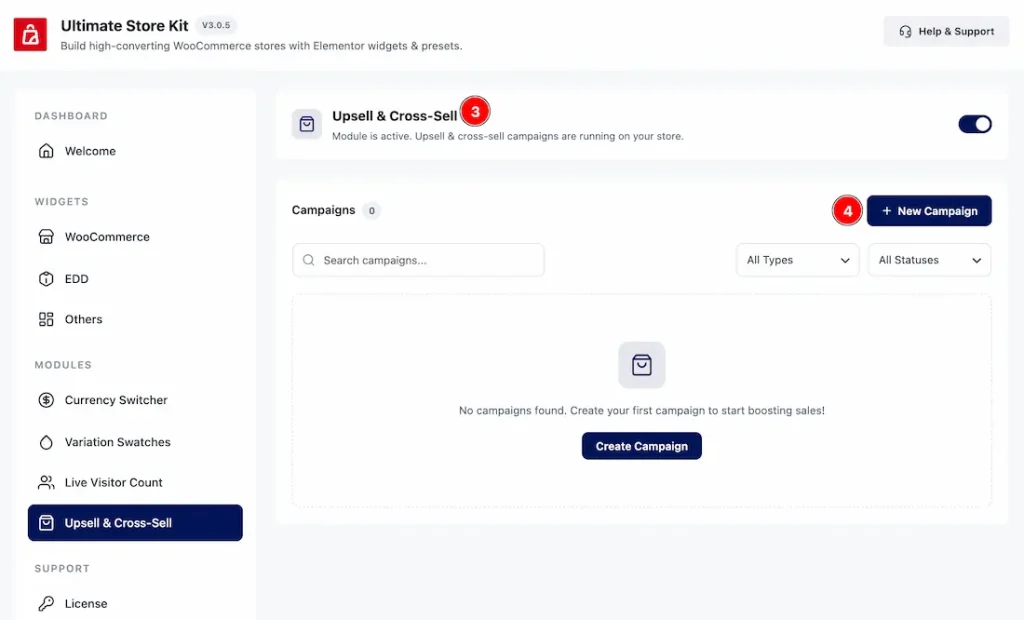
3. After the tab is opened, you have to enable the switcher to run the upsell & cross-sell campaigns on your store.
4. Click on the New Campaign button to add a new upsell & cross-sell campaign with this option.
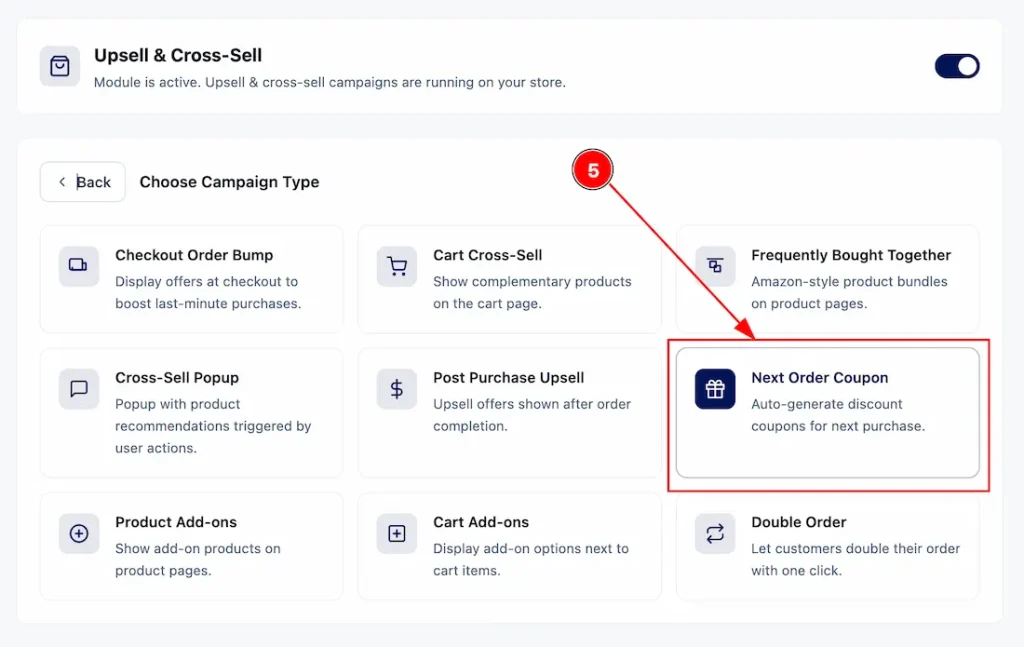
5. After clicking on the New Campaign button, you will see the campaigns that are under the upsell & cross-sell. Here you will see the Next Order Coupon feature. Click on it to open the settings interface for the Next Order Coupon feature.
Setting Up the Next Order Coupon Feature
After selecting the campaign type as Next Order Coupon, you will see a new dashboard will appear where you can customize the Next Order Coupon campaign. Let’s see what options we have here to customize the feature –
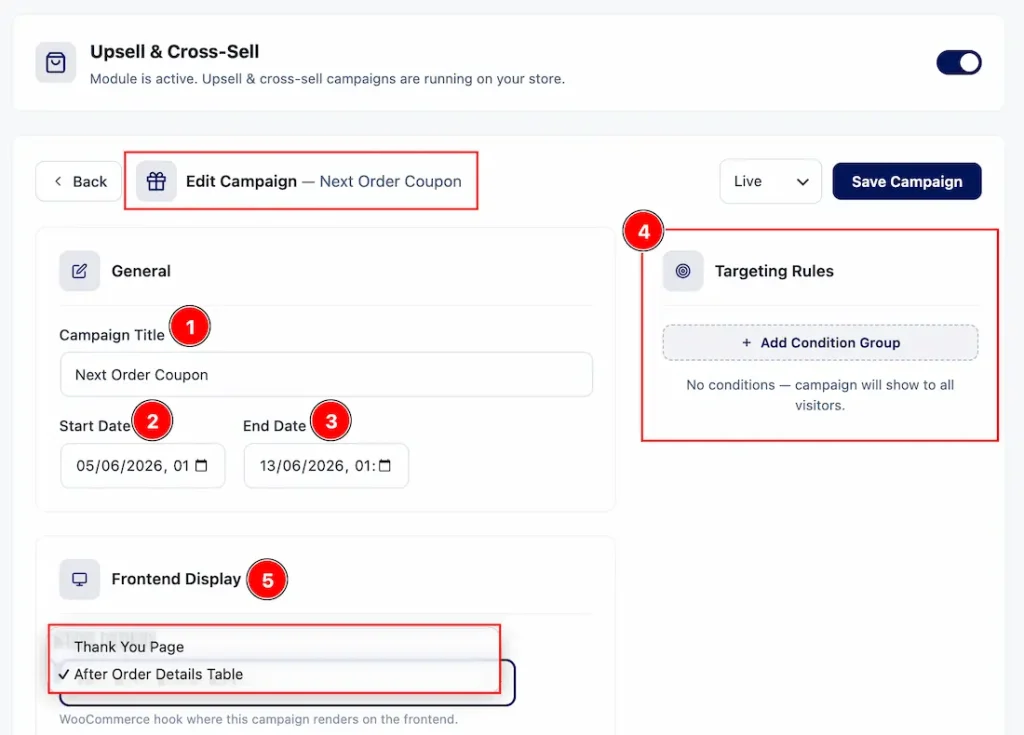
1. Campaign Title: You can add a name to the campaign as you want in this field.
2. Start Date: You can set a date to start running the campaign for your audience with this option.
3. End Date: You can set a date when you want to stop the campaign for your audience with this option.
4. Targeting Rules: You can use the Targeting rules option to control when your campaign appears by checking selected conditions (like cart subtotal, products, user role, etc.) and displaying the offer only if they match based on “Match ALL” (all conditions true) or “Match ANY” (at least one true).
5. Frontend Display: Here, with this option, you can control where the next order coupon offer will be inserted on the thank you page. Let’s see what positions we have here –
- Thank You Page — By selecting this position, you can display the campaign directly to the thank you page for maximum visibility.
- After Order Details Table — By selecting this position, you can display the campaign’s offer card below the order details table on the thank you page.
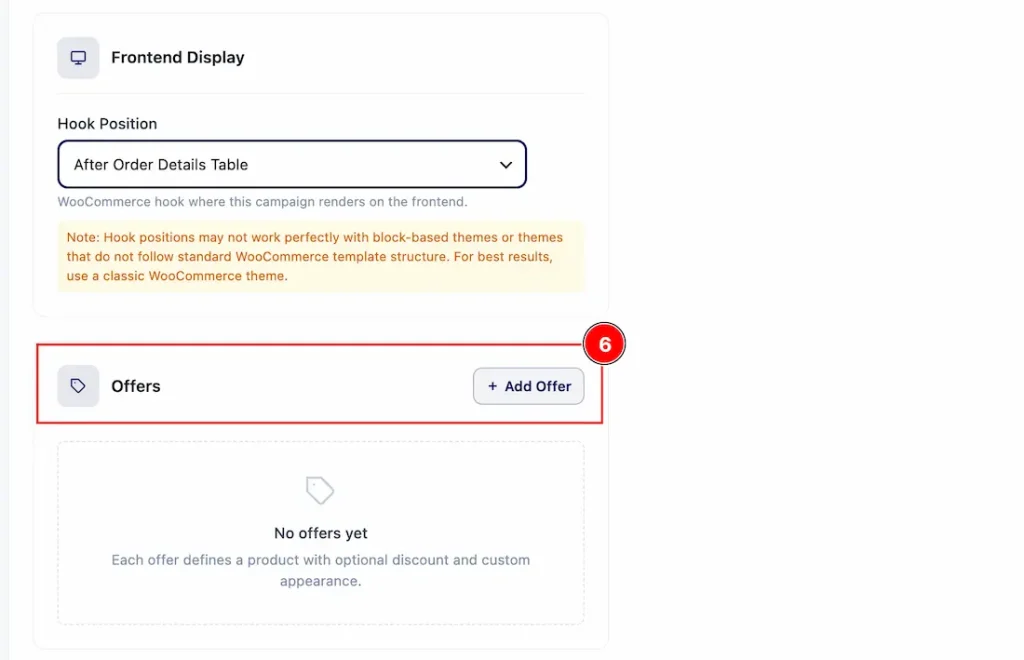
6. Offers: Now, navigate to the Offers tab in the dashboard. This is a very crucial part. Here you can add and customize the offers for your campaign. Now, let’s see how to set an offer for the next order coupon feature with this option.

After clicking Add offer, a new right sidebar will open where you can set the offer for your campaign. Here you will see two parts.
1. This part is on the left, which allows you to add the product and make changes to the offer.
2. Here, you can see the preview that will be visible for your audience in the frontend.
Now, let’s see what to do to set the offer –

1. Coupon Settings: Click on this tab to get options to set up a coupon and make changes to coupon settings for your campaign.
2. Discount Type: You can select the discount type to be a percentage or a fixed card discount with this option.
3. Discount Amount: As we have selected the discount type as a percentage, here you have to add the percentage amount.
4. Expiry (days): You can set the day limit of the coupon expiry with this option.
5. Minimum Spend: You can adjust the minimum limit of the price that the user needs to purchase to get the coupon code with this option.
6. Usage Limit: You can set the coupon usage limit with this option.
7. Coupon Prefix: You can set a prefix word to the coupon and make changes to it with this option.
8. Preview: On the right side, you can see the preview how it will show to your audience.
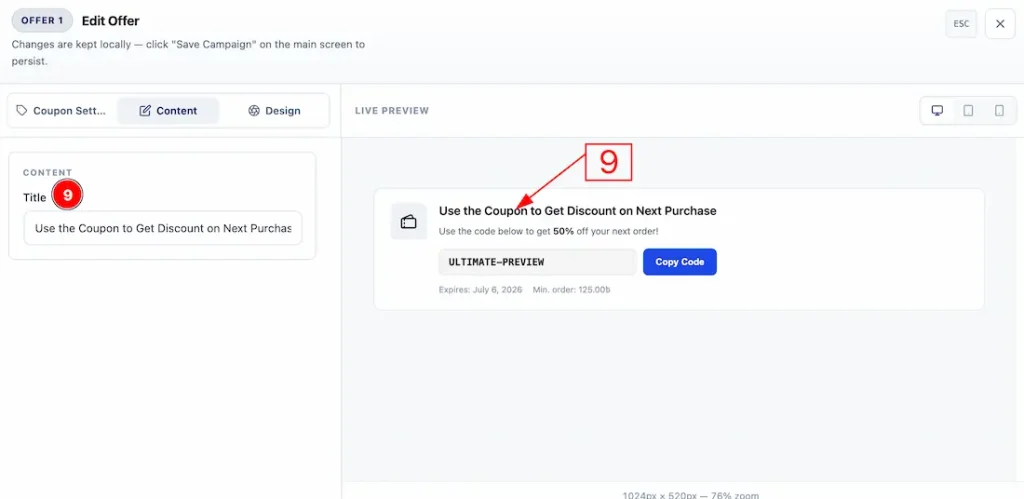
Now, let’s move to the Content Tab and let’s see what we have here –
9. Title: You can add and make changes to the title text with this option.

Now, let’s move to the Design Tab and see what options we have here to customize –
10. Template: You can click on the change template options to get more options to select a template and choose one that you feel is suitable for your campaign.
11. Heading Color: You can make changes to the heading text color with this option.
12. Card Background: You can make changes to the campaign offer card background color with this option.
13. Card Border Color: You can make changes to the card border color with this option.
14. Border Radius: You can adjust the roundness of the offer card border with this option.
15. Meta Color: You can make changes to the meta color with this option.
16. Button Background: You can make changes to the button background color with this option.
17. Button Text Color: You can make changes to the button text color with this option.
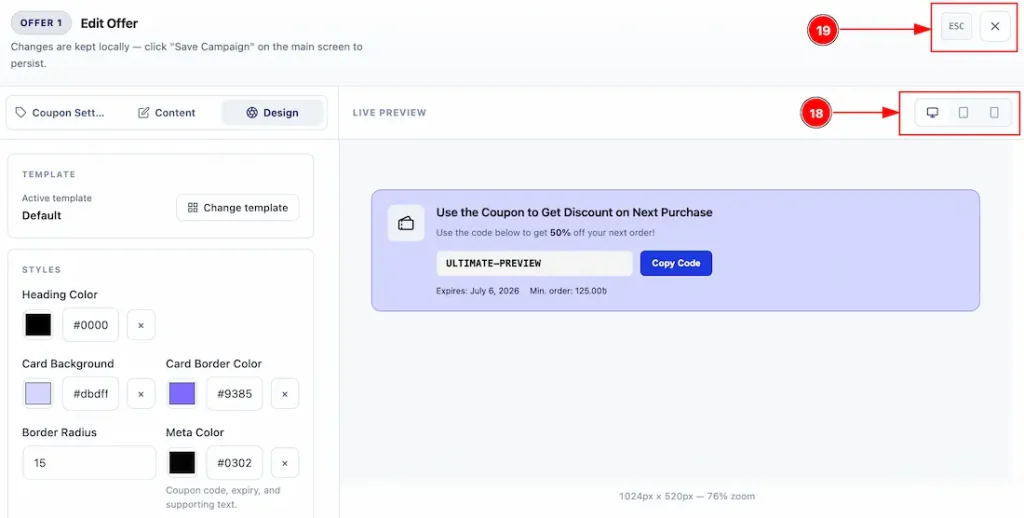
18. In this field, you can check how the card will appear on desktop, tablet, and mobile device.
19. You can click on the close button or press the ESC key on the keyboard to close the offer dashboard.
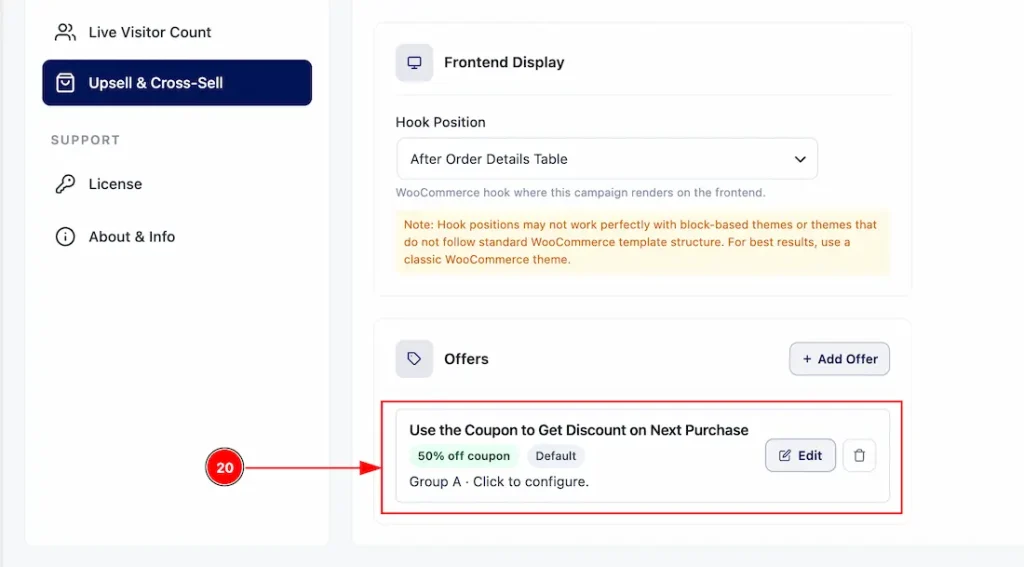
20. Now, as the offer is created, you can close the sidebar and get a visual of your created offer here. If you want, then you can re-edit it and delete the offer as well.
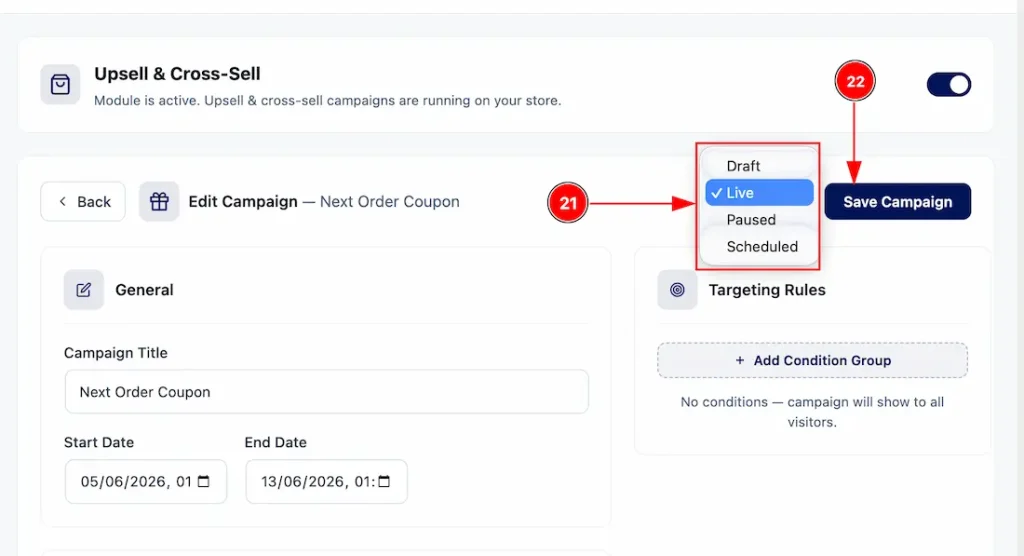
21. Once you have finished configuring the campaign, scroll to the top of the page and publish it. To do this, change the campaign status from Draft to Live. You can choose any status based on your requirements, but selecting Live will publish the campaign and make it visible to your audience.
22. You can click on this button to apply the changes that you have made.
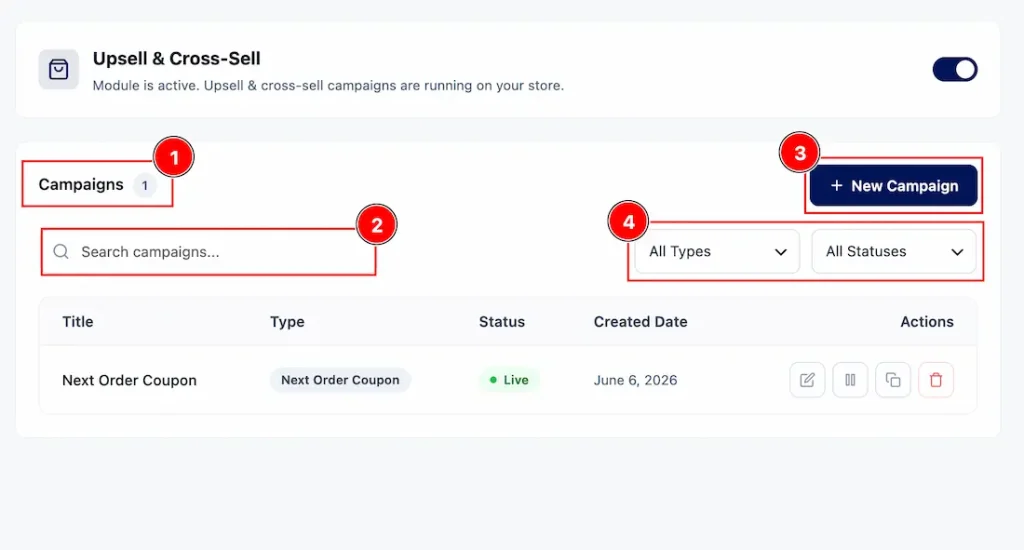
Now, get back to the main Upsell & Cross-Sell dashboard page and here you can see the campaign that you have just created. Let’s see what options we have here –
1. You can see the number of campaigns that you have created in this field.
2. You can search by the name of the campaign that you have created in this field.
3. You can click on this button to add more campaigns to boost your sales.
4. Here, you can filter your campaign as per those types and status in this field.
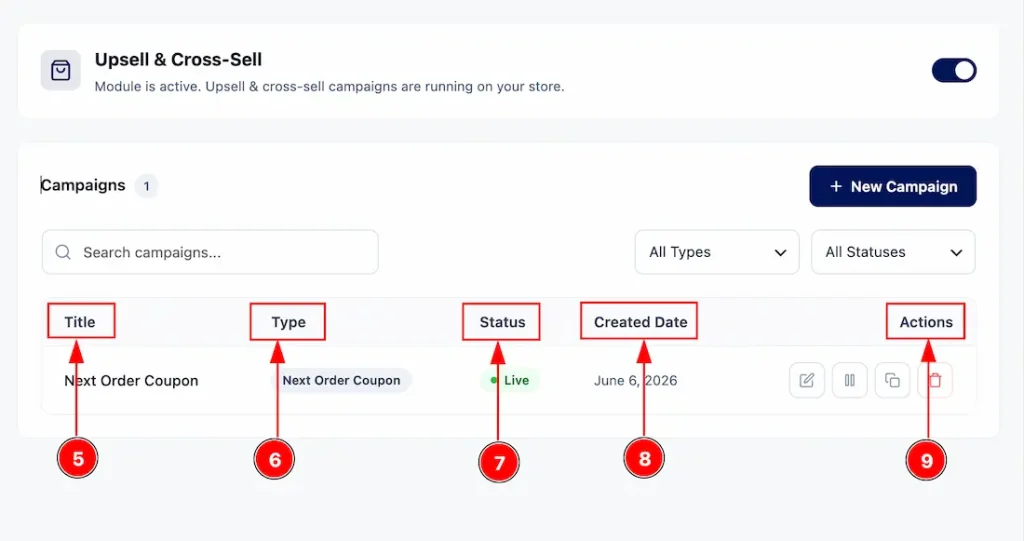
5. You can see the title of the created campaign in this field.
6. You can see the type of campaigns here.
7. You can see the status of the campaign that you have created in this field.
8. You can see the creation date of the campaign in this field.
9. Here, you will get some useful action icons by which you can edit the campaign, pause the campaign, duplicate the campaign, and delete the campaign.
Final Preview of the Next Order Coupon Feature
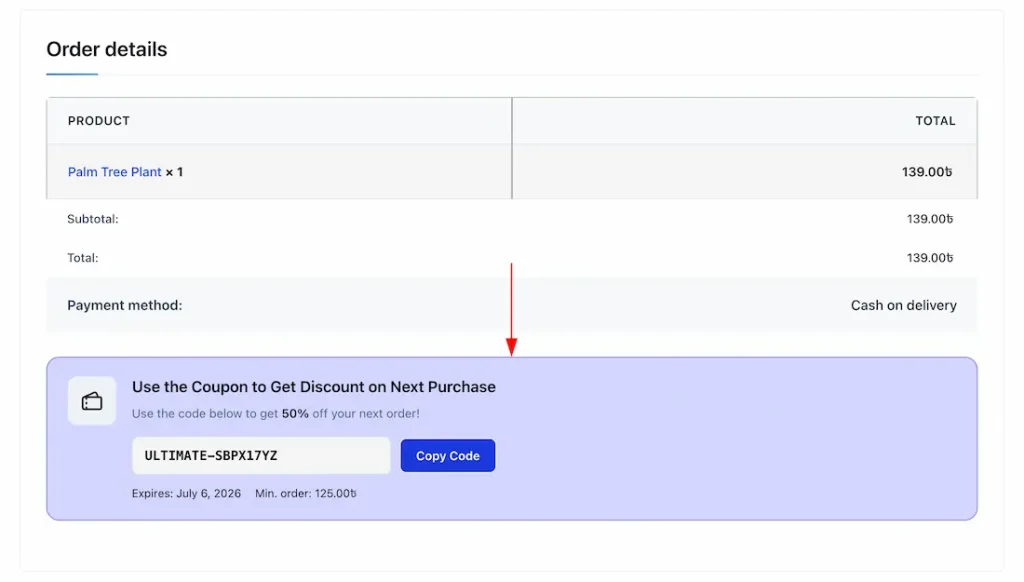
After a customer successfully completes an order, the Next Order Coupon offer will be displayed on the Thank you page. This section highlights the discount coupon code along with important details such as the discount amount, expiration date, and minimum order requirements. Customers can easily copy the coupon code and use it on their next purchase to receive the offered discount. This preview allows you to see exactly how the coupon offer will appear after order details table for your customers.
All done, you have successfully set up the campaign of the Next Order Coupon feature on your website
Video Assist
The video will come soon. Thanks for staying with us.