Do you know that WordPress is developed using an open-source programming language called PHP? And that the latest stable version available for PHP is 8.0.8? If you’re running an older version of PHP, you’re putting your website at risk.
Updating your PHP version is important for security and performance reasons. Older versions of PHP have known vulnerabilities that hackers can exploit.
Additionally, newer versions of PHP offer performance improvements that can make your website faster.
Don’t wait any longer, update your PHP version today after reading this blog.
What is PHP?
PHP means recursive acronym for PHP: Hypertext Preprocessor which is a widely-used open source general-purpose scripting language that is especially suited for web development and can be embedded into HTML.
Why need to update the PHP with a newer version?
WordPress is developed using an open-source programming language called PHP. Now, WordPress requires at least PHP version 7.4 or greater. The current stable version available for PHP is (8.2.10)
Most WordPress hosting companies use PHP versions 7.4 or higher to meet the minimum WordPress requirements. Each PHP version improves performance by more efficiently running processes and reducing memory usage.
This impacts your WordPress site speed by making it faster and reducing the load on your server.
Typically, WordPress hosts automatically update the PHP version in the background. These updates have no effect on most websites, and you may not notice any change at all.
Occasionally, a plugin on your WordPress website may misbehave due to incompatibility with a newer PHP version.
In that case, some website owners may want to roll back to the older PHP version until a plugin update fixes that issue.
How can you check the PHP version in WordPress?
WordPress makes it very easy to check the PHP version used by your hosting provider.
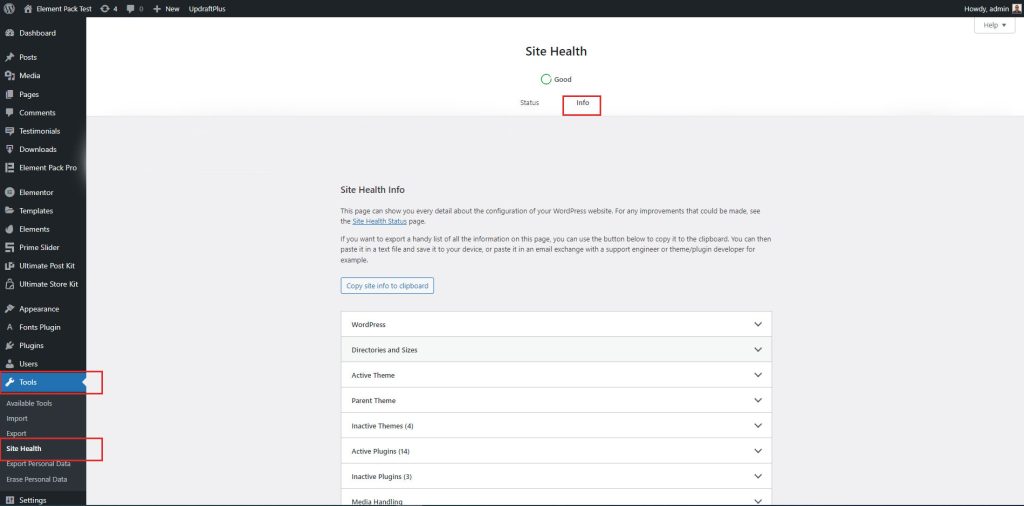
Simply log in to the admin area of your WordPress website go to the Tools » Site Health page and switch to the ‘Info’ tab. Just follow these steps to check the PHP version:
Step-1:
Go to the Site Health option of the Tools section
First, go to the Tools section of the WordPress dashboard. After that, go to the Site Health section, then go to Info.

Step-2:
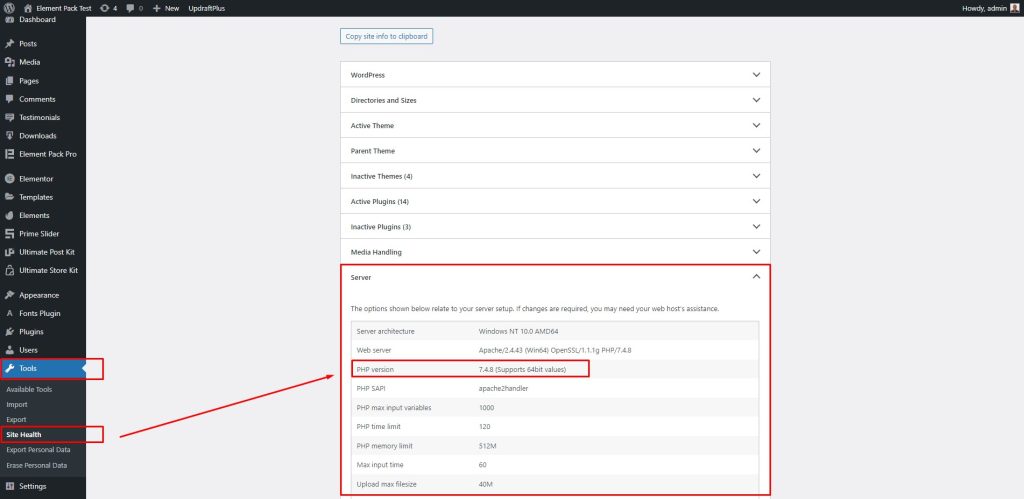
View the PHP version
Then, go to the Server menu of the Site Health section, then go to the PHP version to view the existing PHP version.

How to do this?
Now, we will show the process of updating the PHP version in WordPress. There are several plugins that help update the PHP version. To update the PHP version, you need to follow some steps for several plugins below:
A. Using Bluehost
Step-1: Go to the Advanced tab
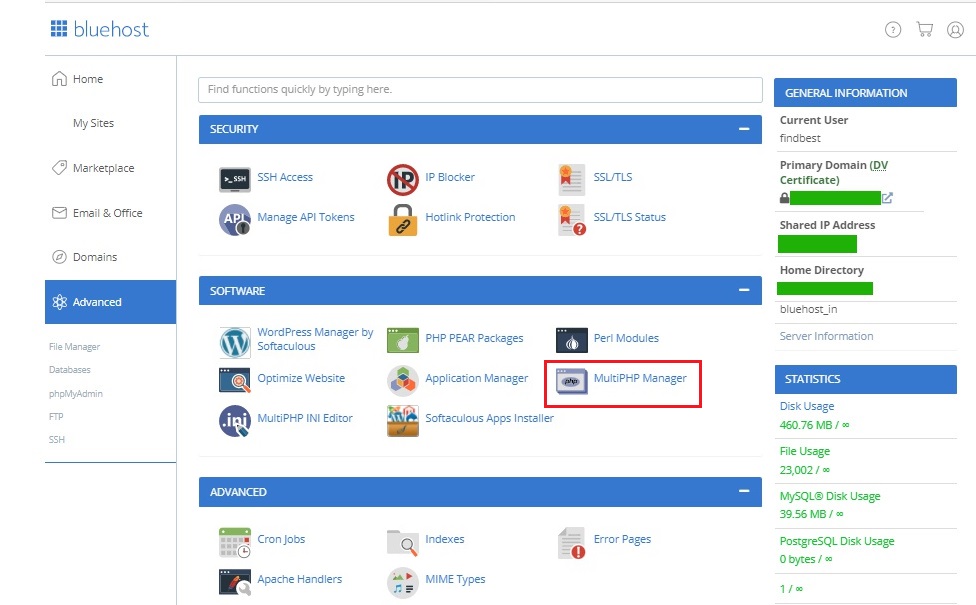
First, log in to your Bluehost hosting account dashboard and click on the Advanced tab in the left column.

Step 2: Update the PHP version
On the next page, you need to select your website and then select the PHP version that you want to use.

B. Using SiteGround
Step-1:
First, you need to log in to your SiteGround account dashboard. After that, you need to switch to the ‘Websites’ page and then click on the Site Tools button next to your website.

Step-2:
Next, you need to go to DEVS » PHP Manager from the left column. From here you can choose to use SiteGround’s Ultrafast PHP or Standard PHP. You can also change the PHP version number by clicking on the Edit icon.
This will bring up a popup where you first need to select ‘Change PHP version manually’ under the ‘Set PHP Version’ option.

Step-3:
After that, you will be able to select your PHP version from a drop-down menu. Don’t forget to click on the Confirm button to apply your changes.

C. Using HostGator
Step-1:
First, you need to log in to your HostGator hosting account dashboard and then click on the Hosting section. From here you need to click on the cPanel link under your hosting account.
This will launch the cPanel dashboard where you can manage advanced settings for your hosting account. You need to scroll down to the Software section and click on the MultiPHP Manager icon.

Step-2:
Next, you need to select your domain name and then choose the PHP version. Don’t forget to click on the Apply button to save your settings.

D. Using WP Engine
Step-1:
First, simply log in to your WP Engine dashboard and click on the PHP version next to your website.

Step-2:
This will bring up a popup where you can choose to downgrade or upgrade the PHP version of your WordPress website.
Don’t forget to click on the ‘Change PHP Version’ button to save your changes.

Conclusion
We have discussed above how to check and update PHP in WordPress for you, and show you some procedures on some PHP updater plugins to follow. Hope these will help you do this on your own.
Thanks for reading this tutorial. Have a nice day.


