If you are wondering, how to make audio version of any blog in WordPress, then you have landed in the right place. Read further to discover the untold tales.
Nowadays everything is either audio or video. And after writing a blog of more than a thousand words it is heartbreaking if no one gets time to read.
But there are other ways you can reach your content to the readers and let them listen to you instead of reading. That is by adding an audio file to it.
And if you are looking for how to do it, it is better to know why you should convert a blog post into an audio file.
Jump right in!
Why Do You Need an Audio Version?
Creating an audio version of your website blog is important as it makes your content accessible to everyone. And a big support to those who can’t see the screen.
It also lets people listen to your content while doing other things, making it more convenient. By having an audio version, you show that you care about making your website usable for everyone.
Benefits Of Making Audio Version Of Any Blog In WordPress
Creating an audio version of your WordPress blog brings numerous benefits. Some of the concepts are known and some are new.
1. Accessibility for All
Creating an audio version of your WordPress blog enhances accessibility. This makes your content available to a broader audience. People with visual impairments, learning disabilities, or those who prefer consuming information through auditory means can now access and enjoy your blog effortlessly.
2. Improved User Engagement
Audio content adds a dynamic element to your blog, capturing and retaining the attention of your audience. By providing an alternative format, you cater to diverse learning preferences, leading to increased engagement and a more enjoyable user experience.
3. Reach a Wider Audience
Many users prefer consuming content while commuting, exercising, or doing household chores. This is a great opportunity to reach them in different contexts.
4. Boost SEO And Discoverability
Audio content contributes to search engine optimization (SEO) by increasing the richness and diversity of your website’s content. Search engines often prioritize multimedia content. So having audio versions of your blog posts can improve your site’s visibility and ranking in search results.
5. Time Efficiency For Users
Reading a blog post can be boring to some users. Moreover, this laziness is a barrier to learning new things and improving skills. But an audio file makes that much easier. Listening to an audio file works like attending a class. Thus it saves time and makes work more efficient.
6. Monetization Opportunities:
Audio content opens up new avenues for monetization. You can explore partnerships with sponsors for podcast-style advertisements, and create premium audio content for subscribers. Even repurpose existing blog content into audiobooks, providing additional revenue streams for your website.
How To Make Audio Version Of Any Blog In WordPress
Now if you are new to this field, this might be like a stack of hard work. But before jumping to any conclusion, let’s check out how many methods are available and which one will be much easier for you.
- Manual process
- Using a plugin
Method 01: Manual Process
The manual process is like doing it by yourself or by any other person. Here are the detailed steps for the manual process of creating an audio version of a blog in WordPress:
Step 01: Read And Prepare Content
Start by thoroughly reading and preparing the blog content for recording. Ensure a clear understanding of the material and practice pronunciations to enhance the overall quality of the audio.
Step 02: Recording
Use a reliable recording device or software to record the narration of the blog post. Pay attention to voice clarity, tone, and pacing for a professional and engaging audio experience.
Step 03: Editing (Optional)
You might need to edit the audio file to remove any background noise, pauses, or mistakes. Thus ensuring a smooth and coherent flow in the recording.
Step 04: Save Audio File
Save the finalized audio file in a compatible format, such as MP3 or WAV, to ensure it can be easily uploaded and played on various devices and platforms.
Step 05: Access the WordPress Dashboard
Log in to your WordPress dashboard and navigate to the relevant blog post where you want to add the audio version.
Step 06: Upload the Audio File to the Media Library
In the dashboard, go to the “Media” section and upload your audio file to the media library. Once uploaded, copy the file URL.
Step 07: Embed Audio in the Blog Post
Return to the blog post editor and place the cursor at the desired location in the post. Add an audio player by using the HTML5 <audio> tag or by utilizing a WordPress audio element. Insert the copied file URL into the player.
Step 08: Preview and Save
Preview the blog post to ensure the audio player is working correctly. Make any necessary adjustments and save the changes.
Step 09: Publish or Update
Once satisfied with the audio integration, publish the blog post or update it if the content has already been published. Visitors can now access and listen to the audio version directly on the blog.
Method 2: Using A Plugin
Now if you don’t want any kind of hassle, there is a better solution. And that is using a compatible plugin that auto converts your blogs into audio files without any hassle.
There are many tools, but we’ll go with Trinity Audio.
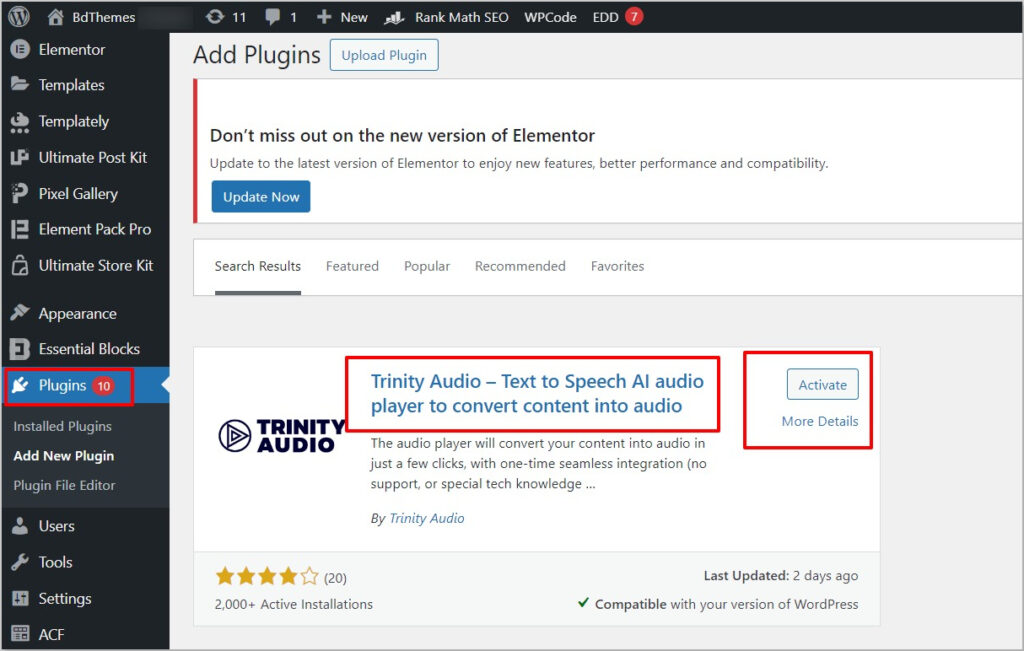
Step 01: Install The Plugin
- Login to your WordPress Dashboard.
- Go to Plugin > Add New.
- Search for Trinity Audio.
- Install and activate the plugin.
Step 02: Plugin Set up
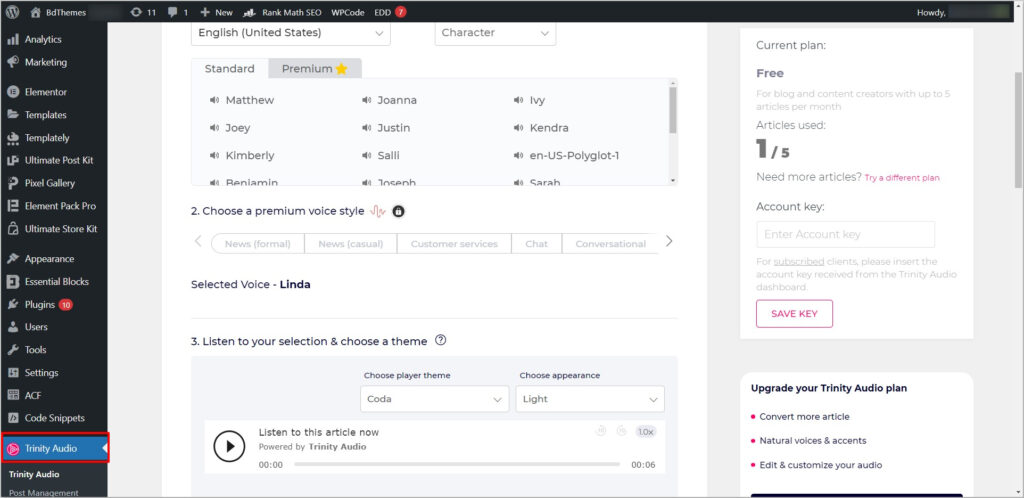
- Navigate to Trinity Audio.
- Now set, country, character (Male/Female), voice and tone, etc.
- You can make more additional changes or just keep it minimal. For more guidance, you can check here.
- Now save the changes.
Step 03: Add To Post
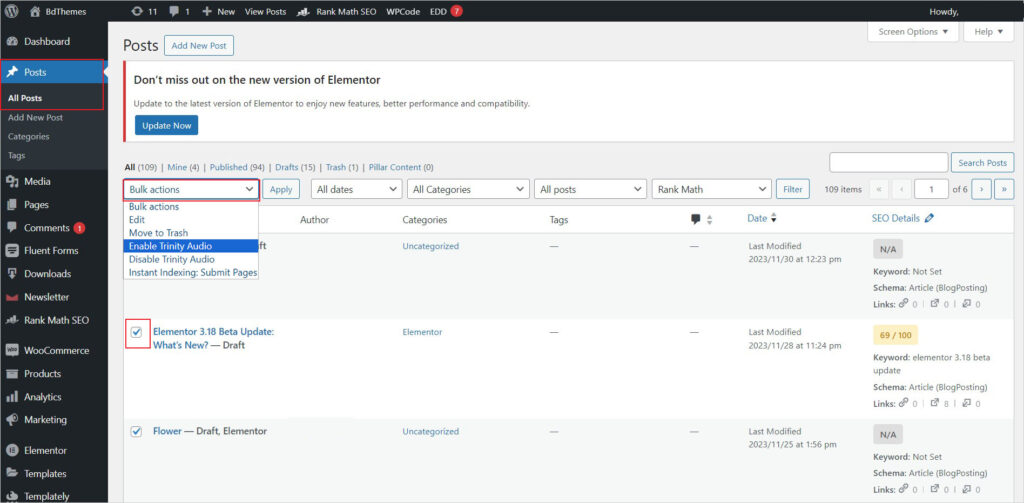
- Go to Posts > All Posts.
- Select the posts you want to add or convert to audio files.
- Click on Bulk Actions > Enable Trinity Audio
- Finally, click on Apply.
Step 04: Preview
Now all you have to do is, publish or update the published post. You will find your audio file in the final copy.
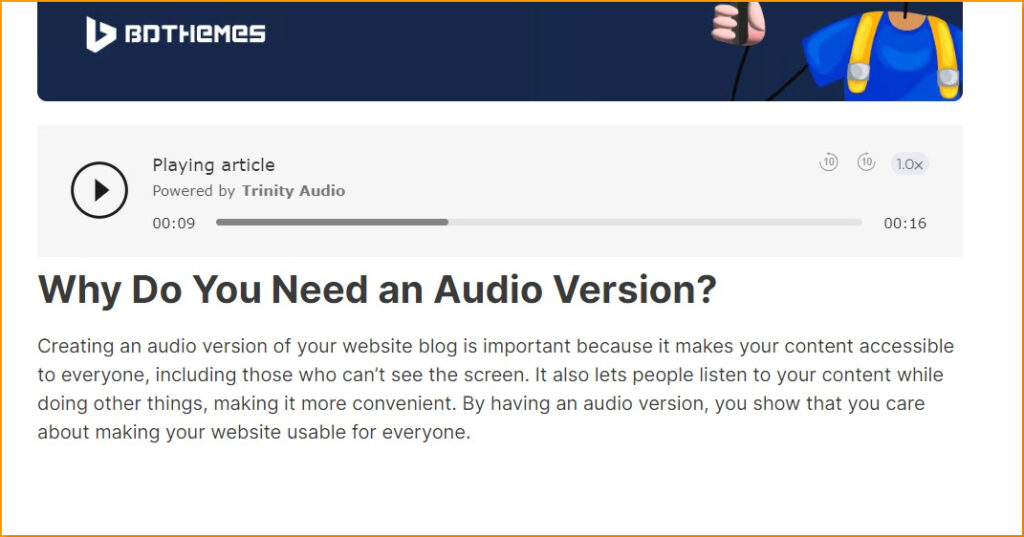
And That's The Most Easy Way To Do It.
You will find every method and step tough unless you perform it. But as we tested, the plugin process was super easy and most of all completely hassle-free.
You can try it out let us know your experience with it. Moreover, if you find a better option, do let us know.
Want to add a newsletter in WordPress Elementor? Read how to add a newsletter in WordPress Elementor in 3 easy steps and add a newsletter to your WordPress site in minutes.
Frequently Asked Questions
There are a few different options available. Here are a few of the most popular plugins:
- Smart Podcast Player: Easily add a stylish audio player to your blog posts, complete with customizable branding. Connects seamlessly to popular podcasting platforms like iTunes and Stitcher.
- WP Audio: Streamline your blog’s audio by effortlessly adding and managing audio files directly from your WordPress dashboard.
- Cincopa Audio Player: Play audio files directly from your Cincopa account, perfect for podcasts, music, and various audio content.
- Kaltura HTML5 Audio Player: Elevate your blog with this plugin, allowing you to play audio files from your Kaltura account, offering versatility for podcasts, music, and more.
Yes, you can export your entire library into an MP3 or WAV file. Here’s how:
- Login to your WordPress account and go to your Dashboard.
- In the left-hand sidebar, hover over “Tools” and click on “Export.”
- On the next page, select “Export All Content.”
- A pop-up will appear asking you what format you’d like to export your content in. Select “MP3” or “WAV.”
- Click the “Export All Content” button.
- A .zip file will be downloaded to your computer. This file contains your exported content in the selected format.
Yes, you can export individual entries to .mp3 files. Here are the steps:
- Open the desired entry in your chosen platform or application.
- Use the export or download option to save the entry as an .mp3 file.
- Ensure that the export settings specify .mp3 as the file format.
- Save the file to your preferred location on your device.
- Repeat these steps for each entry you want to export as an individual .mp3 file.
You can listen to post audio on most modern web browsers. Here are the steps:
- Open your blog post with audio content.
- Look for the audio player embedded in the post.
- Click the play button on the audio player to start listening.

