Want to give your website’s footer a fresh new look but don’t know where to start? Our guide is here to help you learn how to edit footer in Elementor very easily.
It’s actually common for beginners and even experienced web designers to forget about the footer part.
With Elementor, editing the footer part or making the footer sticky is easy.
Yet, it requires a demonstration so you can do it in the 1st try.
In this article, you will learn about-
- Creating Footer in Elementor with Theme Builder.
- Creating Globally customizable Footers.
- Making Footers for specific pages with Global settings.
- Making Footers for pages without Global settings.
How to edit Footer in Elementor
Elementor allows you to create and customize the site footer in several ways.
But which way you take depends on the purpose you need to serve.
To simplify, we can divide the topic this way-
- Create Footer through Theme Builder Template
a. Edit with Global Settings
b. Edit without Global Settings - Create Footer as Templates (No Global Settings)
- Create Footer for specific pages (No Global Settings)
1. Create Footer through Theme Builder Template
Elementor theme builder is a site editing feature that lets you directly customize your theme.
If you want to remove the default footer in WordPress, you must use theme builder settings.
But to use Theme Builder feature, you need to purchase Elementor Pro package first.
Let’s continue with Elementor Pro.
a. Edit with Global Settings
If you set a Footer template to global settings, you will be able to customize it and update the template over the whole website.
No matter where and how many times you used that footer, you can customize it from one place.
To do that, first, you will need to access the Theme Builder option.
Step 1: Access the Theme Builder option
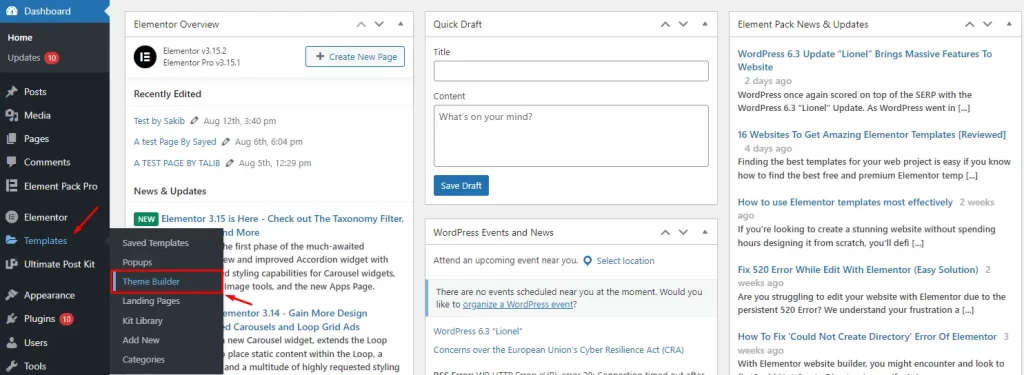
Go to your WP Dashboard > Templates > Theme Builder.
Step 2: Click on the Footer Tab
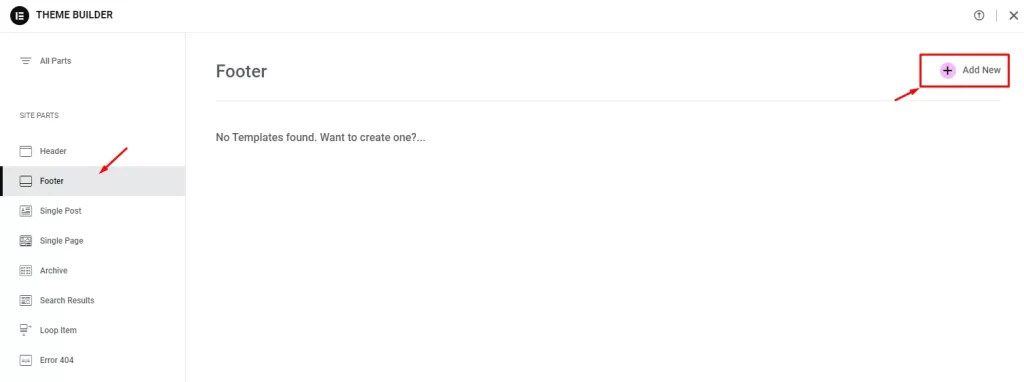
Now you should be able to see an interface similar to the image above. Here, click on the Footer option and then click on Add New.
Step 3: Choose a Design
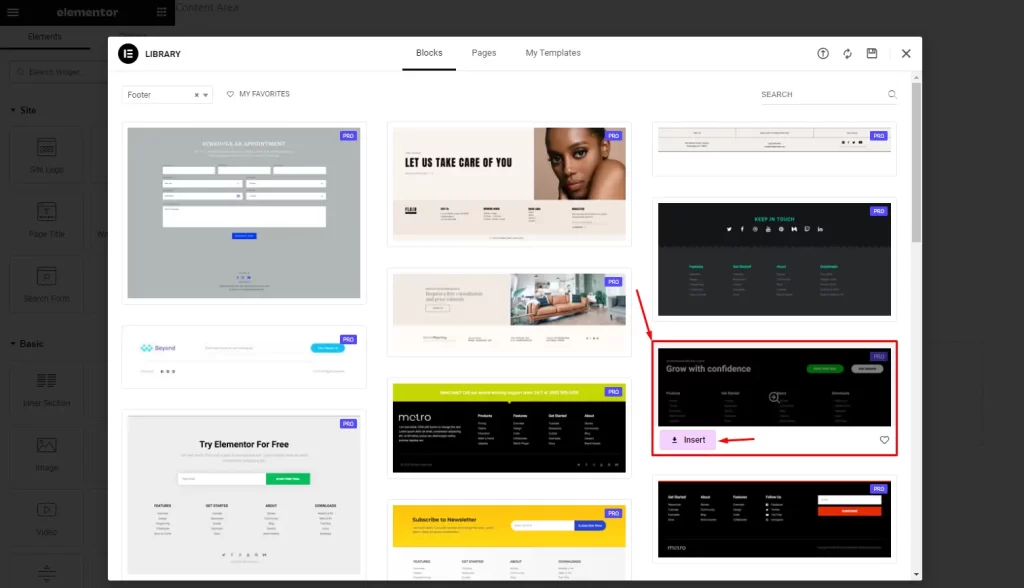
Once you click the Add New button, it will take you inside the editor page and the Elementor template library will pop up by default.
You can choose a footer template from the library to start.
Or you could go from the scratch.
Step 4: Customize the Footer Design
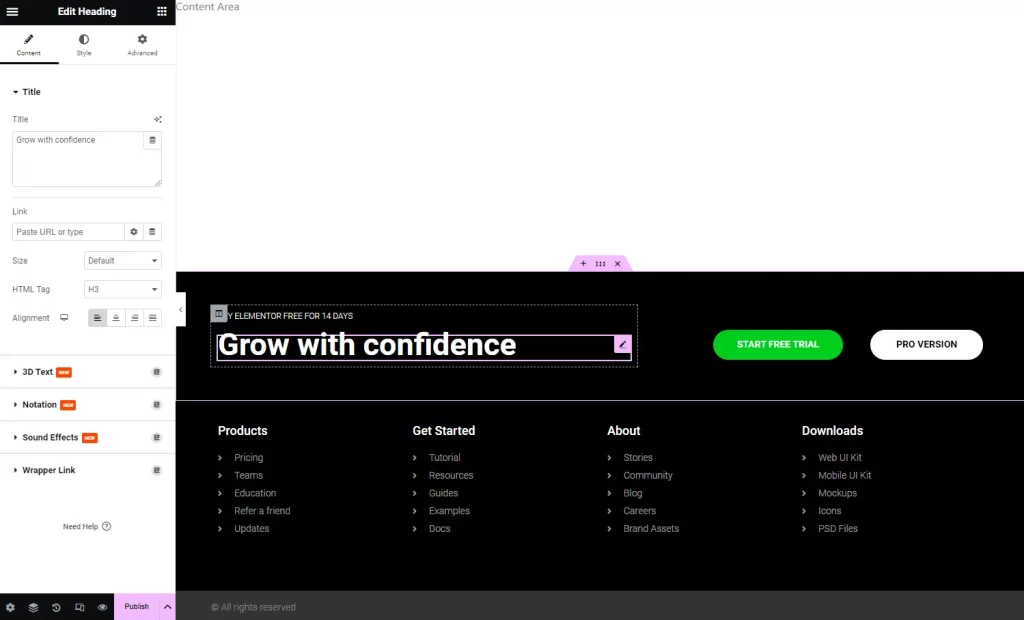
It’s best if you customize the footer to highlight your brand presence.
Most of the time people go with templates instead of custom Elementor footer to save time though.
Step 5: Display Condition Apply

Once your footer is ready, you can click on the tiny arrow icon beside the “Publish” button and select “Display Conditions”.
Step 6: Display Condition Apply
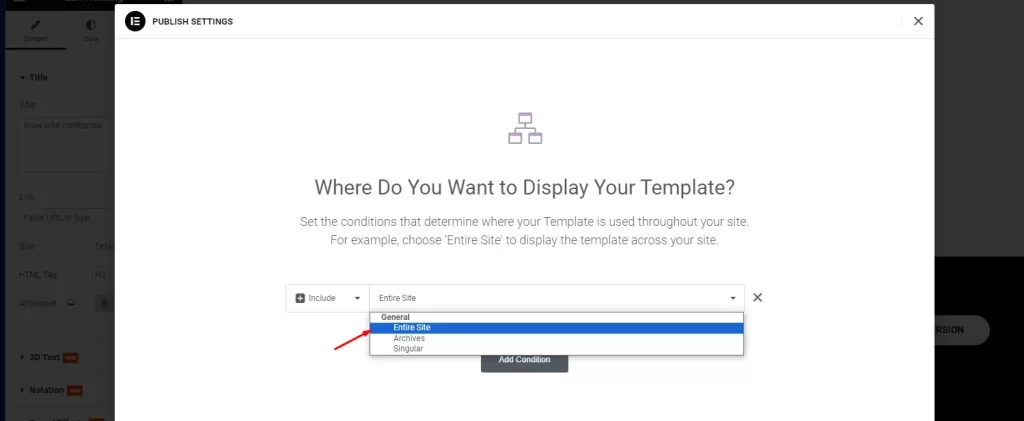
If you want to keep this footer for your entire website, then choose the “Entire Site” option and hit the “Save & Close” button below.
With this, the template will be used as a dynamic property (global settings).
You can modify it later on and the changed version will reflect on the whole site.
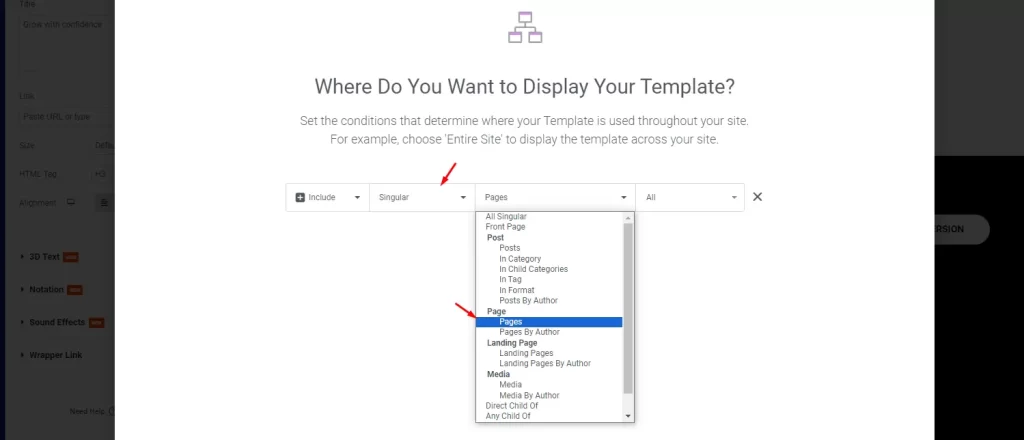
In case you want to show the footer for certain pages, you may select the “Singular” option first and then choose next.
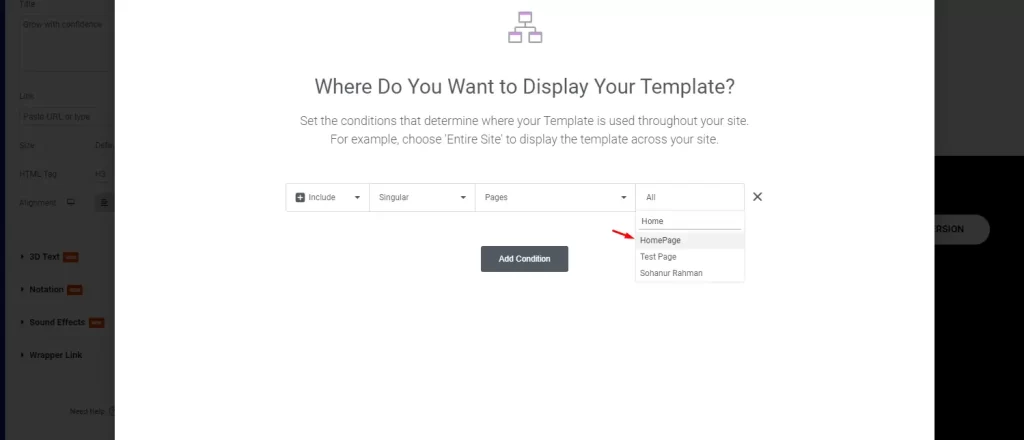
You can further narrow it down by selecting the exact pages if you want.
Also, multiple conditions can be applied at once.
Step 7: Template Saved

You will be able to set a name for this global footer template once you exit the editor page.
Step 8: Find Saved Global Template

This saved footer template won’t appear on the “Saved Template” section inside WP Dashboard.
However, it will appear inside the Theme Builder template library.
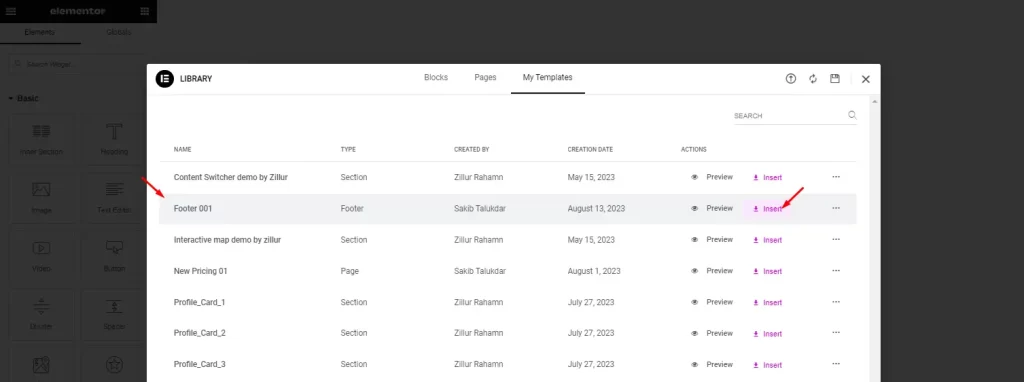
Later, you can just access the template library inside the page editor and use the footer template flexibly. (in case of blank/custom pages)
b. Edit without Global Settings
You can also make your footer template without global settings.
Doing this will save the footer as a plain template and won’t update on every pages when you change something.
For most cases, people don’t edit footer in Elementor this way because it creates problems with maintenance and changes.
Step 1: Save as Template
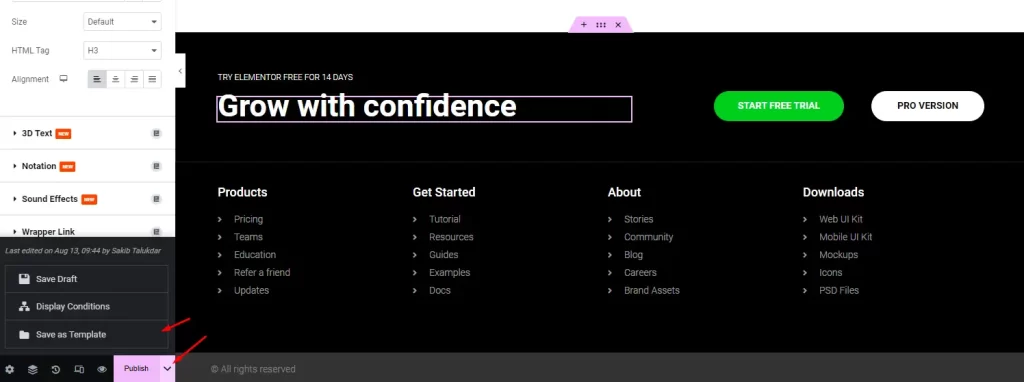
Continue till Step 4 from above and then instead of display conditions, go with the “Save as Template” option.
Step 2:
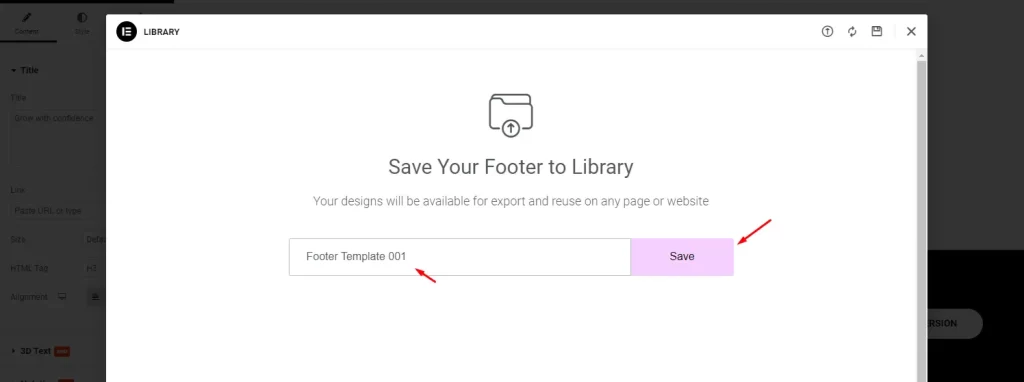
When you do this, the footer will be saved as a plain template that you can quick import on other pages.
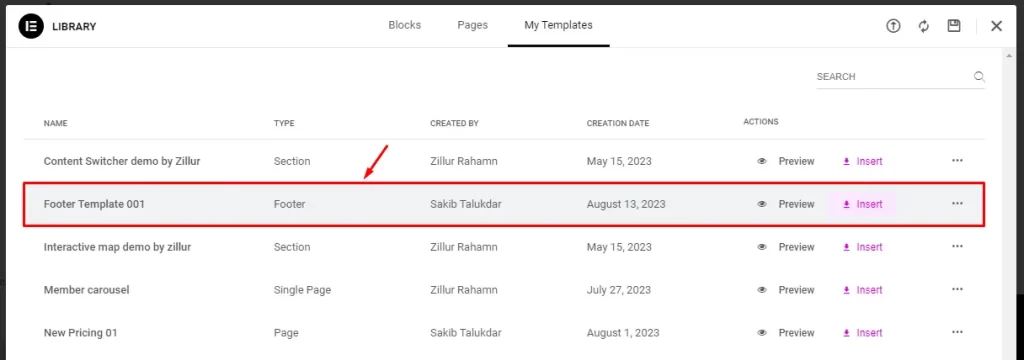
It becomes a regular template with no global settings or sync.
That means you have to edit the footer in Elementor for every page you have used it on each time you need to update the footer.
2. Create Footer as Templates (No Global Settings)
Quite similar to the last part above, if you edit and save your Elementor footer as a template, it looses global settings and become static.
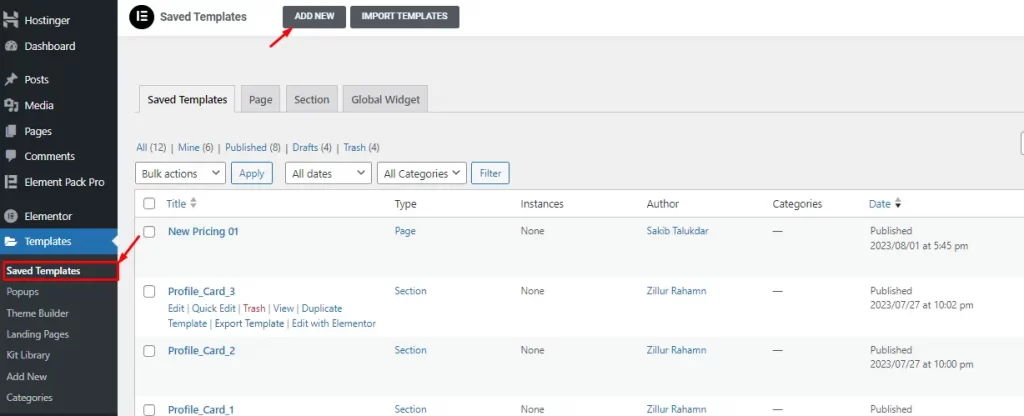
You can simply go inside the Templates section and click on the “Add New” option to open the template editor and start creating your footer.
Once you save it, it stays as a template for later usage.
3. Create Footer for specific pages (No Global Settings)
Apart from the Theme Builder and Template features, you can directly create and customize footers in your pages.
Though this is an inconvenient method because the footer only stays within the page.
Also, editing it later on gets difficult.
Elementor Custom Footer
Step-1: Add a test page
To begin, go to the Elementor page builder. Select a test page, and enter a section with four columns in the text area.
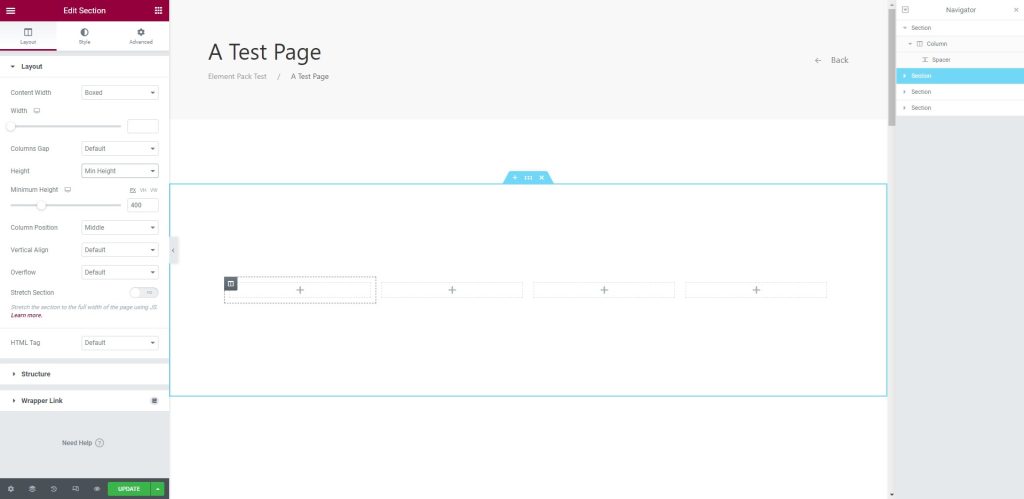
Step-2: Add footer in the section
Next, add footer blocks in the section as you need. After adding the blocks template, you can customize them easily.
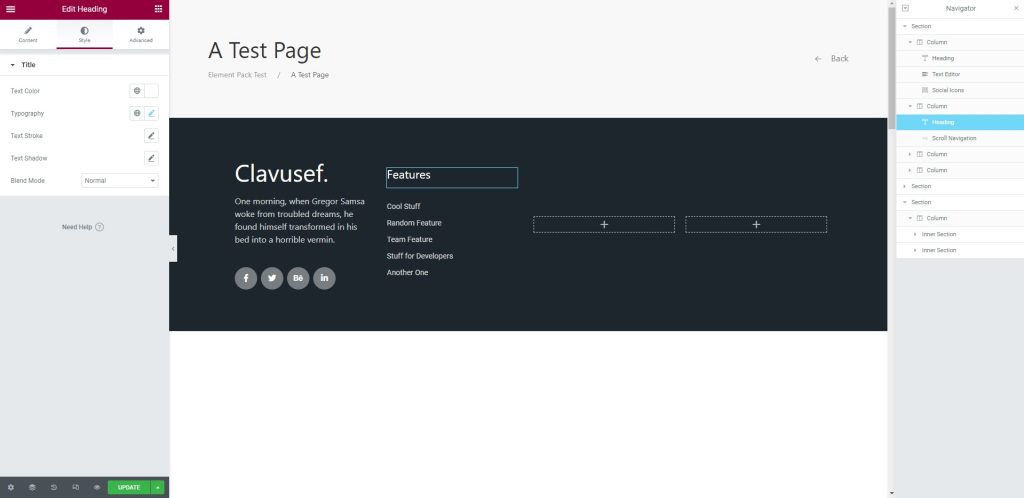
Next, we are going to discuss the second method, which is by using the templates. For this, follow the steps below:
Elementor Footer Template
Step-1: Add a test page
Here, select a test page, hit the Element Pack Pro, and open Elementor page builder. There you can insert templates.
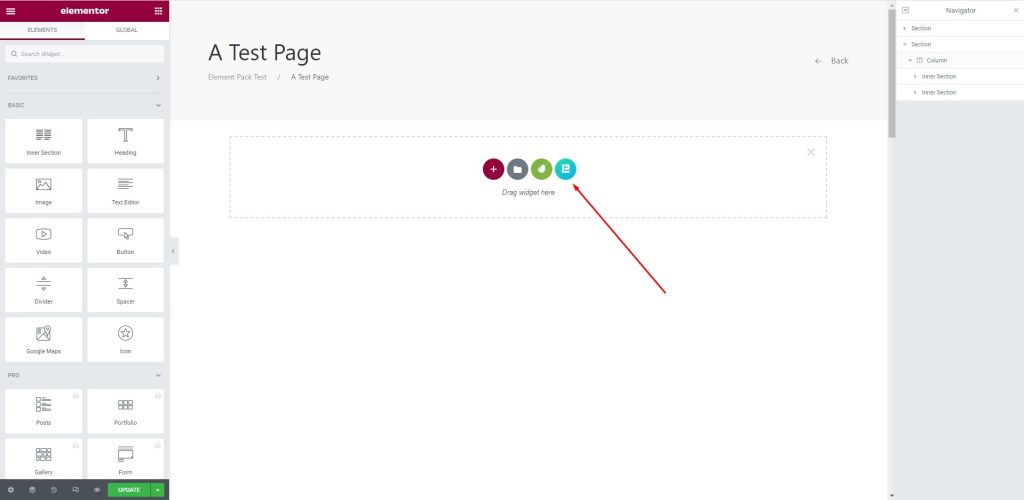
Step-2: Insert a template
After that, a box will appear; go to the Footer menu, and insert the selected template as shown below.
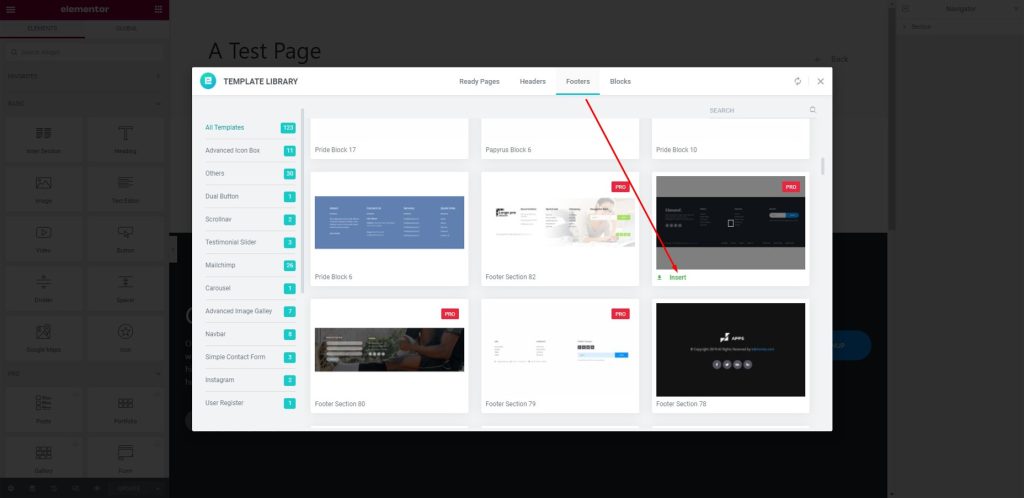
Step-3: Insert footer in the text area
Now, the footer will be shown in the text area.
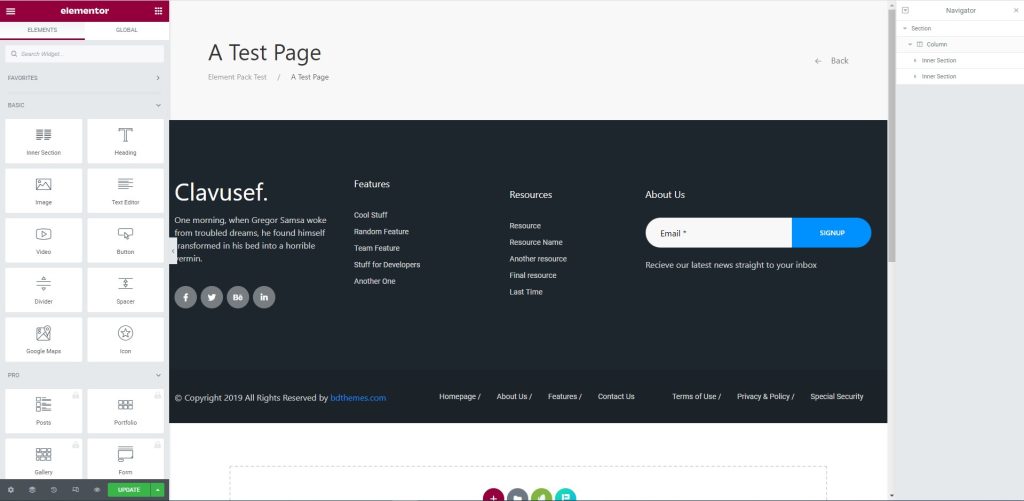
Step-4: Customize the footer
Now, you can edit or customize the footer section using the menu on the left.
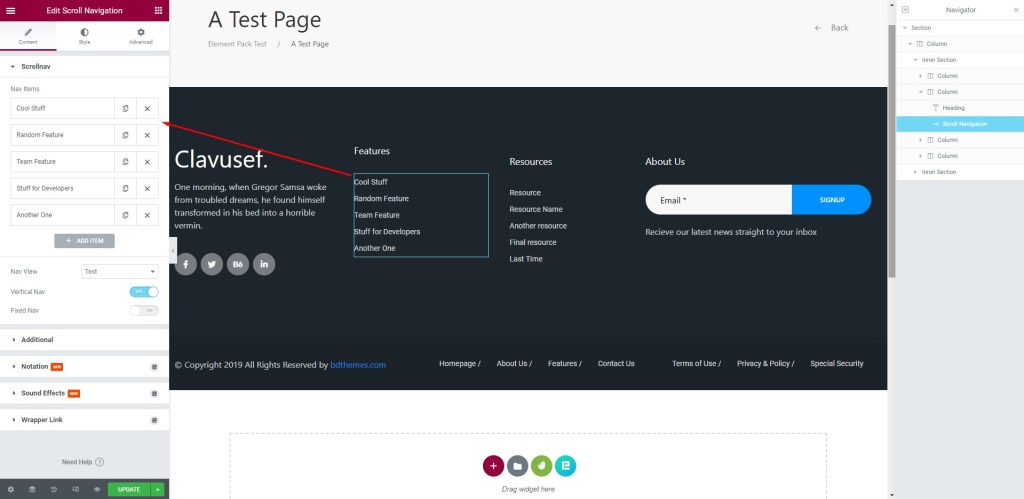
Congrats! You have successfully edited the custom footer for yourself. You can easily edit the footer at any time following the methods.
Bonus:- Create Elementor Sticky Footer
Sometimes, it’s best to have a sticky footer in your WordPress website to let users access some of the useful footer navigations.
By default, it’s not possible to create a sticky footer in Elementor.
But if you have Element Pack addon install on your site, the option is available to you.
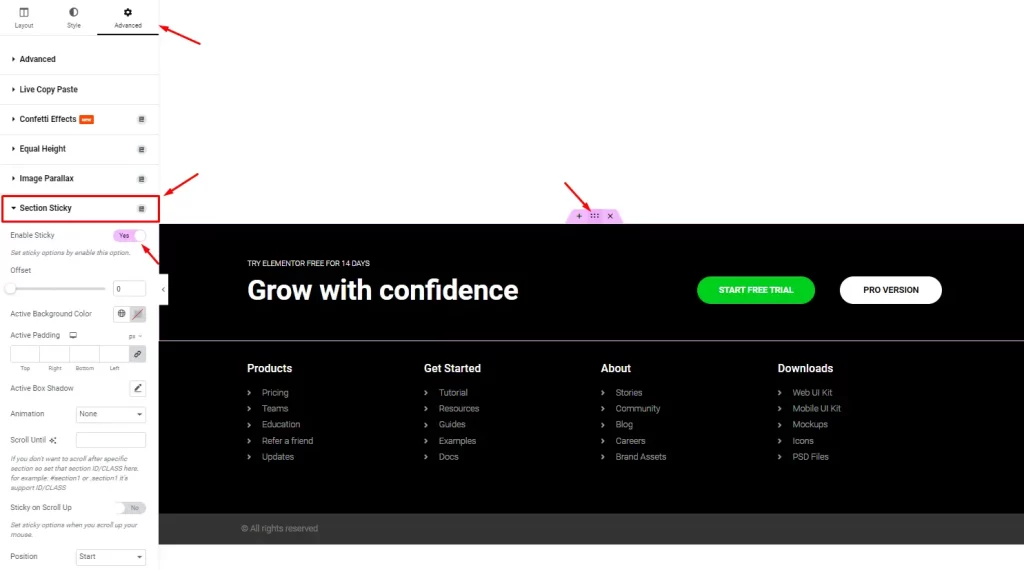
Once you have Element Pack installed, just go into the Theme Builder or Templates menu > click on Section settings > go to Advanced tab > turn on Section Sticky switcher > and configure sticky properties.
This way, you can make your footer sticky in Elementor.
Wrapping up
We have discussed the footer and described how to edit the sites footer by Elementor widget above.
Hope this will help you a lot, and you can use this afterward for your WordPress website.
Feel free to share your thoughts about this article.
