People love to travel. In order to make their journey smooth and to make sure they don’t miss any spots, they collect information about their destination. To collect information, they visit websites, watch videos, and go to social media.
Research by Amadeus shows that a staggering 87% of travelers now rely on online resources to research and plan their trips.
So, if you have a travel website and share authentic information, you will get an abundance of traffic, guaranteed. Also, after getting balanced traffic, you can monetize it by selling travel-related kits or letting them book their trips through your website. The travelers will love it. Because people like to buy from those they can rely on.
On top of that building a travel website is easy as you have WordPress.
WordPress lets you create a travel website in just 5 steps. Unbelievable, right?
But it’s true. You can create your own travel website all by yourself only in 5 steps. Keep reading this blog to unveil those 5 steps.
Excited? Awesome! Let’s get started right away!
Why You Should Build a Travel Website
Before you start creating your travel website, you need to know exactly why you should build one.
You must build a travel website if you-
- are a solo traveler looking to monetize your trips. Or,
- have a travel company and want to start a blog to attract new customers through writing.
Having a travel website can help you in many ways including:
- Visibility: A travel website provides you with an online presence, making it easier for potential customers to find you. It allows you to showcase your services, destinations, and expertise to a wider audience.
- Credibility: Having a professional website enhances your credibility and trustworthiness. It gives potential customers confidence in your brand and services.
- Marketing: A website serves as a powerful marketing tool. You can use it to promote your travel packages, share testimonials from satisfied customers, and engage with your audience through blog posts and social media integration.
- Accessibility: With a website, your services are accessible 24/7 from anywhere in the world. This means that potential customers can learn about your offerings and make bookings at their convenience.
- Monetization: For solo travelers, a travel website can be a platform to monetize their journeys. Through affiliate marketing, sponsored content, or selling products like travel guides or photography, you can generate income from your adventures.
Now if you are convinced that you need a travel website, let us show you the easiest way to build a website for you.
How to Build a Travel Website Using WordPress in 5 Steps
As we said earlier, you can create your own travel website using WordPress in just 5 steps.
Here are those 5 steps:
- Choose a Domain Name
- Buy a Hosting Plan
- Install WordPress on Your Control Panel
- Install a WordPress Travel Plugin
- Configure the Required Settings
After following these steps, you will be able to launch your full-fledged travel website with ease. So, now let’s deep dive into these steps to know what exactly you need to do to build your website!
Step 01: Choose a Domain Name
Before anything else, you need to register your domain name. Many people overlook this step, and eventually, they regret not having proper research for a suitable domain name in the first place
A domain name is the first thing that your audience interacts with. So, it has to be unique, simple, and easy to remember.
Follow these tips while you are searching for a domain name for your website:
- Keep it Short & Sweet: Aim for 15-20 characters. Short names are easier to remember, type, and share. Imagine someone trying to tell their friend about your site while exploring a bustling market!
- Brand Yourself: Is your website about budget backpacking or luxurious getaways? Reflect your niche in the name. Think “BackpackBuddha” or “GlobetrotterGlam.”
- Keywords Matter: Include relevant keywords like “travel,” “explore,” or your specific destination (e.g., “ParisFoodie”). This helps search engines understand your site’s purpose.
- Be Creative & Unique: Stand out from the crowd! Avoid generic names like “TravelBlog123.” A unique name sparks curiosity and reflects your individuality.
- Avoid Hyphens & Numbers: They can be easily forgotten or mistyped. Opt for clear, easy-to-spell words.
- Check Availability: Once you have a few ideas for domain names, use a domain registrar like GoDaddy or Namecheap to see if they’re available. If your first choice isn’t available, don’t worry! Get creative and try some variations until you find one that works.
Bonus Tip: Use a domain name generator for inspiration! Many tools like NameMesh or Lean Domain Search can help you brainstorm creative options.
Step 02: Buy a Hosting Plan
After finalizing your domain name, it’s time to buy a hosting plan. However, before buying a hosting plan for your business, you need to understand the types of hosting:
Shared Hosting: Affordable, but resources are shared with other websites. Good for smaller sites with moderate traffic.
VPS Hosting: More power and control than shared hosting, ideal for growing websites with more visitors.
Dedicated Hosting: Top-tier performance and security, perfect for high-traffic websites or those needing specific software.
Dedicated Hosting: Top-tier performance and security, perfect for high-traffic websites or those needing specific software
After deciding your preferred hosting type, now you need to choose a hosting provider to buy your hosting plan.
There are various hosting providers out there, each offering different plans to suit different needs and budgets. Here’s what to consider when selecting a hosting plan for your travel website:
- Reliability and Uptime: Look for a hosting provider that guarantees excellent uptime, meaning your website will be available to visitors around the clock without frequent downtime.
- Speed and Performance: A fast-loading website is crucial for user experience and search engine optimization. Choose a hosting plan with good server performance and speed.
- Scalability: Your website may grow over time as you add more content and attract more visitors. Ensure your hosting plan can handle increased traffic and provide options to scale up as needed.
- Customer Support: Check reviews and ratings for the hosting provider’s customer support. It’s essential to have reliable support available in case you encounter any issues with your website.
- Cost: Hosting plans come at various price points. Consider your budget and the features included in each plan to find the best value for your needs.
Now you know which type of hosting you’ll require and which provider you are going to choose.
So, it’s time to visit your hosting provider’s website, select your plan, complete the payment, and set up your hosting account.
Step 03: Install WordPress on Your Control Panel
Now that you have your domain name and hosting plan sorted out, it’s time to set up the foundation of your travel website. WordPress is a popular and user-friendly platform that powers millions of websites worldwide.
Installing WordPress on your hosting account is a straightforward process, and it lays the groundwork for building and managing your website efficiently.
Here’s a step-by-step guide to installing WordPress on your hosting account’s control panel (usually cPanel):
i) Access Your Hosting Control Panel
Login to your hosting account and navigate to the control panel (cPanel) provided by your hosting provider. You can typically access cPanel by entering your domain name followed by “/cpanel” in your web browser’s address bar.
ii) Locate the WordPress Installer
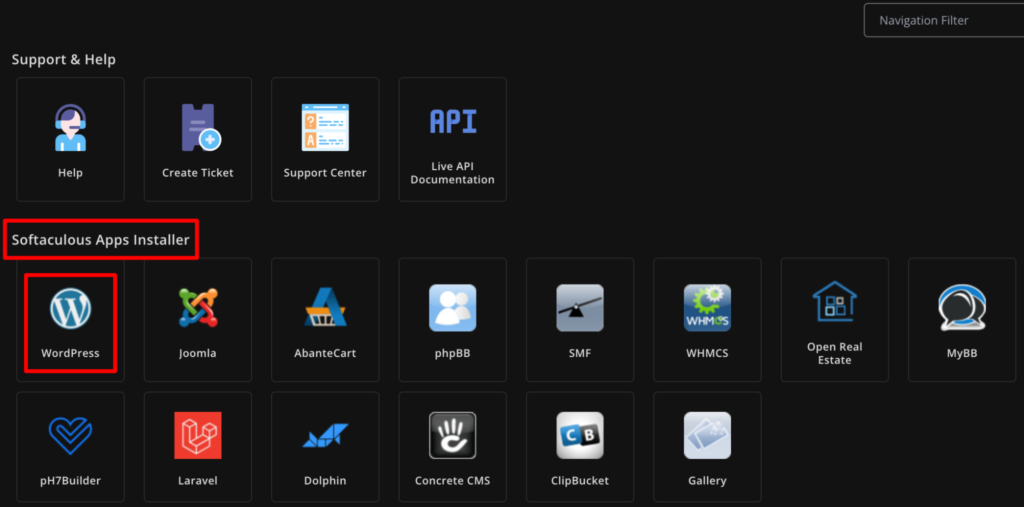
Once you’re in cPanel, look for the “Softaculous Apps Installer” or “WordPress Installer” icon. This tool simplifies the process of installing WordPress by automating most of the steps.
iii) Select WordPress for Installation
Click on the WordPress icon to launch the installation wizard. You’ll be prompted to choose the domain where you want to install WordPress if you have multiple domains associated with your hosting account.
iv) Configure Installation Settings
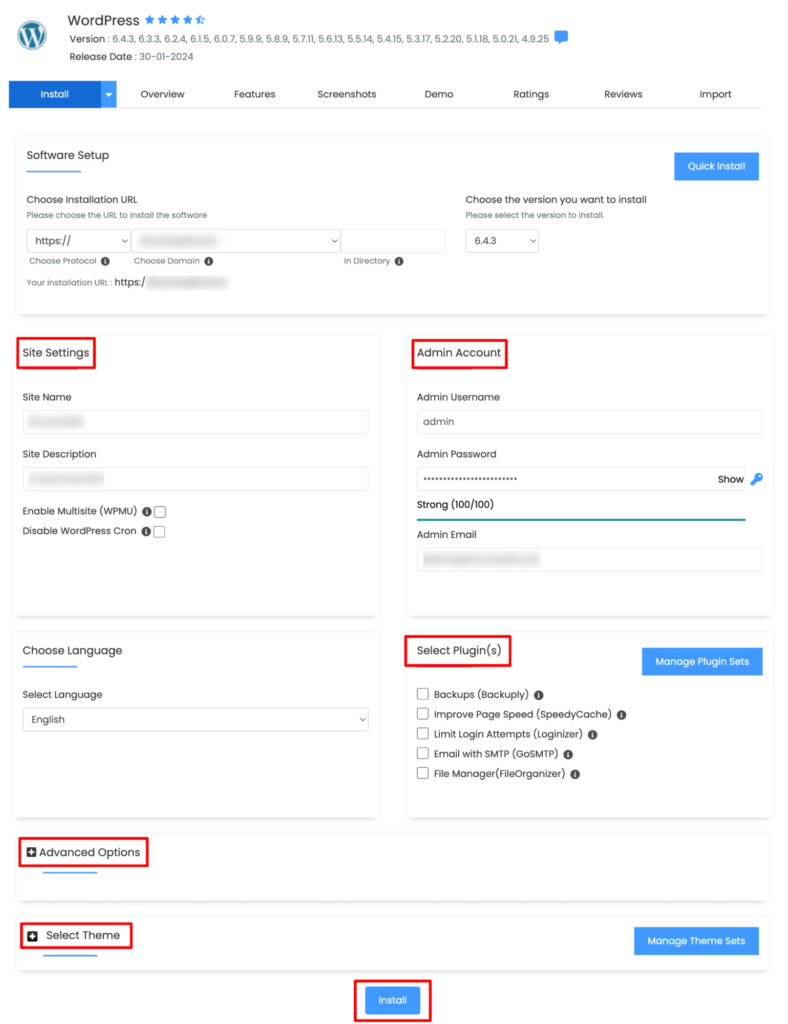
Fill in the required information, such as the site name, site description, admin username, and password. Make sure to choose a strong password to secure your WordPress admin area.
v) Choose Plugins and Themes (Optional)
Some installers allow you to select pre-installed plugins and themes during the installation process. You can skip this step if you prefer to install plugins and themes late
vi) Complete the Installation
Review your settings, double-check everything, and click the “Install” button to begin the installation process. The installer will automatically create the necessary database and configure WordPress for you
Once the installation is complete, you’ll receive a confirmation message with a link to your WordPress dashboard. This is where you’ll manage your website, create content, install themes and plugins, and customize your site’s appearance and functionality.
Step 04: Install a WordPress Travel Plugin
Now that you’ve set up WordPress on your hosting account, it’s time to add some specialized functionality to your travel website by installing a WordPress travel plugin. WordPress plugins are like apps that you can install to add new features and enhance the functionality of your website without needing to code.
But which travel plugin you should install? Since there are several travel plugins in the WordPress repository.
You can choose any WordPress travel plugin that you want. To be very honest, all the travel plugins are almost the same. For this tutorial, we have chosen the WP Travel plugin.
To install the plugin, go to your WordPress dashboard and navigate to the Plugins -> Add New Plugin. Then search for the plugin – WP Travel and install the plugin from the search result. Then activate the plugin to complete this procedure.
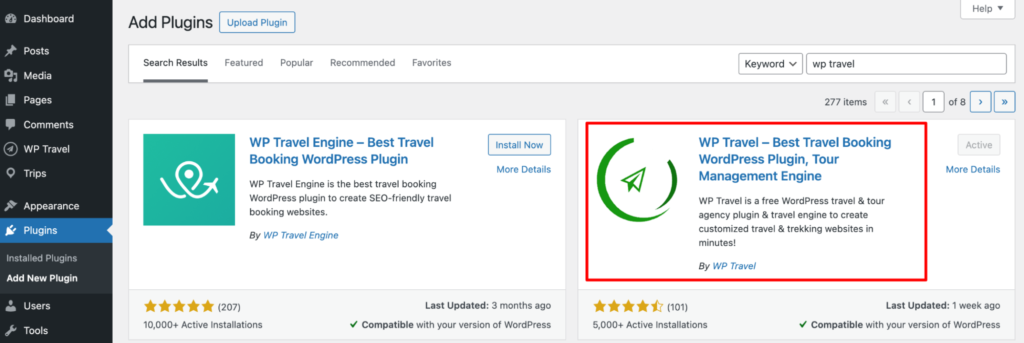
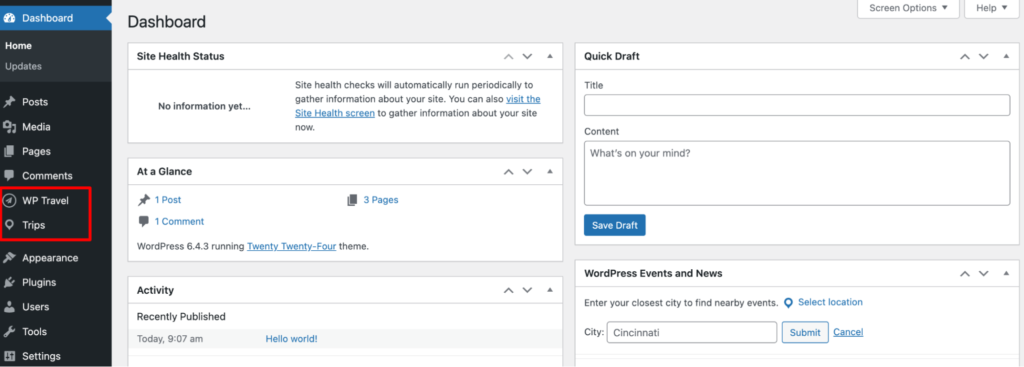
Now if you want to visit your dashboard, you will get two new options- WP Travel and Trips. That means you have successfully installed the plugin.
Step 05: Configure the Required Settings
To configure the required settings, you need to navigate to your WordPress dashboard -> WP Travel. There you’ll find a few options to configure:
- Booking
- Coupons
- Enquires
- Trip extras
- Downloads
- Reports
- Custom filters
- Settings
- Marketplace
- Travel Guide
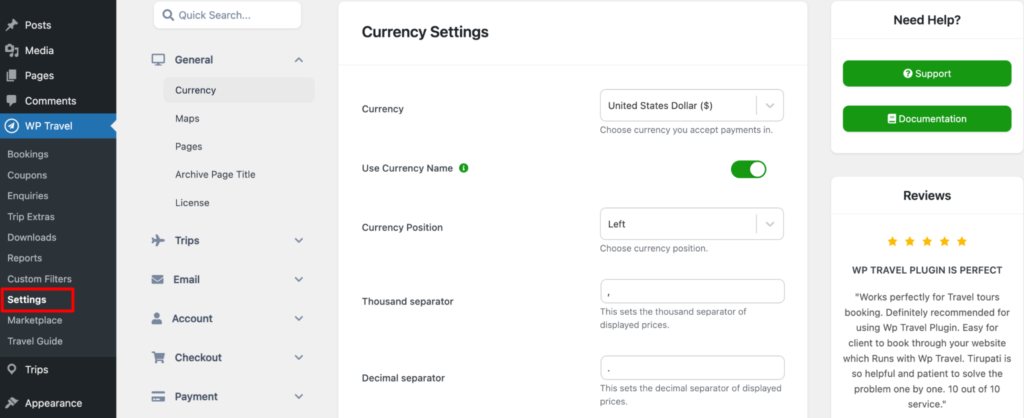
Before configuring any options, we would like to suggest you configure the “Settings” tab. If you click on the Settings button, it will take you to a new interface.
There you should configure the Currency, Maps, Trips, Email, Checkout, Payment, Invoice, and a few more crucial settings. Without configuring these options, you won’t be able to operate your travel website seamlessly.
Once you are done with the basic settings, it’s time to configure the “Trips” settings. To do that, simply click on the “Trips” button and you will get a few options to configure.
The options are All Trips, New Trip, Pricing Category, Trip Types, Destinations, Keyword, and Activities.

Now let us briefly explain what are these options about:
- All trips: It will show all the trips that you have added. Also, you can add new trips using this section.
- New trips: It will allow you to add a new trip for your audience.
- Pricing Category: You can add different prices for different trip categories.
- Trip Types: You can add types of trips with this option.
- Destinations: This option allows you to add destinations for your trips.
- Keywords: Allow you to add keywords.
- Activities: You can add new activities through this option.
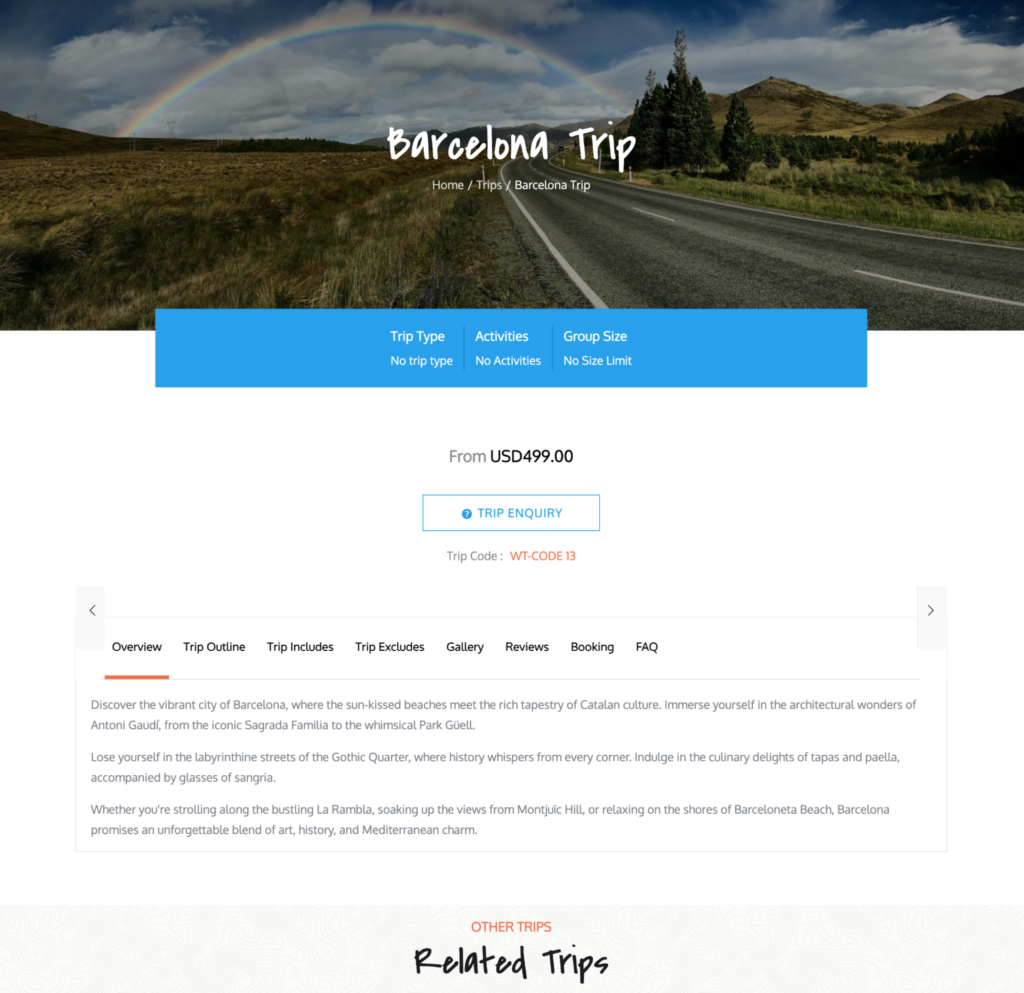
After completing all the configurations, if you add a new trip, the trip will look like this from the frontend.
Congratulations! You have successfully created your own travel booking website using WordPress.
Bonus: How to Turn a Travel Website into an Online Travel Booking Marketplace
Owning a travel booking website means you can earn through your website only. But if you want to earn more, you can simply turn your website into a marketplace.
How?
Well, in a marketplace, there are several vendors. The marketplace owner gets a commission from each vendor when vendors sell anything.
So, if you have a travel booking marketplace, you will be able to:
- Earn from your own travel booking store
- Earn commissions from every registered vendor on your marketplace
That’s how you can earn more by simply transferring your website into a marketplace.
To create a new travel booking website or turn your already existing travel booking website into a travel booking marketplace, you will need to use a WordPress multivendor marketplace plugin.
There are a few popular multivendor marketplace plugins in the WordPress repository, for instance, Dokan, WCFM Marketplace, WC Vendors, MultivendorX, etc. You can choose any plugin you want.
However, if you want us to recommend, we would love to suggest you use the Dokan multivendor plugin. This is the first-ever full-fledged WordPress plugin that comes with every single feature that you need to run any type of marketplace smoothly.
On top of that, it’s very beginner-friendly. If you haven’t used this plugin or any multivendor plugin before, you will be still able to use this plugin through its intuitive interface. That makes it the most popular plugin in this category with more than 60,000 active installations.
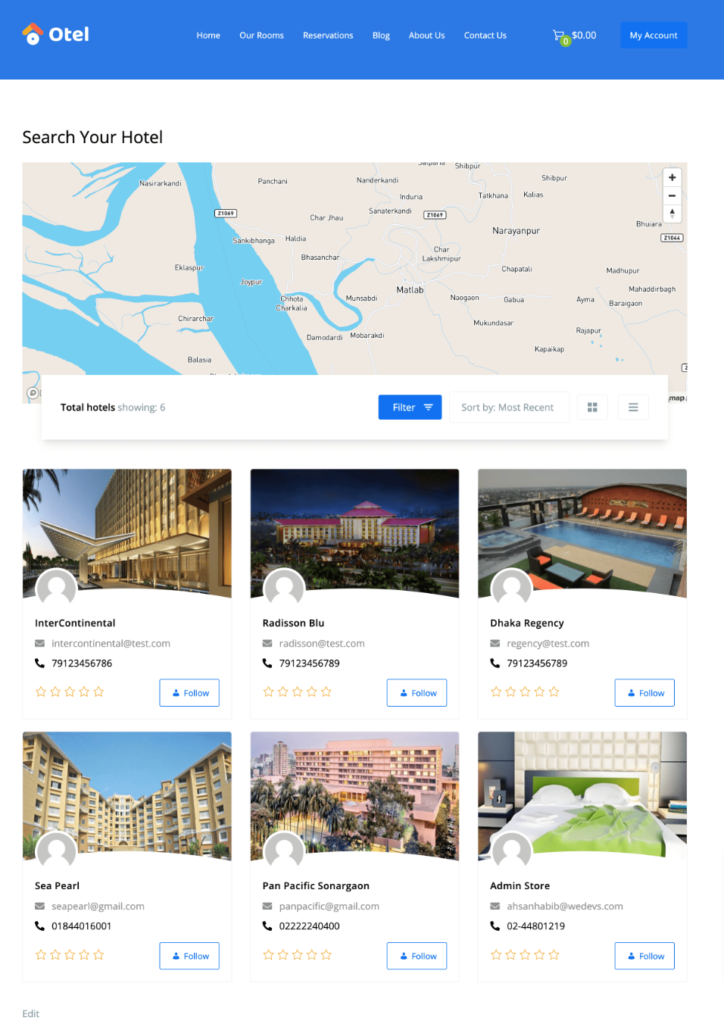
Here is an example of how a multivendor hotel booking marketplace looks like using the Dokan plugin:
Ready to Start Your Own Travel Booking Venture?
Now you know how to create a travel website using WordPress. It’s a simple 6-step guide for you. So, you can launch your own travel booking website all by yourself by following this step-by-step tutorial.
Also, if you want to turn your website into a marketplace, you can do that as well using a WordPress multivendor plugin- Dokan.
That being said, if you have any questions related to this article, feel free to share them with us using the comment box below. We would love to hear your feedback. Thank you.
