Are you looking for a way to build a website spending less time using tips and tricks?
Are you curious about learning Elementor advanced tips and tricks? As far as it is concerned, Elementor is the most time-saving page builder on the market.
Elementor is a great tool and gives you lots of customization power. Now, it has evolved with time and effort and lets you design fully functioning websites without any coding. It has many amazing tips and tricks. For this, the Elementor tips and tricks can help you a lot.
Why use Elementor advanced tips and tricks?
Tips and tricks are basically helpful hints and an easier way of making your job a lot more comfortable. When you work with Elementor, you can use Elementor advanced tips and tricks to further enrich your site-building experience.
As we know, it needs time for a new tool to get used to. If you do your task menu-wise, that will take you a lengthy period. That’s why you need to keep some tips and tricks in hand to save your time. Using Elementor advanced tips and tricks, you can build a website and customize it hassle-free and without wasting time.
How do Elementor advanced tips and tricks help you?
The Elementor advanced tips and tricks are of great importance in the working field. They can help you like this-
- Help you build pages faster and improve your workflow.
- Build professional pages in Elementor.
- Use advanced features and add visual flair to your pages.
In this article, I will enlist some Elementor advanced tips and tricks and describe them to show you how to use them. You can implement them instantly and easily which will help you a lot.
Here is a list of some Elementor advanced tips and tricks:
- Use the Finder
- Use the Elementor templates
- Work with the Navigator
- Use the hotkeys or shortcuts
- Save your Elementor templates
- Find the solution in Elementor first
- Use Global Widgets Efficiently
- Upload Your Own Fonts
- Add Entrance Animation To Your Widgets/Sections
- Add Shape Dividers
- Add Filter Effects To Your Images
- Set Default Fonts
- Set Default Colors
- Add A Full Height Section
- Add Video Backgrounds
- Use Custom Positions For Image Backgrounds
- Change Page Layout Settings
- Add Parallax Effects
Let’s get started!
1. Use the Finder
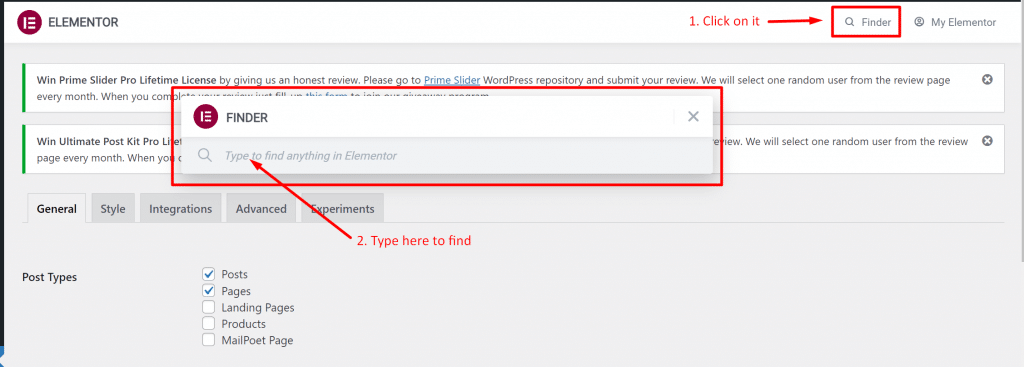
If you take a while to use ‘Finder’, you can’t resist using it. Because it makes a place on the top of the menu. Among the Elementor advanced tips and tricks, using the Finder is the most preferable one.
Finder makes it super easy of switching between Elementor pages and your dashboard settings in Elementor. By using the tips and tricks, you don’t have to close Elementor all the time and search the page again in WordPress.
You can save lots of time using Finder anywhere in WordPress. This feature helps you jump directly to any Elementor template, page, settings, or a part of a theme by searching in the search bar. Get access to Finder from Elementor Settings or with the Cmd/Ctrl + E keys.
2. Use the Elementor templates
Click here

Select template

This one among the Elementor advanced tips and tricks is a bit obvious, but we can mention it. Reinventing the wheel is not needed every time. You don’t have a design for a website, or you are not completely at home with Elementor yet, no worries! Simply use a standard template provided by the Elementor library.
You can edit a page with Elementor by finding the template easily. Simply click on the ‘folder’ icon and the library will appear instantly. Undoubtedly, you will find more beautiful templates by searching with this keyword ‘Elementor templates’ in google. You can apply this Elementor advanced tips and tricks for your work.
3. Work with the Navigator
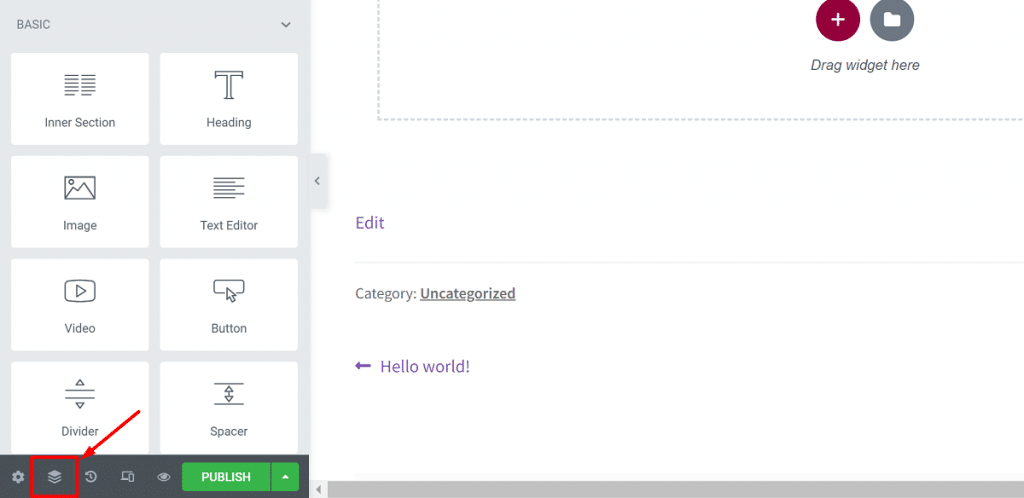
The Elementor Navigator helps you easily keep an overview of your page. Also, you can use Navigator to move sections/columns/widgets easily to another location. Of all Elementor advanced tips and tricks, you can use this as a better choice.
When you are going to create long pages, Navigator is super useful for the job. Navigator is the most under-utilized feature of Elementor that basically lets you navigate your whole page from a small panel.
You can access any element with Navigator by clicking on it. You can easily see the widgets in a section and also delete them right from the Navigator.
At the bottom left of your Elementor panel, you will see the Navigator button, you just have to click to open it. There is another way to do that- right-click on the widget and select Navigator.
4. Use the hotkeys or shortcuts
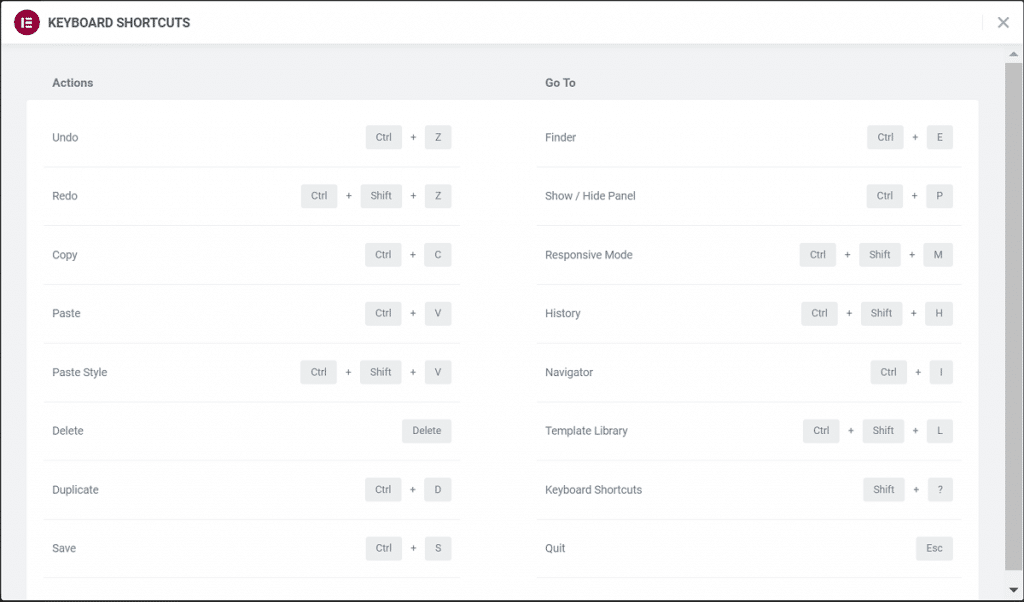
Need to switch quickly between pages or settings? Or do you need to design pages quickly, save something, undo a change, open the Elementor library or use the finder?
You can use a number of keyboard shortcuts to get things done quickly if you work with Elementor. Elementor advanced tips and tricks have a notable feature like using shortcuts.
Make yourself more productive by doing simple tasks swiftly with the help of shortcuts. The fact is, shortcuts undoubtedly make your work easier and much faster. You can speed up your design process because shortcuts are incorporated into the page builder. You will get many advanced custom shortcuts in Elementor.
Tip: You can see the list of all shortcuts by opening the shortcuts reference sheet using ‘Cmd/Ctrl + ?’.
Here is the list of different shortcuts available in Elementor:
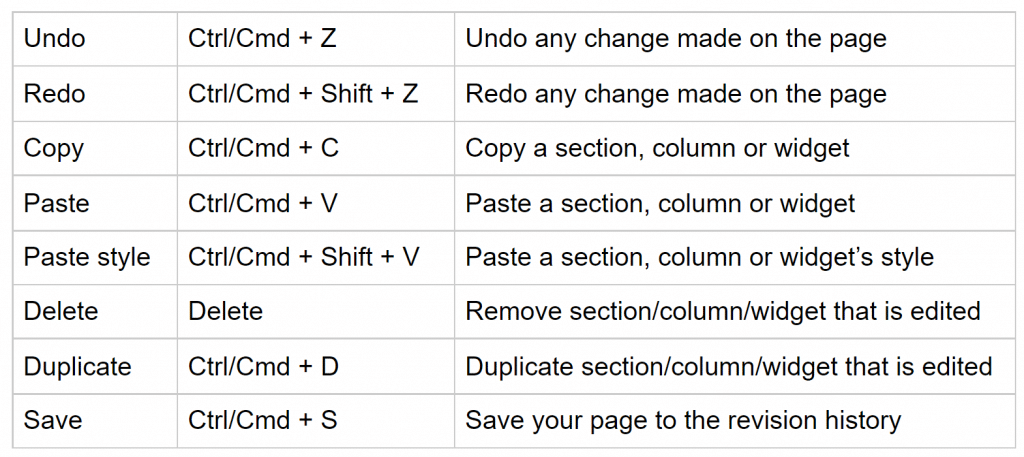
Action shortcuts:
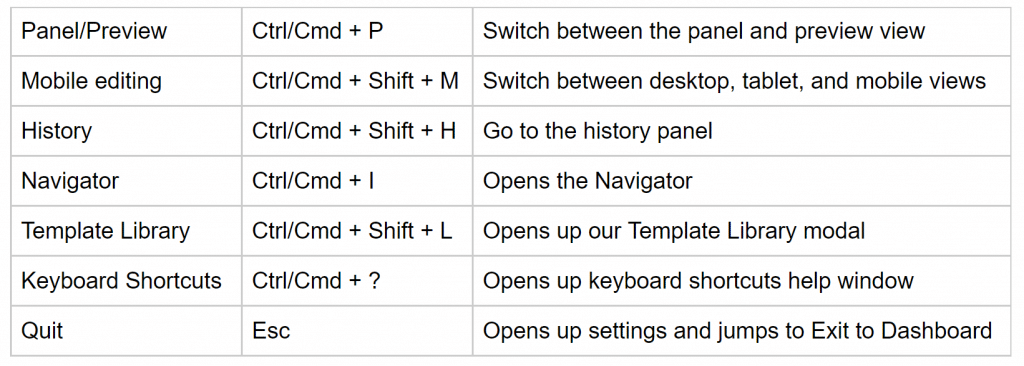
Go to shortcuts:
5. Save your Elementor templates
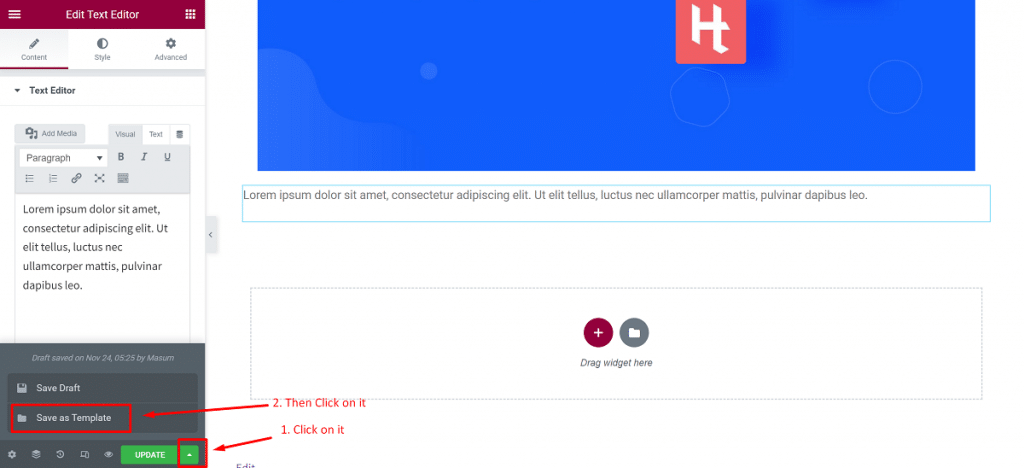
Let’s assume you have made a nice design for you or for a customer and want to use it later again on your own website using Elementor. In this case, you have to save it as a template from the Publish/Update button as illustrated below left.
This gives you the benefit that you need not redesign it repeatedly for every instance. For this, users feel free regarding speed and quick access as well. You can insert your saved templates just like you insert any other template.
If you want to save a section as a template, follow the instructions below:
- Open Elementor and right-click on the section
- Click on ‘Save as Template’
- Give a name to your template and you’re done.
But, if you want to save an entire page as a template, follow the instruction below:
- Click on the green arrow icon next to the Publish/Update button
- Click on the ‘Save as Template’ option
- Give a name to your template and it will be saved.
All templates including the section and page template will be saved in the Elementor templates library. Elementor also allows you to export templates. To get this, in your WordPress dashboard, go to Elementor>Saved Templates.
From this page, you can download your saved templates in a .json format. You can then use these templates on any other website without having to recreate the whole template again.
6. Find the solution in Elementor first
If you are stuck in a problem doing something and spending hours seeking one plugin to the solution on the website, then find the solution in Elementor. Amazingly, you can find the solution here because Elementor replaces many plugins on your website.
Surely, if you go with Elementor and Element Pack plugins, you need not look for any other plugins for regular websites. You can get some great benefits by considering Elementor pro alongside Element Pack as the pro version.
7. Use Global Widgets Efficiently
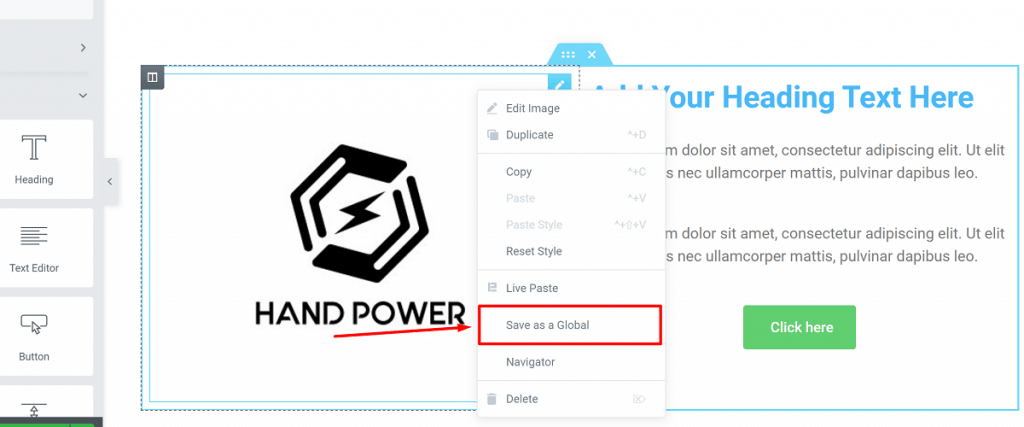
First, click here
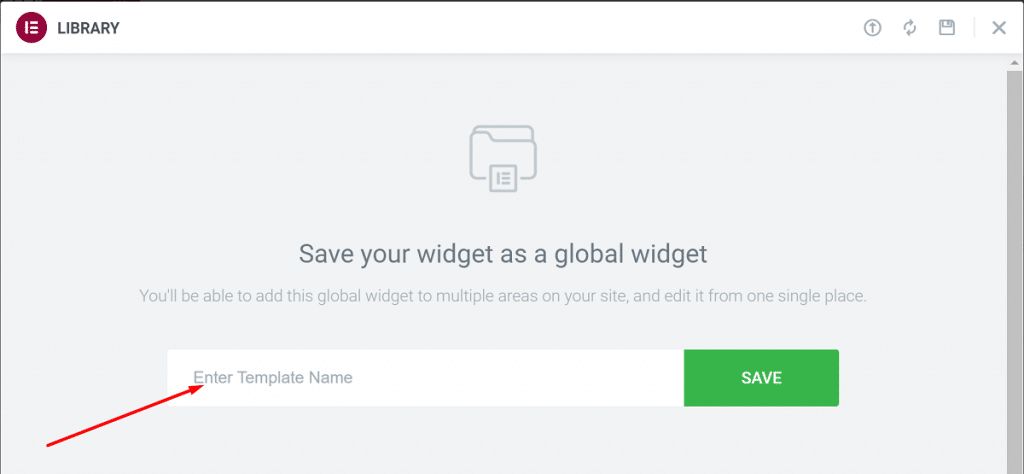
Then, type a name and click ‘Save’
If you have the habit to use copy/paste for reusing widgets, you can begin with global widgets to speed up your working process. Elementor has a feature named ‘global widgets’ that let you define a widget and use it across different pages.
Once a widget is defined as global, changes made to it will affect all the pages where the widget is added. If you have a website with many pages having the same widget, consider it as a golden feature i.e.: a CTA button, testimonials, etc.
Let’s see how you can use a global widget in Elementor:
- Right-click on the widget and click on ‘Save as a Global’.
- Give a name to your widget and click ‘Save’.
You will see a yellow border around the widget after converting it into a global widget and can edit it just like other normal widgets. You can add your global widget from the global tab in Elementor to different pages and use it when necessary to avoid conflicts.
8. Upload Your Own Fonts
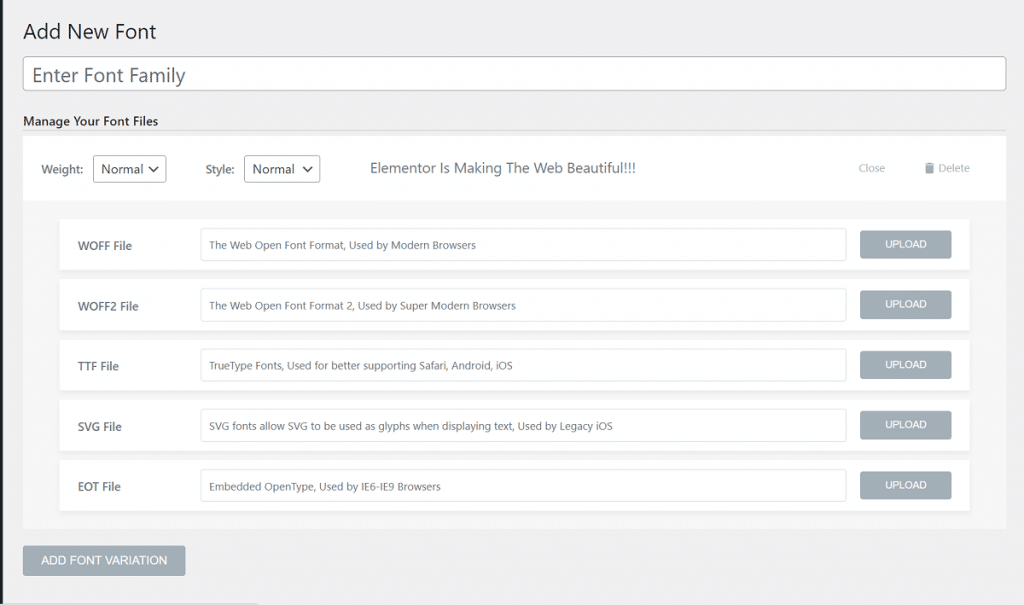
You can create stunning pages using fonts of a massive collection from Google Fonts. But if you want to stand out from the crowd, you can use custom fonts.
You can upload your own fonts in Elementor and use them on your pages. This is an amazing Elementor advanced tips and tricks you can use.
The process to upload custom fonts in Elementor:
- In your WordPress dashboard, go to Elementor>Custom Fonts.
- From the custom fonts page, click on ‘Add New’ to upload your custom font.
- You will be required to upload the font in these formats: .woff, .woff2, .ttf, .svg, .eot, etc.
You can use a font converter to create different formats if you don’t have all the formats of your font. Make sure you upload all the variations of your fonts. You can select the weight and style of font while uploading custom fonts.
9. Add Entrance Animation To Your Widgets/Sections
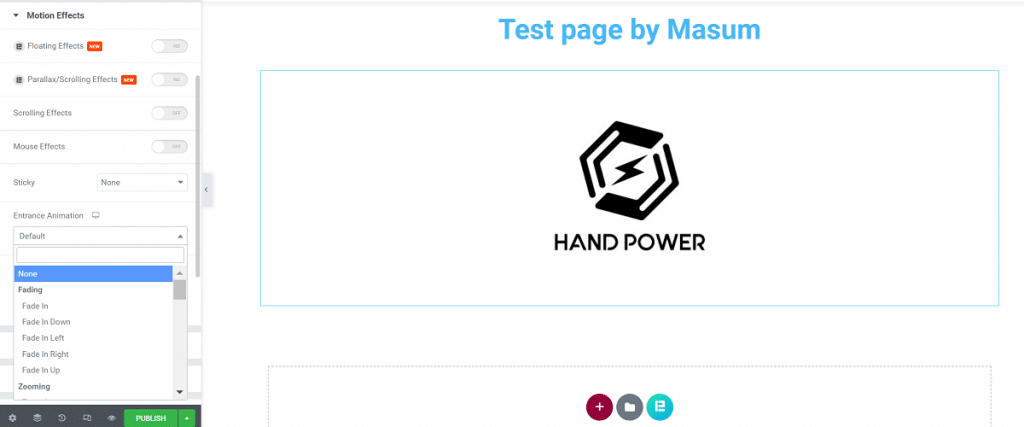
In the online market, UX is a vital issue. If you give your users a pleasing and smooth UX, they will rush towards your site. You can change the whole UX of your website by including even some subtle visual elements. It is a great Elementor advanced tips and tricks.
You can do that simply by adding entrance animation effects to your widgets and sections. Elementor offers many features to add animations to your widgets.
How can you add an entrance animation effect in Elementor? Follow these:
- Select the widget and go to Advanced>Motion Effects.
- From this tab, select the entrance animation for your widget among many options.
- Set animation duration and delay.
10. Add Shape Dividers
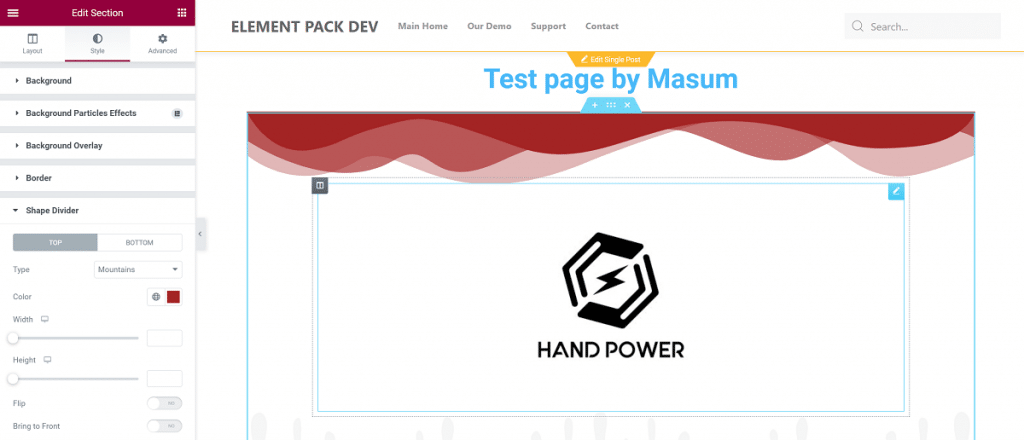
Shape dividers are common features added to the top/bottom of a section and I believe that you have used them. It’s amazing Elementor tips and tricks for you. You can make your pages attractive by adding shape dividers instead of using plain dividers, which will look much better.
Follow the instruction to add a shape divider:
- Select the section where you want to add a shape divider
- Go to Style>Shape Divider
- Choose to display at the top or bottom of the section
There are 15+ shape dividers you can choose from. You will be able to customize the color, change the height, flip the divider, and bring the shape divider to the front once you select your preferred one.
11. Add Filter Effects To Your Images
First, click here
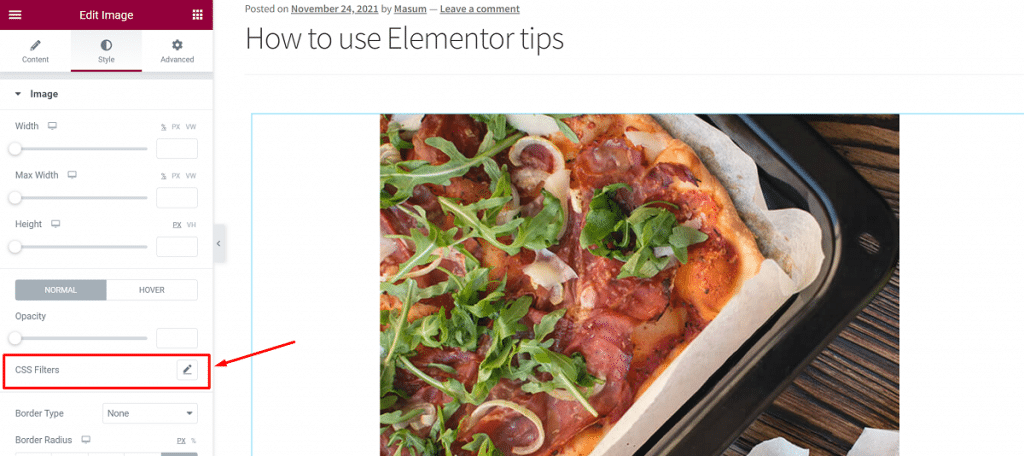
Then, change as you want
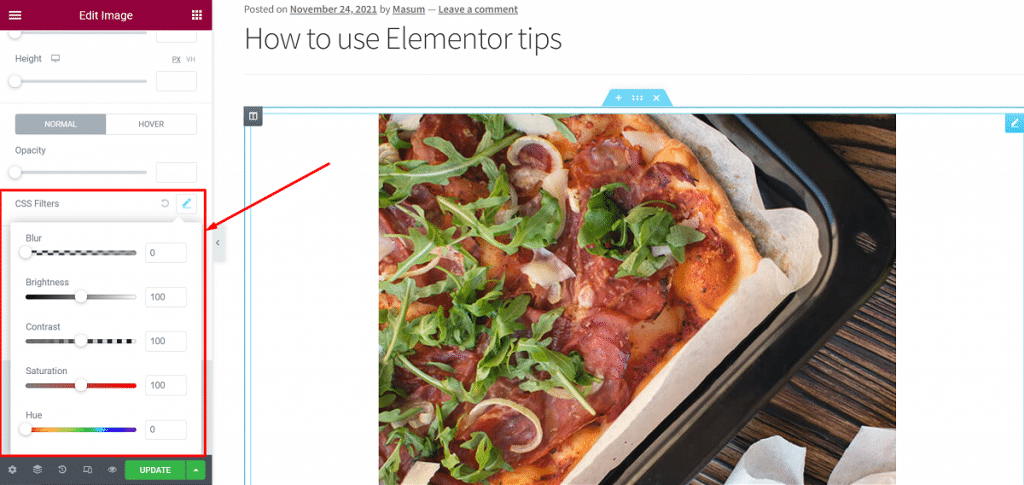
Basic image customization i.e.: changing the alignment, image size, and width can be done on Elementor. You can do basic image editing inside Elementor. It’s a nice Elementor advanced tips and tricks suitable for you.
With CSS Filters in the Style tab of the image widget, you can do basic editing on your images. You can adjust the brightness, contrast, saturation, and hue of the image. Even you can blur the image, and change whatever you need to make it look better on the page.
12. Set Default/Global Fonts
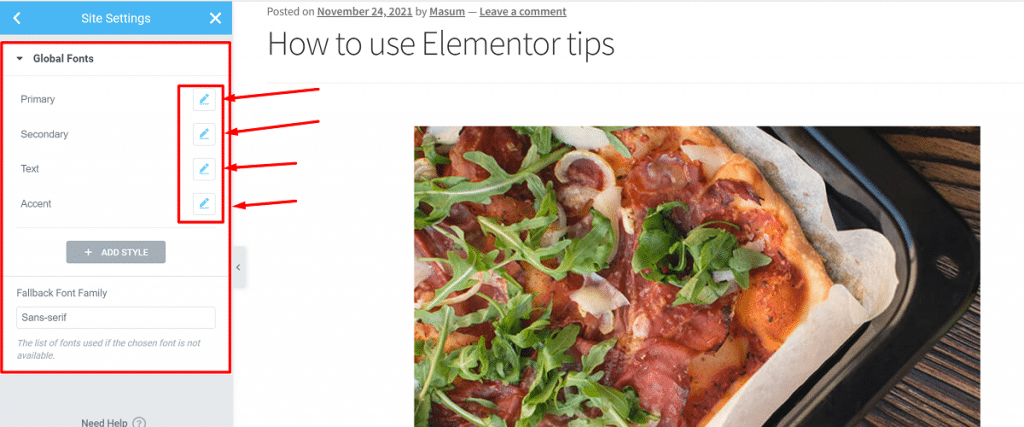
It happens commonly that you have to change fonts when you create a page every time. This won’t happen if you use this Elementor advanced tips and tricks and that is- set a default font of your website that will appear on every new page and you don’t have to worry about it.
You can choose the default/Global font of your website. Here’s how you can do this:
- Click on the top-left hamburger menu in Elementor to open the style and settings configuration menu.
- You will see an option for default fonts here. Click on this option and set the default fonts. You can choose different fonts for the primary heading, secondary heading, body text, and accent text.
Once you’ve selected the default/Global fonts, they will be selected automatically on every new page or editing a page. Note that the default fonts will not work where you have explicitly applied a font.
13. Set Default/Global Colors
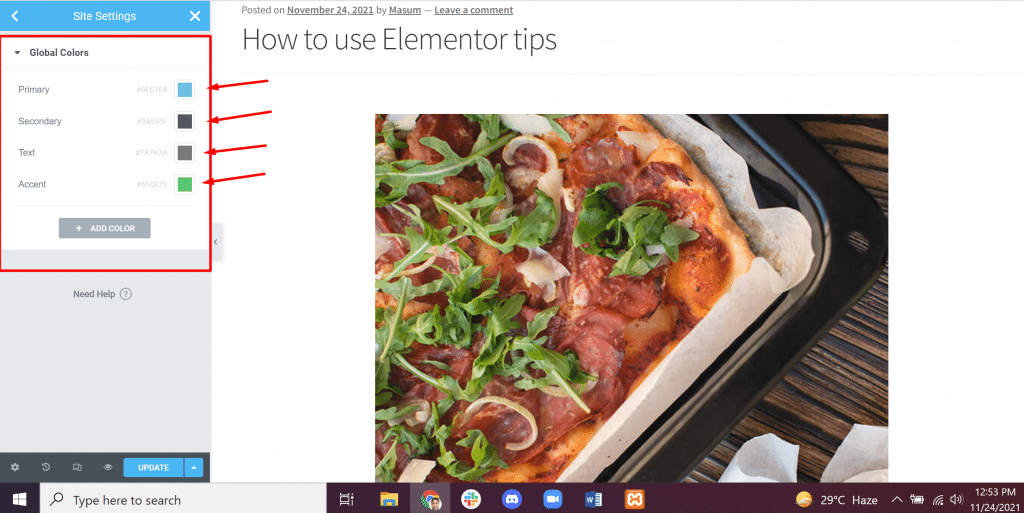
Among Elementor advanced tips and tricks, this is similar to default/Global fonts. You can set default/Global colors as you have set the default fonts. But unlike the default fonts, this feature adds your chosen colors to the Elementor’s color picker pre-set simply.
Still, this is a useful feature as you don’t have to copy and paste a color code every time.
To set default colors, you have to:
- Click on the Elementor hamburger menu on the top left and click on Default Colors.
- Choose the default colors.
You can choose primary, secondary, body, and accent colors. There are pre-made palettes you can also choose as your default colors.
14. Add A Full Height Section
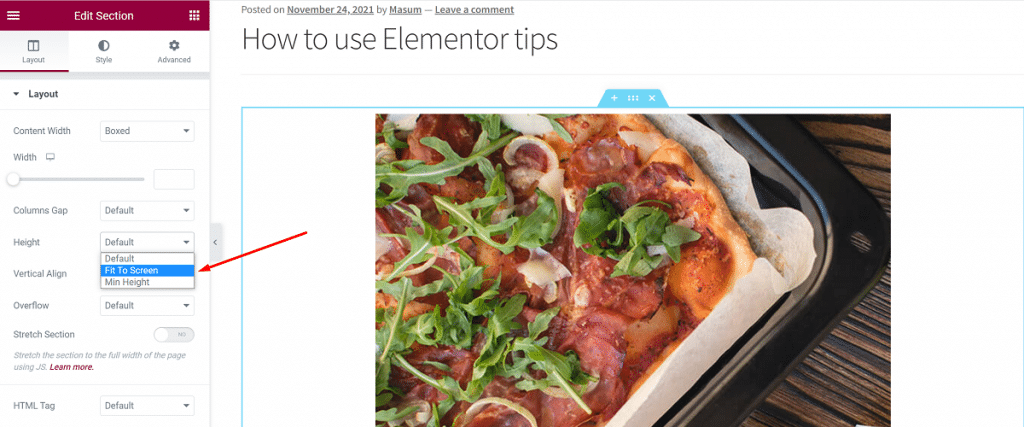
You can add a section that covers the whole browser screen. This is also a good choice among the Elementor advanced tips and tricks. You can easily create a full-height section with Elementor.
To do this, follow the steps below:
- Select the section you want to make full height.
- In the layout settings, click on the height.
- Set it by clicking ‘Fit To Screen’.
You are done! This will fit the whole section to the browser screen automatically.
15. Add Video Backgrounds
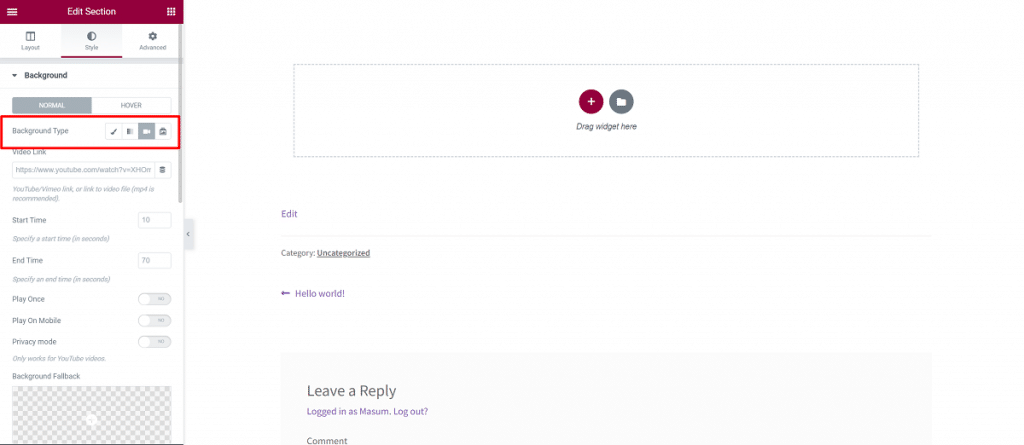
One of the Elementor advanced tips and tricks is to add video backgrounds. You can easily add stunning video backgrounds to your page.
To add video backgrounds in Elementor, you have to:
- Select the section
- Go to Style>Background
- Change the background type in the background settings to a video.
- Choose a video
- Add the link to the video, set the start and end time of the video.
There is an option to choose a fallback image also. This image replaces the background video on tablets and mobile devices.
16. Use Custom Positions For Image Backgrounds
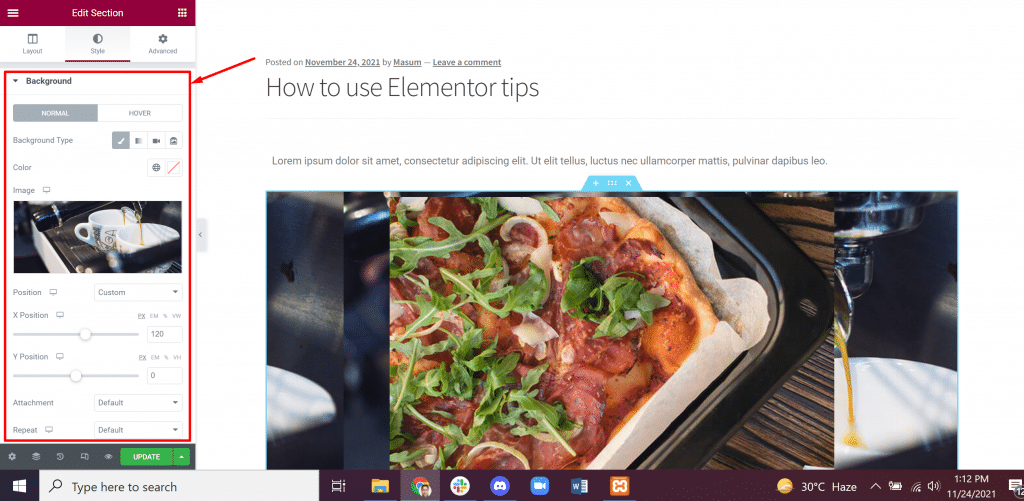
Beginners do not know how to set the position of a background properly and that is one of the biggest problems. No worries! Using custom positions for image backgrounds is one of the Elementor advanced tips and tricks that can solve the problem.
There are options that let you set the position for the image background. If your background image is still not positioned, you can set a custom position.
To do that, you have to follow this instruction below:
- Go to the style settings of the background image
- Click on position settings
- Select options i.e.: Top Left, Top Right, Center Left, etc.
There is another option for the custom position. This option lets you set the x and y position of the image easily. This is really helpful to fit the section properly with the other position options. You can use this option for positioning an image for mobile devices.
17. Change Page Layout Settings
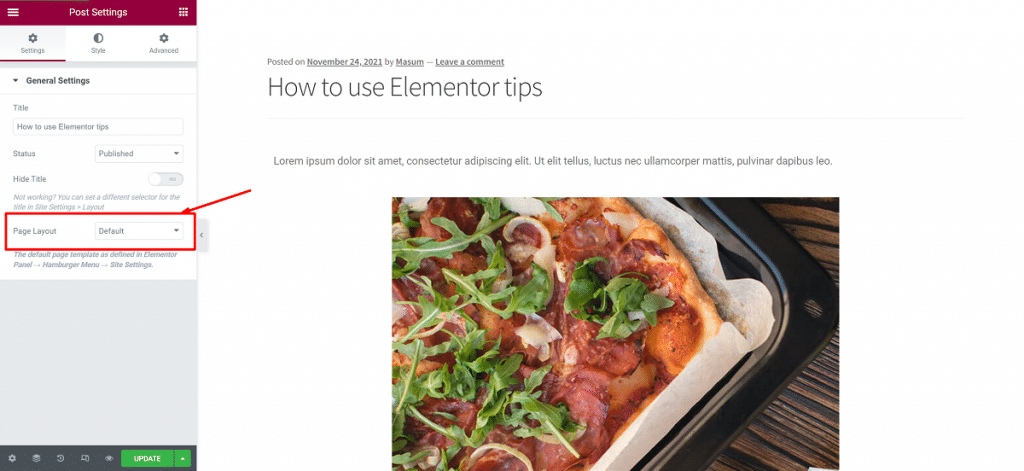
Many new Elementor users are not aware of this another feature. It is one of the Elementor advanced tips and tricks. You can customize the layout of your page using page layout settings.
How to change your page layout:
- Click on the settings button at the bottom left
- Select the general settings
- Change the page layout i.e.: Default Layout, Elementor Canvas, Elementor Full Width.
Let’s see what these layouts do:
- Default Layout: The Default Layout includes the page layout of your theme.
- Elementor Canvas: Elementor Canvas lets you start from scratch and design your page from a blank canvas.
- Elementor Full Width: Elementor Full Width makes the content full width. It lets design from scratch including the header and footer.
18. Add Parallax Effects
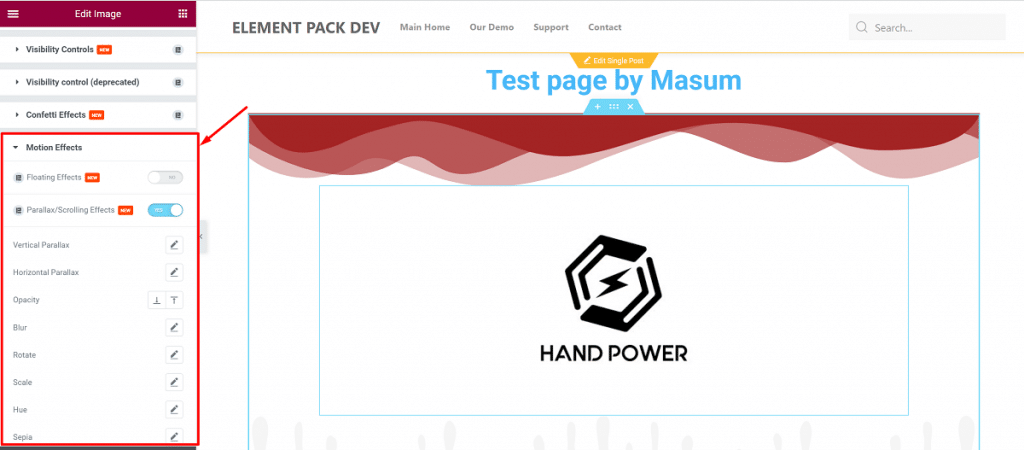
Another amazing tip of Elementor advanced tips and tricks is Adding Parallax Effects. It makes the page more engaging and usable. Besides being a design feature, it creates an engaging environment and gives a satisfying UX.
You can add different parallax effects with newly introduced Motion Effects by Elementor. There are two types of it:
- Scroll Effects: These are the effects when you scroll on the page. Vertical and horizontal scroll effects can be added.
- Mouse effects: It can help in creating a sense of depth. It makes the element move in relation to the movement of the mouse.
To add parallax effects:
- Select the widget to which you want to add the effect.
- Go to Advanced>Motion Effects.
- Enable the one you want to choose and customize it as you want.
Transparency, blur, scale, rotation, and other properties of this widget can easily be tweaked.
Conclusion
These are some cool Elementor advanced tips and tricks I discussed above for you. I hope this will help you speed up your work pretty much.
See you again. Have a nice day!
