

The Compare Button widget from Ultimate Store Kit Pro lets customers add products to a comparison list and compare multiple items side by side. It helps users evaluate product features, specifications, and pricing more easily, improving the shopping experience. This documentation explains how to use and customize the Compare Button widget.
Enable the Compare Button Widget
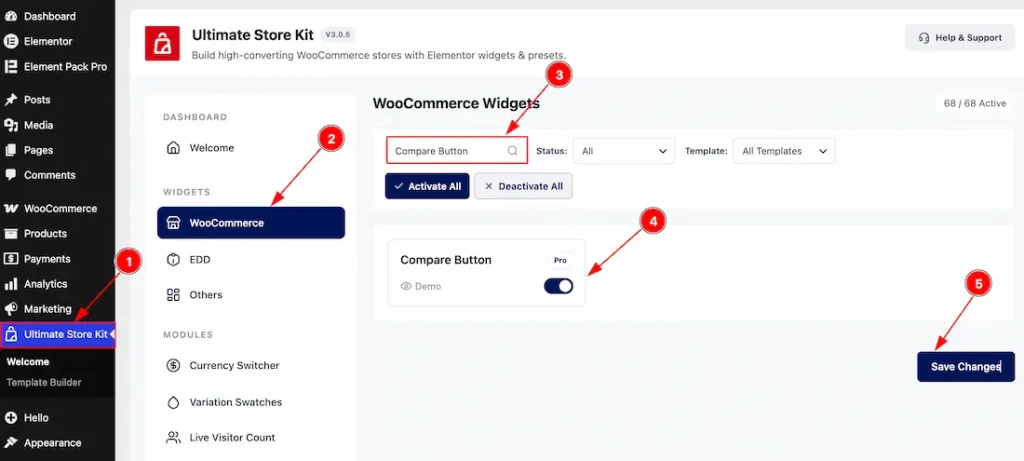
To use the Compare Button widget by Ultimate Store Kit, first, you have to enable the widget.
- Go to WordPress > Ultimate Store Kit Plugin dashboard.
- Then, click the WooCommerce Tab.
- Search the Compare Button Widget Name.
- Enable the Compare Button Widget.
- Hit the Save Settings Button.
Inserting the Compare Button widget
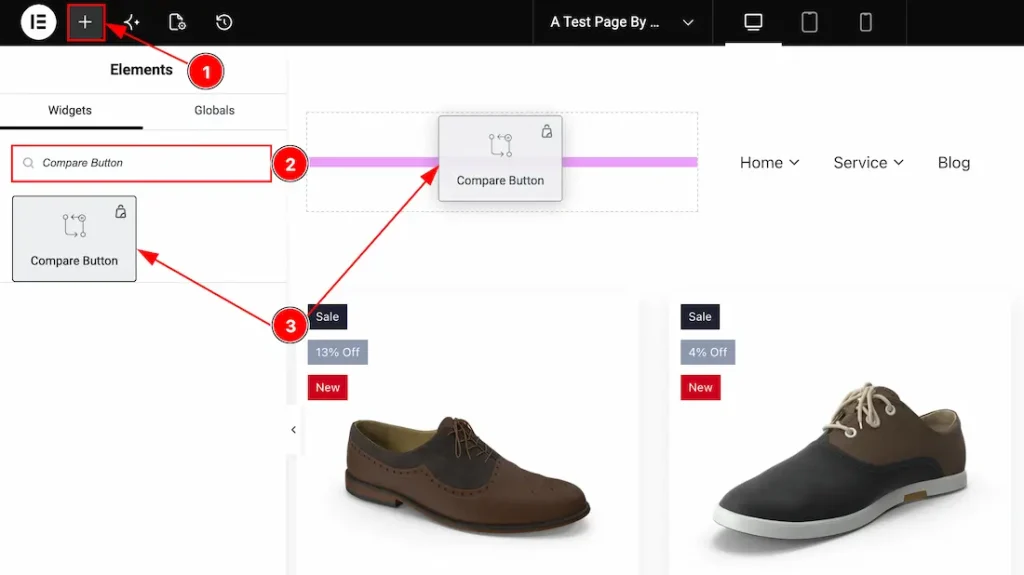
To give you a better idea of how the widget can be used in a real-world design, we have created a demo layout showcasing the widget in action. You can place and customize the widget anywhere on your website according to your specific needs and design requirements. Now. let’s see how to drag & drop the widget –
- Go to the Elementor Editor Page and Hit the “+” (Add Element) icon button.
- Search the Compare Button widget.
- Drag the widget and drop it on the editor page.
Things That Must Be Done
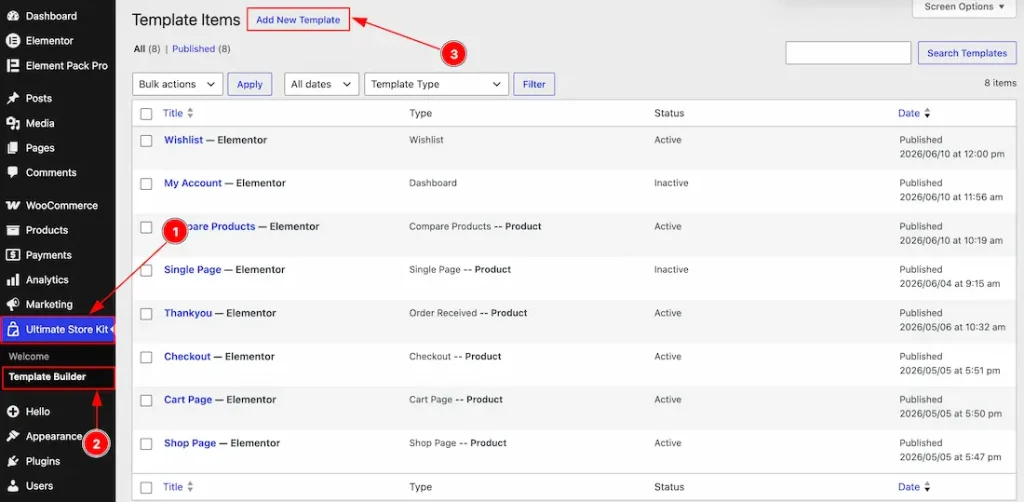
1. Go to the WP Dashboard and then click on the Ultimate Store Kit.
2. Below, inside the Ultimate Store Kit dashboard, you will find the Template Builder section. Now click on it.
3. After that, click on the Add New Template to create a new template.
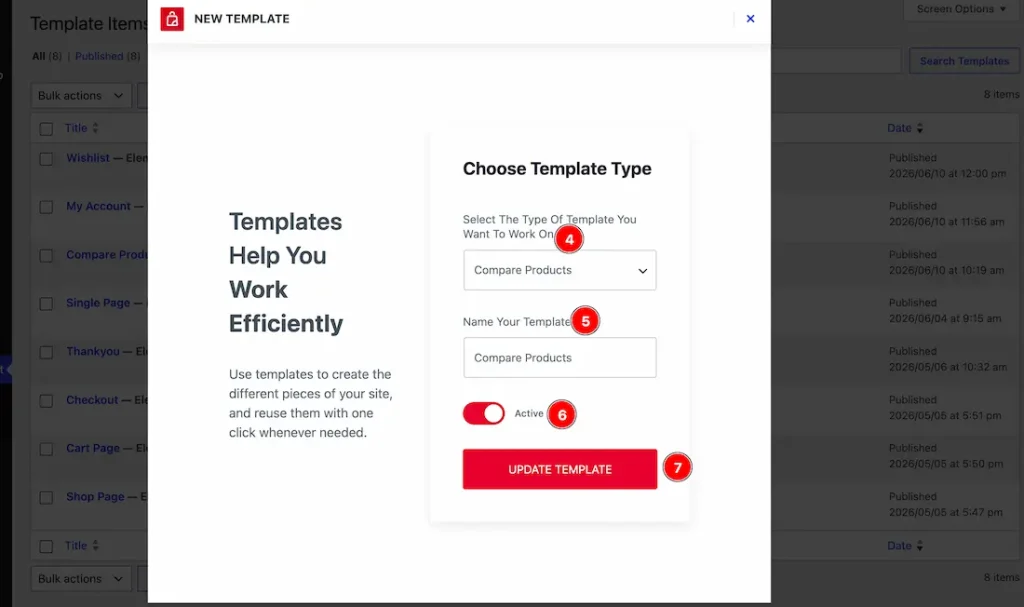
4. Choose Template Type: You can select the template type with this option. You need to find the template type named compare products and select that.
5. Name Your Templates: In this field, you have to name the template.
6. Switcher: Enable the switcher to make the template active with this option.
7. Update Template: Click on this button to save the settings that you have changed above.
After clicking on the update template button, the settings will change and it will redirect to the Elementor editor page, where you can customize the template. Let’s see what we have to do here –
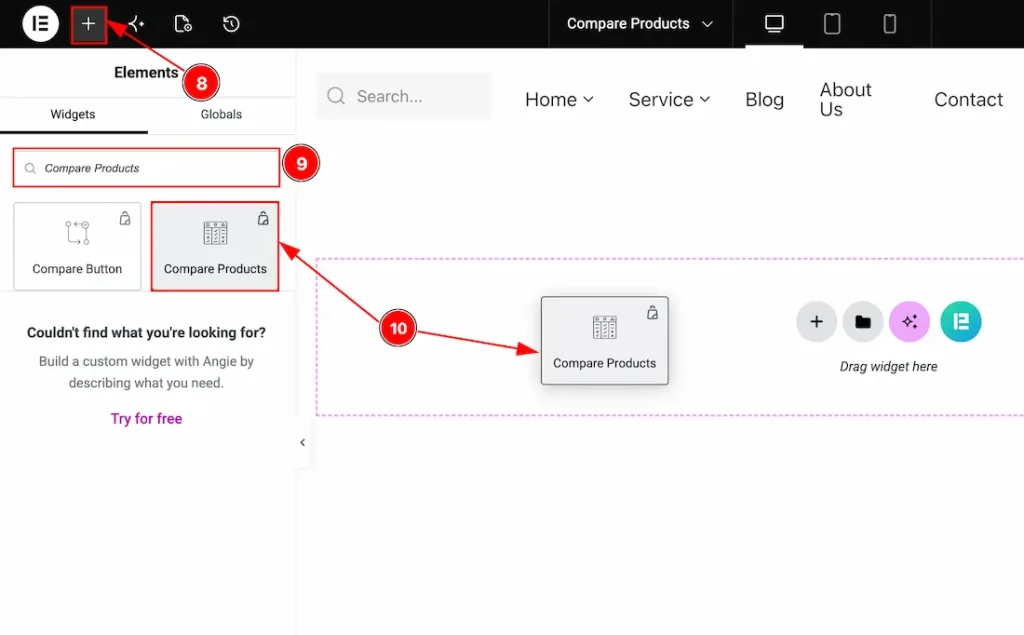
8. Go to the Elementor Editor Page and Hit the “+” (Add Element) icon button.
9. Search the Compare Products widget.
10. Drag the widget and drop it on the editor page and publish the page.
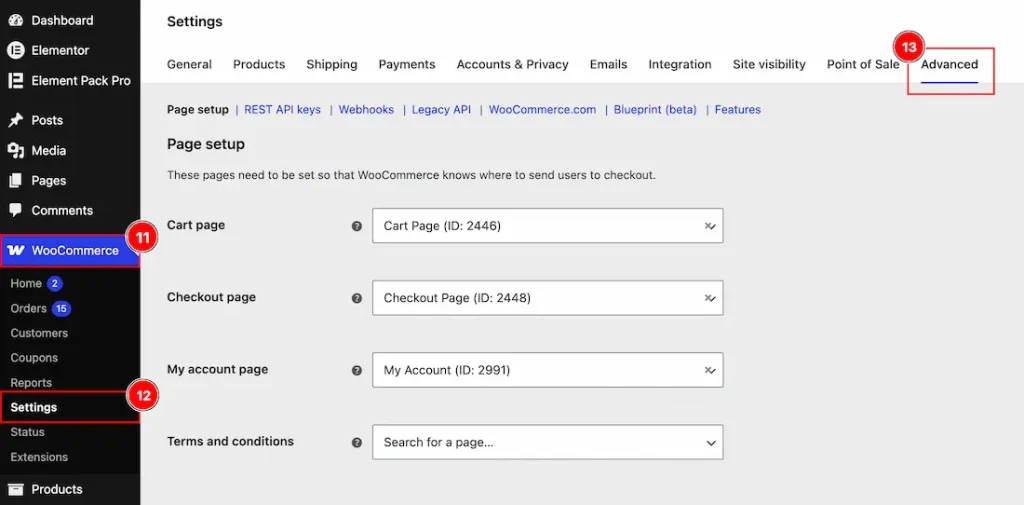
11. Now, you have to go back to the WP Dashboard and then click on the WooCommerce Tab.
12. After that, click on the settings option of the WooCommerce Tab.
13. Now, click on the Advanced Tab.
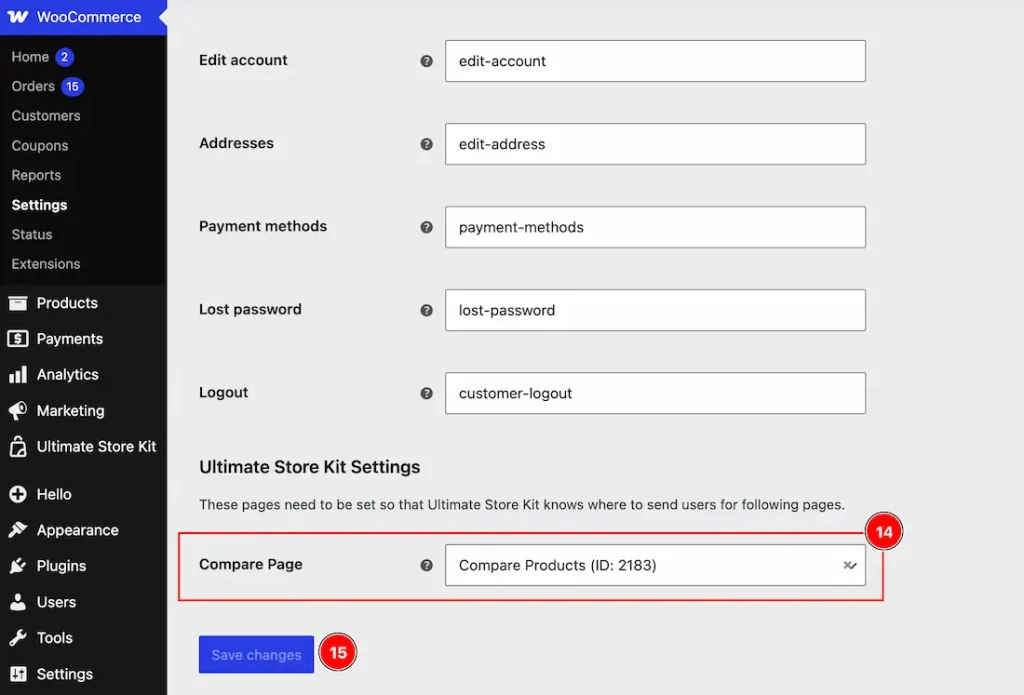
14. Now, scroll below, and you will find the compare page field. Here, you have to select the page that you just clicked.
15. Click on the ” Save Settings ” button to apply the changes you have made.
How the user compares counts on the Compare Button
You must enable the compare feature on the grid widget that you are using to showcase your products. You need to follow this –
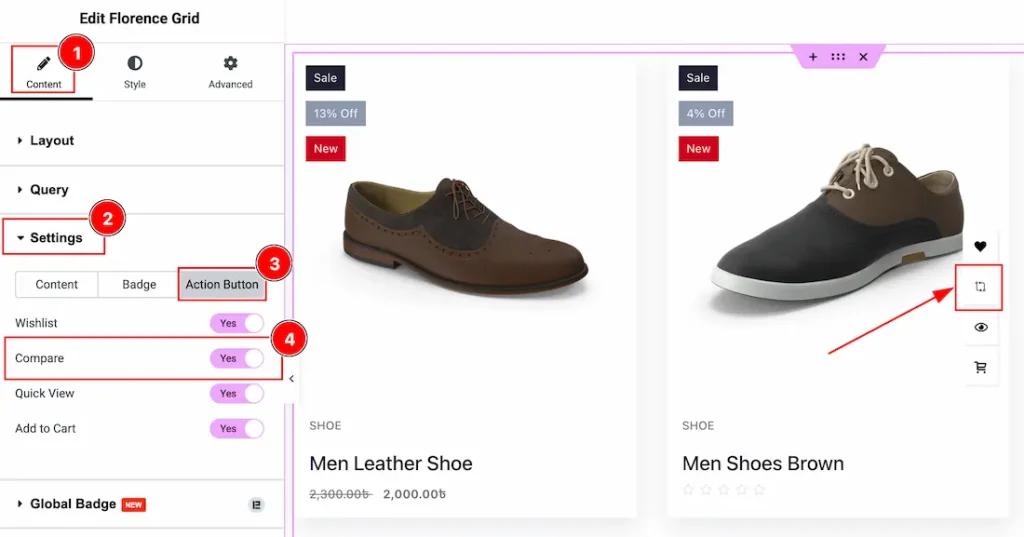
1. Select the Grid widget. Here, we have used the Florence Grid, so we have selected the Florence Grid and then navigated to the content tab.
2. Click on the Settings section to open the settings options.
3. Now, move to the Action button tab of the settings section.
4. Now, enable the switcher of the compare to display the compare icon on the products.
All done, now the product will display the compare icon, and let’s see how we can connect the Compare Button with this appeared compare icon.
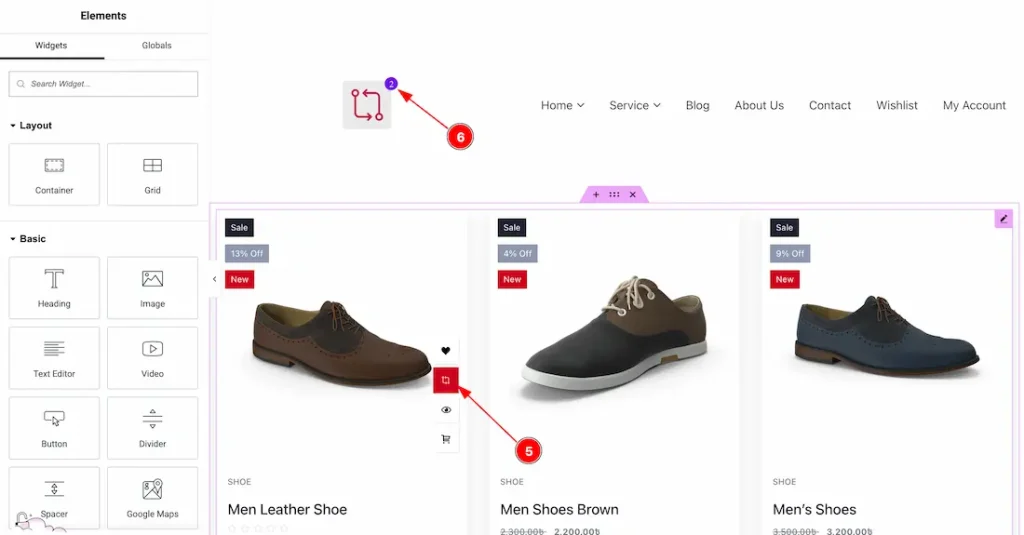
5. Click on the compare icon on the grid widget.
6. The number of clicks on the compare icon of the products will count on the button.
Note: You can see this preview when you publish the page, and on the live page, you will click on the compare icon.
Configuring the Style Tab
Compare Button Section
Go to Style > Compare Button
1. Alignment: You can adjust the position of the Compare Button to left, center or right with this option.
In this section, we have two more tabs. These are Icon & Badge. Let’s start customizing the Icon tab first –
2. Color: You can make changes to the Compare Button icon color with this option.
3. Background Color: You can make changes to the icon background color with this option.
4. Border Type: You can add and change the border types with this option.
5. Border Radius: You can control the roundness of the border with this option.
6. Padding: You can adjust the inner space of the icon with this option.
7. Box Shadow: You can add a shadow effect to the icon field with this option.
8. Size: You can adjust the size of the Compare Button with this option.
Now, let’s proceed to the badge tab customization –
1. Color: You can make changes to the badge count number color with this option.
2. Background Color: You can make changes to the background color of the badge with this option.
3. Border Type: You can add and change the border types with this option.
4. Border Radius: You can control the roundness of the border with this option.
5. Size: You can adjust the badge size with this option.
6. Typography: Change the font family, size, weight, transform, style, decoration, line height, letter spacing, and word spacing from here.
7. Offset: You can move the badge position horizontally and vertically with this option.
All done! You have successfully customized the Compare Button widget on your website.
Video Assist
The video will come soon. Please check the demo page for more examples.
Thanks for staying with us.