Picture this, you just published an epic 4000-word blog post or you’re visiting one. The topic of the blog is “Best Strategies for Link Building in 2024” so it deserves a long article to cover all the essential aspects.
But there’s one problem. That blog post is too long. So long that anyone might get overwhelmed. And bail before reading the entire thing.
So, what can you do about this?
Simple. Add jump links. These handy shortcuts take your website visitors directly to the most important sections. Result? A better user experience. And lower bounce rates.
I’ll show you exactly how to add jump links in WordPress Block Editor (without a plugin).
Let’s jump in.
What are Jump Links?
In simple terms, Jump Links are the easiest way to take site visitors from one part of a web page or blog to another part. Without scrolling.
Jump links also go by the names “Anchor links” and “Navigation links”. They’re super useful on long web pages.
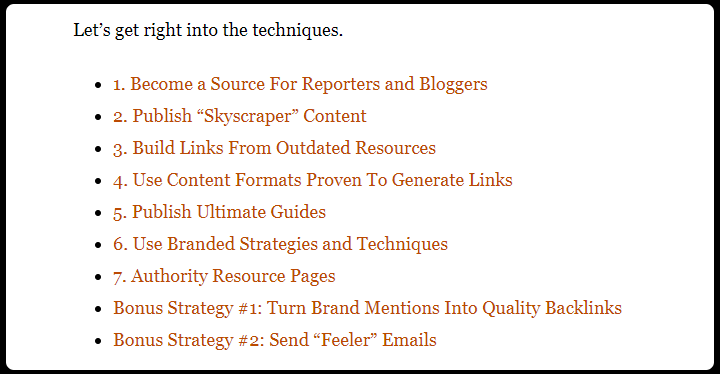
For example, Backlinko has a long blog post on backlink-building strategies. It has over 8,000 words worth of juicy tactics. But chances are, most readers will only want to read specific sections of that blog.
So they added some jump links in the intro that can take the visitors straight to the most important sections of the blog.

The plan is simple, sending readers right to their hottest advice. It will increase the visit duration by keeping the visitors hooked.
I also included a table of contents as jump links at the beginning of this blog, did you notice that?
How to Add Jump Links in WordPress Block Editor (without Plugins)
There are various ways to create jump links for your web pages. You can either do it manually or use a plugin to do the work for you.
Here I’ll just focus on the manual strategy so that you understand the basics of jump link creation.
Jump to a Section on the Same Page
You can easily provide your readers with a shortcut to the juiciest parts of your content. That can be a different section, a paragraph, or even an image within the same page.
The first thing you need to do is open the page in the WordPress block editor that you want to work with. After that, you’ll be ready to create jump links between different parts of the page.
Here’s how to do it step-by-step:
Step 1: Create an Anchor Link
Let’s say in the blog on link-building strategies for 2024, you covered all sorts of tactics:
- Content clustering
- Skyscraper technique
- Broken link building
- Backlink Building
- And more…
That’s a lot of scrolling!
So to make it easier for your readers, add jump links in the intro so readers can skip right to the section they want.
First, create an anchor link for readers to jump to.
Scroll down and highlight the section you want to link to. Let’s say it’s the content clustering segment.
Select the text “Content Clustering” as your anchor text. After selecting the text, you’ll see the insert link button. Click on it.
You’ll see the insert link popup where you usually insert a URL or search for a post or page of your website to link. Now type in the anchor link starting with a pound or hash sign (#) instead of the traditional HTTP.
Use relevant and descriptive anchor text like “#Content-Clustering-Section” to easily understand where it’ll take you. Using hyphens (-) between each word is a good idea here. You can also capitalize each word for better readability.
Now press Enter and your jump link will be active. Copy the anchor text without the # sign to use it as the ID attribute.
Step 2: Add the ID Attribute to Your Anchor
Scroll down and highlight the section you want to link to. In this case, it’s the “Content Clustering” section. Select the heading and open the block editor menu.
In the block editor menu, go to Advanced and you’ll see an option to add an HTML anchor. Paste the anchor text you copied earlier in the box like this:
And that’s it. Your jump link is ready for testing.
Step 3: Save and Preview the Changes
We’re in the home stretch now.
Hit that blue “Update” button to save your new jump link.
Next, preview the page to test it out. Click the jump link in the intro paragraph. If there is no issue, you should jump straight down to your anchored section.
Some things to check:
- Make sure the linking text is descriptive. For example, “#Content-Clustering-Section”, not just “#Section.”
- Check that the anchor tag ID (Content-Clustering-Section) matches your link. Always make the ID unique by not using the same ID for two different anchor links.
- Test by clicking back and forth several times.
If your jump link doesn’t work, no worries. Just recheck Steps 1 and 2 above.
Jump to a Different Page
Linking within WordPress pages is another powerful application of jump links. Here’s how to jump from one page to another using jump links:
Let’s say you have two pages called “Jump Page One” and “Jump Page Two”. Now you want to jump between them using jump links.
The process is similar. But this time, you’ll grab the URL of the page section you want to link to and add the anchor link with it.
Let’s create a jump link from “Jump Page One” to “Jump Page Two”.
- Go to “Jump Page Two” and find the section you want to jump to.
- Select the heading of the section and open block settings.
- Go to the Advanced tab and in the HTML Anchor box, type in your preferred jump link text. Copy the text.
- Go back to “Jump Page One”, select your anchor text, and click the link icon. Search for the “Jump Page Two” page and click on it. It will insert the URL of the page.
- Now click on the Edit icon and add # followed by the jump link text that you copied earlier. Press Enter and update the page.
The jump link will be successfully created now. Open the “Jump Page One” page and click on the jump link to test if it’s working.
How to Create Jump Links with HTML
If you prefer the text mode rather than the visual editor, then you can add the anchor link from there too by editing HTML. Here’s how to manually create an anchor link in HTML.
Select the anchor text, click on the three dots, and click Edit as HTML.
To create the anchor link, use the <a href=“”> </a> tag around the anchor text and type in the anchor link you want to use (starting with #), like this:
Once you’re done, click “Edit Visually” and you’ll see the change in the anchor text.
Then go to the heading of the section you want to jump to and open the HTML editor in the same way. Here, use the ID attribute to the HTML tag and type the anchor link inside it without the # sign.
Note: If there is a class attribute in the HTML, use the ID attribute after that.
How to Create Jump Links with Table of Contents
If you use a plugin to generate a table of contents, then it’ll automatically create jump links to all the sections of a web page. The table of contents will include all the headings of the sections and they’ll be clickable.
Let’s show you a demo with the Table of Contents feature of the Rank Math plugin:
Why Should You Use Jump Links?
At this point, you may be wondering: Why bother with jump links anyhow?
Fair question!
Here are 5 killer reasons to start using them TODAY:
1. Better User Experience
Jump links create a smoother navigation system on your site. Readers don’t have to endlessly scroll or click “back” when they miss sections. Instead, they seamlessly jump between pages and page sections. This reduced friction keeps visitors engaged.
2. Increased Time on Page
According to Backlinko, longer page visit duration correlates to higher rankings. Why? It signals to Google that visitors find your content useful. Jump links encourage deeper exploration and reading, boosting that key metric. You should always plan on how to keep visitors on your WordPress website longer and jump links can help you there.
3. Lower Bounce Rates
Bounce rate measures single-page visits with no other site activity. The higher your bounce rate, the less sticky your content is. Jump links entice further reading, lowering bounce rates by allowing readers to effortlessly jump to key sections.
4. Backlink Target
Anchor links create prime backlink targets on popular evergreen content. For example, other content creators may link to a specific section of your blog rather than the whole post. This earns niche-relevant backlinks.
5. Professional Polish
Jump links also add an extra layer of refinement and utility to your content. They look ultra-pro and thoughtful compared to wall-of-text posts. Consider them the finishing touch of site usability!
Other benefits of jump links include better content organization and increased SEO performance. You can see different jump links as featured snippets in the Google SERP from time to time.
Final Words
There you have it – everything you need to know about how to add jump links in WordPress Block Editor.
We covered:
✅ What is a jump link?
✅ How to create jump links step-by-step in the block editor.
✅ How to link sections of the same page and how to link different pages.
✅ Advanced customization with HTML.
✅ Key benefits of jump links.
The best part? No plugins required. Just good old Anchor tags and URL linking.
Remember, well-placed jump links transform long posts from endless drudgery into clear-cut navigation systems. All with a few clicks.
So go out there and start jumping your visitors down to your money content today!
Have any lingering questions? Drop them below in the comments section and let’s keep the discussion going!


