Building a WordPress contact form from scratch requires hours of coding, CSS tweaks and responsiveness testing. Even though you do it right, your website may still be vulnerable to spam submissions, leaving you overwhelmed.
You can address these issues with pre-built templates that instantly deliver professional fields, modern styling, spam protection and mobile-ready designs, without any technical expertise.
This guide shows how to use ready-made contact form templates to capture leads quickly and effectively on your site.
Why Use a WordPress Contact Form Pre-built Template?
Pre-built templates save hours compared to creating fields one by one. They come pre-loaded with standard contact form elements, such as name, email, subject and message fields, ready to use right away.
These templates ensure professional, responsive designs across all devices without CSS knowledge. Customization is easy, changing colors, fonts, or adding fields through intuitive editors.
Users avoid common pitfalls like broken layouts or spam issues found in scratch builds. Targeting keywords like “contact form template” is perfect for beginners who need fast, reliable results.
Creating a WordPress Contact Form Using a Plugin
You will find many plugins in the WordPress directory or marketplace that promise easy contact form creation, but most of them only offer basic, non-templated layouts.
Even when a few plugins include pre-built templates, those templates are often rigid, hard to customize, or missing essential features like conditional logic, analytics, and strong spam protection. That’s where Sigma Forms stands out.
It combines AI-powered form generation with fully customizable pre-built templates, so you get professional designs, flexible fields, and conversion-focused functionality in a single plugin.
How to Create a WordPress Contact Form Using a Pre-built Template
Here, we will create a contact form using Sigma Forms and its pre-built template. We recommend Sigma Forms as a premium form builder for pre-built templates. It offers cutting-edge features that you won’t find in any other plugin. Let’s see what premium features the Sigma Forms plugin offers.
Follow these simple steps to create a contact form:
Step 1: Install Sigma Forms Plugin
After purchase, you need to install the plugin in your WordPress website.

- To install the plugin, go to your WordPress dashboard and open the “Plugins” menu.
- Select the “Add Plugin button.

- Click on “Upload Plugin.”

- Then choose the file, locate the plugin’s ZIP file on your computer, and select it.

- Click the “Install” button.

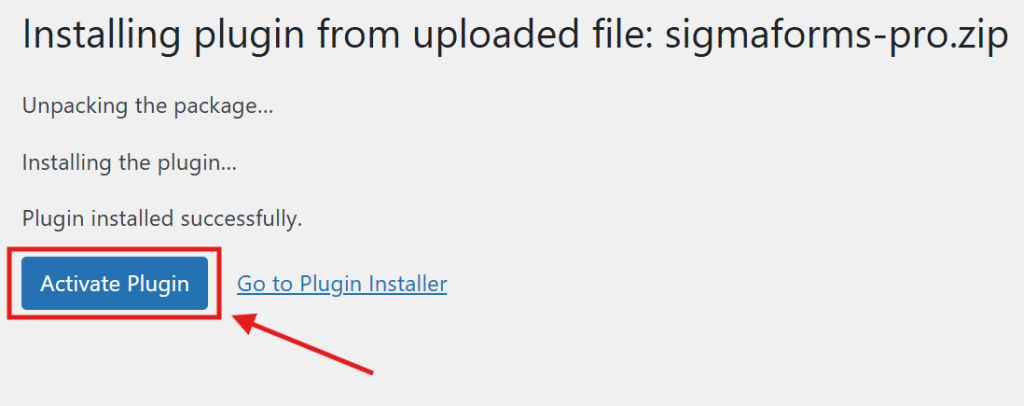
- Finally hit the “Activate button”.
Step 2: Start a New Form
After installing the Sigma Forms plugin, let’s make a new form.
- Stay in your WordPress dashboard.
- On the left sidebar, click on “Sigma Forms” → “Forms.”

- At the top, click “Create New Form” to get started.
Step 3: Choose a Pre-built Template for a Contact Form

- Here you will find the pre-built template section
- Choose the Contact Form template

- Then, an automatic prompt will appear in the AI input field. You can add more prompts as needed.
- After the input prompt, click Generate Form with AI

- Then the fields will be generated according to the conditions and requirements given in the prompt. You can also customize them if you want.

Step 4: Add a Field and Customize Your Form
- You can create a new field by clicking the + Add Field button. And if you need to customize or edit a field, click the pencil icon next to it.
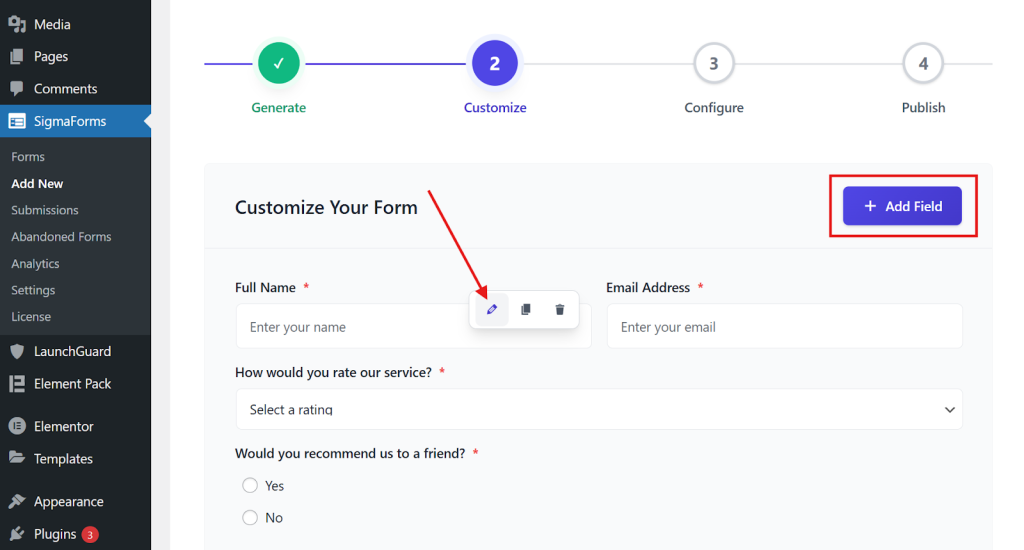
- Then click Continue to Configure.
Step 5: Configure Your Form
Now it’s time to set up your contact form.
- First, give your form a name and write the message users will see after they submit it.
- If you want to save the form entries in your database, make sure to turn on the “Store Submissions in Database” option.

- Next, navigate to the Email tab to configure how the form handles submissions, sends email notifications, and manages security.

- Then, open the Webhooks tab. Here, turn on any webhooks you need for the form. By default, each webhook follows the global settings; however, you can make changes for this particular form if desired.

- Finally, click the “Continue to Publish” button below.
Your contact form is now ready to publish! Review everything one last time, and then click “Publish” to make your form live for users.

Step 6: Place the Form Using Shortcodes on Any Page or Post
Great job! Your survey form is ready. You’ll get a special code, called a shortcode, to add it to your website.

- Copy the shortcodes.

- Go to the page or post where you want to show the form.
- Add a “Shortcode” block or widget on that page.

- Paste your shortcode into the block.

- Save or publish the page, then preview it to ensure the form appears correctly.

- Your contact form is now set up!
This way, you can easily set up any online contact form, from basic to advanced, on any page or post. If you want to build forms more quickly and efficiently, you can use the pre-built feature.
Conclusion
Building a high-converting contact form in WordPress shouldn’t require hours of manual coding or troubleshooting. With Sigma Forms, you can leverage AI-powered generation and pre-built templates to deploy professional, secure forms in a fraction of the time.
Whether you are designing a straightforward contact page or a complex lead-capture system, the plugin provides the necessary tools for every skill level. By combining intuitive drag-and-drop customization with advanced features like conditional logic, seamless integrations, and robust spam protection, you can ensure your forms are both highly functional and visually engaging.
Stop letting spam submissions and rigid layouts slow down your workflow. Start capturing qualified leads today, utilizing built-in analytics and conversion tools to drive better results across your entire site.
Want more insights delivered straight to you? Subscribe to our newsletter for the latest WordPress tips, in-depth tutorials, and exclusive offers sent directly to your inbox.