WordPress is a popular content management system, making it a common target for attacks.
While the core software is secure and regularly audited by many developers, it’s crucial to implement further strategies to protect your site.
We at BDThemes believe that security is not limited to eliminating risks; it also involves reducing those risks. As a website owner, you can take many actions to enhance the security of your WordPress site, even if you are not particularly tech-savvy.
So, today, in this blog, we will provide our essential recommendations and a WordPress security guide checklist to guide you in safeguarding your website from hackers and malware.
How to Secure Your WordPress Website?
WordPress powers a significant portion of the internet, making it a popular target for hackers and malicious actors. Ensuring the security of your WordPress website is critical for protecting your data, maintaining user trust, and keeping your site operational.
Below is a detailed guide that covers step by step to safeguard your site.
Keep Strong Passwords
Using strong passwords is one of the most critical steps in securing your WordPress website. A strong password should include a combination of uppercase and lowercase letters, numbers, and special characters.

Avoid using easily guessable words like “123456789” or personal information such as your name or birthdate. Instead, opt for complex and unique passwords, such as “ou$%3diuyr67”.
Control User Permissions
Managing user permissions is a crucial aspect of WordPress security. WordPress offers predefined user roles, each with specific capabilities. By assigning roles thoughtfully, you can minimize the risk of unauthorized access and maintain better control over your site.
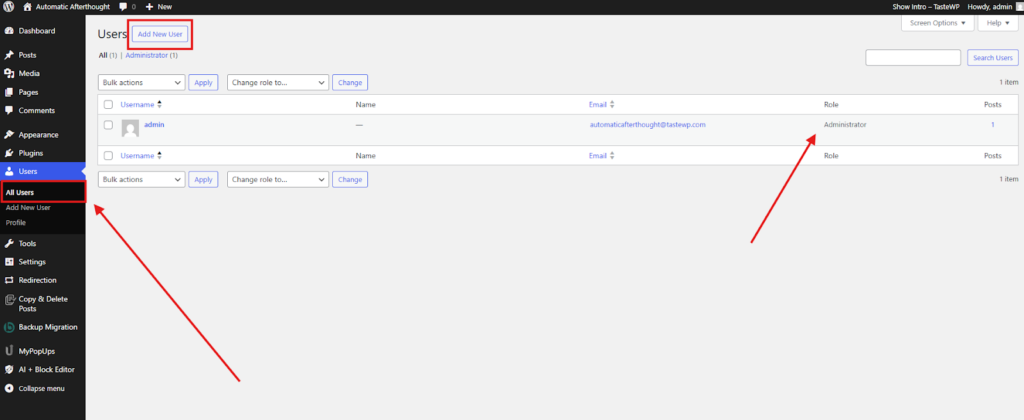
Here’s a breakdown of the main roles:
- Administrator: Has full access to the entire site. Limit this role to only trusted individuals, as administrators can make critical changes, including deleting the site.
- Editor: Can manage and publish all content, including content created by other users. Ideal for team members responsible for overseeing content but not site settings.
- Author: Can create, edit, and publish their posts but cannot access posts by others or make site-level changes. Perfect for regular content contributors.
- Contributor: Can write and edit their posts but cannot publish them. This role works well for guest writers or occasional contributors.
- Subscriber: Can only manage their profile and access restricted content if your site includes subscriptions. Suitable for user accounts that need limited site interaction.
Keep WordPress Updated
Outdated versions of WordPress can leave your website exposed to known security issues, making it easier for hackers to exploit weaknesses.
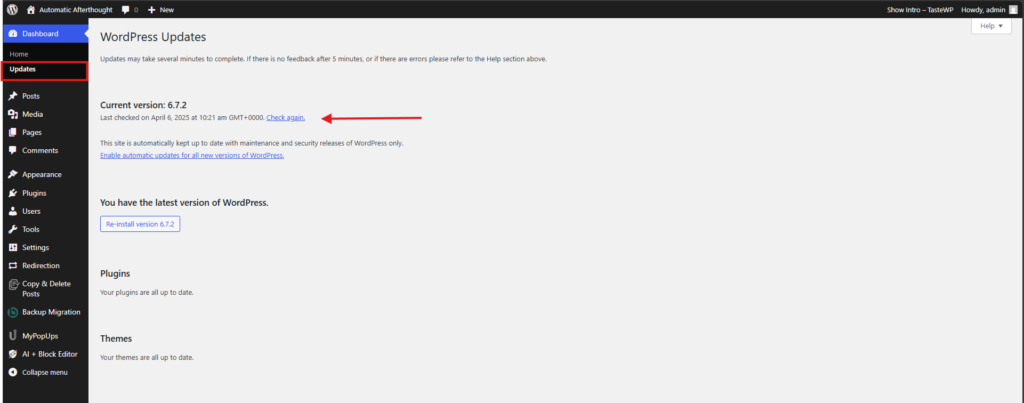
With WordPress continually evolving, updates ensure your site remains compatible with the latest technologies and performance standards.
Keep Themes and Plugins Updated
Keeping your WordPress themes and plugins updated is crucial in ensuring your website remains secure and functional. Here’s how you can manage updates effectively:
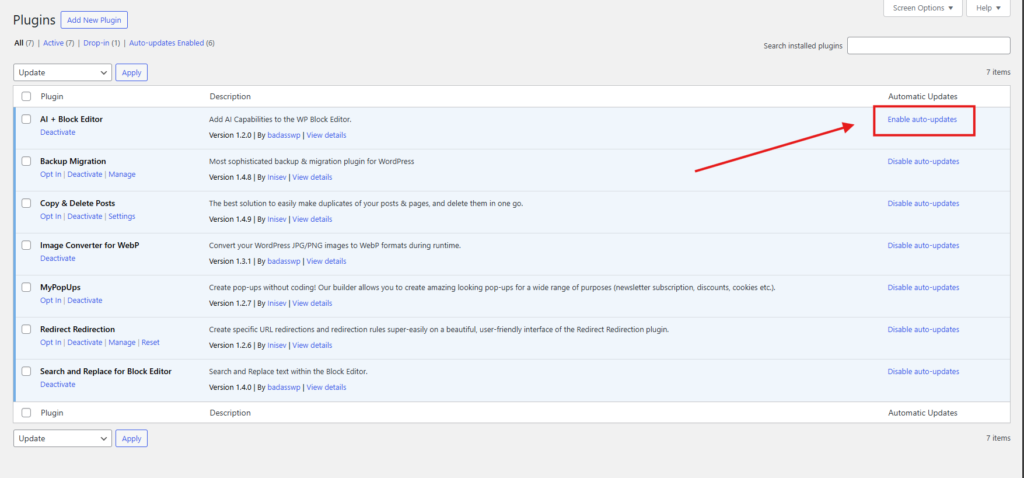
- Enable Automatic Updates: Many themes and plugins offer an option for automatic updates. Activate this feature to ensure they are updated as soon as new versions are released.
- Manual Updates: Regularly check for updates in your WordPress dashboard under the Plugins and Appearance sections. Click “Update Now” whenever updates are available.
- Remove Unused Plugins and Themes: Unused or inactive plugins and themes can become security vulnerabilities. Delete them if they’re no longer needed.
- Follow Developer Recommendations: Always update plugins and themes to the latest versions recommended by their developers. These updates often include important security patches.
- Test Updates in a Staging Environment: Before applying updates to your live site, test them in a staging environment to avoid compatibility issues that could disrupt your site.
- Check Change Logs: Before updating, review the change logs provided by the developers. This helps you understand what the update entails and ensures compatibility with your site.
WordPress Backup Solution Installation
Backups are your best line of defense against WordPress attacks. Let’s face it—nothing online is completely secure. If high-profile government websites can be hacked, your site isn’t invincible either.

With a backup, you can quickly restore your WordPress site if something goes wrong. There’s no shortage of backup plugins, both free and premium, to get the job done. However, the key is to regularly save complete backups of your site to a remote location—not your hosting account.
Cloud services like Amazon, Google Drive, and Dropbox, or private storage options like Stash, are smart choices. How often you should back up depends on how often you update your site. For most, daily or real-time backups are ideal.
The good news is that setting this up is a breeze with plugins like Duplicator, UpdraftPlus, or BlogVault. They’re reliable, user-friendly, and don’t require any coding expertise.
Here are a few steps to help you set up a reliable backup solution:
- Choose a Plugin: Install a reliable backup plugin like UpdraftPlus.
- Set up: Schedule automatic backups and configure storage options (e.g., Google Drive, Dropbox).
- Run Backups: Perform a manual backup initially and ensure files like the database, themes, and media are included.
- Test: Use the restore feature to verify the backup works correctly.
WordPress Security Plugin

Your website is the backbone of your business, making its security essential. For high-value websites, relying solely on web hosting security isn’t enough. Some WordPress security plugins offer advanced protection and are the most reliable way to safeguard your site. Here we suggest some solutions:
- Choose a Plugin: Use trusted options like Wordfence, Sucuri, or Solid Security.
- Install and Activate: Find the plugin under Plugins > Add New, click Install Now, and then Activate.
- Set Up: Configure features like malware scans, login protection, and firewall.
- Scan Regularly: Run scans to detect and fix vulnerabilities.
- Stay Updated: Keep the plugin updated to tackle new threats.
Web Application Firewall (WAF)
The simplest method to secure your WordPress website and feel secure is to use a web application firewall (WAF).

A firewall serves as a line of defense against possible attacks on your website. Only valid requests are permitted to pass through after harmful traffic is filtered out. The firewall stops unwanted access to your website by blocking the connection if it detects a threat.
Firewalls come in two primary varieties, at the network and application levels.
Application-level firewalls analyze data packets at the application layer, whereas network-level firewalls filter traffic according to IP addresses and ports.
There are numerous WordPress plugins and features available, providing a wide range of solutions that cover all of the security choices accessible to WordPress users. For various reasons, this makes it easier to manage each plugin or service and enables smooth operation.
We used Cloudflare on BDThemes for many years and still recommend it as one of the best web application firewalls for WordPress.

To enable a Web Application Firewall (WAF) using Cloudflare, follow these steps:
Sign up or Log in: Create a Cloudflare account or log in to your existing one.

Add Your Website: Add your website to Cloudflare by entering your domain name. Cloudflare will scan your DNS records.
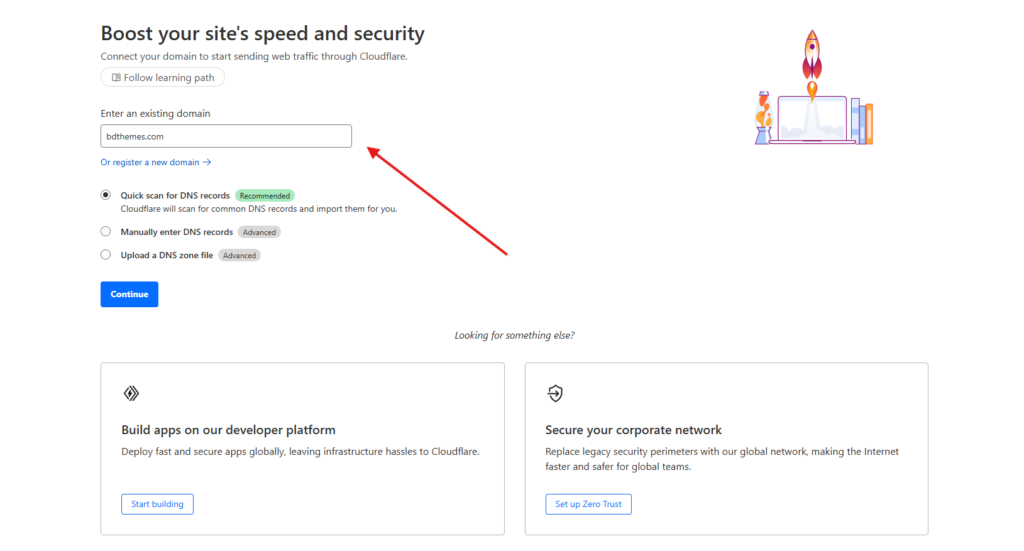
Update DNS Settings: Update your domain’s nameservers to point to Cloudflare’s nameservers. This step is crucial for routing traffic through Cloudflare.
Enable WAF:
- Go to the Firewall section in your Cloudflare dashboard.
- Navigate to the Managed Rules tab.
- Enable the WAF by toggling the switch.
Configure Rules:
- Use the pre-configured Managed Rulesets provided by Cloudflare to protect against common threats like SQL injection and cross-site scripting.
- You can also create custom rules to suit your specific needs.
Test Your Configuration: Ensure that your WAF is functioning correctly by testing it against potential threats.
SSL/HTTPS
If a website’s URL contains HTTPS, it has an SSL certificate installed and is using a secure data transfer protocol. This is crucial because most contemporary browsers display warnings for websites that do not employ HTTPS.
To set up SSL/HTTPS in WordPress, follow these steps:
- Obtain an SSL Certificate: Get an SSL certificate from your hosting provider or a Certificate Authority like Let’s Encrypt.
- Install the SSL Certificate: Follow your hosting provider’s instructions to install the certificate on your server.
- Update WordPress Settings:
- Log in to your WordPress dashboard.
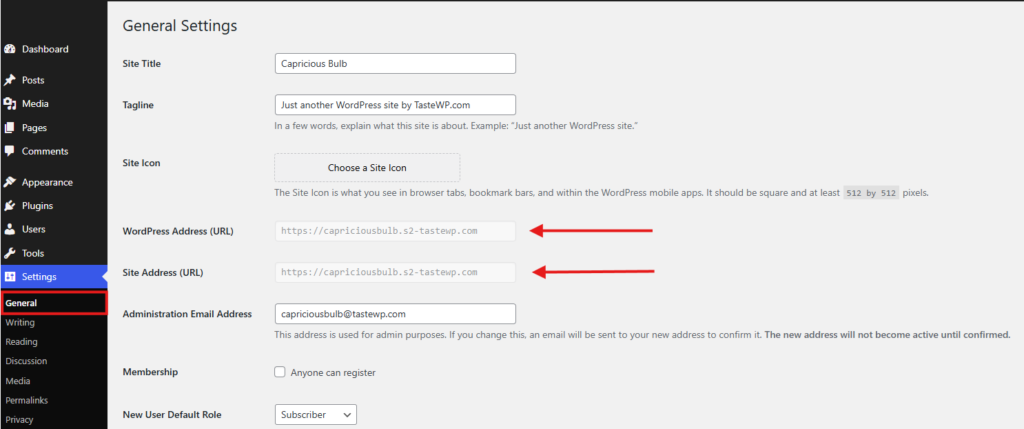
- Go to Settings > General.
- Update the “WordPress Address (URL)” and “Site Address (URL)” fields to use https://
- Redirect HTTP to HTTPS:
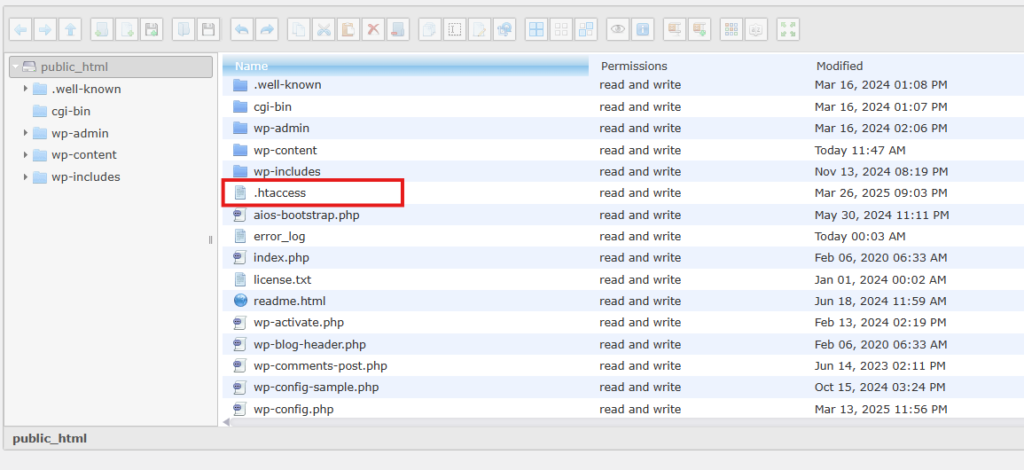
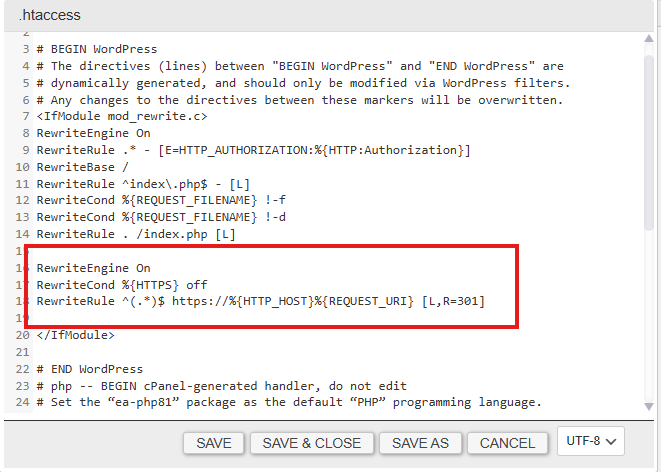
- Add the following code to your .htaccess file to redirect all traffic to HTTPS:
RewriteEngine On
RewriteCond %{HTTPS} off
RewriteRule ^(.*)$ https://%{HTTP_HOST}%{REQUEST_URI} [L,R=301]
- Fix Mixed Content Issues:

- Use a plugin like “Really Simple SSL” to automatically detect and fix mixed content issues.
Update Admin Username
Previously, “admin” was the default WordPress admin username. This makes it simpler for hackers to use brute-force attacks because usernames include half of the login credentials.
Fortunately, WordPress has now modified this, requiring you to choose a unique username when you install the plugin.
Nevertheless, some one-click WordPress installers continue to utilize “admin” as the default admin username. Switching web hosting is probably a smart decision if you observe it to be the case.
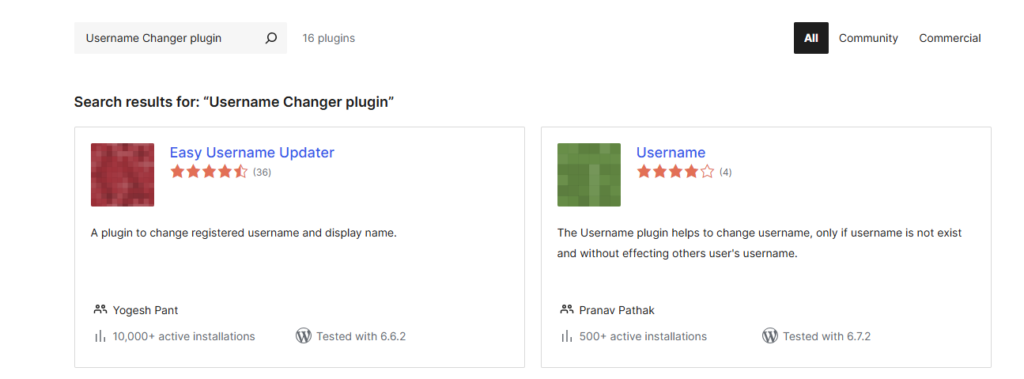
There are three different ways to modify the username because WordPress doesn’t let you do so by default.
- Delete the previous admin username and create a new one.
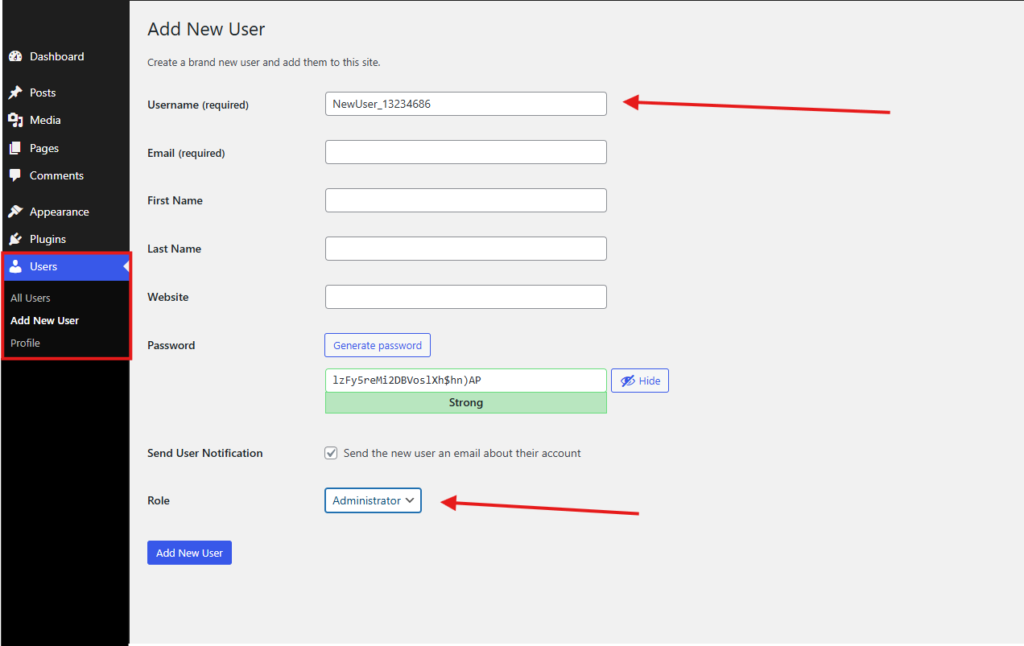
- Update your username from phpMyAdmin
- Using the Username Changer plugin
Block File Editing
You can modify your theme and plugin files directly from the WordPress admin area.
We advise disabling this function since it poses a security risk in the wrong hands.
To disable file editing in WordPress (e.g., to prevent editing themes and plugins from the dashboard), follow these steps:
- Access Your Website Files: Use an FTP client or your hosting control panel (like cPanel) to access your website files.
- Open the wp-config.php File: Locate the file in the root directory of your WordPress installation.
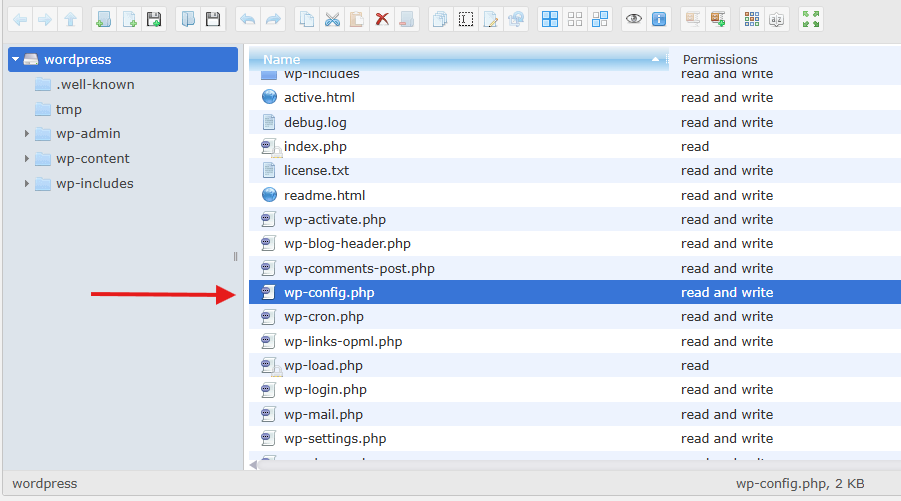
- Add the Following Code: Insert this line of code into the file, preferably above the comment /* That’s all, stop editing! Happy blogging. */:
define(‘DISALLOW_FILE_EDIT’, true);
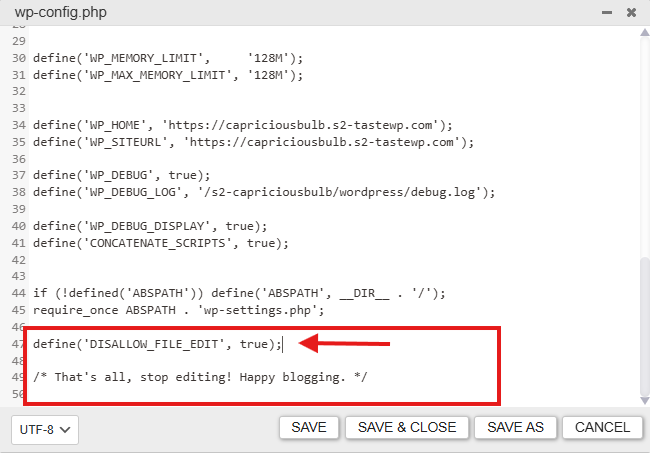
4. Save and Upload: Save the file and upload it back to the server if you’re using FTP.
This will immediately disable the built-in file editor for themes and plugins, enhancing your website’s security.
Stop PHP Execution
To disable PHP execution in certain WordPress directories and enhance security, follow these steps:
- Create an .htaccess File:
- Open a text editor (e.g., Notepad) and add the following code:
<Files *.php>deny from all</Files>
- Open a text editor (e.g., Notepad) and add the following code:
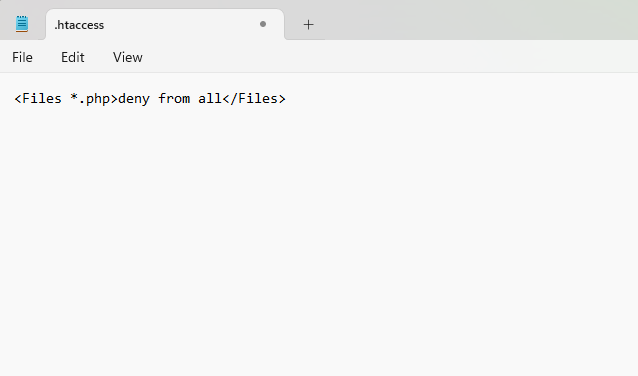
- Save the file as .htaccess (not .htaccess.txt).
- Identify Target Directories:
- Focus on directories like /wp-content/uploads/ and /wp-includes/ where PHP execution is not required.
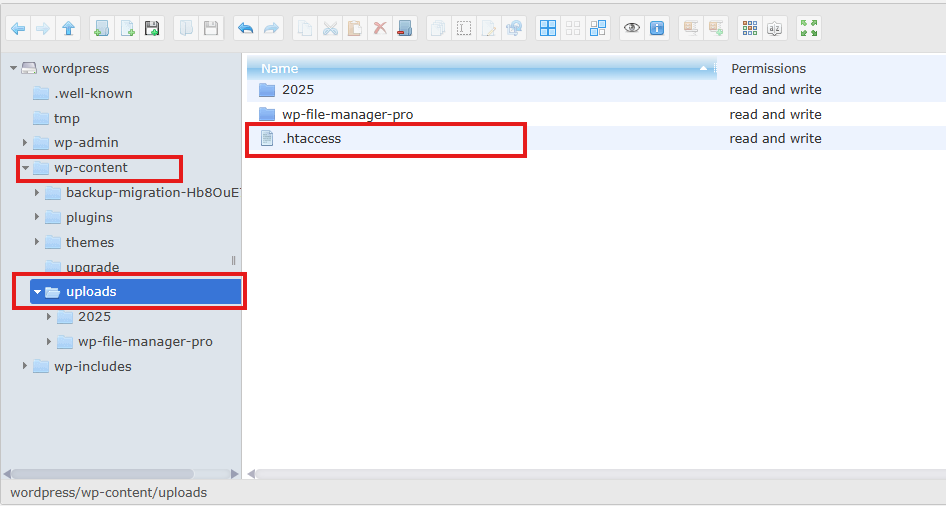
- Upload the .htaccess File:
- Use an FTP client or your hosting control panel (e.g., cPanel) to upload the .htaccess file to the target directories.
Limit Failed Logins
WordPress lets users attempt to log in as many times as they’d like by default. Because of this, your WordPress website is open to brute-force attacks. Here, hackers attempt to break passwords by attempting to log in using various combinations.
Restrict the number of unsuccessful login attempts a user can make to resolve this issue effectively. The previously described web application firewall automatically manages this process.
Nevertheless, you can proceed with the following procedures if you do not already have the firewall configured.
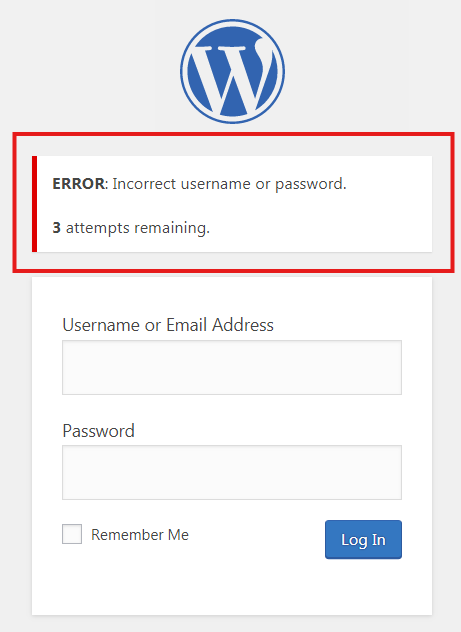
Install a Plugin: Use a plugin like Limit Login Attempts Reloaded
Configure Settings:
- Set the maximum number of login attempts allowed.
- Define lockout durations for repeated failed attempts.
Enable Notifications: Configure email alerts for lockouts to stay informed about suspicious activity.
Whitelist Trusted IPs: Add your IP address to a safelist to avoid accidental lockouts.
Enable Captcha: Use plugins compatible with Google reCAPTCHA for added protection.
Enable 2FA
To enable Two-Factor Authentication (2FA) in WordPress, follow these steps:
- Install a 2FA Plugin: Use a plugin like WP 2FA or miniOrange Google Authenticator.
- Activate and Configure:
- Go to the plugin settings in your WordPress dashboard.
- Choose your preferred 2FA method (e.g., authenticator app, email, or SMS).
- Set up an Authenticator App:
- Install an app like Authy or Google Authenticator on your phone.
- Scan the QR code provided by the plugin to link your account.
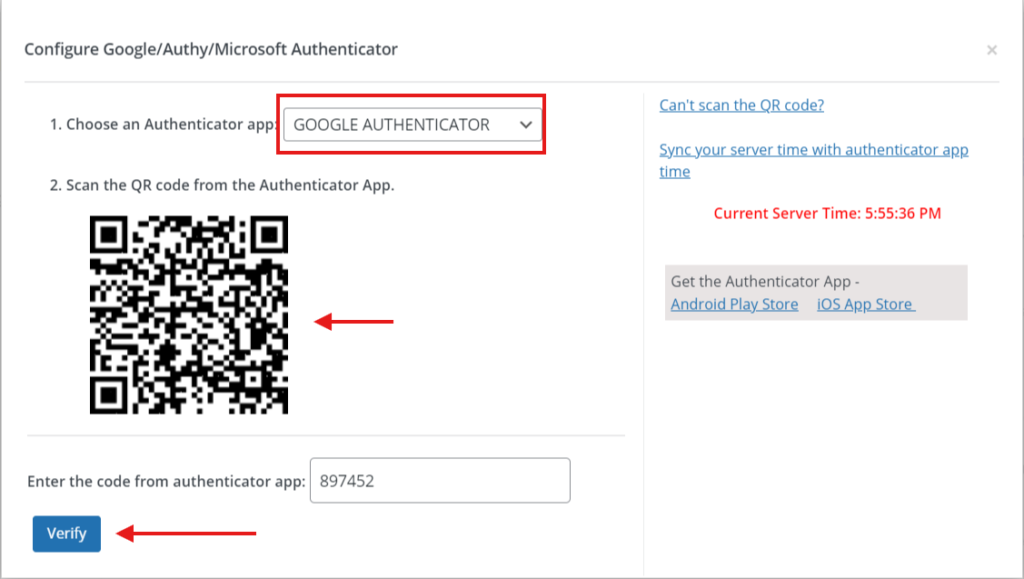
- Test and Save: Verify the setup by entering the generated code and save the settings.
- Enforce 2FA for Users (Optional): Require 2FA for all users or specific roles for added security.
Conclusion
Cyberattacks can happen in many ways, like injecting malware or launching DDoS attacks. Since WordPress is such a popular platform, hackers often target it. That’s why WordPress site owners need to know how to protect their websites.
But keeping your site secure isn’t something you do just once. Cyberattacks are constantly changing, so you need to check and update your security regularly. While risks will always exist, using the right WordPress security measures can help lower them.
I hope this blog has helped you understand why WordPress security is so important and how you can protect your site. If you have any questions or know more tips, feel free to share them in the comments.
If you liked this article, don’t forget to subscribe to our newsletter to get more exciting articles, news, and offers right in your inbox. Also, follow us on Facebook, Twitter, and LinkedIn to stay updated.


