WordPress stands out as a leading website creation platform. It is also renowned for its limitless customization possibilities. Its popularity is inherently tied to the exceptional flexibility it offers users.
Transforming your entire website into a unique masterpiece and customising its themes and plugins can be an effortless task with the use of WordPress. Even, beginners like zero tech-knowledged people can master this technique.
Wondering how?
This blog covers everything about ´how to customize my WordPress website´.
Preparing for Customizing Your WordPress Website
Before you jump on the complete anatomy of your WordPress website, having a backup of your previous version is vital. Thus, whether you´re customizing your client´s site or your own website, the backups are the failsafe for you if you go through anything wrong.
We all know it needs a lot of effort to build an entire website. Whether you created a health, business, or eCommerce website, you need to keep it safe from certain threats like software crashers.
Besides, having a backup can save tons of your productive time, effort, money, and more.
It can help you in various situations. Suppose you need to get back to the previous version of your site after customizing or analyzing the performance of the new website. Sometimes, not all the changes may not work apparently as you plan. So, it´s always better to have a clone of your site if you need it later.
Moreover, getting a backup of your WordPress website is not a hassle. You can utilize some backup plugins to save time when making a secondary copy of your valuable online presence.
There are bundles of WordPress backup plugins that can save your day, like Solid Backups, UpdraftPlus, Duplicator and many more.
Here´s a quick step that you can follow to install a backup plugin for your site–
- Go to ´Plugins´
- Click on ´Add New Plugins´
- Search for backup plugins.
- Install and Activate the plugin you prefer the most.
Customizing WordPress Theme
There are three ways to customize your website´s look or it looks–
- Customize the Entire Website Manually
- Customize the Themes Codes
- Customize the Theme using plugins
As all the available themes on WordPress allow customization opportunities to users, you may need to utilize theme customization plugins as well.
Therefore, in this article on mastering the ways of customizing your WordPress website, let´s begin with the first method of ´Customize the Entire Website Manually´ on your own—
How to Customize My WordPress Website Manually Using The Customizer
The Customizer is WordPress´s built-in solution that allows you to customize your entire website. It is one of the easiest ways of customizing your website using this solution.
So, from changing your website header to adding new pages to the website, you need to go to the Customizer page for whatever change you want to make. There are two different ways of accessing The Customizer on your WordPress site.
Method 01:
- Go to ´Appearance´
- Select ´Customize´
Method 02:
- Click on the ´🖌️ Customize´ button from your editor dashboard.
1. Changing logo and website fonts
Let´s suppose you want to change the font styles and logo of your website. So, firstly, what should you do to change the logo?
It´s simple, just click on the logo of your website, and it will open the header builder on your editor sidebar.
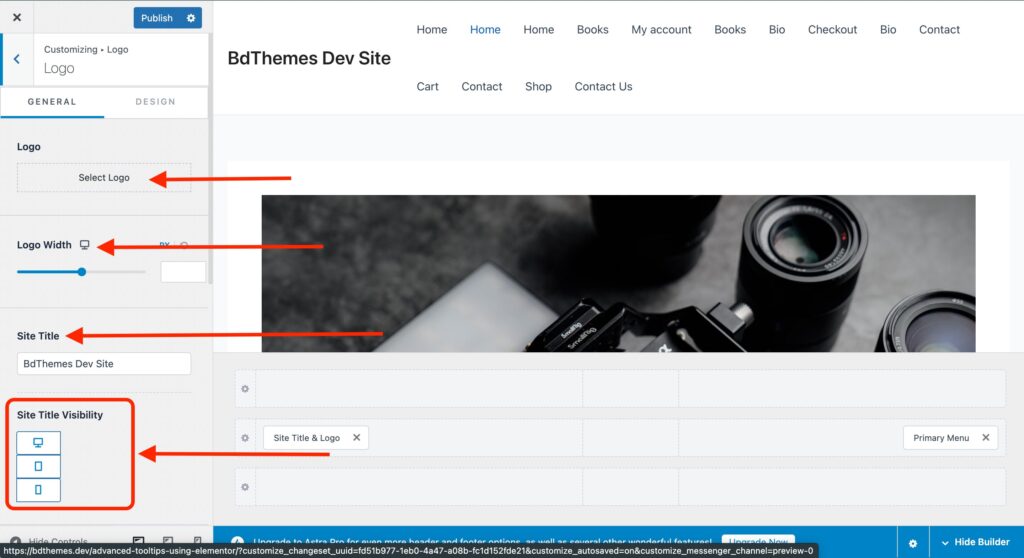
Here, you can add a logo by clicking on ´Select Logo´ if you have a pre-designed logo. From here, you can also change the width and visibility of the logo on the website. Suppose, you want to show your website logo only to the desktop users. So you can set the ´Site Title Visibility´ of the website as well.
Now suppose, you don´t own a logo for your online presence. So, how can you make your site stand out from the crowd? Don´t worry, WordPress won´t let its users be abandoned. You can write your company name in the ´Site Title´ section as well and it will appear as a logo appears on a site.
Well, we have seen the process of setting up a logo on your website. But, how to change the logo of a WordPress website? Go to the ´Global´ setting option of your website.
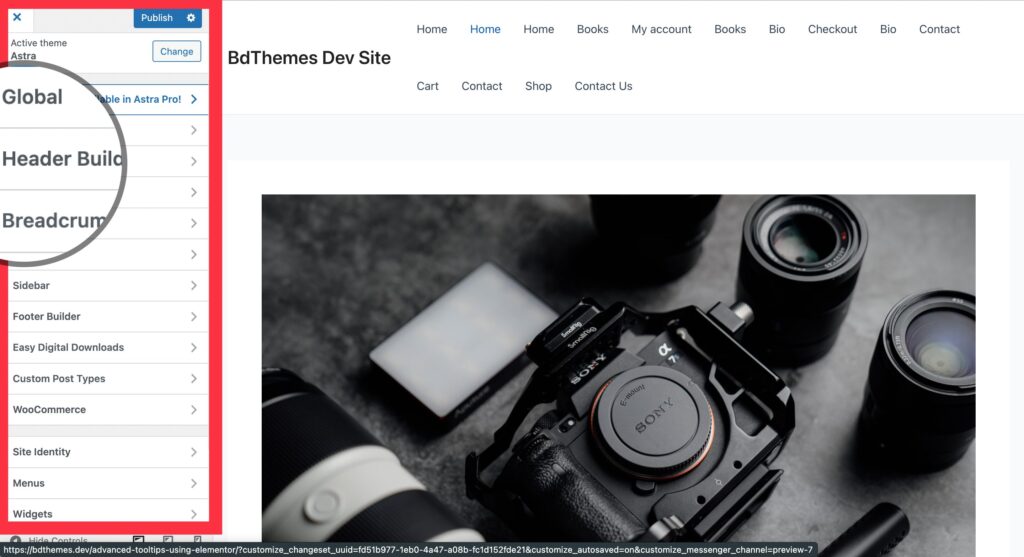
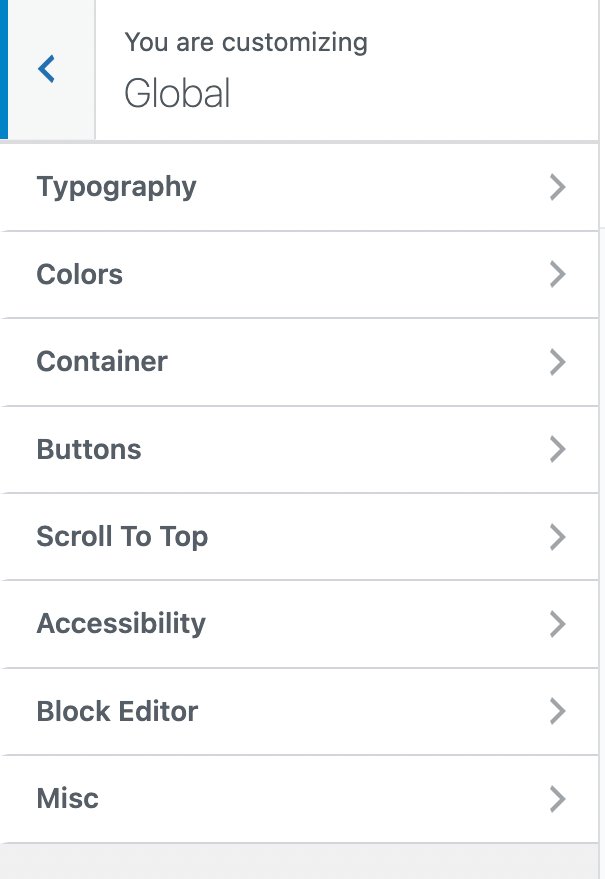
From here you can change your entire website´s typography, colours, buttons, and even the block editor. So, to change the fonts on your website, you need to install a plugin.
But, how you can install that plug-in? Follow the steps, Go to Plug-ins> Add New Plugin > Search for ´Easy Google Fonts´ > click on ´Install´ > and then ´Activate´ it.
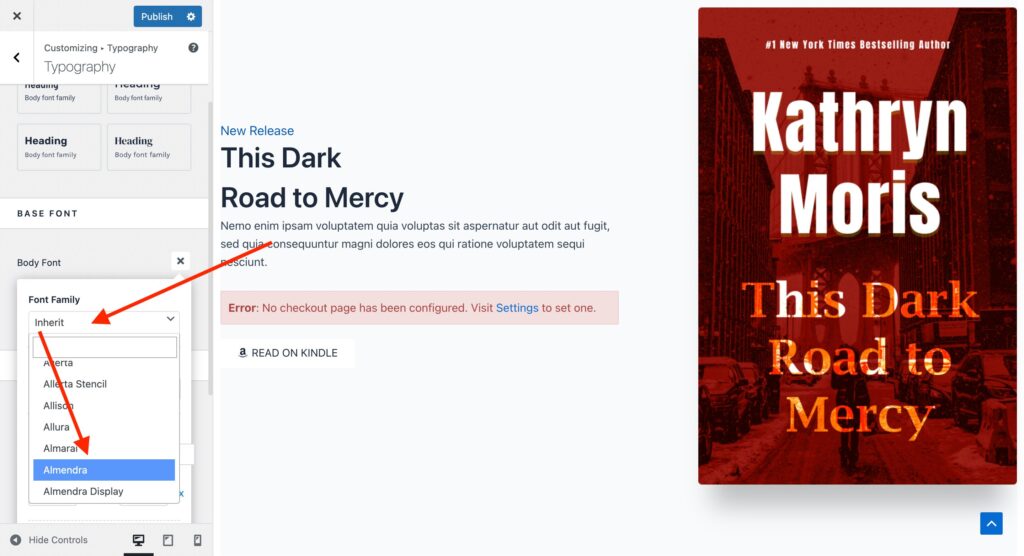
Now, you have a wide range of font libraries that you can use on your website. So, to change the website fonts, simply get the Customization option of your site and click on ´Typography.´
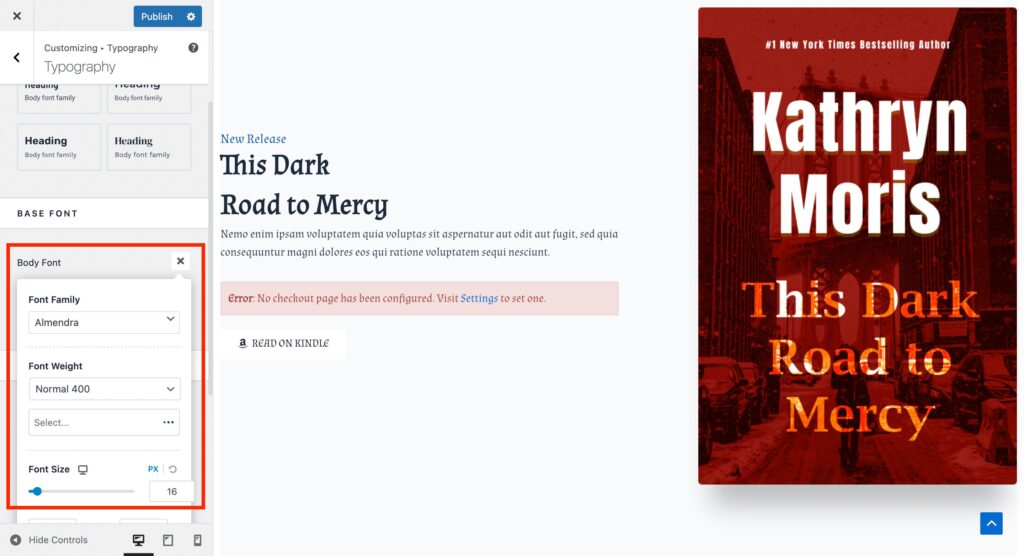
Let´s say you want to change the body font style of your website from ´Inherit´ to ´Almendra´. You can simply do that by selecting ´Body fonts´ and changing the font family.
Even, if you want to change the font weight and size, you can customize it from here as well.
2. Adding New Pages
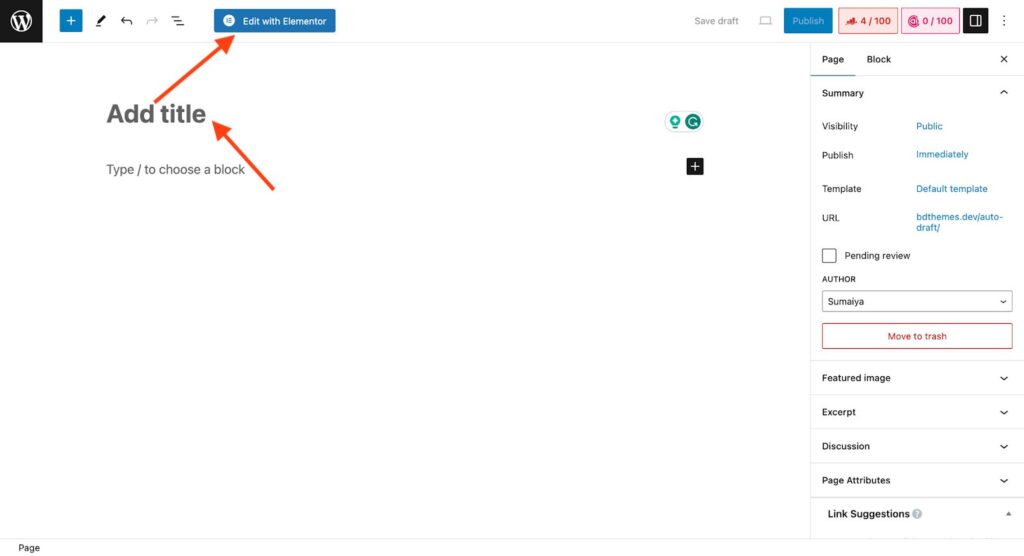
Adding new pages on your WordPress website is as easy as pie. Just Go to pages from your WordPress dashboard and select ´Add new pages´.
Once the page is added, give it a name and select the Elementor page builder to edit it.
Now, you can give this page an amazing look by utilizing popular add-ons like ´Elementor Pro Pack´. This robust add-on comes with hundreds of pre-built WordPress templates, pages, and widgets. Businesses of all types can install this add-on on their website and enjoy using it completely for free.
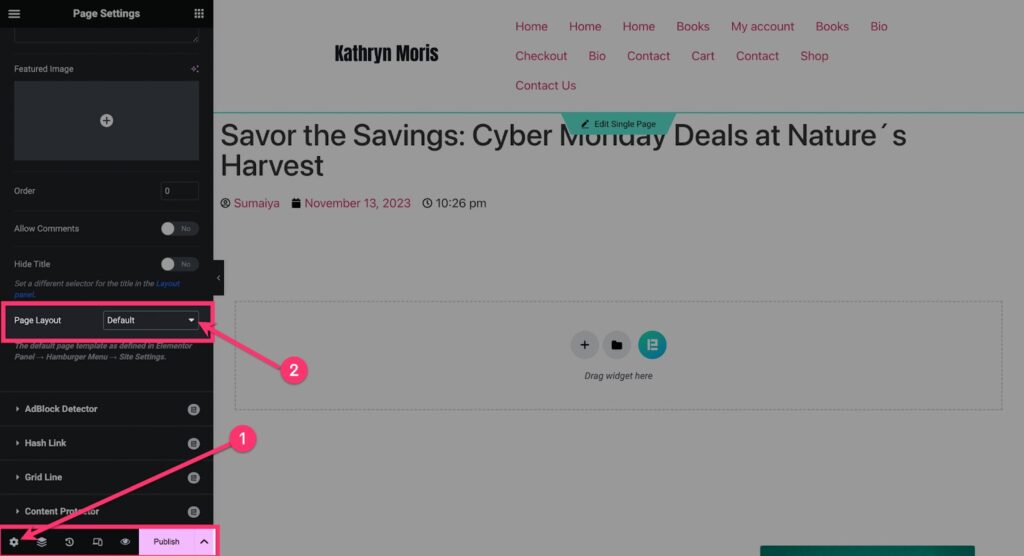
For instance, let´s assume you are building a landing page for your website. First, you need to make sure the page you are trying to edit is clean and ready to adapt any template. Follow the steps to clean the webpage so you can use any template you prefer.
Click on the hamburger icon of your Elementor editor. Then click on ´Site settings´.
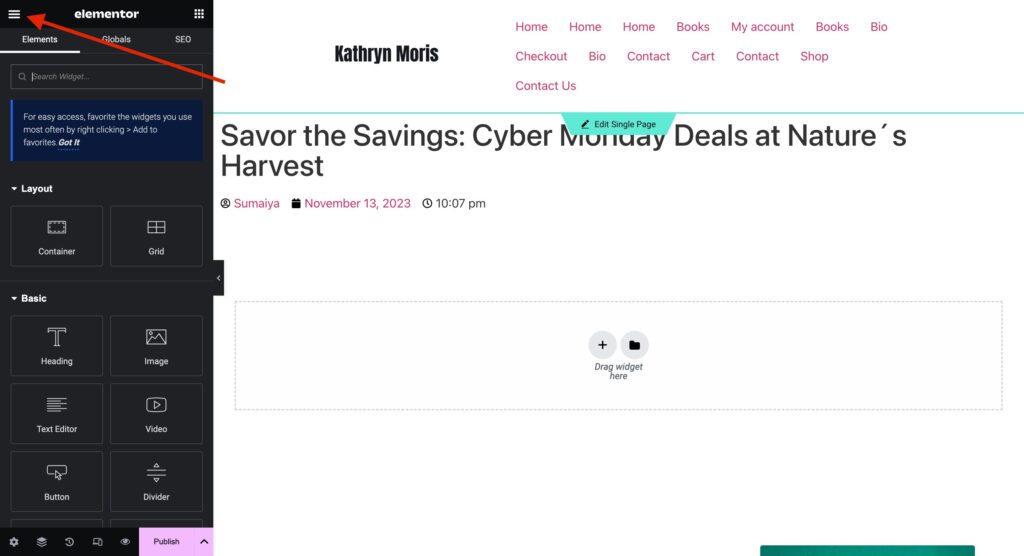
Then, change the Page Layout– Default to ´Elementor Canvas´.
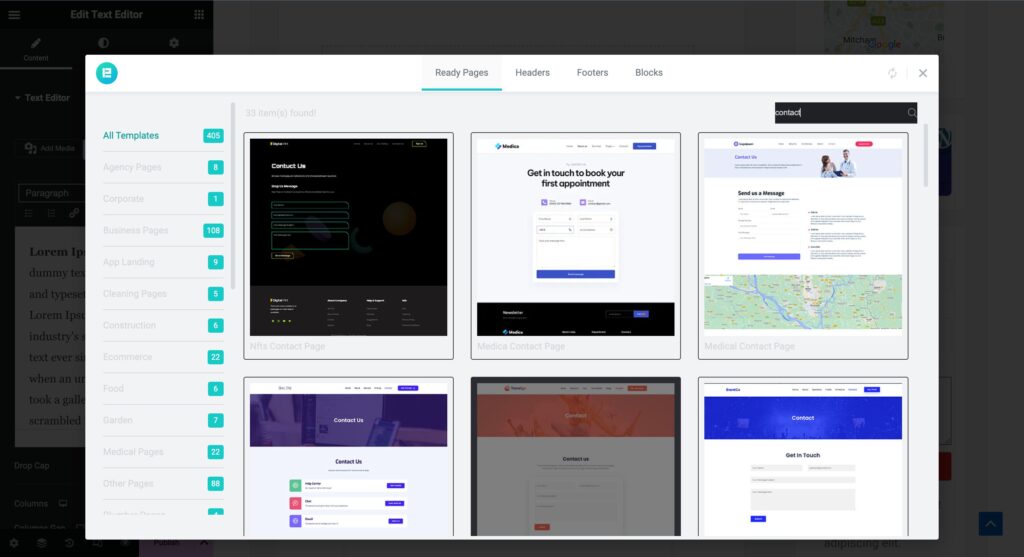
Now, you can implement the Elementor Pack Pro´s unlimited templates into your page by selecting it. Click on the Elementor Pack Pro icon to access its wide pre-made template library.
Search for ´Contact´ to get all these stunning Contact page template designs. Preview a template you prefer to see if it fits your needs. If it seems ready to go, click on Insert to add this template to your page and ´Publish´ it.
3. Adding New Widgets.
Widgets help you showcase different elements on your WordPress website´s footer and sidebar area. Maybe you want to add your site motto on the header or simply add categories or customize your blog post area. Whatever your need is, the widget area can help you do it right.
However, there are two prominent ways of adding new widgets to your website.
- Method 01: From the Appearance area.
- Method 02: From the Customiser.
Method 01:
To add your desirable widgets by using the Appearance of your website, go to Appearance and select ´Widgets´.
Then, you can choose any Section where you want to add widgets and click on ´Add Block´. At this point, you can add any widget you want to add to your website.
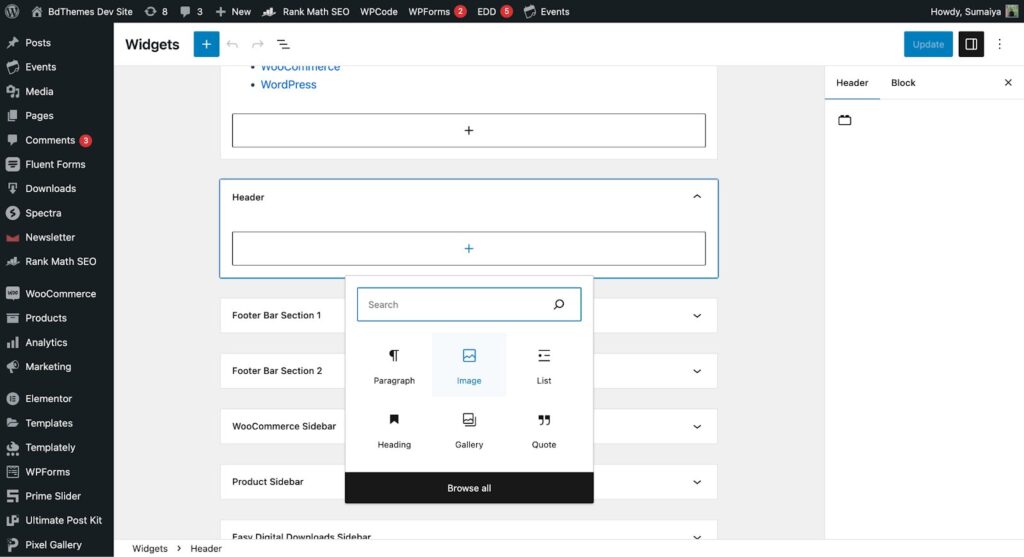
Suppose, you want to add an image section on your site´s header. So, you can select the ´Image´ block, it will immediately get inserted on your website.
Method 02:
The other way of adding the same widget on your site is using the Customiser of WordPress. To get to this, Again go to Appearance > Customize.
Now, scroll down the sidebar and select ´Widgets´.
Now select the area where you want to add the Widget block. For example, if you want to add a widget to your website´s sidebar, select it from here.
Select the ´+´ add block icon to add your preferred widget block. Finally hit the Publish button to make your changes go live.
4. Customising Fonts in Block Editor.
Changing fonts using the WordPress block editor is easier than you imagine. Suppose you want to change the fonts in your recent blog post.
- Go to the ´Post´ section from your WordPress dashboard.
- Choose ´+ Add new post´ to create a new blog post. Alternatively, you can edit your already-created posts by selecting ´Edit´ from the Post list.
Now, as you enter the block editor area, you have complete access to bring any change you want.
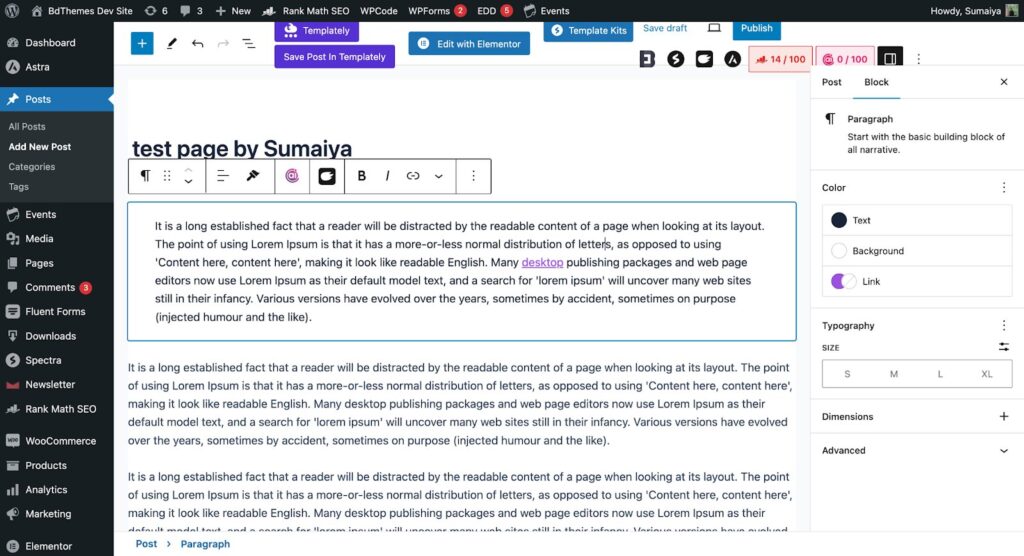
You can change the font size, make them bold or italic, change heading tags, add links, and change the text format as you do on your Google Docs files.
It´s easy, versatile, and provides you with the freedom to work on your content.
5. Adding a Google map location on your site.
Well, the ready-made template you added to your contact page doesn´t have any Google Map location. In that case, you can easily add a map to the page.
Simply click on the plus icon of your webpage to add a new section.
Choose Flexbox instead of Grid as we don´t need to add multiple elements in one section.
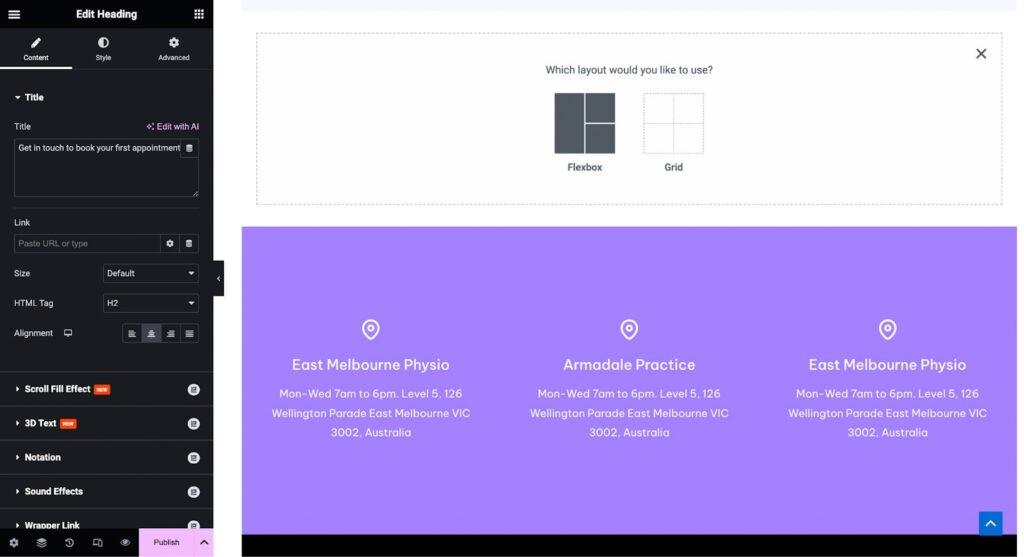
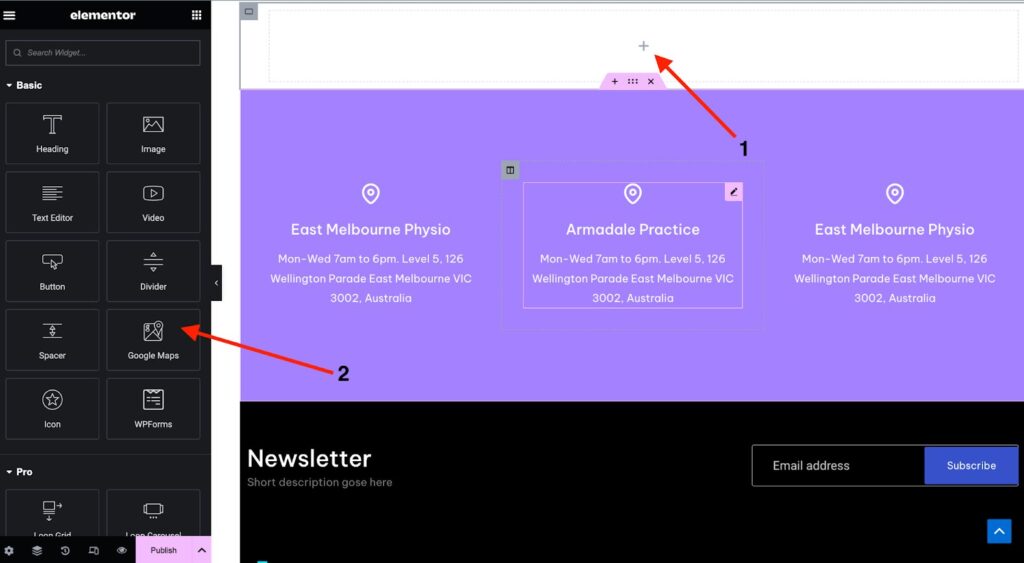
Now, choose the ´Direction´ box. Then
- Click on the plus icon to add your element here.
- Select ´Google Maps´ from the Elementor sidebar editor.
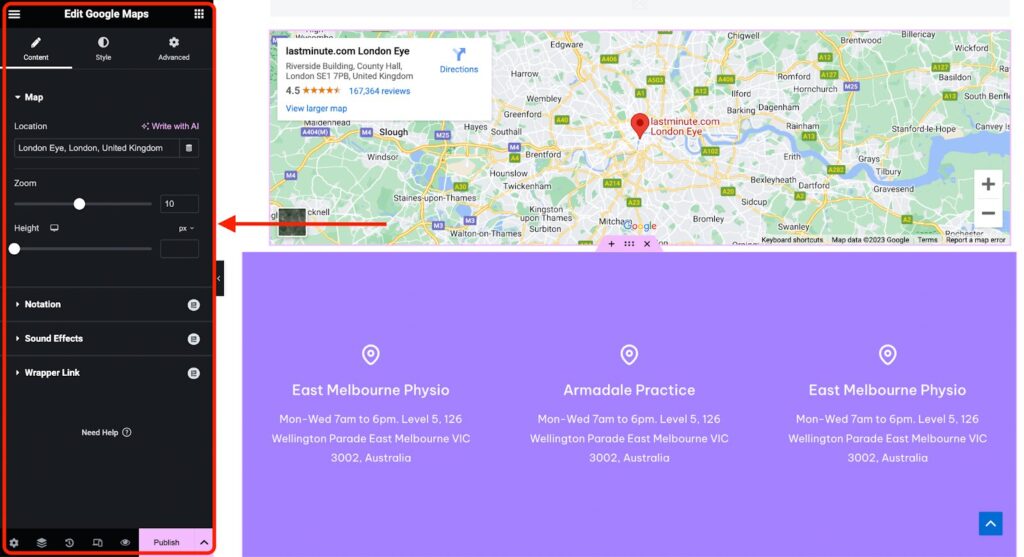
And here you go with your business location added to your website. From the Elementor editor, you can change your location, zoom it in for a precise location view, and even change this section´s height exactly the way you want it to look.
Now, as we have gone through the process of customizing your website manually, there´s another way of editing it.
You can also edit the website by changing its theme codes. So, let´s see how you can do that as well—
Customize the Themes Codes
WordPress provides complete freedom to its users to build a website utilizing their creativity and skill. Therefore, people with prior technical knowledge can bring a lot of changes by changing the theme codes.
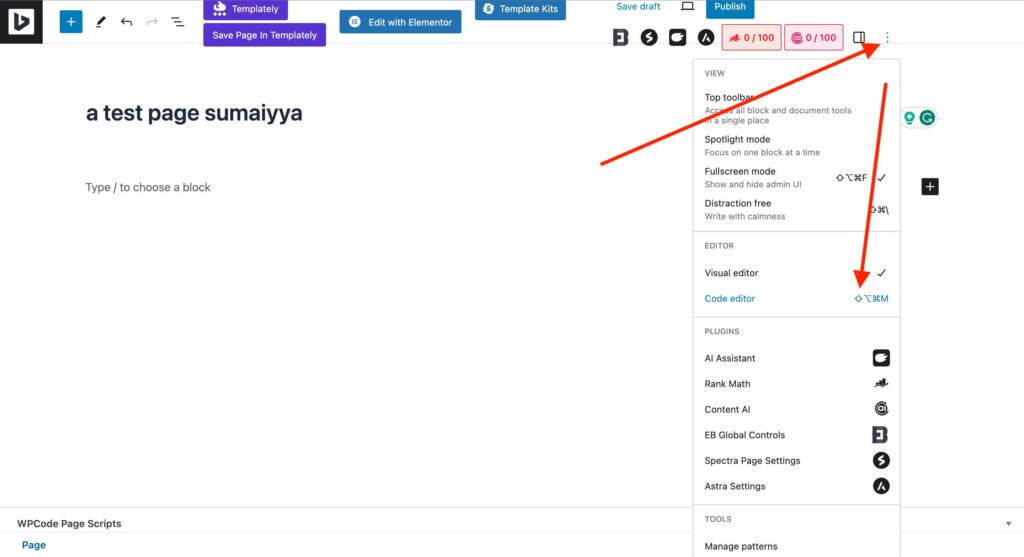
So how do you get it from the editor? Click on the three-dot icon on your page and select ´Code Editor´ to change the codes of your theme.
Customize the Theme using Plugins
As we said before, not all WordPress themes offer manual customizations. There is a customization limitation depending on the Theme a user is using. Therefore, you may need to get help from some customization plugins.
You can customize your website with various types of plugins like SeedProd. It is one of the best WordPress customization plugins to edit, and customize your website any way you want it to be.
This fit-to-all plugin works with every type of WordPress theme. It even provides full access to customize the website layout and content. SeedProd´s drag-and-drop editor makes it efficient for everyone to re-design a website exactly the way they want it without getting their website crashed.
So, how should you utilize this plugin to find the answer to your question of ´how to customize my WordPress website´ to the fullest? Simply go to the plugin section and install the SeedProd plugin. Then go to ´Customize´ and select ´Edit with SeedProd´
At this point, you have complete access to customize your website the way you want it to be. You can see in the image below how easy it is to customize your website using ´SeedProd´. The page looks more complete after customizing it through SeedProd.
3 Highly Customizable WordPress Themes
Though not all the themes in WordPress offers customization opportunity, there are a few highly customizable themes as well. They offer multipurpose themes that can be easily adaptable for any website you want to build.
So, let´s know more about these themes in detail–
1. Astra

If you are familiar with WordPress and its fields, you might also know about the ´Astra´ theme. It is popular among the WordPress users community because of its high customizability, boundless features, user flexibility and many more. From people with zero WordPress knowledge to tech experts, everyone can use this widely used theme plugin even for free.
One of the best reasons Astra is loved by millions of users is because of its powerful design option. Anyone can build a site that captures visitors’ attention, is very light in weight, and easy-to-use editor.
The Astra theme also integrates with the most popular page builders, like- Elementor, WooCommerce, and Beaver Builder. You can also utilize its wide library of 300+ ready-made starter templates.
2. Hello
Similar to Astra, Hello is also one of the most popular WordPress themes. Besides, the Hello theme follows the best coding standard. It requires a resource of 6 that ensures a loading time of ¼ seconds. That means that whatever site you build, will load into your users´ browsers within the blink of an eye.
This amazing theme with total design freedom is also RTL-ready which means it supports right-to-left languages Arabic and Hebrew. This fully compatible theme also offers 100+ widgets, is SEO friendly, and allow you to customize your eCommerce store without maintaining any boundary.
3. Rooten
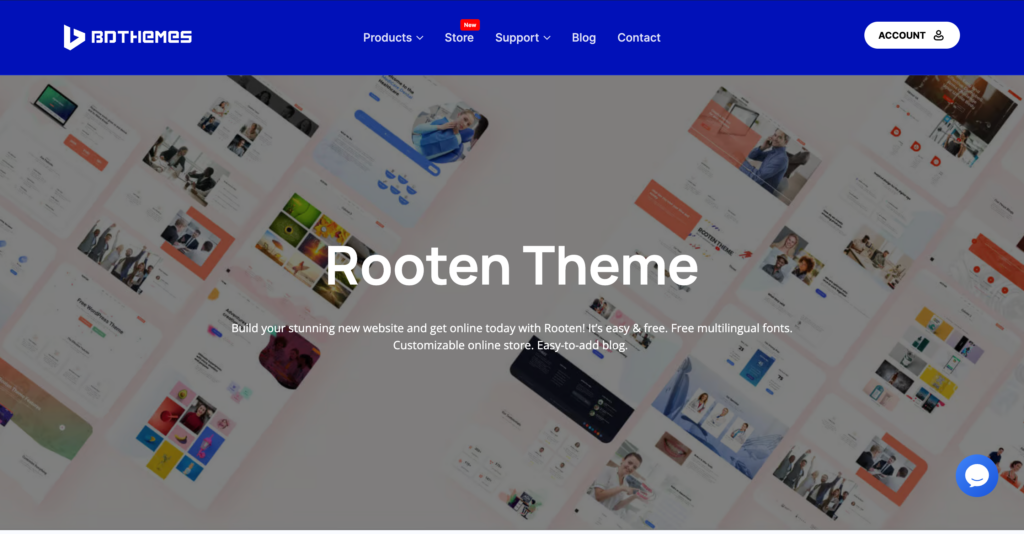
It was difficult for us to decide in which position we should place this amazing, highly customizable theme. But, as a newcomer to the market, we decided to talk about this unique and powerful tool after Astra and Hello.
Rotten is a theme that opens all the doors for every type of user to build a website that performs well. It is not only the performance, but it is an incredible choice for site builders as well. Why? Rooten provides you with the most unique website customization feature, creating a Child theme.
As WordPress itself make sure its users are not directly editing their primary theme and suggest building a child theme instead of changing the original, Rooten Themes gives it a hand ahead to assist you. Besides, this theme plugin is WooCommerce, WPML support, translation, and even Retina ready. So you don´t need to lose that 217 million people around the world because of their severe vision disability.
Customizing Your WordPress Website for SEO
At this point, you have learned the process of editing and customising the theme of your WordPress website. Now, let´s learn how you can boost your site´s SEO to get more customers and stand out from the crowd in the internet world.
To boost your site’s SEO, you need to install a plugin. WordPress SEO Plugins help you –
- Finding the issues that can harm the ranking of your site.
- Revamp organic traffic.
- Optimize it for various campaigns and
- Boost your Search Engine Optimization process.
There are a bundle of SEO plugins that you can utilize to improve your WordPress site SEO without any hassle. Some popular WordPress search engine optimization plugins include Yoast SEO, All In One SEO Pack, and SmartCrawl Pro.
You can integrate any of these plugins on your site to improve your SEO in the right way. Plugins do everything you need to do for the SEO of your site. However, if you are an SEO expert, you can also go through some processes like-
- Updating the site´s XML sitemap.
- Using tags and categories.
- Adding Captions on visuals.
- Updating permalink.
- Improving your WordPress accessibility.
FAQs on How to Customize WordPress Website–
How do I customize the theme of my WordPress website?
Customizing your WordPress site´s theme is a few clicks away. Go to your Dashboard ´Appearance´ and select ´Customize.´ Now, you have the customization field and have full access to edit your WordPress website.
Is it possible to add custom CSS to my WordPress website?
Yes, WordPress offers full access to customizing your site even by changing the codes. To do so, just navigate through ´Appearance´ > select ´Customize > Scroll down the page and Click ´Additional CSS´. This way you can easily add any CSS code you would like to add to your already-built WordPress site.
Customize Your WordPress Website in The Most Easiest Way
There are various methods we have gone through to customize your WordPress Website. You can utilize a plugin, customize it by yourself, or even change the theme codes to give the site a new look.
However, with all the options available, you can now go for the easiest way you feel comfortable with.
As a beginner, you may opt for a plugin or utilize The Customiser. However, if you are a tech expert, renovating your site through coding can be a great choice.
But, before choosing a theme for your Website creation, try to prefer the mostly customizable themes like Rooten that allow you a forever customization opportunity.
Try to utilize a limited number of plugins while customizing to keep your site error-free and light in weight. Analyze your website performance, measure its success, and enjoy the success of your website creation journey.

