
Build any WordPress form in minutes with Sigma Forms.
Coming Soon & Maintenance Mode Page Builder Plugin
Easily make websites accessible One Accessibility
Simplify your dashboard with Smart Admin Assistant
Dark Reader plugin is eye-friendly reading experience.
A full Featured web design companion for Anyone
Most superior Slider in the Era of Elementor Slider
ZoloBlocks helps you create stunning websites with the Gutenberg builder.
The only Compatible blogging widgets in Elementor for any Blog
Create next gen e-commerce website for your business in WordPress
Organize your photos in a different angel every time with Elementor
Boost engagement and sales with the Spin Wheel WordPress plugin.
Instant Image Generator for WordPress powered by ChatGPT.
Copy & Paste any web design you like just with 2 clicks!
A fully functioning theme for elementor with unlimited options
Smart Clean & Flexible Block Theme for Gutenberg
WooCommerce one-page checkout to boost conversions.
Find us 24/7 at your service. We are glad to help.
Detailed guidelines available for every features at BdThemes
A changelog is a log or record of all notable changes made to a product.
Learn product usage, WordPress tips & tricks from our videos
Earn hefty commissions by joining us in the promotion
Widget Idea Share is a great way to find similar widgets that you can improve.
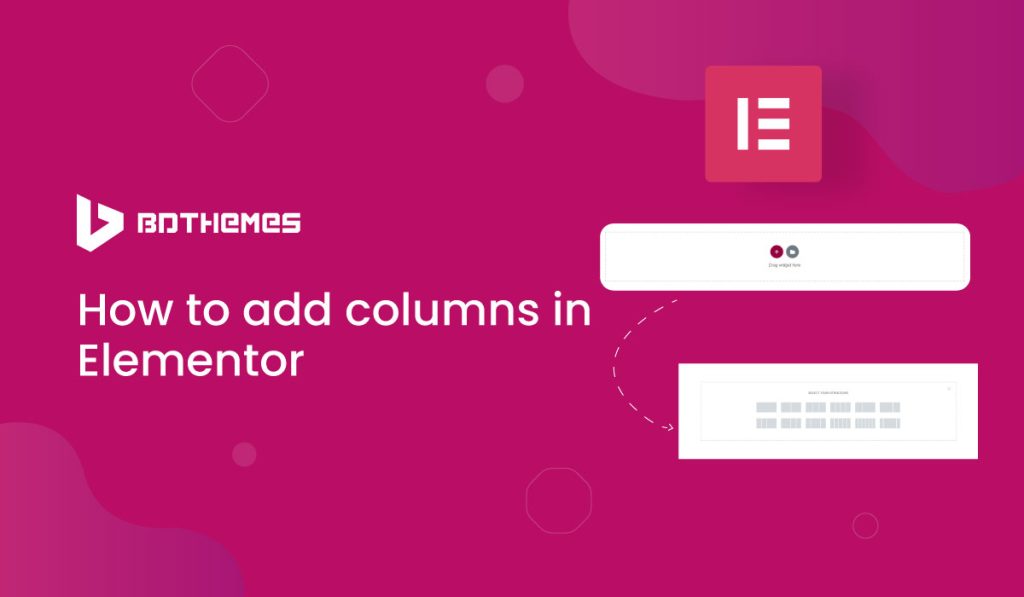
If you are looking for the procedure on how to add columns in Elementor, you have reached the right place. In this article, we will show you the way to do so. To know more details, stay with us till the end.
Before we move on to the procedure, let’s learn something about Elementor and the purpose of Elementor columns.
When you want to create separate sections for your business purpose, Elementor columns will help you do it with ease. You can manipulate the columns via the options in the Elementor Panel on the left.
Elementor makes it easy for us to create and customize columns for web design purposes. With the flexibility of Elementor page builder, making columns as per your preference is not a mammoth task.
You may have noticed there are no longer columns and sections showing in the editor.
The question may raise- “Why can’t I find the columns anymore?”
To answer that, you should know-
Due to a recent update in Elementor plugin, the columns and sections are now replaced with Elementor Flexbox containers.
Question:- Then what will happen to my columns?
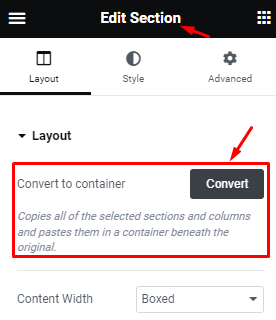
Simple, Elementor also provided a quick way to convert existing columns into containers.
With that, you can convert to flexbox containers easily and keep your designs.
But as we want to continue with columns and section, how can we restore them back?
There’s a way.
Let me show you how.
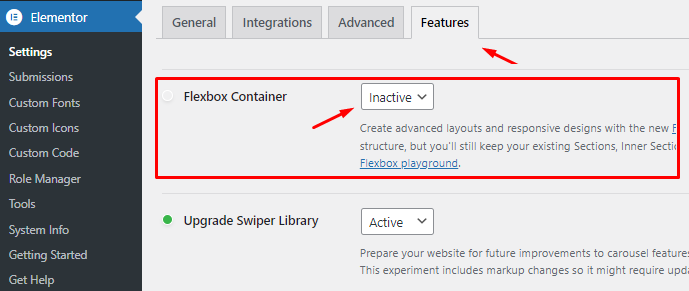
Go into your WordPress Dashboard > Elementor > Settings > Features > and find the Flexbox Container option there.
Just set it to Inactive and save settings.
This will turn off containers and restore the Sections and columns in the editor.
Warning! :- Deactivating Elementor flexbox container will remove any existing containers from the whole site, including elements within the containers. So, if you decide to stick with containers, don’t disable it. Can be restored after enabling flexbox again.
If you want to add columns in Elementor, you can do it in these two methods:
Now, we will discuss the methods.
In this method, you have to follow these steps:
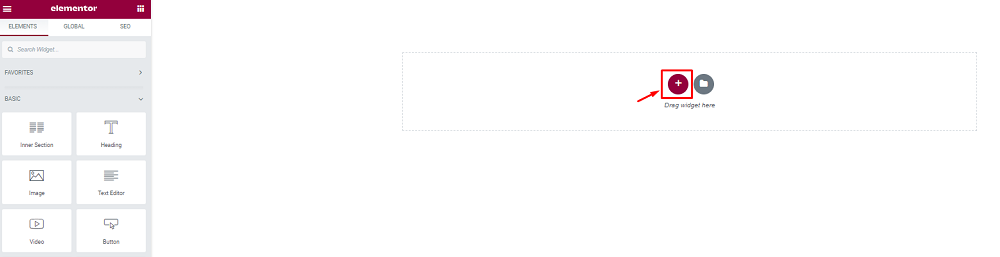
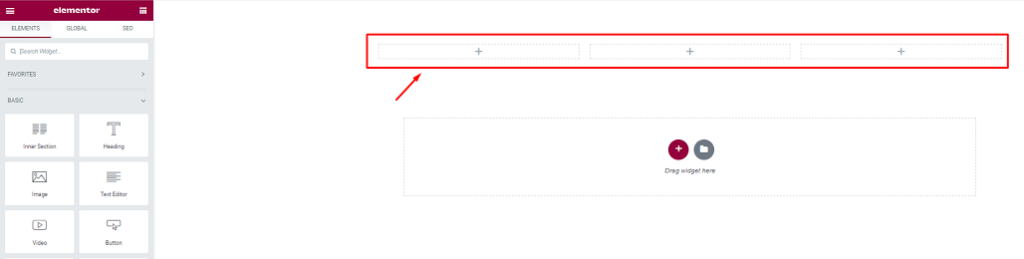
Before adding columns, first, we need to create a row. To do this, click on the (+) sign as shown in the picture below.
After that, select the desired structure based on your design direction and content type. For instance, we will pick one row with two columns.
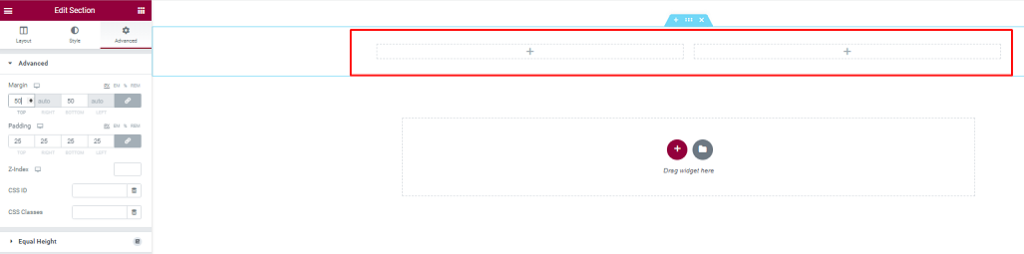
After that, the column will show in the text area. Now, you can add your content/widgets to your columns. You can adjust the row and columns as you need.
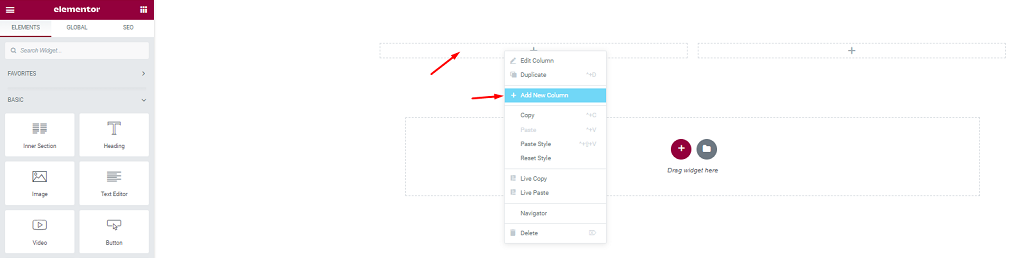
Notice that, the row is marked with blue color when you hover over it. You can modify the row by right-clicking on the row, then clicking on the Edit section.
But, we will focus on adding columns to the structure. Let’s proceed.
Now, hover over the column and right-click on the field or on the Edit Column. After that, click on Add New Column to add a new column to the field.
After doing that, you can notice that the number of columns is increased. You can add your desired number of columns by repeating the 4th step as needed.
Well done! You have successfully added a column in the text field in Elementor.
Want to know more on how to add columns in Elementor? Let’s go ahead!
Now, we will proceed to the 2nd method:
In this method, you have to follow the steps below:
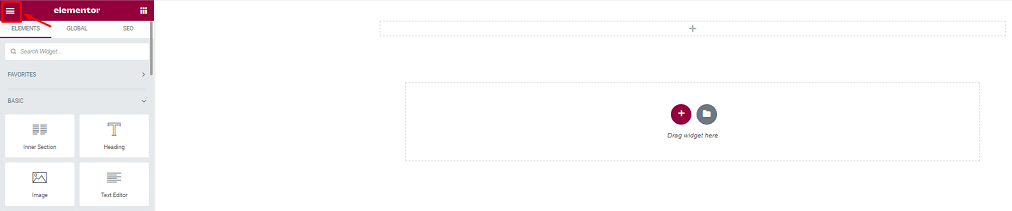
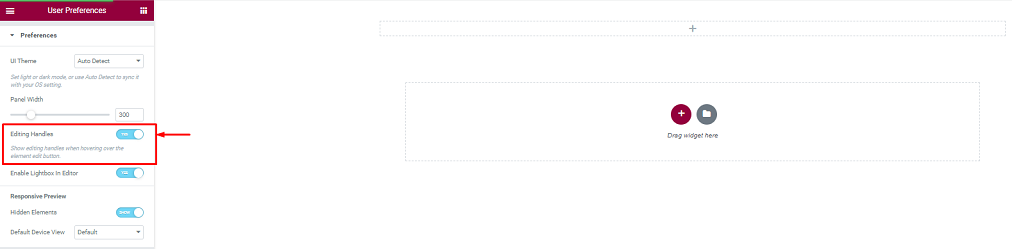
To proceed with this method, first, click on the button with three horizontal lines located at the upper top left corner of the page. It will open up the Elementor menu.
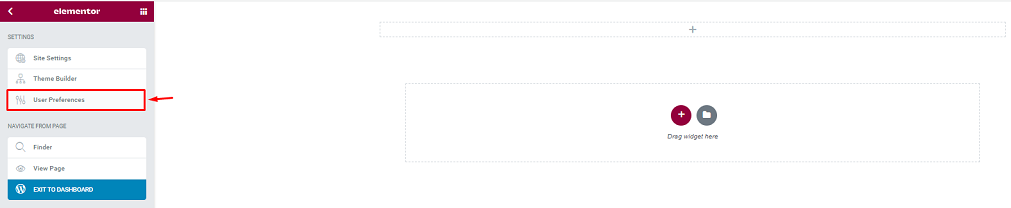
Next, go to the User Preferences menu to enable the Editing Handles option.
Now, enable the Editing Handles switcher to use the handles for adding columns to the field.
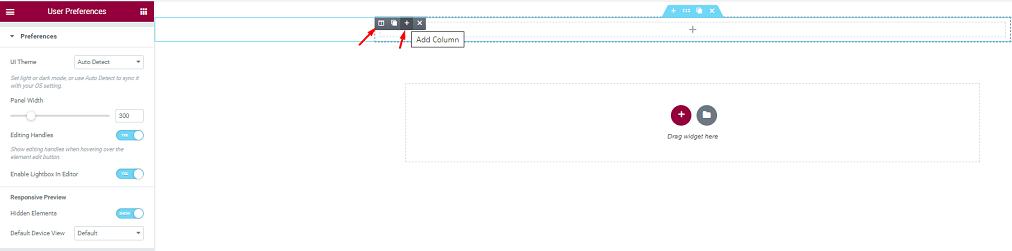
It’s time to add columns to the field. For this, hover over the edit column icon on the section that will unveil the handles. Here, you can duplicate, add, or delete columns.
As we are going to add columns, just click on the “+” icon to add a column. Do this repeatedly if you want to add more columns to the field as you need.
Good job! You have successfully added your desired columns to the field.
Now let’s show you some functionalities of Elementor Column which will enable You to create more interactive Column than ever!!
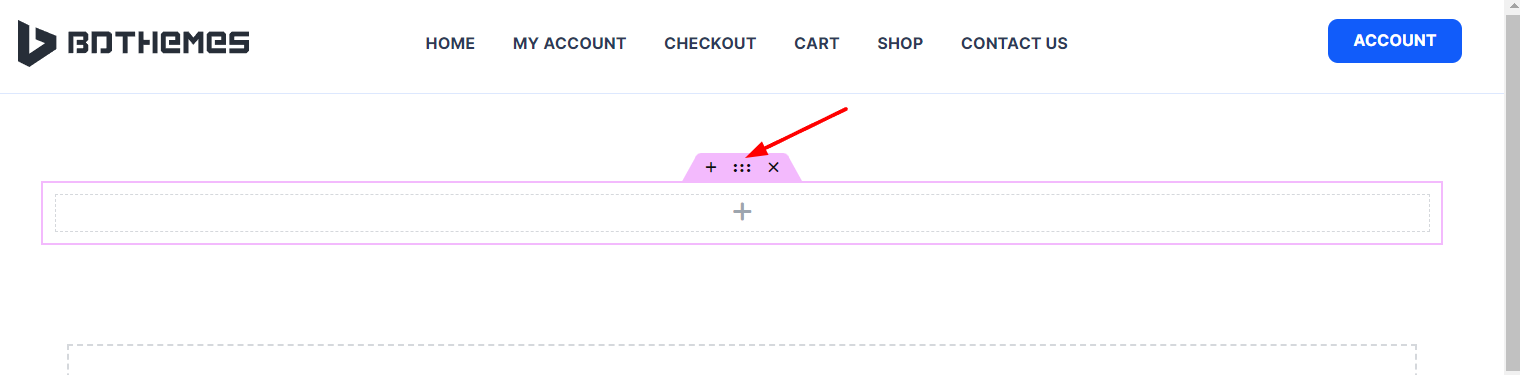
To add a link in a column in elementor is easy as pie. First, click the following icon that is marked in the image below to edit the whole section.
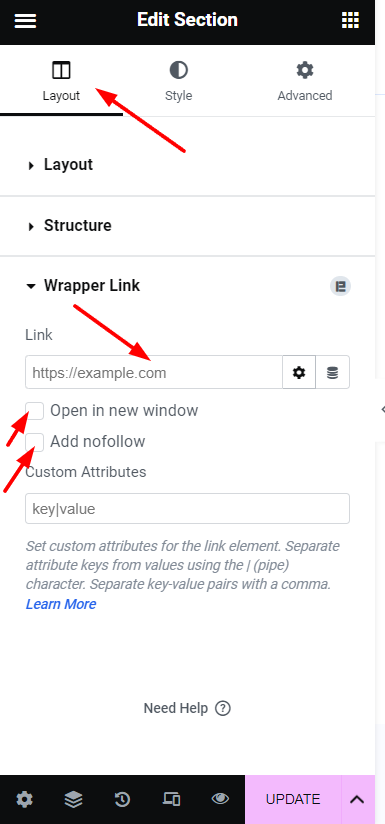
You can simply add link Your whole column by Wrapper link by Element Pack Pro.
Also if you want the link to be opened in a new tab then enable the “open in new window” and if you want to add nofollow attritube to that link for your SEO purpose then enable the “add nofollow” option also.
By Following those steps, you can make your elementor column clickable and add link to enable more navigation for your Users.
Sometime for Better user experience, You need to make elementor column sticky so it will create better accessibility for your user.
You can make your section sticky By two method. WIth Elementor Pro and With Element Pack free version.
Check the steps below to make your very own sticky column in Elementor website.
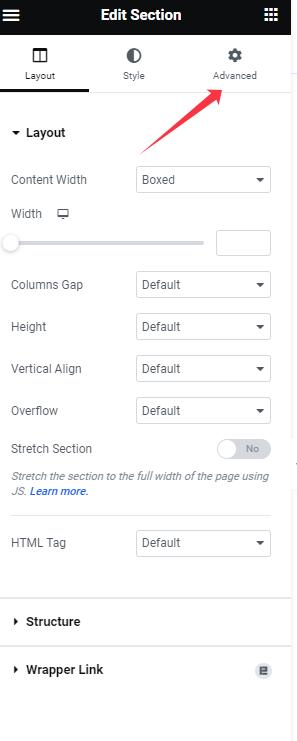
1. Click the icon of “Edit section”
2. there you will see advance tab on widget panel
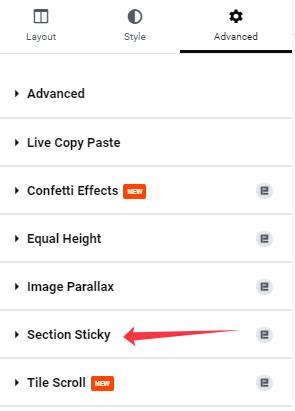
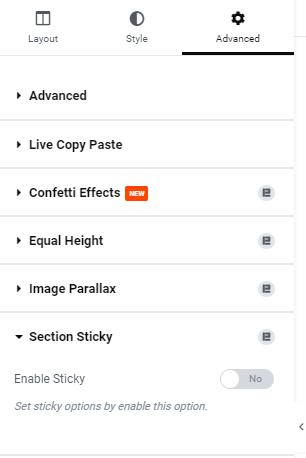
3. There You can see “section sticky” feature , enable it to make your column sticky.
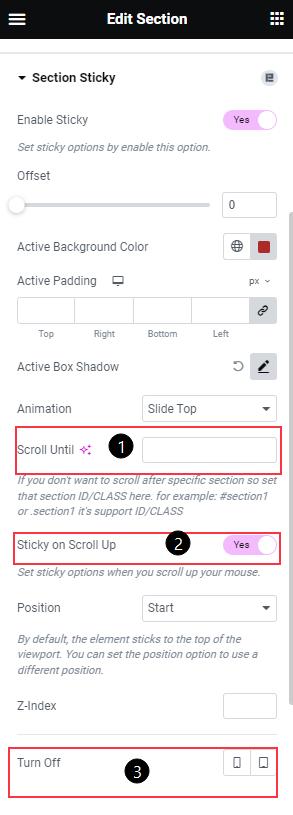
4. For Further Customization you can use other features Like i)“Scroll Until”, ii) “Sticky on Scroll Up” and iii)make it enable or disable for Mobile and tab devices.
Design trendy Elementor Website With Element Pack Pro. We have over 2000+ Ready templates and 250+ widgets to help your task at any level!!
We have shown you two easy and clear methods of how to add columns in Elementor above. You can follow the steps of either method to add your desired columns to the field in Elementor with ease for your business purpose.
We appreciate your patience in reading this article to the end. Have a good day.
Take advantage of fine-tuned plugins to speed up web projects without sacrificing quality. We offer a 60-days money-back guarantee.

Call or WhatsApp for assistance:+880 1700 55 95 95