Build any WordPress form in minutes with Sigma Forms.
Coming Soon & Maintenance Mode Page Builder Plugin
Easily make websites accessible One Accessibility
Simplify your dashboard with Smart Admin Assistant
Dark Reader plugin is eye-friendly reading experience.
A full Featured web design companion for Anyone
Most superior Slider in the Era of Elementor Slider
ZoloBlocks helps you create stunning websites with the Gutenberg builder.
The only Compatible blogging widgets in Elementor for any Blog
Create next gen e-commerce website for your business in WordPress
Organize your photos in a different angel every time with Elementor
Boost engagement and sales with the Spin Wheel WordPress plugin.
Instant Image Generator for WordPress powered by ChatGPT.
Copy & Paste any web design you like just with 2 clicks!
A fully functioning theme for elementor with unlimited options
Smart Clean & Flexible Block Theme for Gutenberg
WooCommerce one-page checkout to boost conversions.
Find Nearby Stores Instantly with Sigma Store Locator
The Ultimate WordPress Media Library Organizer
Find us 24/7 at your service. We are glad to help.
Detailed guidelines available for every features at BdThemes
A changelog is a log or record of all notable changes made to a product.
Learn product usage, WordPress tips & tricks from our videos
Earn hefty commissions by joining us in the promotion
Widget Idea Share is a great way to find similar widgets that you can improve.

If you have an eCommerce website regarding loans covering from a smartphone to an entire apartment and you want something to drive more traffic to your site. The solution is, you must go for an EMI calculator using Elementor to your site for your visitors. This will incredibly do a great job for your business goodwill.
Providing mere financial information on loans won’t do much for your visitors and they will ask for full support from your site. They land on your site and search for features that will help accomplish all their queries on financial issues including the EMI calculator. If they can not find what they require, then they won’t stay on your site anymore.
It’s very easy to onboard an EMI calculator using Elementor to give visitors the opportunity to easily calculate their EMI. If you can satisfy your visitors, they will come back and bring more along with them. Continue reading this article to learn how to do it.
EMI means Equated Monthly Instalment. It is a set monthly payment on a set day each month provided by a borrower to a creditor. This applies to both interest and principal each month and the loan is paid off in full in around some years.
EMI calculator is a calculator provided to your WordPress site that helps your visitors to easily calculate their EMIs without any hassle. All they have to do is, just input the necessary information in the fields and get the result automatically calculated by the EMI calculator in a very short time.
Now the question is, why EMI calculator using Elementor is important? Providing loan-related information including an EMI calculator using Elementor is of great importance for your visitors and it is worth a lot for your site and helps drive more traffic. Your visitors feel free and well-informed about their loans and will be eager to join your business circle. It’s a tiny step forward towards a greater user experience.
Now that we have learned the meaning of an EMI, let’s see how it works. The borrower might pay higher sums of his or her choosing in the flexible payment arrangements, whereas EMIs are not the same. On the EMI program, borrowers are only allowed to make one set payment per month.
EMI makes personal financial planning easier where borrowers profit from it since they know exactly how much money they will have to pay towards their loan each month. It provides a consistent and predictable stream of income that helps the lenders benefit from the loan interest.
Let me take you through the easy step-by-step process of making an EMI calculator using Elementor & Element Pack.
For this, you must have-
Well then, let’s begin!
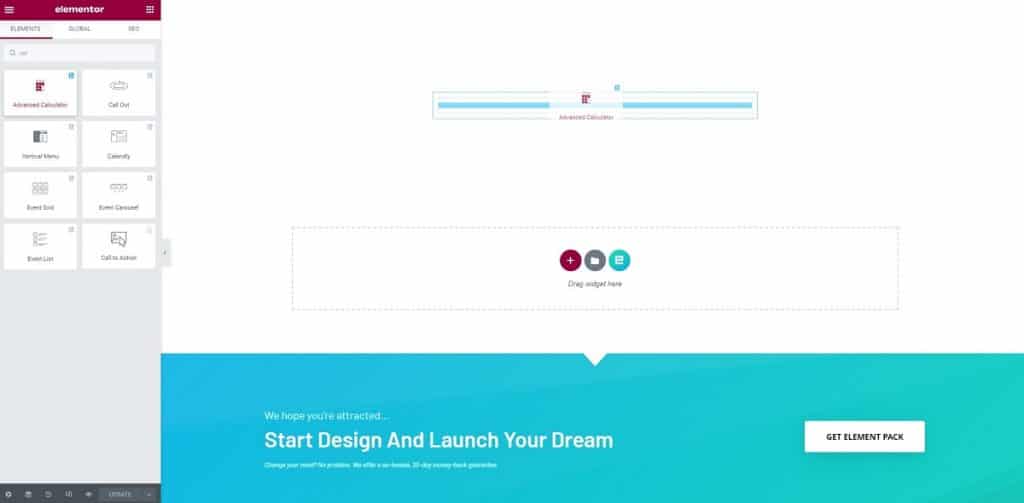
To start making an EMI calculator using Elementor and Element Pack, go to the Admin menu, type ‘calculator’, click and drag the ‘Advanced Calculator’ widget in the text area to drag EMI calculator.
Then, click on the column icon, go to the ‘Advanced’ menu, and change the padding to 80.
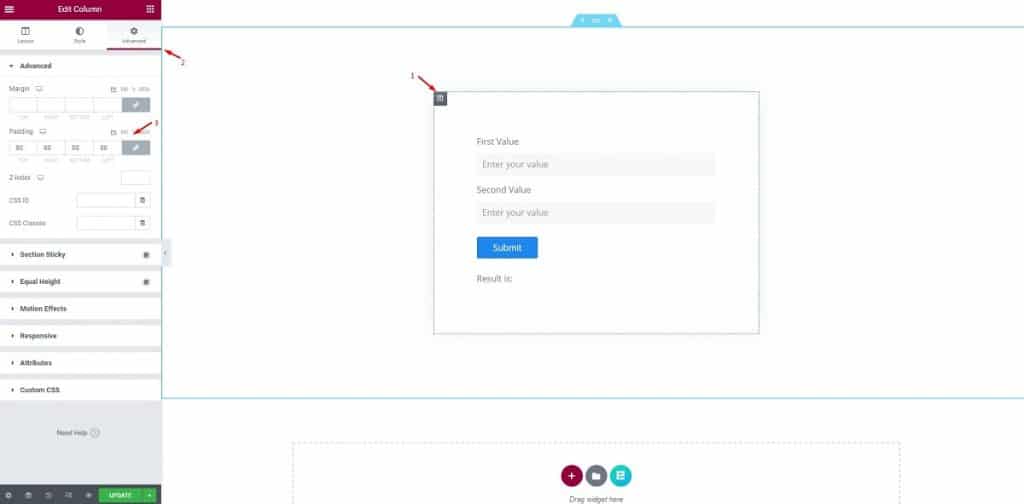
This is not for the widget but to limit the area of action into a suitable window. This helps you notice the default appearance of the widget with a clear understanding.
In this step, you can see the complete EMI calculator using Elementor ready for action. We provided the whole thing at the beginning of making it because we want to let you know what the calculator form consists of.
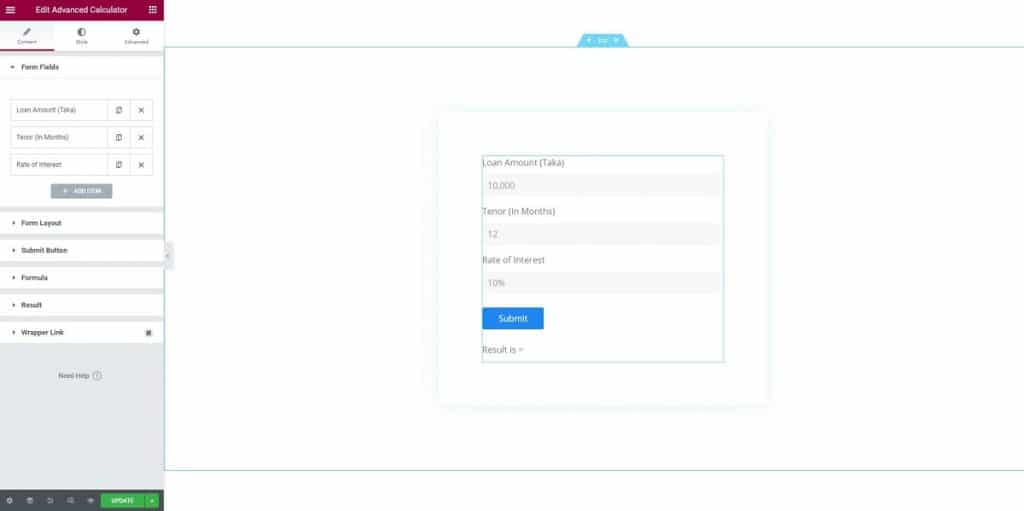
Now, let’s break it down part by part.
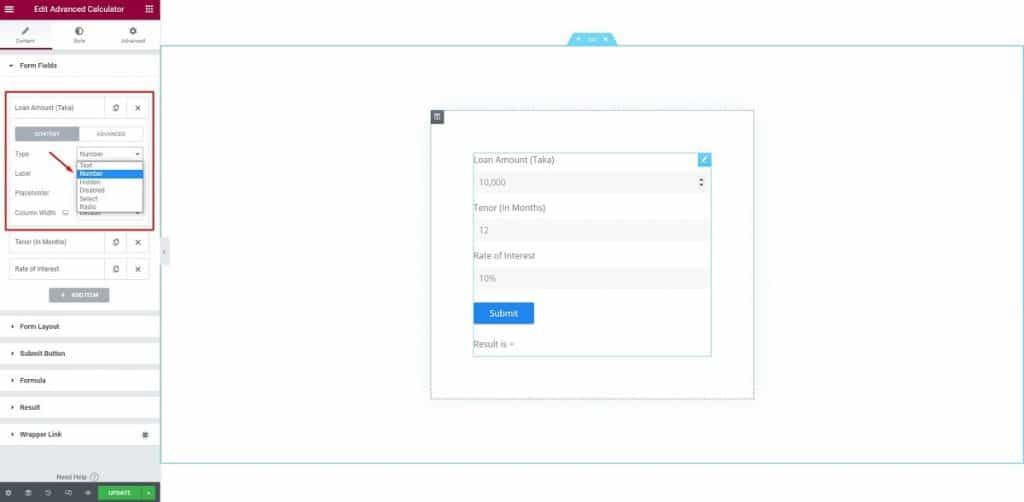
Go to the Content Tab and click on the first form field. You will see some options there including type, label, placeholder, and content width.
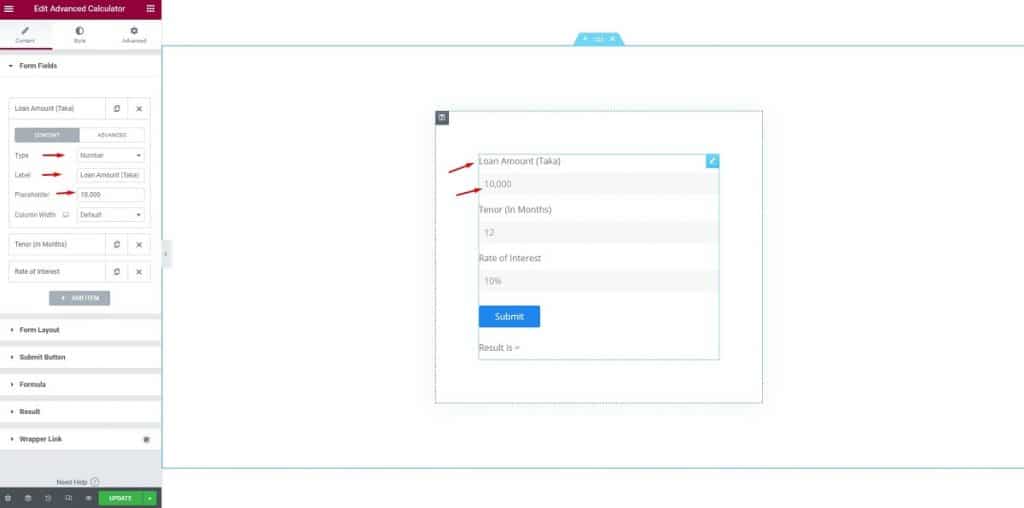
For the first field, we are selecting numbers from the field type option. Then as you can see, we put “Loan Amount (Taka)” as the label, 10,000 as the placeholder, and did nothing for the column width.
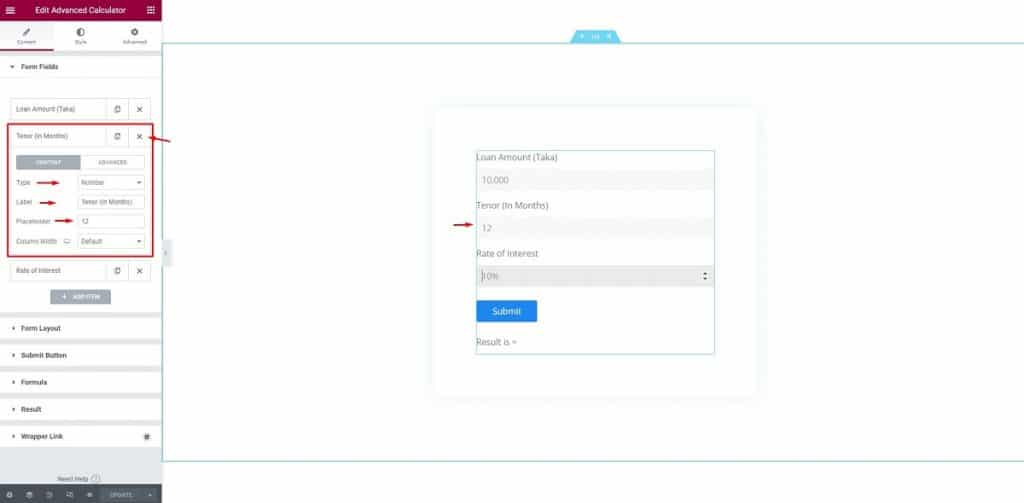
After that, we moved on to the next field. Here, you can edit the label as ‘Tenor (In Months)”, then keep the type as numbers and change the placeholder to 12 (for 12 months).
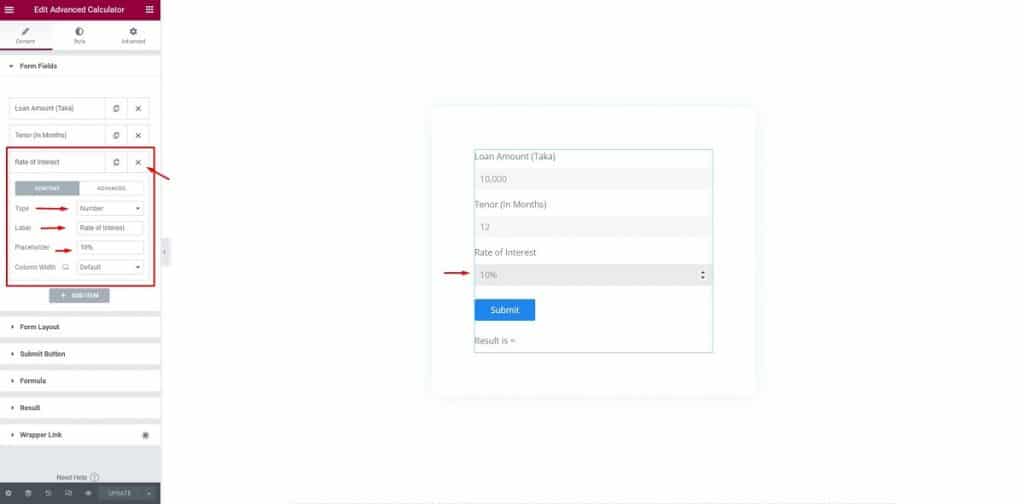
For the “Rate of Interest” field, we just have to make the basic changes by adding a percentage icon alongside the placeholder.
With this, our form setup is complete to make an EMI calculator using Elementor. Now for the next step.
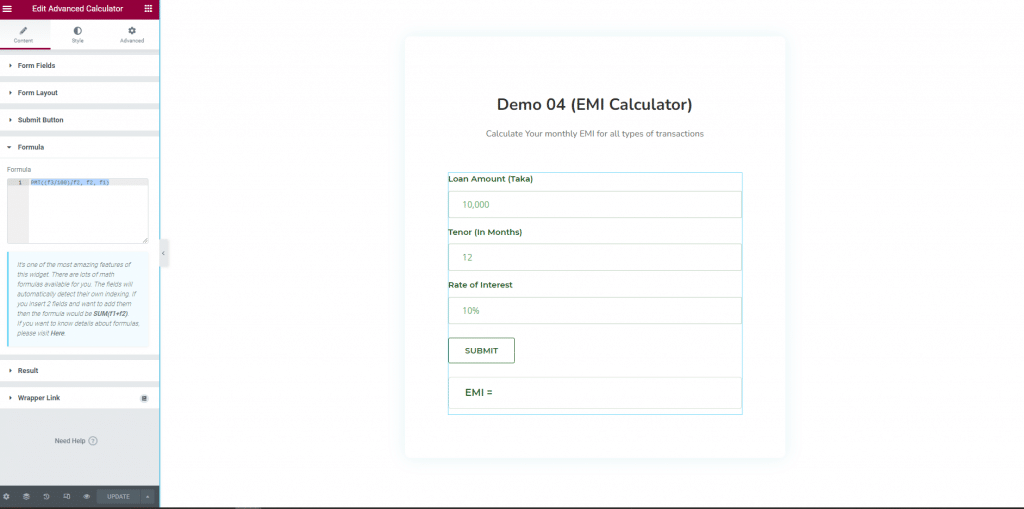
In this step, you have to set the formula to make an EMI calculator using Elementor really work. This is the main and vital point of this feature. Click on the ‘Formula’ section, enter the formula in the formula section. The formula is: PMT((f3/100)/f2, f2, f1)
Wait just for a minute! A little more to go for making an EMI calculator using Elementor.
In this step, you need to set up the layout. Click on the ‘Form Layout’ menu, For the ‘Form Layout’ field, change the label, Input Size, set the Text Alignmentedit.
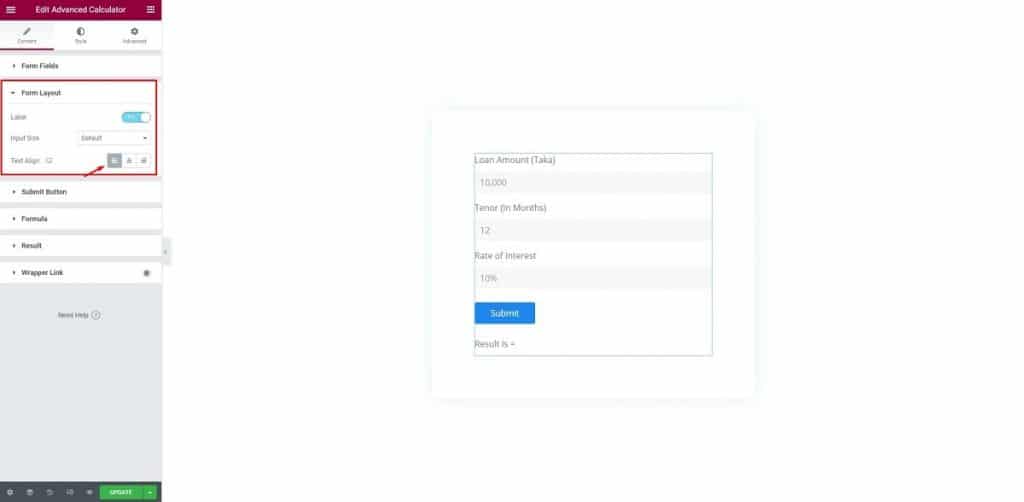
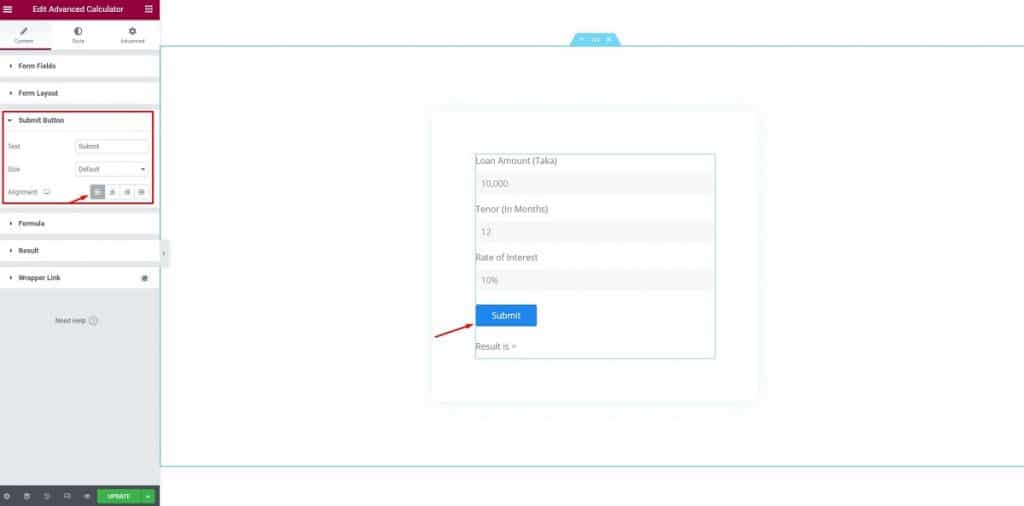
After that, click on the ‘Submit Button’, select ‘Submit’ for the Text, ‘Default’ for the Size, set the alignment as left alignment.
No more to wait. The final step is ahead! You are almost there to make an EMI calculator using Elementor
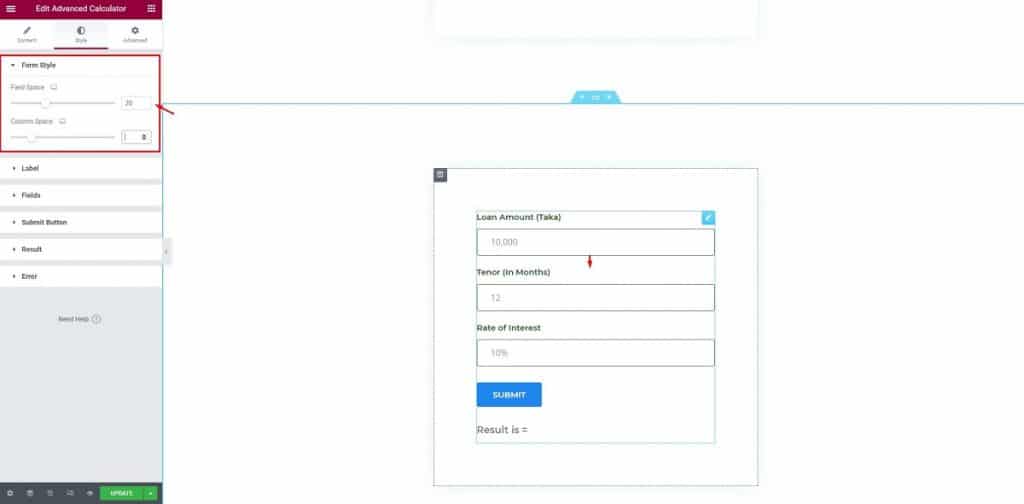
In this step, we are going to edit the style. Let’s start. First, click on the ‘Style’ button, click on ‘Form Style’, change the Field Space and Column Space.
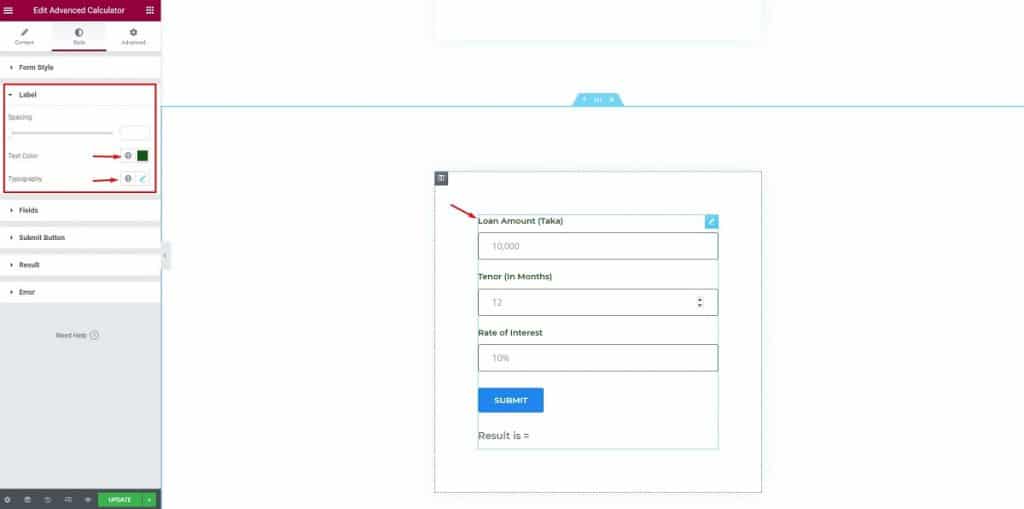
After that, click on ‘Label’, keep the Spacing unchanged, change the Text Colour, change the Typography.
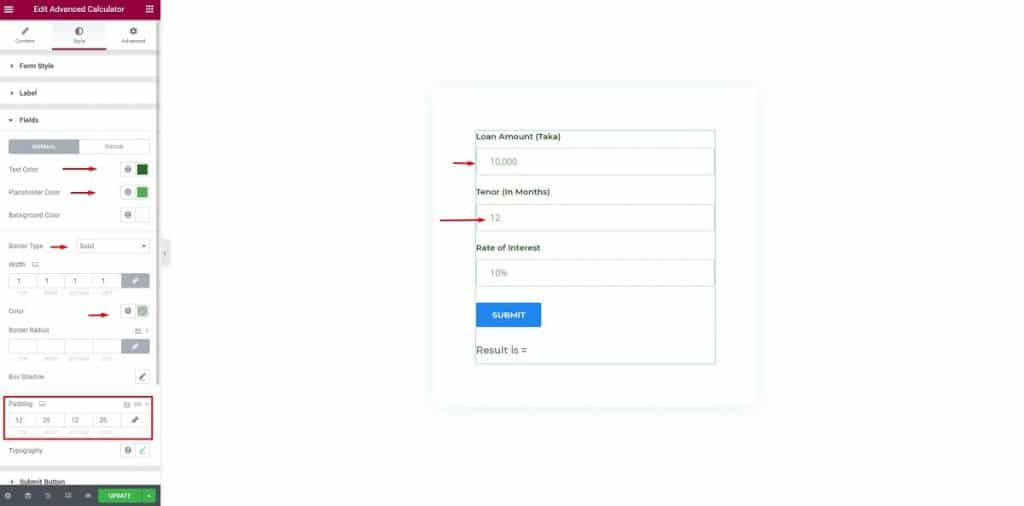
After that, change the options of the fields. Change the Text Colour, Placeholder color, Border type, Border Colour, change the padding of the Box Shadow.
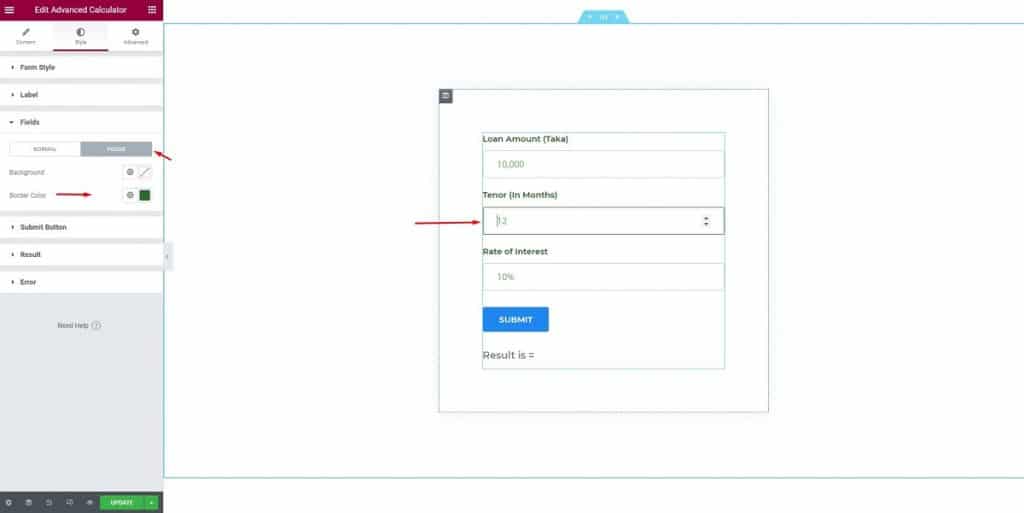
Then, in the ‘Fields’ menu, click on the Focus bar, change the background and border color.
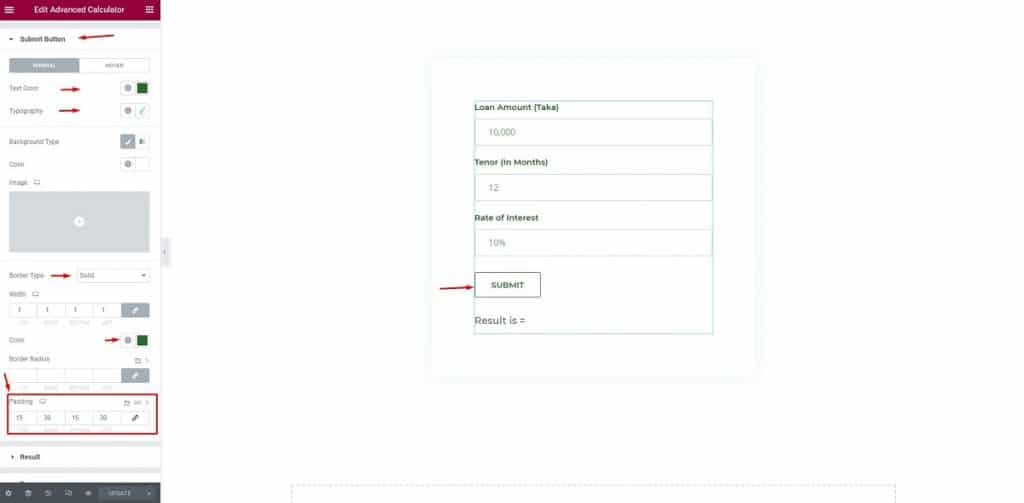
Then, select the ‘Submit Button’, change the text color, typography, padding.
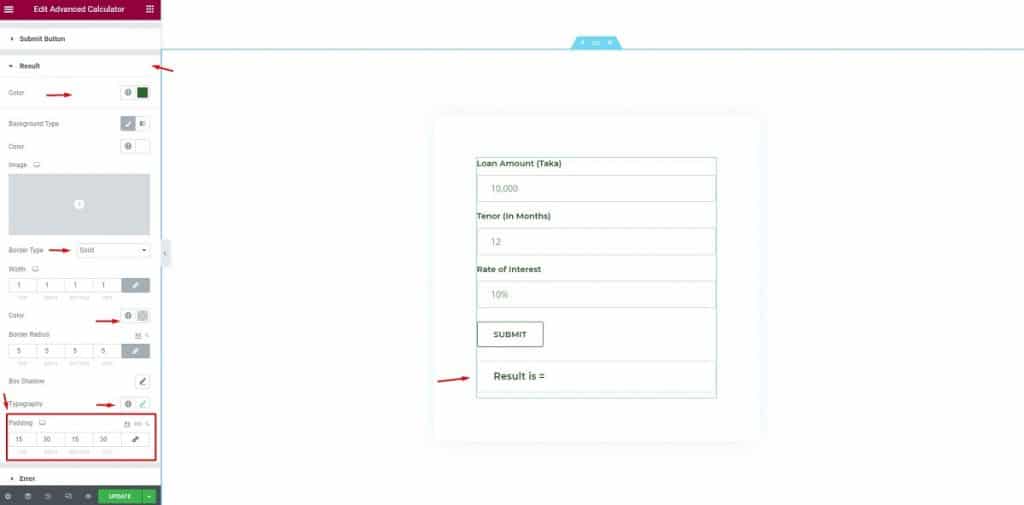
After that, click the ‘Result’ menu, change the Colour, Border Type, Border Colour, Padding of Typography.
Almost there! You are about to complete making an EMI calculator using Elementor
If your visitors input wrong information, then this notification will appear.
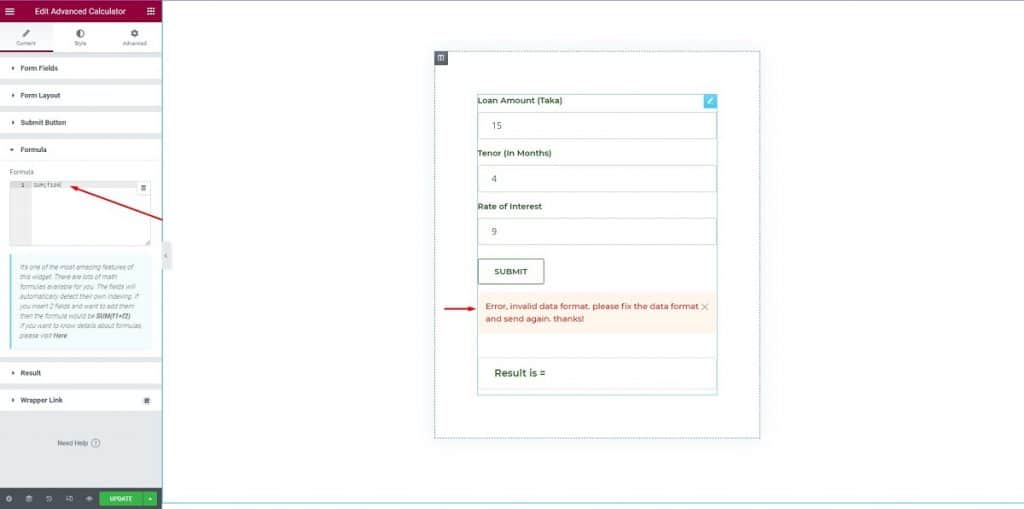
Here, change the color, Background type, Typography, keep the Padding unchanged. That’s it! Making an EMI calculator using Elementor is done.
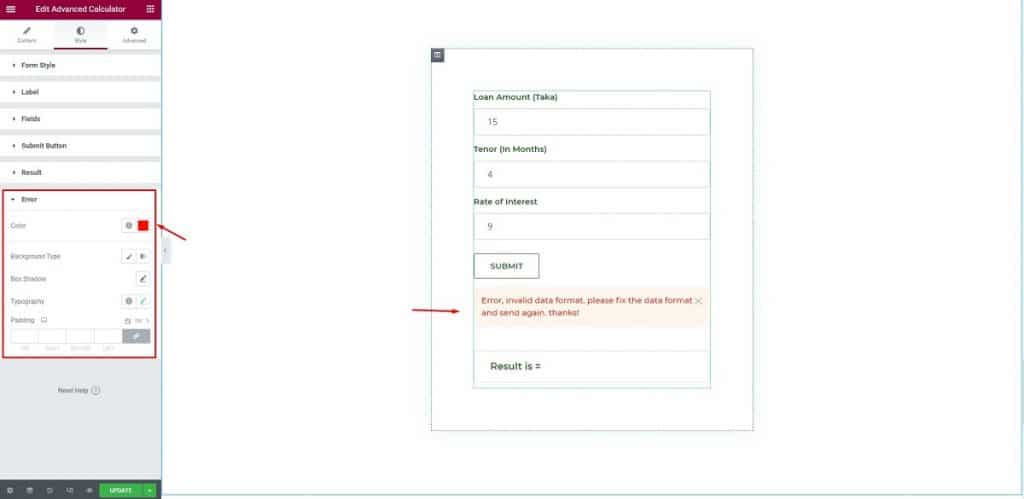
Congrats! All done! You have completed making an EMI calculator using Elementor & Element Pack.
I have discussed an easy step-by-step process of making an EMI calculator using Elementor & Element Pack. I hope this will help you a lot in driving more traffic to your site.
Thank you for keeping in touch and patiently reading this article. See you again!
This article is published on BDThemes.

Take advantage of fine-tuned plugins to speed up web projects without sacrificing quality. We offer a 60-days money-back guarantee.
Call or WhatsApp for assistance:+880 1700 55 95 95