People often ask how to create the footer in GeneratePress using Elementor in online forums as well as using our LiveChat. So, we decided to answer your question in this article by creating a custom footer using Elementor in GeneratePress.
This is going to be a technical tutorial type of content so we expect you to have some basic knowledge about Elementor and GeneratePress to not get confused during the procedures.
GeneratePress is a Multi-Purpose WordPress Theme
Among the 60,000+ WordPress themes in the online marketplaces, GeneratePress ranks in the top 5 fastest and lightest theme in the world. This is a highly optimized theme with a very lightweight framework that can hold a ton of features without slowing down your website.
GeneratePress is often regarded as a standard theme for blogging or news websites due to how it’s built. But, all users found it suitable for a variety of web building purposes including WooCommerce store, publications, Portfolio, blog, etc.
With more than 3.7 million downloads, GeneratePress is one of the top-selling WordPress themes in the market. It’s a freemium theme available for downloading anytime you want with limited features. The premium version only costs $59 per year or $249 for a lifetime.
Top features of GeneratePress theme-
- Theme builder
- Large site library
- Advanced theme hook
- Less than 30KB theme size
- Double AA (>98%) score with GTmetrix
- Super loading speed
- Highly responsive
- Lots of advanced features
If you want to find out about how to create the footer in GeneratePress using Elementor, please continue reading this article till the end.
Advantages of Creating GeneratePress Footer Using Elementor
GeneratePress is a versatile WordPress theme that supports page builder plugins to further simplify the site-building process for you. Among the many page builders, Elementor is the most easy-to-use platform and has the highest compatibility with WordPress.
Elementor page builder lets you customize your website from the top to bottom like painting a blank canvas with whatever color you choose. Not only that, Elementor has the highest number of active plugin support next to WordPress and the numbers keep rising every day.
GeneratePress theme itself provides a full customization interface that is very suitable to work with Elementor. Also-
- Both the theme and page builder support the drag-drop feature
- Elementor block widgets offer more features than the ones from the theme
- Very easy to use
- Flexible and highly responsive design (no need for manual responsiveness calibration)
Because of these advantages, it’s better to combine GeneratPress with Elementor for a better web-building experience.
Now, let us show you the step-by-step process of how to create the footer in GeneratePress using Elementor.
How to create the footer in GeneratePress using Elementor
Creating a footer using Elementor is the easiest thing next to eating a hot burger in winter. Just follow our steps and you will be able to make a stunning GeneratePress footer using Elementor.
Step-1: Setting up the Template page
The best way to make a footer for GeneratePress is to make a footer template and hook it with the GeneratePress theme.
To do that, go to your WordPress Dashboard> Templates> Add New to add a new template.
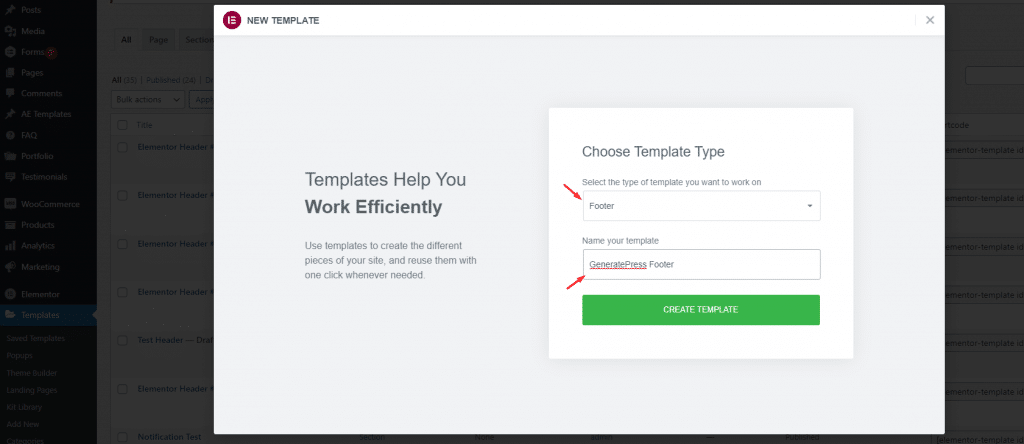
From the top, you need to select Footer as the type of the template and then give a suitable name to it. This popup is generated from the Elementor page builder plugin, hence, it allows you to directly create & customize the footer in Elementor.
Just, click on the Create Template button.
Step-2: Footer Section Customization
Once you head inside the page editor, all you will see is a blank page with no content. Here, we need to set the initial frame for the footer that we want to design.

To do that, create an empty section and head for the section settings. There, change the content width to Full Width, change the Height option to Min Height, and set the bar to 400. This is the minimum section set up for the footer.

After that, drag the inner section widget inside the section. This widget helps you divide a single section into multiple usable columns for adding features.
Here, you need to determine the layout of your footer through the number of columns. The more items you have in vertical separations, the more columns you will need.

As we are going to build a 4 column footer, simply click on the column icon on the inner section and duplicate it horizontally. Now that your primary footer layout or exoskeleton is ready, it’s time you learn how to create the footer in GeneratePress using Elementor.
Step-3: Adding Features For The GeneratePress Footer
Let’s add our footer items on the 4 footer columns to shape our footer for perfection.
Let’s start with adding an image on the first column from your left to board the company logo in the footer. Just drag and drop the Image widget inside the column and select your PNG or JPG logo from the media library.

After that, let’s add a Title widget combined with an icon list widget on the second column. We are going to put the company location on the second column.

Just add as many icon list items as you want. We removed the icon, placed our text and link to Google map location. That’s all it takes to arrange the content on the footer. For this part, you can also use a custom menu from Dashboard> Appearance> Menus and create a flexible WordPress menu.

Then put a title and icon list for the 3rd column as well to make it the support menu. Then for the 4th column, we are adding social media icons to let visitors get us on social groups.
This widget is developed by Element Pack Pro and supports more than 50 social media platforms.
Step-4: Style Customizations For The GeneratePress Footer
As you just learned how to create the footer in GeneratePress using Elementor, it’s time to style the footer using the widget style tab. Let’s start with the social media icons.
Get into the widget style tab and start changing the style of the icons.
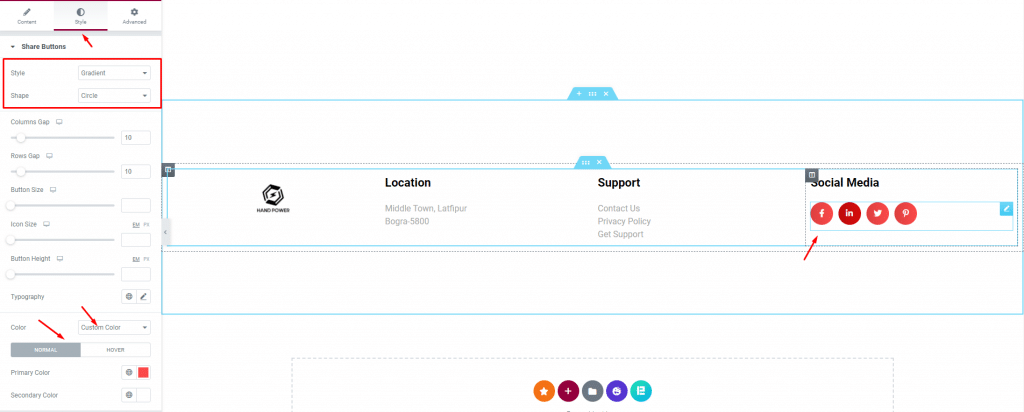
From the top, let’s select a gradient style coupled with a circle shape for the icons. After that, choose a custom color and select a unique color for all the icons for both normal and hover modes. We can just leave all as their own colors but using a custom color to match your theme or site’s main color is a good move.
Next, let’s change the section background color of the footer. Click on the section settings icon and go for the style tab. There, change the background color into something that suits your website.
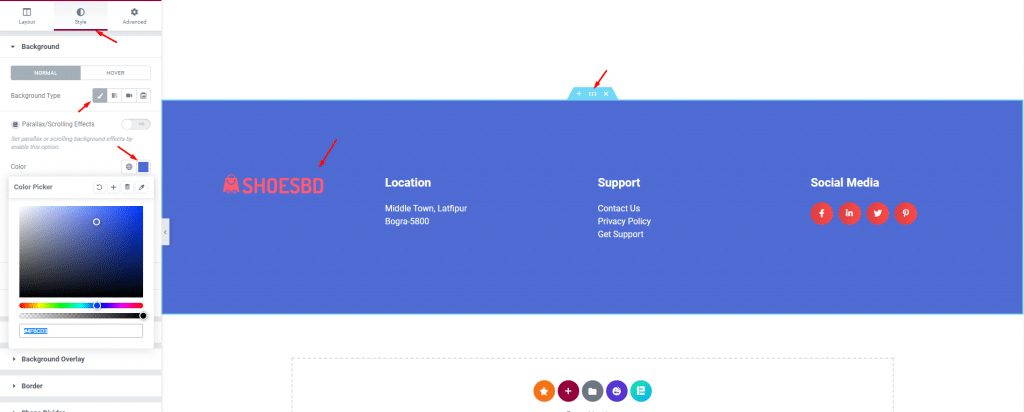
As you can see, we already changed the icon to one of our templates for better color matching.
Step-5: Save & Call The Footer In GeneratePress
Now for the last part, click on the template saving menu and click on the Display Conditions option.
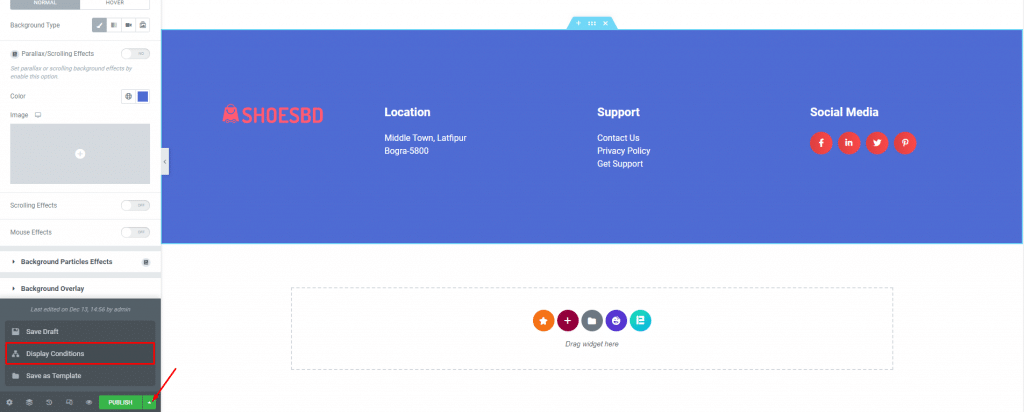
Then, select Entire Site as the display option and you will see the newly designed footer as the default footer of GeneratePress on your website.
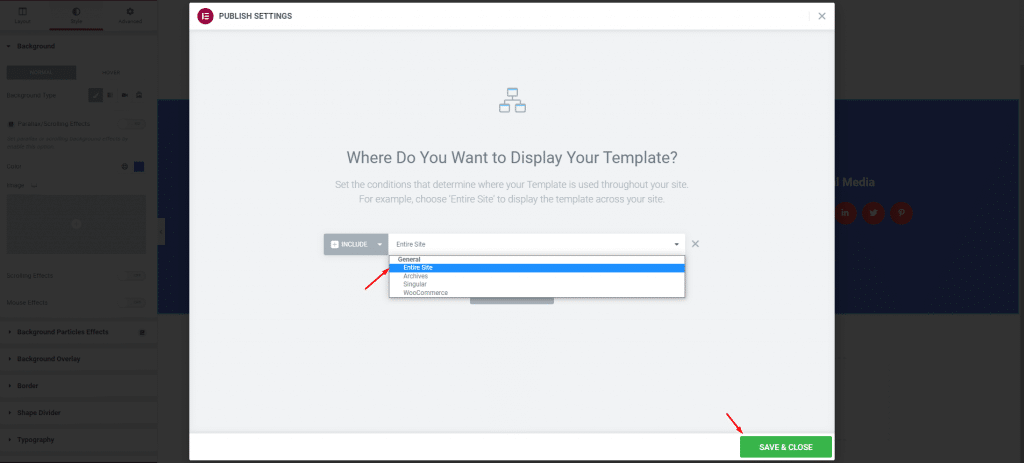
Hit the save & close button and you are done. This is how easily you can set a custom GeneratePress footer using Elementor.
Conclusion
In this blog, we showed you exactly how to create the footer in GeneratePress using Elementor with very easy steps. Make sure to follow the steps along with your imaginations to make a dynamic, responsive, & good-looking footer for GeneratePress.
Thanks for reading this article. Stay safe.

