Build any WordPress form in minutes with Sigma Forms.
Coming Soon & Maintenance Mode Page Builder Plugin
Easily make websites accessible One Accessibility
Simplify your dashboard with Smart Admin Assistant
Dark Reader plugin is eye-friendly reading experience.
A full Featured web design companion for Anyone
Most superior Slider in the Era of Elementor Slider
ZoloBlocks helps you create stunning websites with the Gutenberg builder.
The only Compatible blogging widgets in Elementor for any Blog
Create next gen e-commerce website for your business in WordPress
Organize your photos in a different angel every time with Elementor
Boost engagement and sales with the Spin Wheel WordPress plugin.
Instant Image Generator for WordPress powered by ChatGPT.
Copy & Paste any web design you like just with 2 clicks!
A fully functioning theme for elementor with unlimited options
Smart Clean & Flexible Block Theme for Gutenberg
WooCommerce one-page checkout to boost conversions.
Find Nearby Stores Instantly with Sigma Store Locator
The Ultimate WordPress Media Library Organizer
Find us 24/7 at your service. We are glad to help.
Detailed guidelines available for every features at BdThemes
A changelog is a log or record of all notable changes made to a product.
Learn product usage, WordPress tips & tricks from our videos
Earn hefty commissions by joining us in the promotion
Widget Idea Share is a great way to find similar widgets that you can improve.
Does your site has the usual menu with difficult navigation and are you losing visitors due to their wasting time hovering over it hoping to pick the right option? If so, then you must need a mega menu. In this article, we will talk about how to build a mega menu with Elementor.
Now, people are more conscious of the time they spend online and a large website without a mega menu is unimaginable. From a recent study, we know that 94% of users expressed their positive opinion on the easy navigation feature of a website. For this purpose, building a mega menu on your website is the right option for you.
Let’s start!
A mega menu is a menu with big expandible menus where the users can see everything visible at a time within a single category at most when they actively click on the particular menu. They don’t need to hover over a drop-down menu to search for their option.
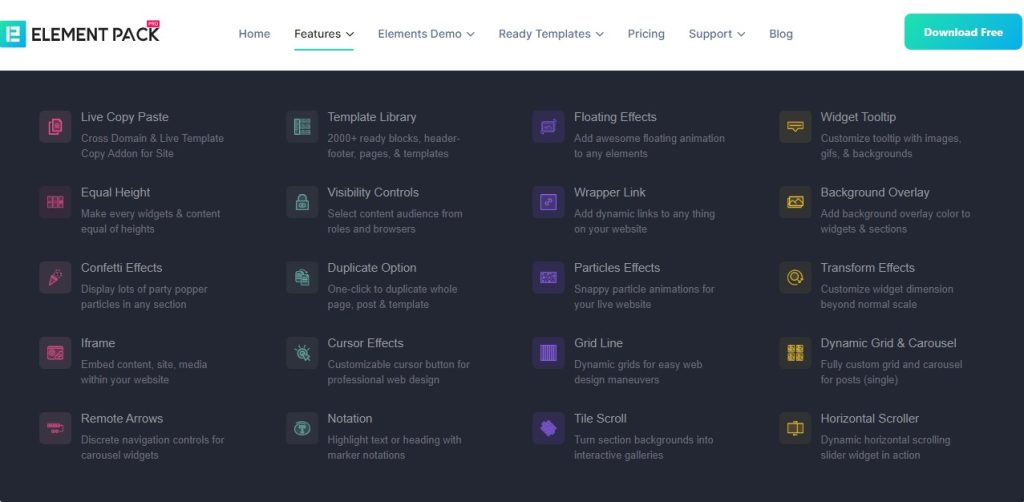
A mega menu is different from a regular drop-down menu which offers you easy navigation while surfing through various sites. Many successful websites i.e.: e-commerce stores like Amazon, Walmart, eBay, and big publishers like NBC use the mega menu as a universal option.
It is clear that if your website has an easy navigation feature like a mega menu, users will feel free surfing on the site, and you will be able to drive more visitors to your site within a short time.
Here are some good reasons to use a mega menu on your site:
Now, we are going to build a mega menu. But first, you have to know that by default WordPress doesn’t support a mega menu. So, you have to take the help of a theme with a built-in mega menu feature.
To do that, you must install and activate Elementor and Element Pack Pro on your WordPress website.
Now, follow the steps below to build a mega menu:
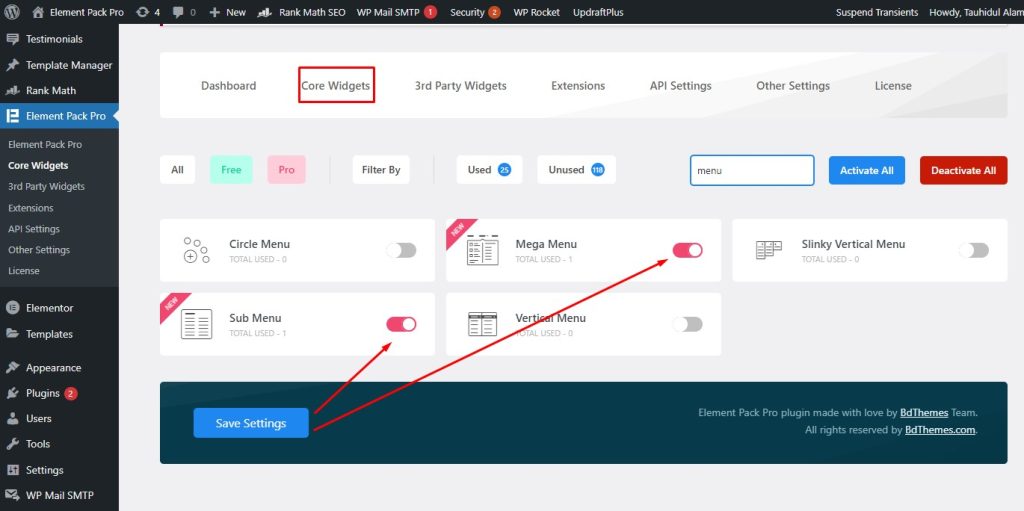
First, go to Element Pack Pro, then click the Core Widgets menu. After that, enable the Mega Menu and Sub Menu switcher.
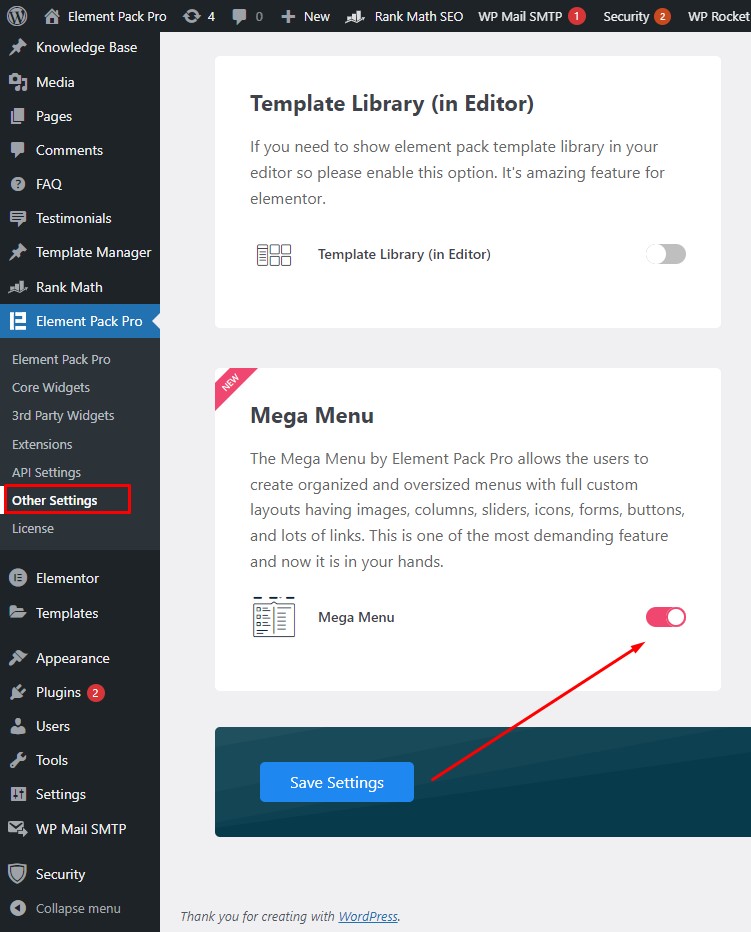
Next, go to Element Pack Pro, then go to Other Settings. After that, enable the Mega Menu switcher and click Save Settings.
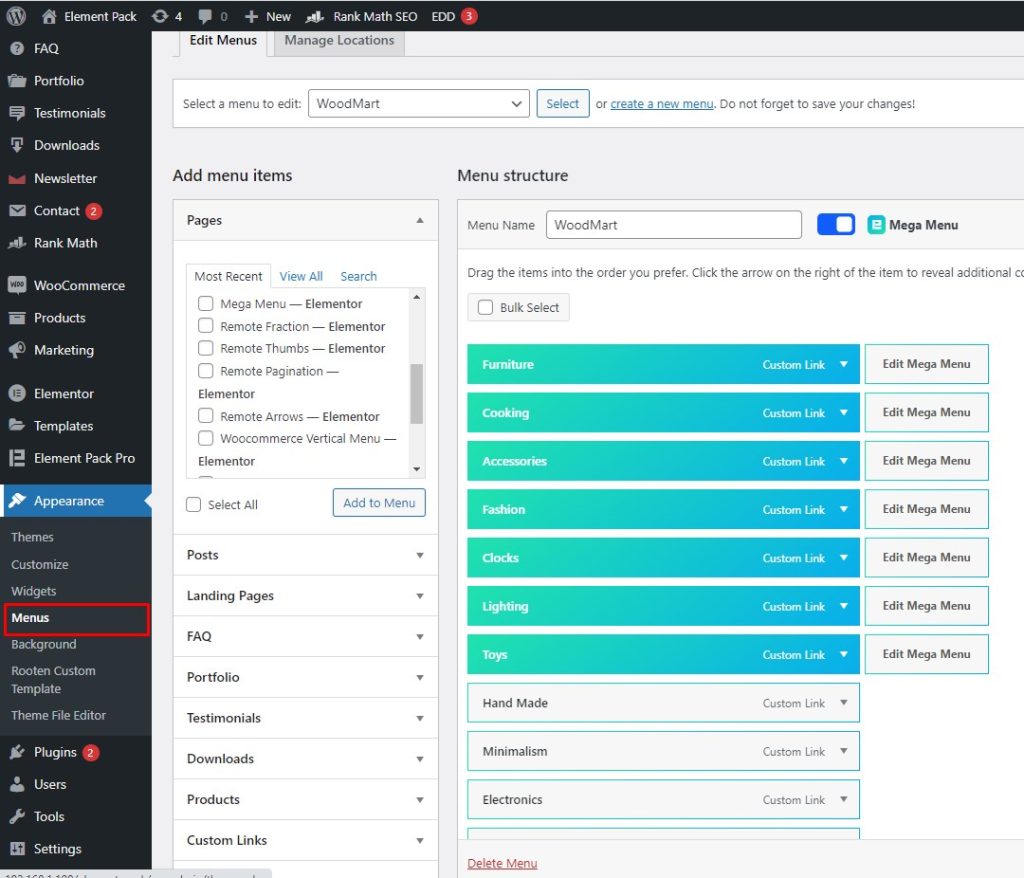
After that, go to Appearance, then click Menus. Here, you can select a menu to edit.
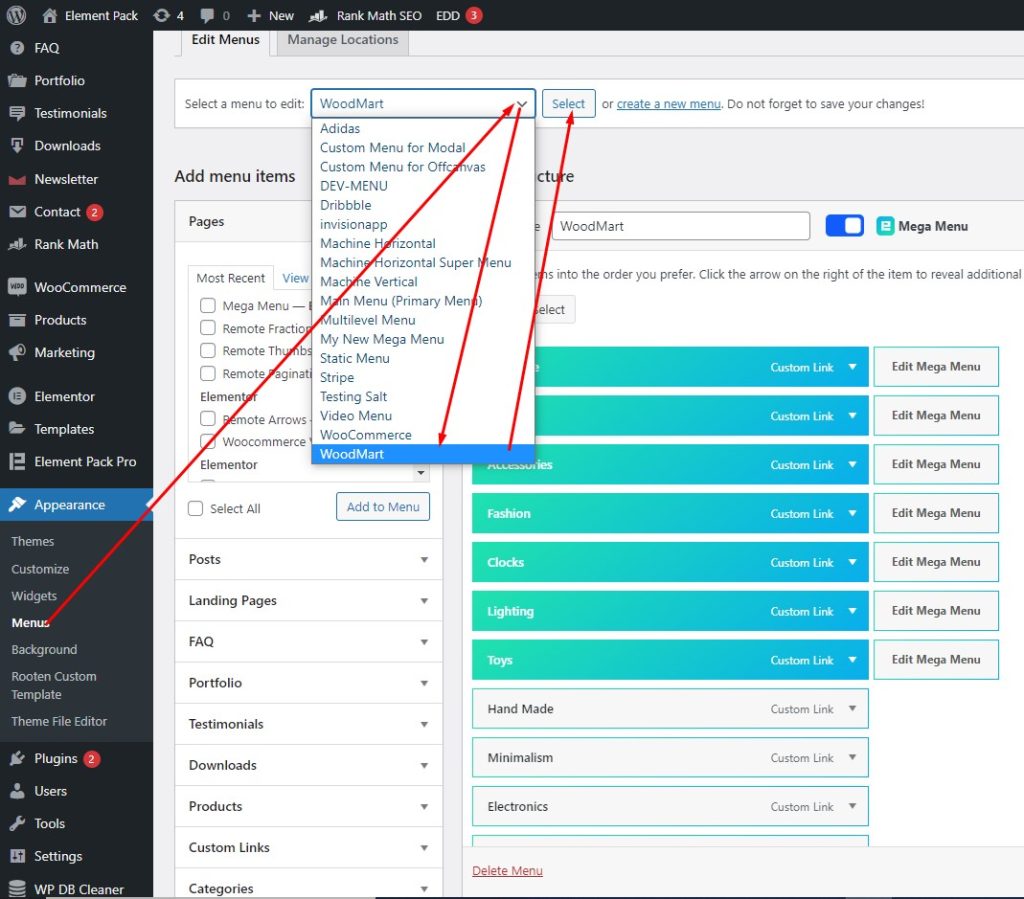
Then, select ‘WoodMart’ from the drop-down menu and click Select.
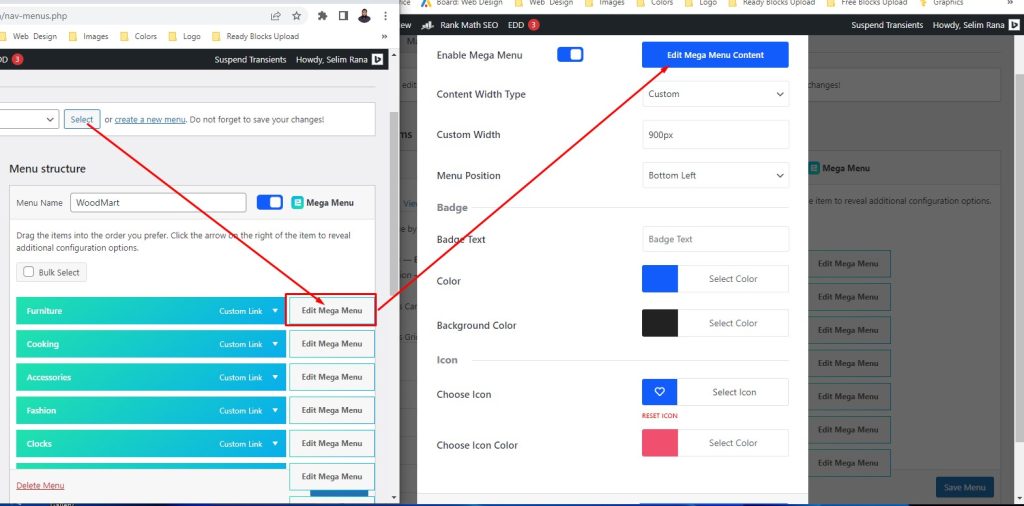
After selecting a menu, click Edit Mega Menu of an item, then click Edit Mega Menu Content. Do this to other items to customize mega menu.
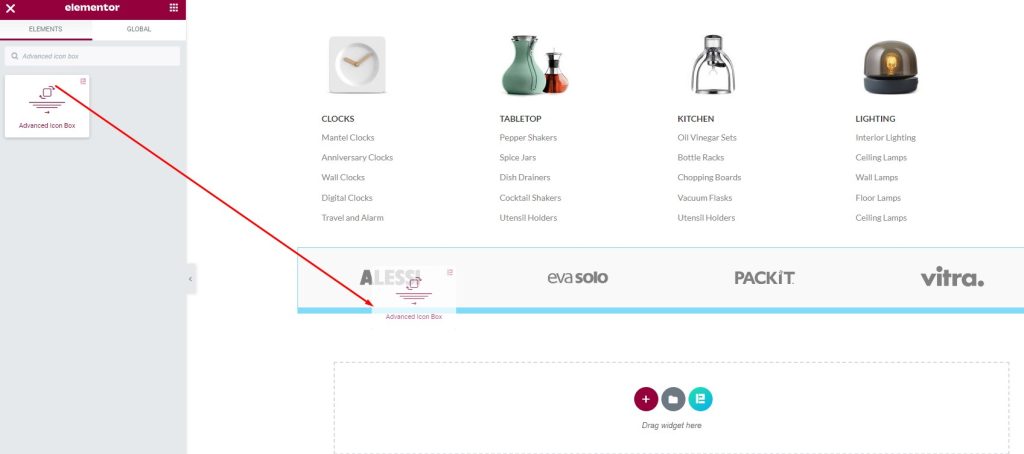
Now, go to the widget menu, search Advanced Icon Box in the search field, then drag-drop it in the text area.
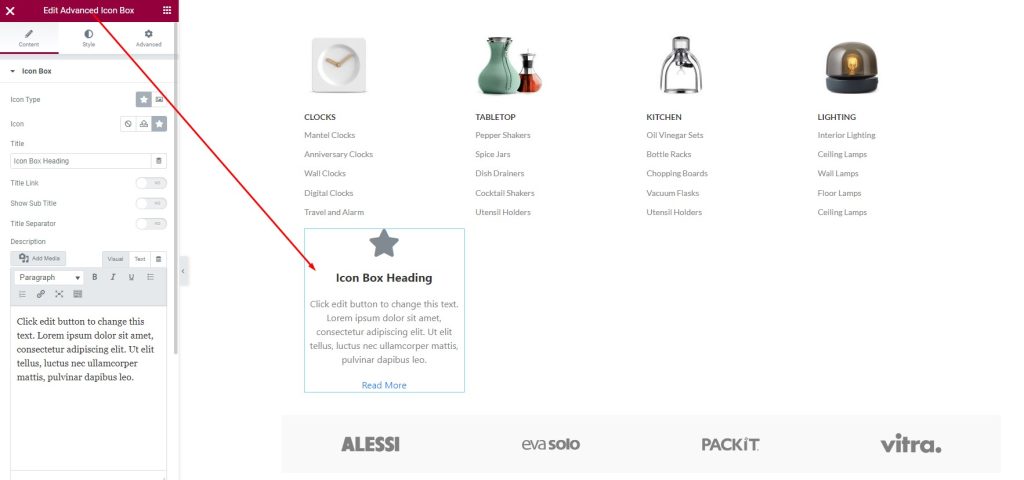
Next, edit the Advanced Icon Box heading, text, and footer.
Well done! You have successfully built a mega menu.

Your mega menu is complete. After building a mega menu, it will look like this as you see on the screen. Next, click the cross button to close the mega menu.
We have discussed the process to build a mega menu with Elementor for you. We hope this will help you a lot with information and procedure regarding the mega menu. You can implement it on your website to grow more visitors and proceed further in the online market.
Thank you for reading this article. Have a nice day.
Take advantage of fine-tuned plugins to speed up web projects without sacrificing quality. We offer a 60-days money-back guarantee.
Call or WhatsApp for assistance:+880 1700 55 95 95